| Building a
display base - Part 1: Base with a scratchbuilt tree |
When I was approaching the last steps of my Revell
He-70 in 1/72, I started to think about the display base. Ok, it should
be an area of a Hungarian airfield somewhere, but another boring plain
green base? I wanted something different. What about including some
bushes or a tree in the display? I had some limited experience on using comercial
scale trees, but I've never liked them that much, and besides, you're
of course limited to what you can find on the shelves... So I recalled
the "wire armature" method used by railroad modelers
and decided to give it a go. An excellent reference to read about this
and other techniques is the book "Terrain Modelling", by Richard
Windrow, from Osprey Modelling series.
But before we go, let me recall that modeling should be fun. I mean, do the tree of the type you want, and that's it. Simply something that pleases you. Now, if you want to exercise the same level of accuracy you apply to your model, be prepared for a more difficult task. In my opinion, the shortest path is to take a look at photos of the subject in the field. Observe the types of trees (if any!) around the airfield/battlefield and try to reproduce it roughly - this is not an exact science... However, some things must be observed, or you may incurr in the same error of putting a pine tree in a Sahara Desert diorama.
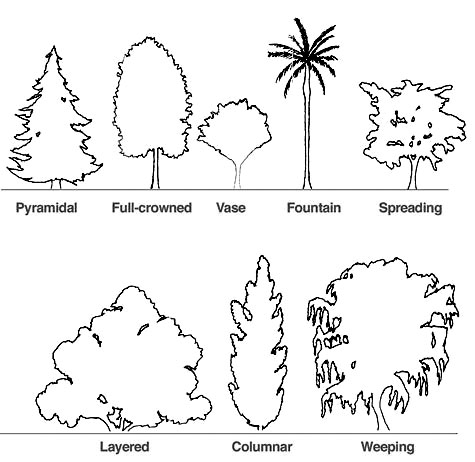
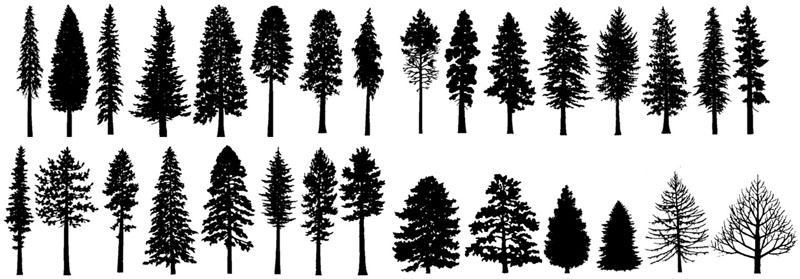
First off, what's the approximate shape of the tree? The figures below are examples of pictures which help to identify a tree by its basic crown shape in broad categories:
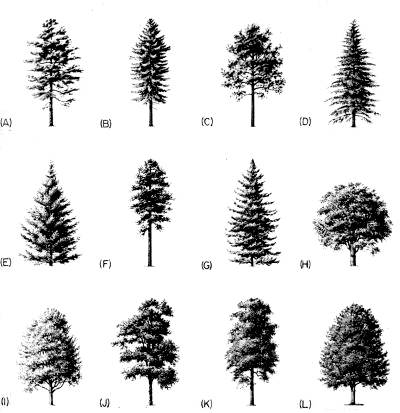
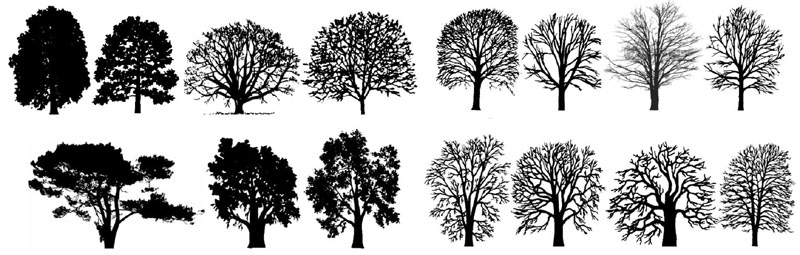
And the subject goes on. But besides the shape and type, there's one particular question which plays a very important role in modeling scale trees: the size and shape of trunk and branches. Not all types and sizes are commercially available, and if not, you will need to do it yourself (like we will shortly). Instead of discussing an interesting but out of topic subject here, let me show you an index I've been using and updating for years. I've been assembling this index using pictures from the internet, and they do not cover palm and coconut trees (subject for another article), but you can use it a starting point to choose the type of armature over which you will build your tree.
Once you have decided, it is time to start working.
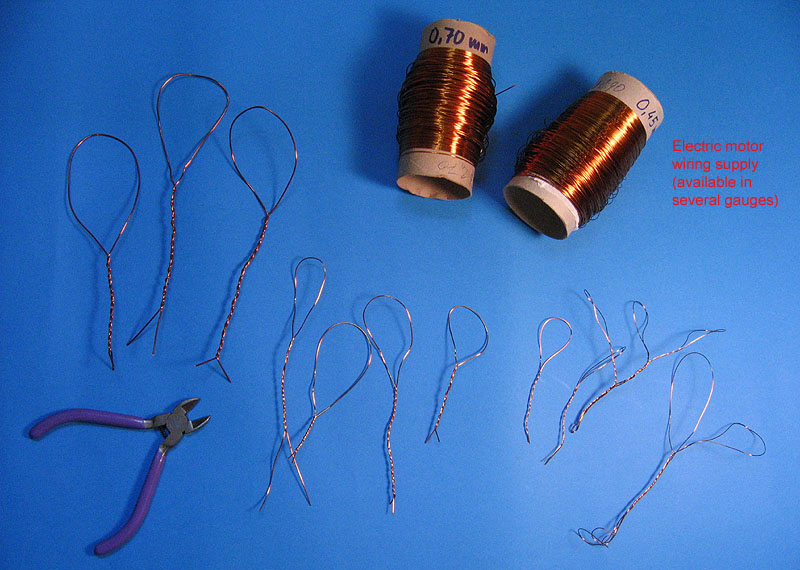
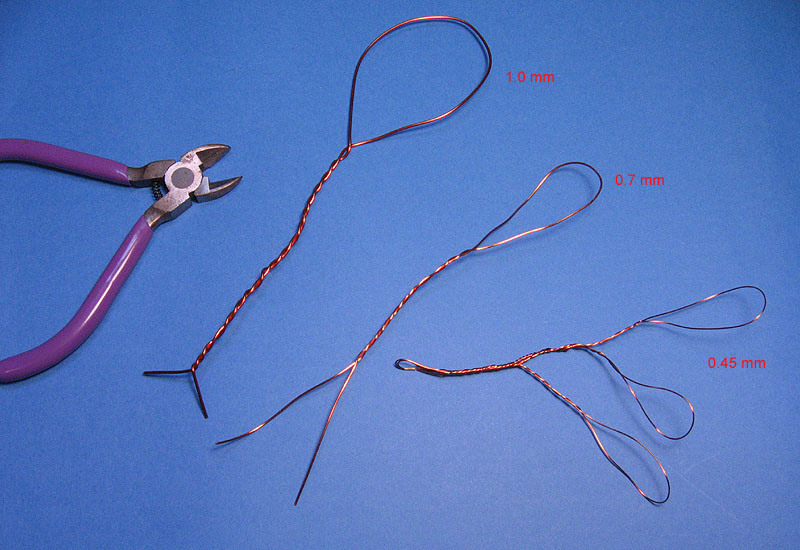
I must stress that this is probably the cheapest method to build scale trees. At least in what concerns the trunk. All you need to start is some supply of any not-so-stiff wire. I use cooper wires sold in radio shacks to overhaul electric motors. It is recommended to use at least two gauges (one for the trunk and the other to the branches). Some modelers use soldering wire. I personally think they are too soft, but it may be a good choice for small trees. In the following example, I used three gauges of cooper wire: 1.0, 0.7 and 0.45 mm (diameter), but it is perfectly possible to make a fine tree using a single gauge.
Start shaping strands from 10-20 lengths of wire twisted, with the longer ones used with the thicker wires:
The thicker ones will be used to shape the trunk, while the thinner ones will be progressively twisted together to the main branches to form the secondary branches:
Shape the trunk by twisting the thicker loops to form a skeleton. The loops are cut and shaped according to the type of tree you are interested in.
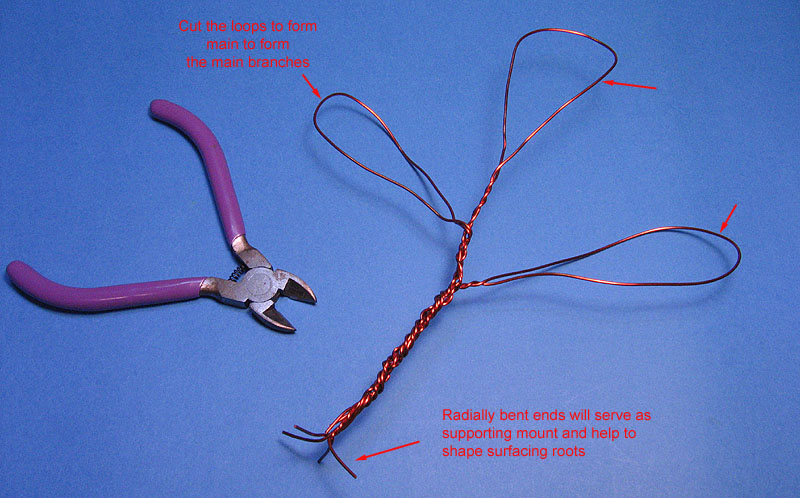
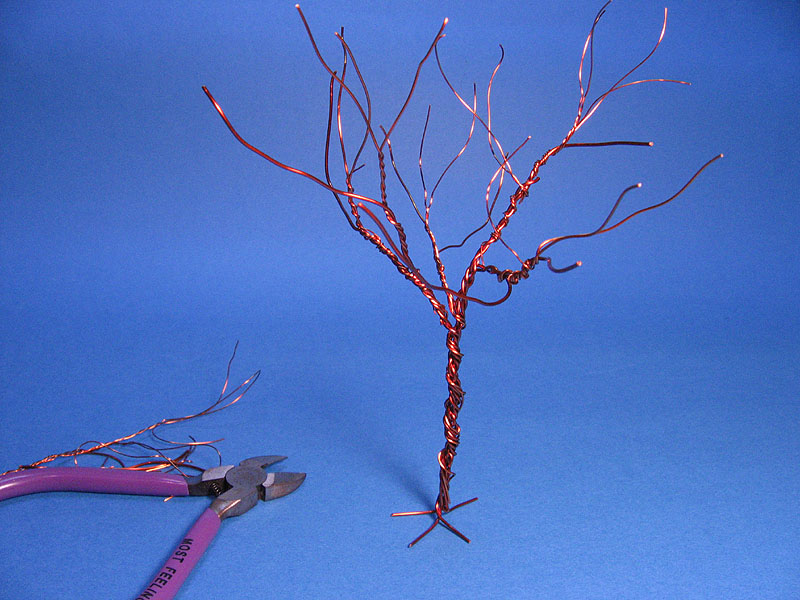
The smaller gauges are then progressively twisted, separated at a bough, divided and twisted again. Work your way up, with the number of strands determining the thickness of the branches. Of course, a natural tapering must be achieved, so do not exagerate on the thickness of the higher branches. Remember that the skeleton will be covered with putty later, increasing the final thickness of the branches and trunk. You can always build up layers of putty to increase too thin areas, but not the contrary. It is crucial at this stage to know which type of tree you are building. Check photos to have a reasonable idea of typical thickness/length of trunks and branches, as well as the spreading pattern of the thinner branches. To be honest, I haven't followed any particular type of tree, but I was interested in something more or less like an oak tree. After a mere 10 minutes twisting section, this is what I got:
Now we have to cover the wire armature with a suitable material. A variety of materials can be used for that. Some people use plaster, but I think it is too brittle, and these little trees must support some abuse during the next steps. I like to start by applying a thick coat of acrylic modeling paste over the whole armature in order to provide a better grip than the bare wire. You don't have to be too careful on this task. Just spread a good coat of the paste using a medium brush, trying to smooth out the twisted appearence of the armature and filling the most prominent holes between the strands.
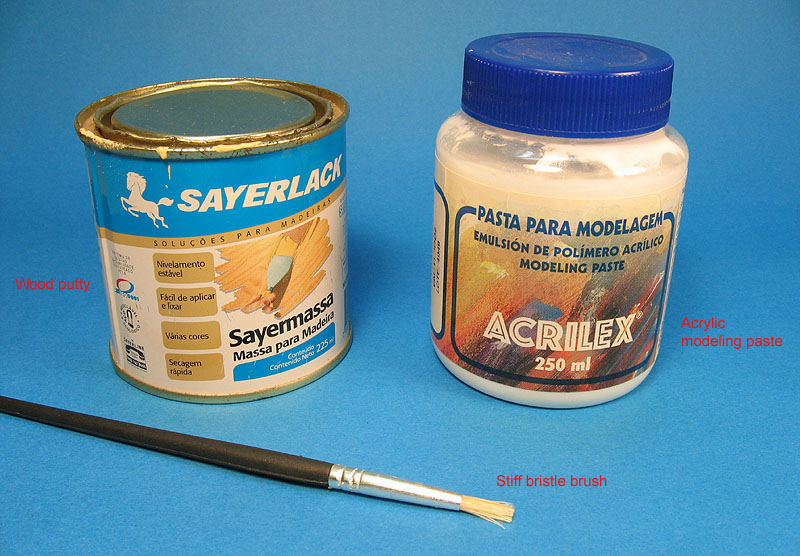
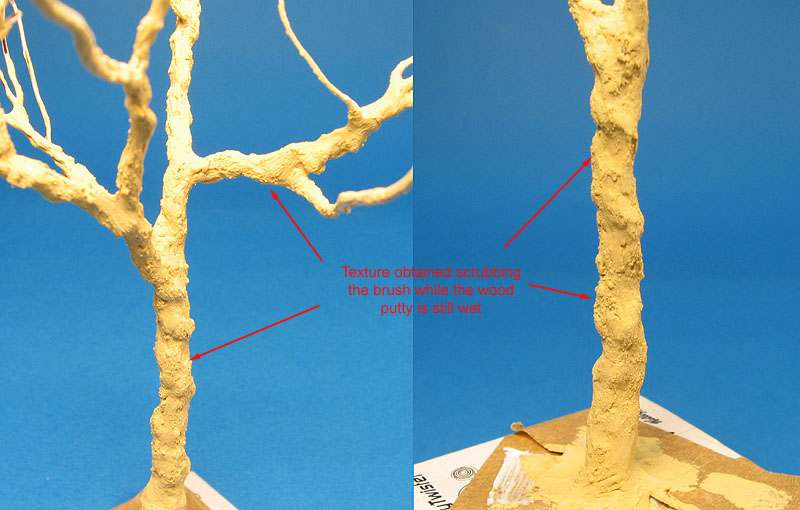
Once the paste is dry, take a brush with stiff bristtles and apply a good coat of fast drying wood putty. These stuffs are used to prepare the surface of wood forniture, doors and windows for painting. It dryes very fast, is water soluble and can be easily sanded. Its consistency can be adjusted if necessary by adding water. The ideal point is when it is not too runny nor not too lumpy. If new, you can use it straight from the tin. But the characteristic I like the most on this stuff is its ability to be shaped while still wet. Start by the base of the trunk and work up until the thinner branches. After spreading the material over all the armature, wait some minutes to allow the putty to dry enough to start texturing. Go back to the starting point with a stiff brush or a toothbrush and run the bristles lengthwise to simulate the bark effect. Some small blobs of putty may accur. Let them there, as they make pretty decent knots. As the putty becomes harder, you can score deeper lines using the point of a knife, if you want, particularly along the trunk:
If you are not satisfied with the result in some places, apply some more putty and redo the area. I bet you will obtain a very convincing effect on your first try. There's absolutely no secret, just the use of a putty with the correct consistency:
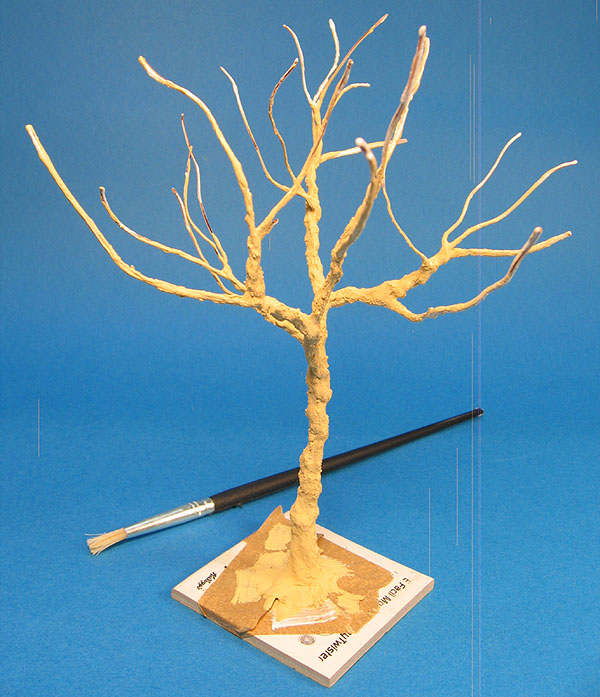
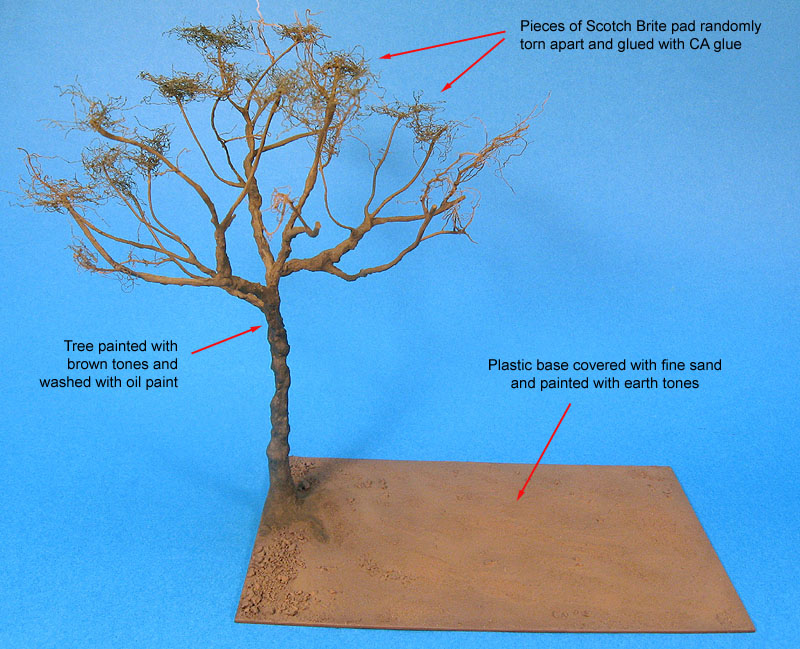
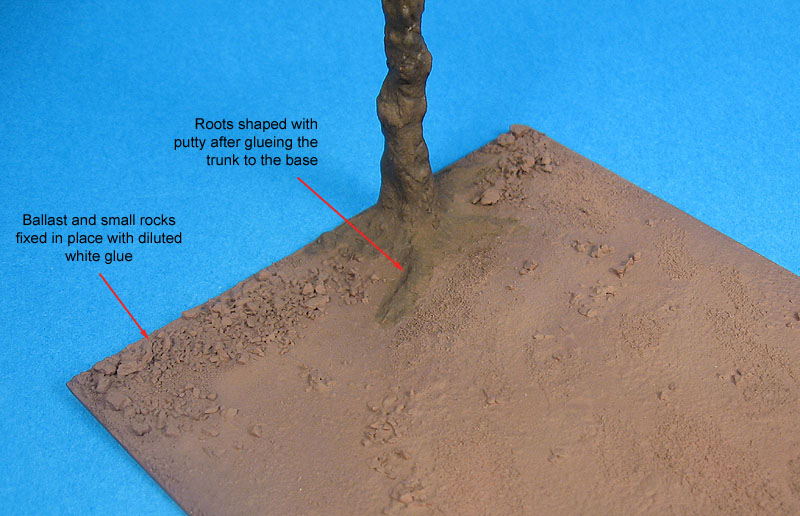
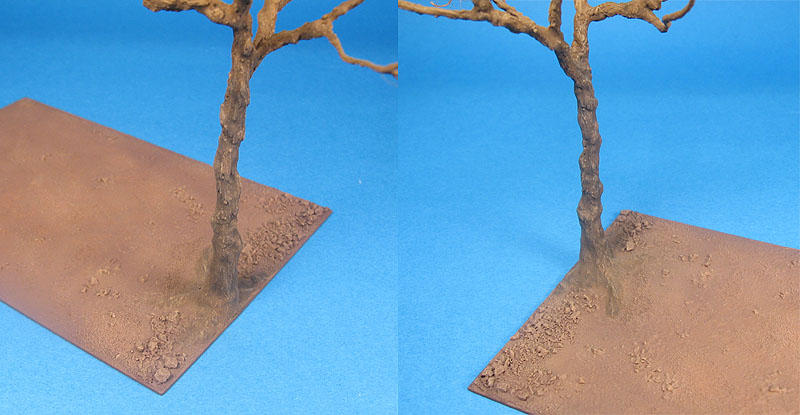
The armature is then removed from its temporary base and securely glued to the diorama base. Apply some more wood putty to the base and shape the characteristic thicker base of the trunk, as well as some exposed roots. Using the stiff brush, blend the surface detail with the ramaining of the trunk. Let it dry. Next, I painted the tree and the base using brown and earth tones using acrylic paints. A heavy wash of burnt umber/black was applied over the tree, in preparation for the drybrushing. Some rocks and stones were spreaded along the base to add interest o the scene, fixed in place with white glue:
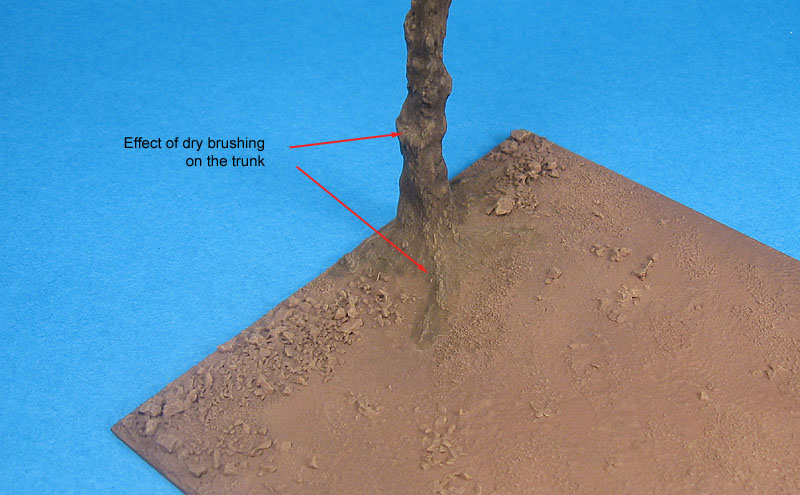
I then airbrushed a good coat of Humbrol flat varnish, and waited the base to dry overnight. In the next day, I mixed oil paints in light earth / light brown tones and drybrushed over the tree and ground. The drybrushing over the previously washed areas makes a drastic difference over the final aspect of the model. In particular, the surface texture of the tree becomes quite evident, and the time spent texturing the putty pays off gorgeously:
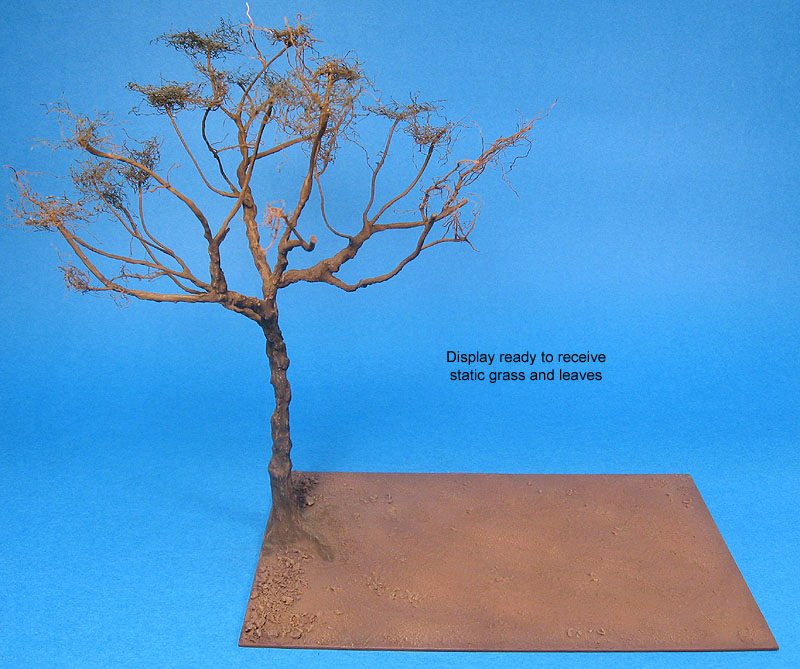
The first layer of foliage is in fact the very thin branches at the end of the supporting ones. These can be done with a number of materials: coconut fibre, dried fern, dried roots, sisal strings, etc. Since this will support the foliage, I prefer synthetic materials whenever possible, so I opted for small pieces of Scotch-Brite pads torn apart randomly. These were glued with CA at the end of the branches. In essence, they provide a nest over which the foliage will be glued later. I prefer to finish off with the ground work before adding the foliage, but still now I'm not sure it was a good idea.
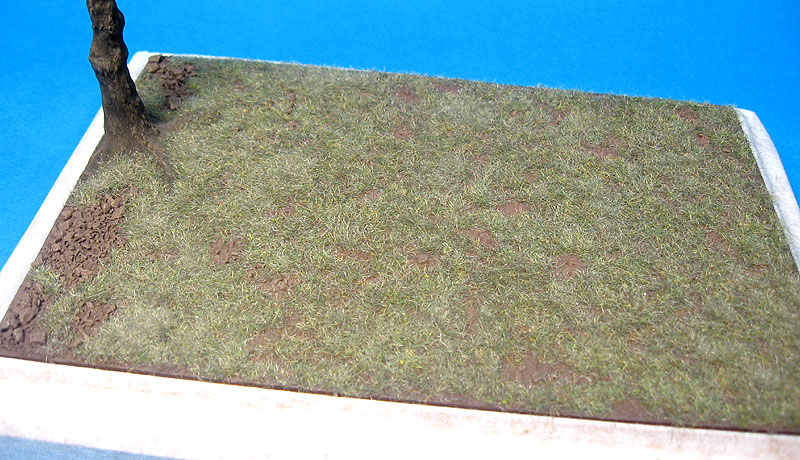
So let's proceed to the grass. With a few exceptions, I don't like to cover completely the ground with static grass. This is because, in general, well used airfields tend to show bare ground spots due to heavy traffic, particularly around parking areas, where most maintenance is done. I applied a thin mix of wood glue/water using a round brush, intentionally leaving some areas uncovered to simulate these spots. I applied the grass by parts, checking the progress and making minor corrections. For the grass itself, I used Woodland Scenics green and medium green, barely mixed to show some tonal variation:
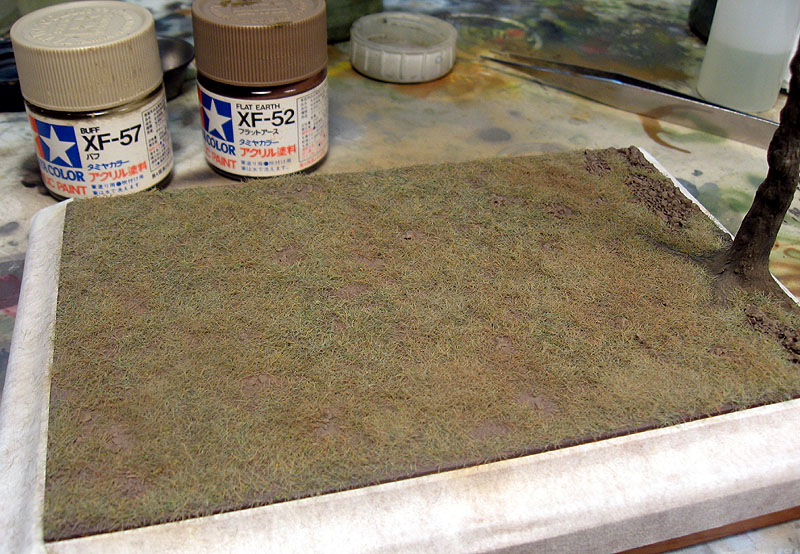
Contrary to many modelers, I don't like to use static grass as is. It always show a kind of synthetic shine which doesn't look natural to me. I then airbrushed a very thin mix of Tamiya XF-52 and XF-57 and applied over the grass covered areas. You don't want to paint the grass, just to apply a mist to cut the shine. Another advantage is that this step helps to blend the ground colors with the bare grass. Here's the result:
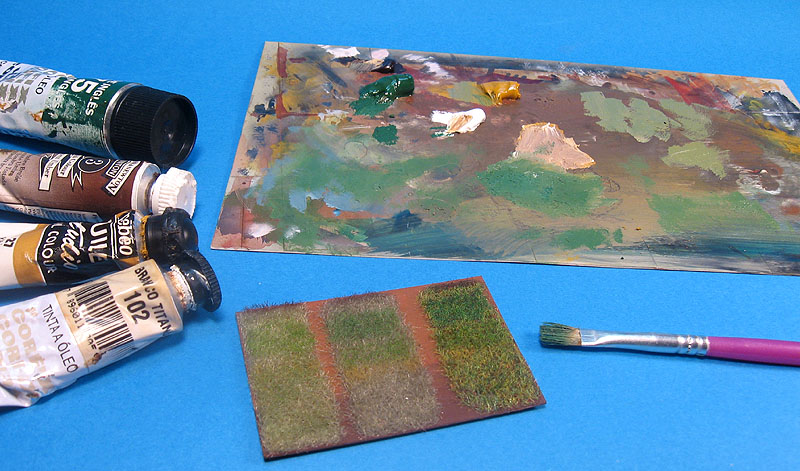
In order to bring some shine back to the high spots, I drybrushed more vivid green tones over the grass using a soft, wide flat brush. The key is to use the correct shade of green. I used two or three mixes of white, raw umber, ocrhe and green oil paints. I have a small plastic sheet covered with static grass where I carry my experiments to adjust the colors:
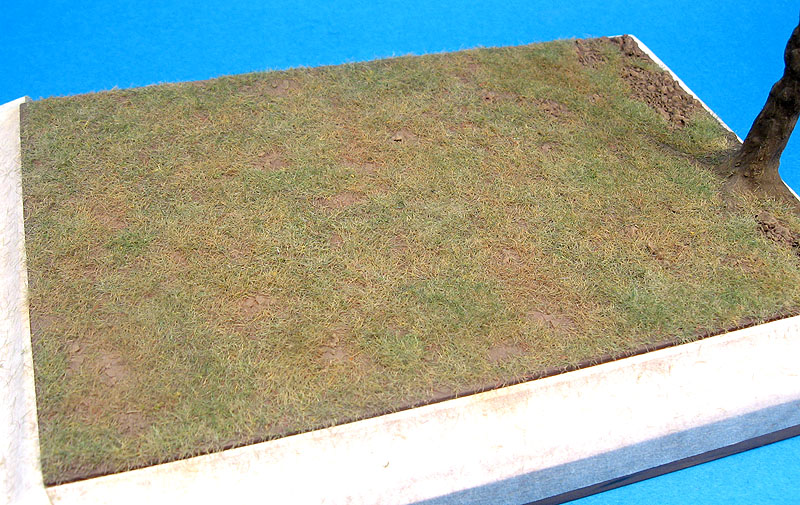
On the top of the high spots I used almost pure green, with the surrounding areas receiving the olive/brownish tones to match the bare earth. Of course, this can be done with an airbrush, if you prefer:
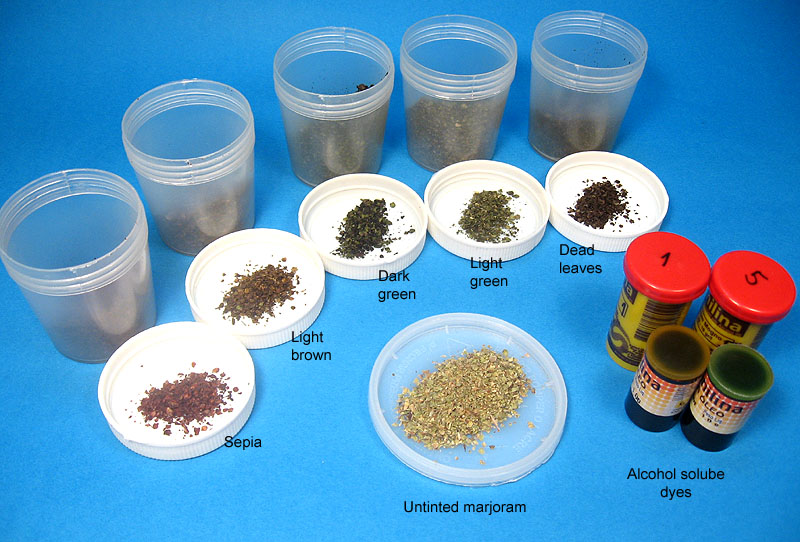
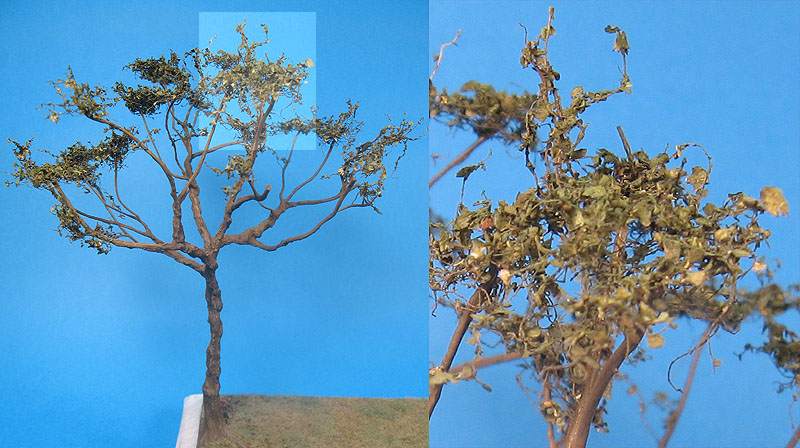
Finally, the time to attack the leaves came. I have a good stock of model railroad foliage, but I wanted something different for this tree. My intention was to simulate those flat wide leaves, and foam foliage wouldn't do the job quite well (well, this is just a technical excuse to try something new...). I decided to use another approach this time. I got a bag of grinded dried marjoram (origanum majorana) spice, which is a kind of oregano. I grinded it even more. To adjust the color, I used alcohol soluble dyes in yellow, brown and green colors. This is done by soaking the marjoram in the tint and drying it very well (microwave it). This is important. If you don't dry it completely, the stuff may rot with time. I made a stock of these natural scale leaves in various colors a while ago. Time to use it...
Since I left the application of the leaves for the last steps, I couldn't spray the glue because that would ruin the flat finish of the branches. I then applied it by brush, then sprinkled the marjoram, branch by branch, in a long and tedious process. I'm not fully satisfied, but it is a convincing scale tree (don't ask me the exact type!):
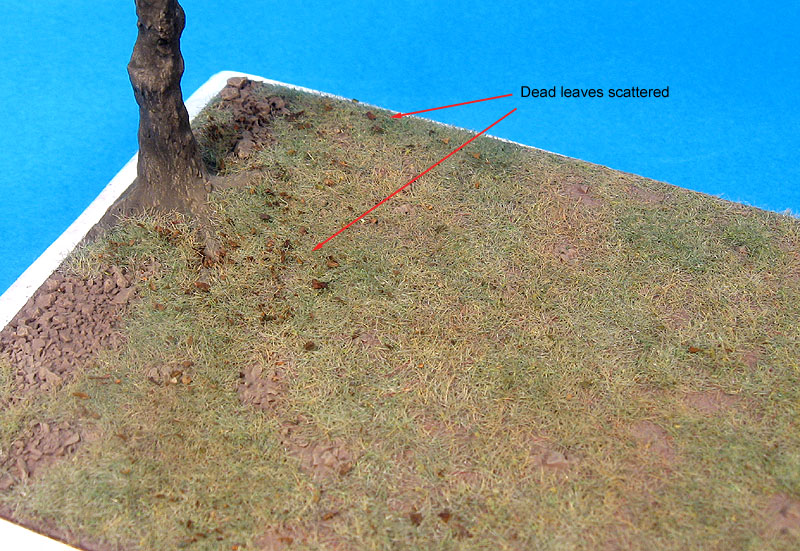
If necessary, you can airbrush a mist coat over the leaves very lightly with yellow/green tones after the glue has dried to blend everything. The final touch is to scatter some dead leaves under the tree canopy:
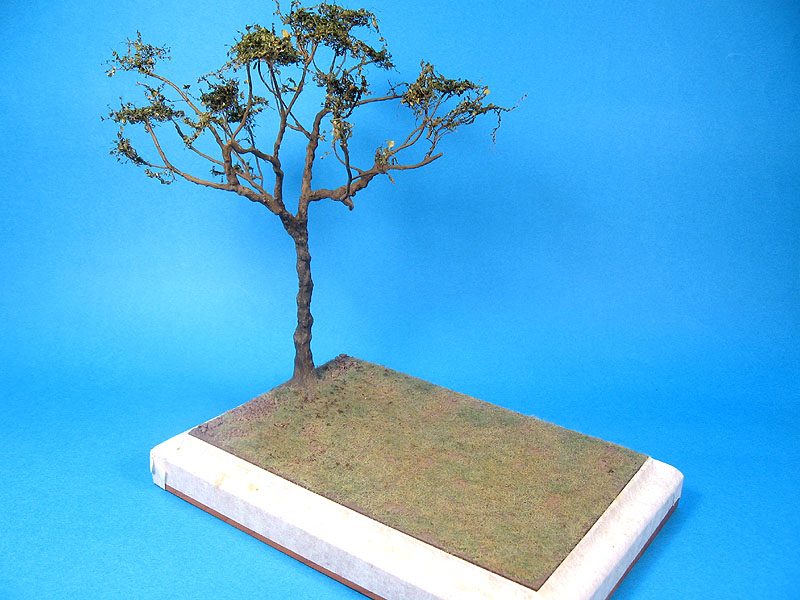
And the basic setting is done:
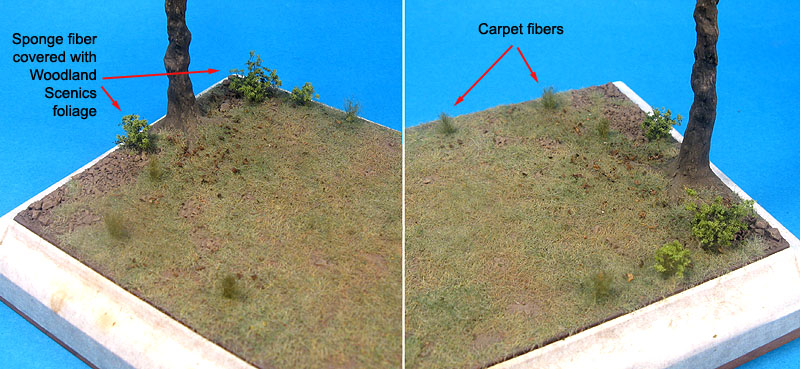
For the final touches I added some bushes here and there as well as some tall grass on a few high spots of the ground. There are many methods to make bushes. Over the years, I've been trying some of them, and I like to keep a little plant lab where I can check what to use:
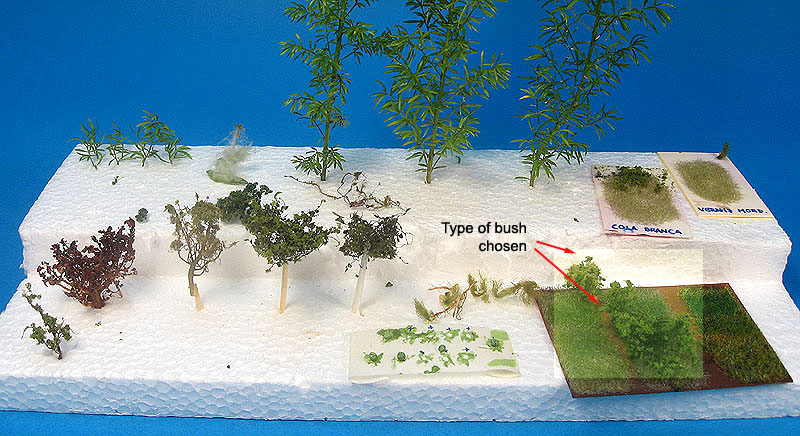
As for the bushes, I took some pieces of
the same material used to support the leaves in the tree, and formed
small volumes with my fingers. I then applied a coat of hair spray and
sprinkled Woodland Scenics light gree foliage. The tall grass are
simply tuffs of carpet cut to the proper size (see
my Polikarpov I-16 base). Everything was fixed in place with
diluted wood glue:But before we go, let me recall that modeling should be fun. I mean, do the tree of the type you want, and that's it. Simply something that pleases you. Now, if you want to exercise the same level of accuracy you apply to your model, be prepared for a more difficult task. In my opinion, the shortest path is to take a look at photos of the subject in the field. Observe the types of trees (if any!) around the airfield/battlefield and try to reproduce it roughly - this is not an exact science... However, some things must be observed, or you may incurr in the same error of putting a pine tree in a Sahara Desert diorama.
First off, what's the approximate shape of the tree? The figures below are examples of pictures which help to identify a tree by its basic crown shape in broad categories:
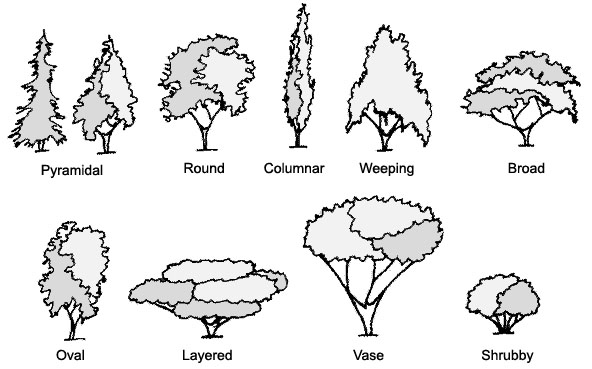
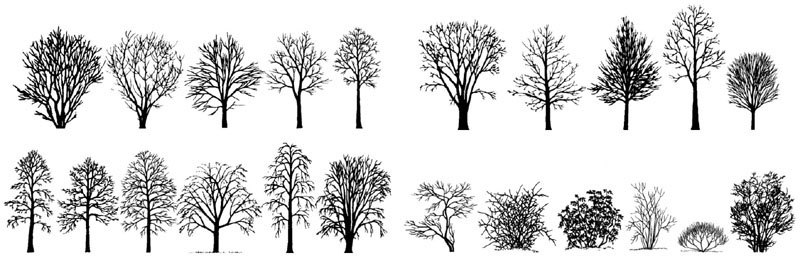
And we could go as far as
sub-categories. For example, the following picture illustrates some
subtypes of pyramidal and oval shapes:
And the subject goes on. But besides the shape and type, there's one particular question which plays a very important role in modeling scale trees: the size and shape of trunk and branches. Not all types and sizes are commercially available, and if not, you will need to do it yourself (like we will shortly). Instead of discussing an interesting but out of topic subject here, let me show you an index I've been using and updating for years. I've been assembling this index using pictures from the internet, and they do not cover palm and coconut trees (subject for another article), but you can use it a starting point to choose the type of armature over which you will build your tree.
Once you have decided, it is time to start working.
I must stress that this is probably the cheapest method to build scale trees. At least in what concerns the trunk. All you need to start is some supply of any not-so-stiff wire. I use cooper wires sold in radio shacks to overhaul electric motors. It is recommended to use at least two gauges (one for the trunk and the other to the branches). Some modelers use soldering wire. I personally think they are too soft, but it may be a good choice for small trees. In the following example, I used three gauges of cooper wire: 1.0, 0.7 and 0.45 mm (diameter), but it is perfectly possible to make a fine tree using a single gauge.
Start shaping strands from 10-20 lengths of wire twisted, with the longer ones used with the thicker wires:
The thicker ones will be used to shape the trunk, while the thinner ones will be progressively twisted together to the main branches to form the secondary branches:
Shape the trunk by twisting the thicker loops to form a skeleton. The loops are cut and shaped according to the type of tree you are interested in.
The smaller gauges are then progressively twisted, separated at a bough, divided and twisted again. Work your way up, with the number of strands determining the thickness of the branches. Of course, a natural tapering must be achieved, so do not exagerate on the thickness of the higher branches. Remember that the skeleton will be covered with putty later, increasing the final thickness of the branches and trunk. You can always build up layers of putty to increase too thin areas, but not the contrary. It is crucial at this stage to know which type of tree you are building. Check photos to have a reasonable idea of typical thickness/length of trunks and branches, as well as the spreading pattern of the thinner branches. To be honest, I haven't followed any particular type of tree, but I was interested in something more or less like an oak tree. After a mere 10 minutes twisting section, this is what I got:
Now we have to cover the wire armature with a suitable material. A variety of materials can be used for that. Some people use plaster, but I think it is too brittle, and these little trees must support some abuse during the next steps. I like to start by applying a thick coat of acrylic modeling paste over the whole armature in order to provide a better grip than the bare wire. You don't have to be too careful on this task. Just spread a good coat of the paste using a medium brush, trying to smooth out the twisted appearence of the armature and filling the most prominent holes between the strands.
Once the paste is dry, take a brush with stiff bristtles and apply a good coat of fast drying wood putty. These stuffs are used to prepare the surface of wood forniture, doors and windows for painting. It dryes very fast, is water soluble and can be easily sanded. Its consistency can be adjusted if necessary by adding water. The ideal point is when it is not too runny nor not too lumpy. If new, you can use it straight from the tin. But the characteristic I like the most on this stuff is its ability to be shaped while still wet. Start by the base of the trunk and work up until the thinner branches. After spreading the material over all the armature, wait some minutes to allow the putty to dry enough to start texturing. Go back to the starting point with a stiff brush or a toothbrush and run the bristles lengthwise to simulate the bark effect. Some small blobs of putty may accur. Let them there, as they make pretty decent knots. As the putty becomes harder, you can score deeper lines using the point of a knife, if you want, particularly along the trunk:
If you are not satisfied with the result in some places, apply some more putty and redo the area. I bet you will obtain a very convincing effect on your first try. There's absolutely no secret, just the use of a putty with the correct consistency:
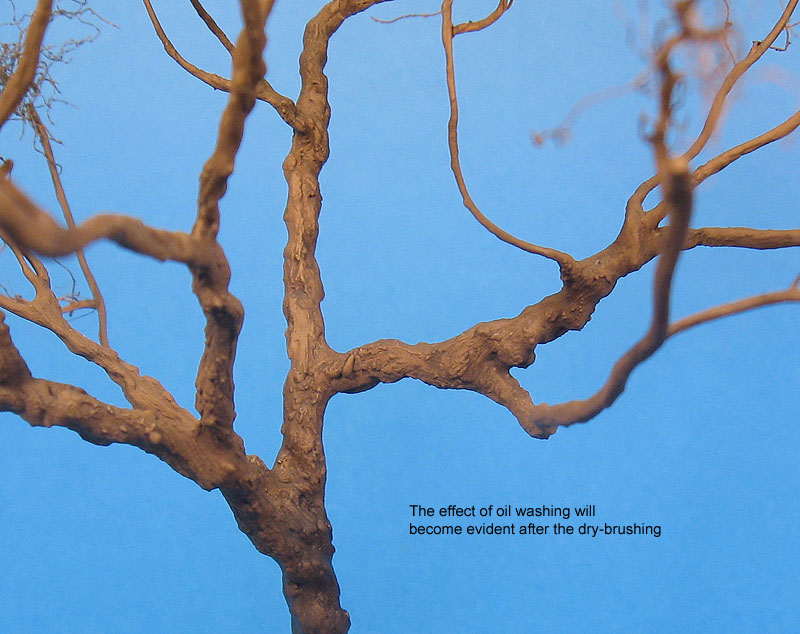
The armature is then removed from its temporary base and securely glued to the diorama base. Apply some more wood putty to the base and shape the characteristic thicker base of the trunk, as well as some exposed roots. Using the stiff brush, blend the surface detail with the ramaining of the trunk. Let it dry. Next, I painted the tree and the base using brown and earth tones using acrylic paints. A heavy wash of burnt umber/black was applied over the tree, in preparation for the drybrushing. Some rocks and stones were spreaded along the base to add interest o the scene, fixed in place with white glue:
I then airbrushed a good coat of Humbrol flat varnish, and waited the base to dry overnight. In the next day, I mixed oil paints in light earth / light brown tones and drybrushed over the tree and ground. The drybrushing over the previously washed areas makes a drastic difference over the final aspect of the model. In particular, the surface texture of the tree becomes quite evident, and the time spent texturing the putty pays off gorgeously:
The first layer of foliage is in fact the very thin branches at the end of the supporting ones. These can be done with a number of materials: coconut fibre, dried fern, dried roots, sisal strings, etc. Since this will support the foliage, I prefer synthetic materials whenever possible, so I opted for small pieces of Scotch-Brite pads torn apart randomly. These were glued with CA at the end of the branches. In essence, they provide a nest over which the foliage will be glued later. I prefer to finish off with the ground work before adding the foliage, but still now I'm not sure it was a good idea.
So let's proceed to the grass. With a few exceptions, I don't like to cover completely the ground with static grass. This is because, in general, well used airfields tend to show bare ground spots due to heavy traffic, particularly around parking areas, where most maintenance is done. I applied a thin mix of wood glue/water using a round brush, intentionally leaving some areas uncovered to simulate these spots. I applied the grass by parts, checking the progress and making minor corrections. For the grass itself, I used Woodland Scenics green and medium green, barely mixed to show some tonal variation:
Contrary to many modelers, I don't like to use static grass as is. It always show a kind of synthetic shine which doesn't look natural to me. I then airbrushed a very thin mix of Tamiya XF-52 and XF-57 and applied over the grass covered areas. You don't want to paint the grass, just to apply a mist to cut the shine. Another advantage is that this step helps to blend the ground colors with the bare grass. Here's the result:
In order to bring some shine back to the high spots, I drybrushed more vivid green tones over the grass using a soft, wide flat brush. The key is to use the correct shade of green. I used two or three mixes of white, raw umber, ocrhe and green oil paints. I have a small plastic sheet covered with static grass where I carry my experiments to adjust the colors:
On the top of the high spots I used almost pure green, with the surrounding areas receiving the olive/brownish tones to match the bare earth. Of course, this can be done with an airbrush, if you prefer:
Finally, the time to attack the leaves came. I have a good stock of model railroad foliage, but I wanted something different for this tree. My intention was to simulate those flat wide leaves, and foam foliage wouldn't do the job quite well (well, this is just a technical excuse to try something new...). I decided to use another approach this time. I got a bag of grinded dried marjoram (origanum majorana) spice, which is a kind of oregano. I grinded it even more. To adjust the color, I used alcohol soluble dyes in yellow, brown and green colors. This is done by soaking the marjoram in the tint and drying it very well (microwave it). This is important. If you don't dry it completely, the stuff may rot with time. I made a stock of these natural scale leaves in various colors a while ago. Time to use it...
Since I left the application of the leaves for the last steps, I couldn't spray the glue because that would ruin the flat finish of the branches. I then applied it by brush, then sprinkled the marjoram, branch by branch, in a long and tedious process. I'm not fully satisfied, but it is a convincing scale tree (don't ask me the exact type!):
If necessary, you can airbrush a mist coat over the leaves very lightly with yellow/green tones after the glue has dried to blend everything. The final touch is to scatter some dead leaves under the tree canopy:
And the basic setting is done:
For the final touches I added some bushes here and there as well as some tall grass on a few high spots of the ground. There are many methods to make bushes. Over the years, I've been trying some of them, and I like to keep a little plant lab where I can check what to use:
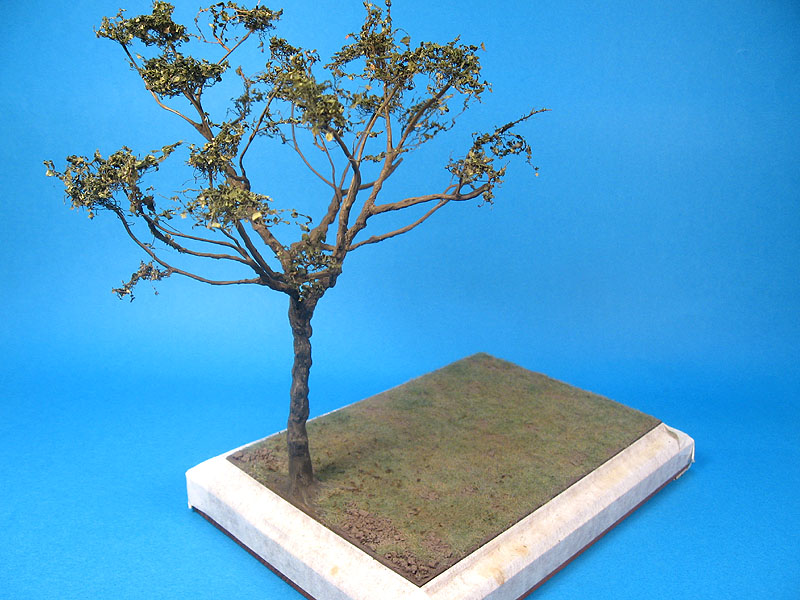
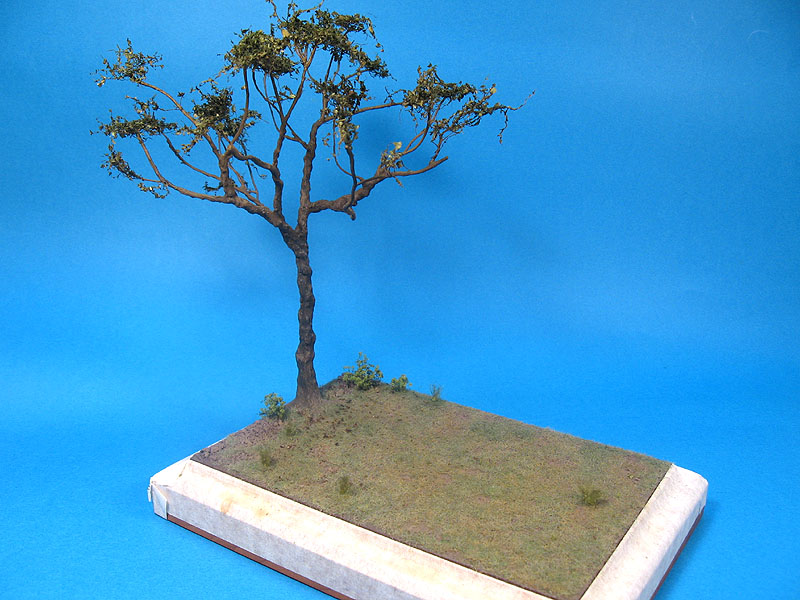
And its done! Yes, it is a simple base, but add an aircraft and a few crew members and your model comes to life. I promise to add some pics of it when I finish my Heinkel He-70. Here's the final result:
Try it on your next project. I bet you'll have a lot of fun...
Rato Marczak © 2008
