| The hairspray chipping paint method |
Some thoughts
The hairspray method has became quite popular during the last decade or so. The main reason is probably associated to the forgiveness of the method, as well as the possibility of obtaining reasonable results already at your first try. It is not, however, a new method. I have printed articles on the technique in railroad and crafts magazines dating from early 70's. It just happens that the internet helped to make the method known, and also because now we have dedicated products for paint chipping.
Nevertheless, I still find people claiming that 'the method A doesn't work', or that 'no matter what, the method B can't deliver what the article says', or yet 'he is a lier, it is impossible to obtain those results with method C'. I honestly think that in most of these situations it is the modeler who has not applied the technique correctly, whatever it is. Or, more likely, the modeler doesn't have any clue of the role each and every step of a given method has. And that's my point. In order to obtain good results we must know - at least superficially - the physical/chemical principles behind the modeling tricks we use.
We already do that. We deal with adhesives, paints, resins, thinners, putties, liquid masks, you name it. All these things work under physical/chemical principles. You don't need a degree to use them, that's not what I'm saying. But if you will just follow blindly those 5 or 6 steps of a new trick that you read on the internet or in a magazine, without having any idea of what/why you are doing, you may not obtain the result you were expecting. So, yes, it is important to have a notion of what each step is doing in that particular order, and its role to the final effect on your model.
Therefore, it is essential to understand the idea behind the method because of two basic reasons:
1. Like everything in life, when you understand what you are doing, you will probably do it right. The chances that you will end up satisfied with your efforts are greatly increased. You become a more accomplished modeler, and your models raise the bar a notch.
2. When you really know the role of each step in the method you are using, you start to change it, try new things, add others, and even use the method for something that nobody thought before. That's when the method really improves, and new techniques are created. That's when our hobby evolves.
The hairspray method
Strictly speaking, it should be called the hairspray fluid method, for it doesn't matter much if you use a spray can or an airbrush or a brush... Anyway, I'm not going to write much about the method - you can find more comprehensive material on the internet.
The basic idea is to apply two colors on your model: a base coat and a top coat, and remove partiallly the top coat, so that the base coat becomes visible. This is essentially what we call paint chipping. The problem is that paint chipping covers a whole family of methods used to simulate on models the paint removal that happens on the real thing. It may happen in a number of ways. Modeling-wise, we can use a number of methods to simulate it, depending on the type of chipping/effect you are after. For example, the method that you use to simulate a worn out winter camouflage on your Tiger tank can't be the same that you apply to simulate the camouflage chipping on the leading edge of the wings on aircraft.
The most well known methods are:
- Brush painting (or pencil)
- Sponge method (at least two variations)
- Salt method
- Hairspray method
I'm not going to cover the first three in this report. Let's focus on the hairspray technique. In a nutshell:
Let's forget clear coats and primers for a moment. For understanding purposes, the following simplified view suffices:
And the four steps above can be illustrated as:
Therefore it is very important:
I don't have many models painted using the technique, but I like to use it to simulate painted wooden structures showing through the bare wood. Here is an example (Trumpeter WR360 engine in 1/35 scale) where I wanted to remove a lot of paint from the surface to simulate heavy scrubbing. Note that there are other steps after finishing with the hairspray:
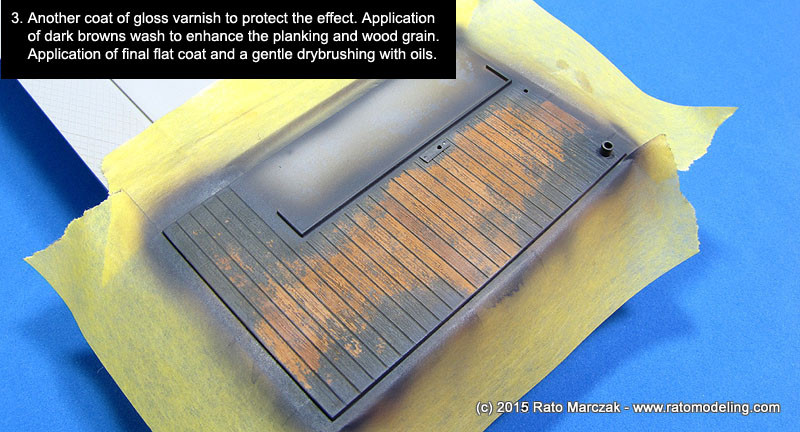
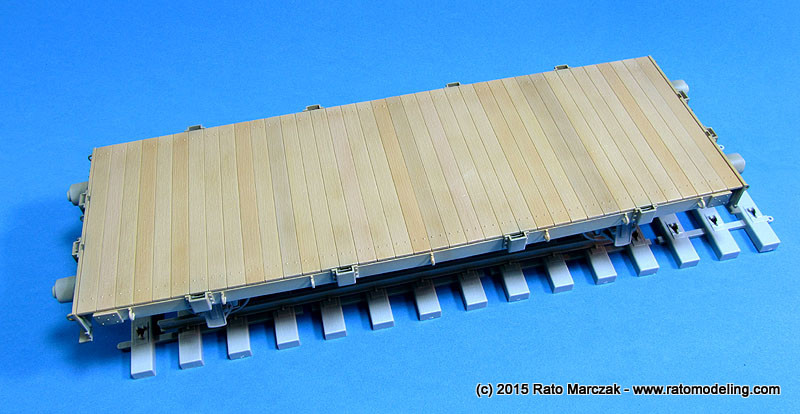
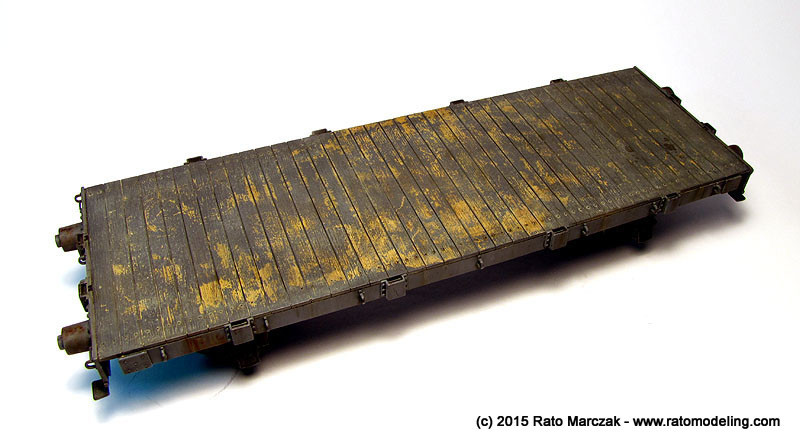
Another example is this Trumpeter flatbed railcar in 1/35 scale. Note that the heavy chipping is concentrated along where the gondola doors normally go. In this example, I played with the method 'on the fly' and scrubbed a round cap here and there to simulate the paint removed by fuel/oil barrels while being loaded on the car - or was it a Tiger wheel? Once finished with the hairspray, the planked area was sealed and oils wash applied to enhance the joints and wood grain. Once dry, the model was flat coated. Next, the model received a dry-brushing with pale yellow over the planking:
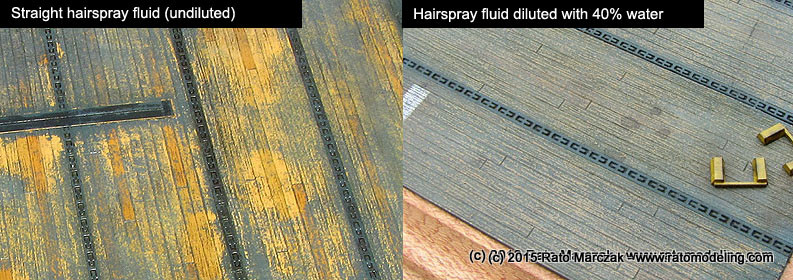
In another example, the method was used to emulate the abused surface of aircraft carrier decks - a new one and an older one. In both cases, I applied wood color and retouched some planks with different wood colors and, once everything was dry, coated the deck with hairspray. The old deck (left) had the hairspray applied straight from the can. On the newer one (right), the hairspray fluid was decanted, thinned with water (40%) and airbrushed over the deck. Since I wanted the deck stain moderately worn out, the weakened hairspray would make more difficult to remove the top coat of paint. With the hairspray layer completely dry I used a mix of Tamiya grays and blues over it. Then I sprayed water over the deck and started to remove paint using a flat brush. The dilution of the hairspray made the removal much more difficult (and diffused) than in the case of the old deck:
As a final example, let me show you how easily you can correct excessive paint removal. While working on the carrier deck for my 1/72 Panther diorama, I inadvertidly removed too much paint from certain areas of the deck:
Another example. Not counting the masking time, the wooden parts of this farmhouse were weathered with the hairspray method in half an hour:

Finally, like most weathering methods, you can obtain interesting results by superimposing several applications of the method. In the example below, the wood plank was initially painted in yellow, and chipped. Then, it was repainted in blue and suffered chipping again. So, depending on where you look, you can see the blue, the yellow underneath or even the bare woood. The same situation happens in military subjects, where the blue would be a camouflage paint, the yellow would play the primer and the wood is the metal surface:
Back to one of my carrier decks (not the best example here), after chipping the deck, I sealed everything and repeated the method for the white and yellow markings. A simple example of superposition of the method:
Well, you got the idea. Last weekend we made a workshop on the hairspray method at our modeling club, and we prepared a not so informative, but funny video. I'm sorry that everything is in Portuguese. One day I'll add the translation captions. Or not...
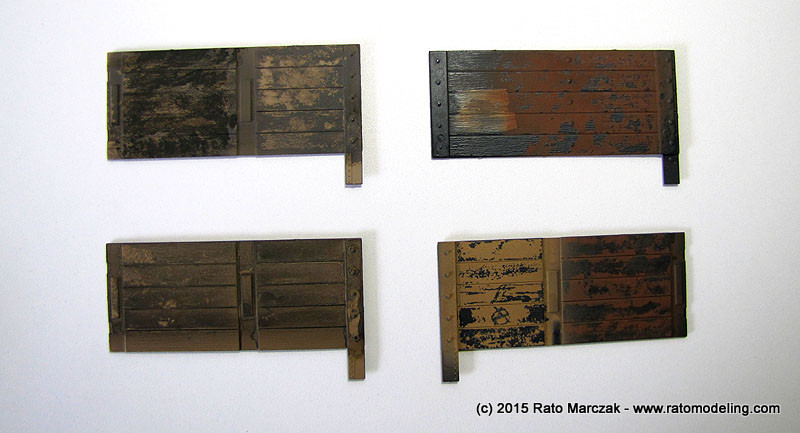
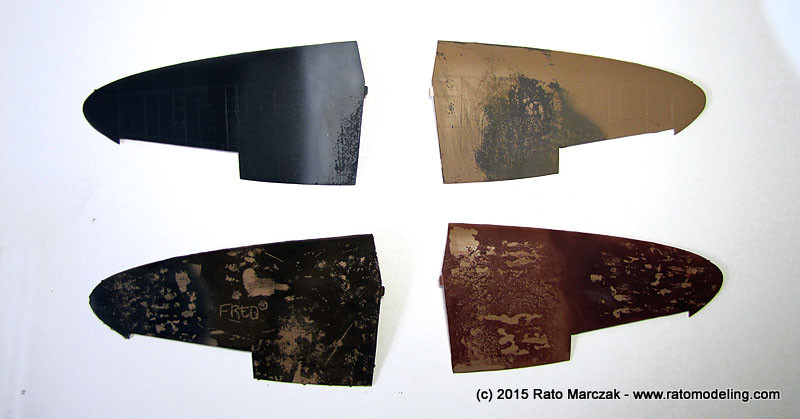
Thanks to our club members, we had the opportunity to test some things, paint brands, etc. Here are the results of the workshop:
See you in the next workshop.
Rato
Marczak
© 2015The hairspray method has became quite popular during the last decade or so. The main reason is probably associated to the forgiveness of the method, as well as the possibility of obtaining reasonable results already at your first try. It is not, however, a new method. I have printed articles on the technique in railroad and crafts magazines dating from early 70's. It just happens that the internet helped to make the method known, and also because now we have dedicated products for paint chipping.
Nevertheless, I still find people claiming that 'the method A doesn't work', or that 'no matter what, the method B can't deliver what the article says', or yet 'he is a lier, it is impossible to obtain those results with method C'. I honestly think that in most of these situations it is the modeler who has not applied the technique correctly, whatever it is. Or, more likely, the modeler doesn't have any clue of the role each and every step of a given method has. And that's my point. In order to obtain good results we must know - at least superficially - the physical/chemical principles behind the modeling tricks we use.
We already do that. We deal with adhesives, paints, resins, thinners, putties, liquid masks, you name it. All these things work under physical/chemical principles. You don't need a degree to use them, that's not what I'm saying. But if you will just follow blindly those 5 or 6 steps of a new trick that you read on the internet or in a magazine, without having any idea of what/why you are doing, you may not obtain the result you were expecting. So, yes, it is important to have a notion of what each step is doing in that particular order, and its role to the final effect on your model.
Therefore, it is essential to understand the idea behind the method because of two basic reasons:
1. Like everything in life, when you understand what you are doing, you will probably do it right. The chances that you will end up satisfied with your efforts are greatly increased. You become a more accomplished modeler, and your models raise the bar a notch.
2. When you really know the role of each step in the method you are using, you start to change it, try new things, add others, and even use the method for something that nobody thought before. That's when the method really improves, and new techniques are created. That's when our hobby evolves.
The hairspray method
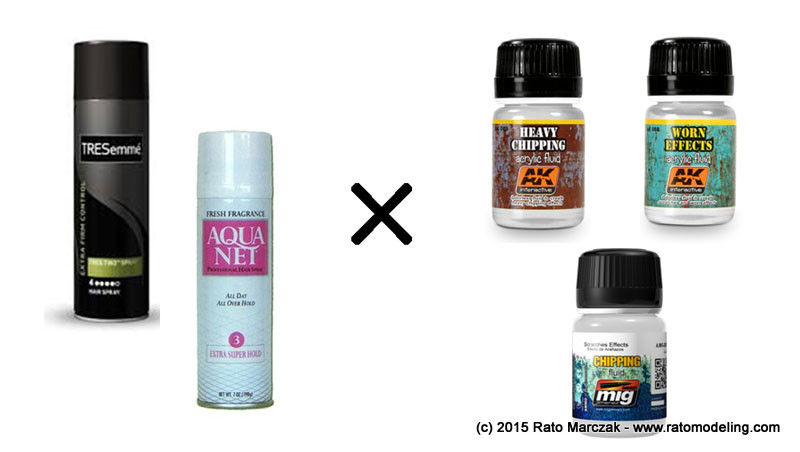
Strictly speaking, it should be called the hairspray fluid method, for it doesn't matter much if you use a spray can or an airbrush or a brush... Anyway, I'm not going to write much about the method - you can find more comprehensive material on the internet.
The basic idea is to apply two colors on your model: a base coat and a top coat, and remove partiallly the top coat, so that the base coat becomes visible. This is essentially what we call paint chipping. The problem is that paint chipping covers a whole family of methods used to simulate on models the paint removal that happens on the real thing. It may happen in a number of ways. Modeling-wise, we can use a number of methods to simulate it, depending on the type of chipping/effect you are after. For example, the method that you use to simulate a worn out winter camouflage on your Tiger tank can't be the same that you apply to simulate the camouflage chipping on the leading edge of the wings on aircraft.
The most well known methods are:
- Brush painting (or pencil)
- Sponge method (at least two variations)
- Salt method
- Hairspray method
I'm not going to cover the first three in this report. Let's focus on the hairspray technique. In a nutshell:
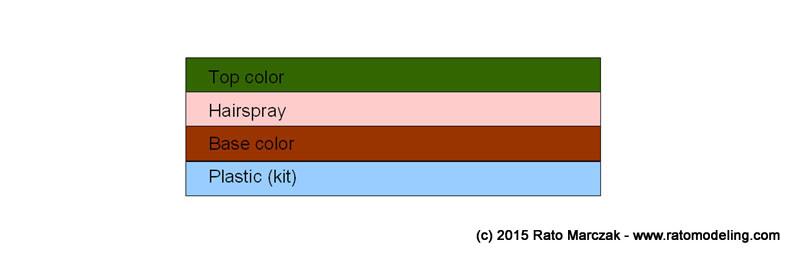
- We are going to apply (at least) two colors. The base color simulate a previous color, an oxidation, wood or metal on the real thing. The top color if the current color on the real thing - the one which is to be worn out, scuffed, chipped, flaked of peeled off from the surface in order to allow one to see the base coat.
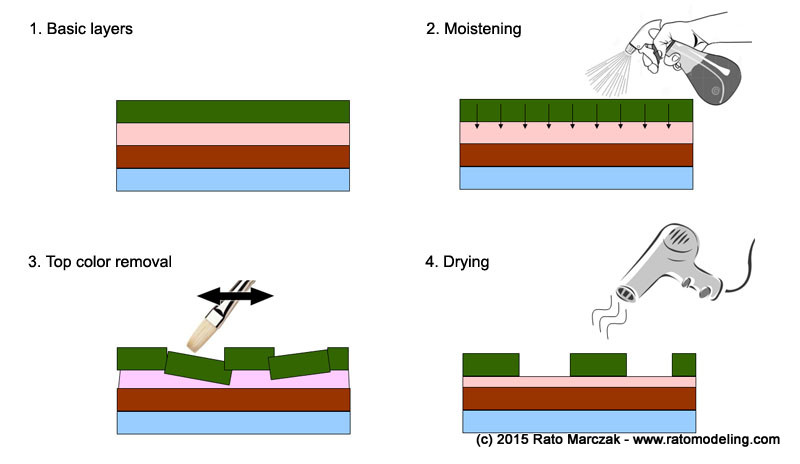
- The top color will partially be removed by creating an unstable surface for it.
- In order to create this unstable surface, we apply the hairspray fluid between the two colors and, once the top color is dry, moisten the surface to allow water to reach the hairspray fluid in between the two colors.
- Once the hairspray fluid is softened, we can remove the top coat in a controllable way using a brush or a toothpick.
Let's forget clear coats and primers for a moment. For understanding purposes, the following simplified view suffices:
And the four steps above can be illustrated as:
Therefore it is very important:
- To use a waterproof base color, or seal it with a waterproff clear varnish. Laquers and enamels don't need varnish, but the protective varnish is always a good idea even then to help the base color to support some abuse when scrubbing the brush to revome the top color.
- That the top color must not be waterproof. I recommend acrylics. Vinylic paints work too, but it is not as good as acrylics, in my opinion.
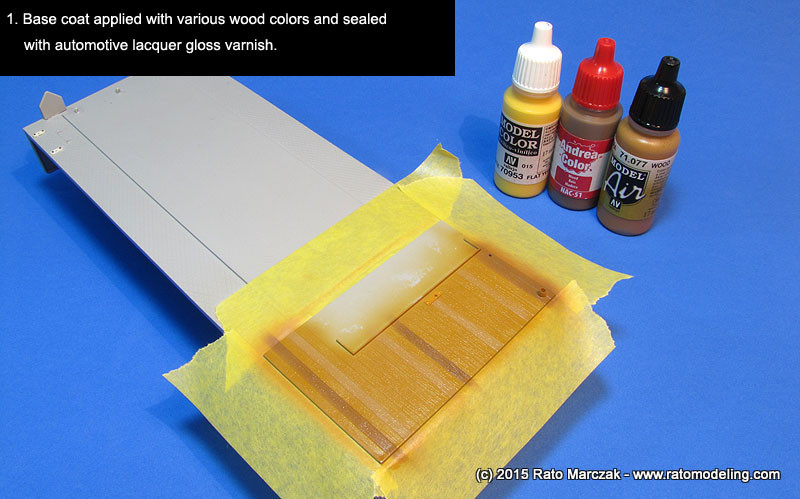
I don't have many models painted using the technique, but I like to use it to simulate painted wooden structures showing through the bare wood. Here is an example (Trumpeter WR360 engine in 1/35 scale) where I wanted to remove a lot of paint from the surface to simulate heavy scrubbing. Note that there are other steps after finishing with the hairspray:
Another example is this Trumpeter flatbed railcar in 1/35 scale. Note that the heavy chipping is concentrated along where the gondola doors normally go. In this example, I played with the method 'on the fly' and scrubbed a round cap here and there to simulate the paint removed by fuel/oil barrels while being loaded on the car - or was it a Tiger wheel? Once finished with the hairspray, the planked area was sealed and oils wash applied to enhance the joints and wood grain. Once dry, the model was flat coated. Next, the model received a dry-brushing with pale yellow over the planking:
In another example, the method was used to emulate the abused surface of aircraft carrier decks - a new one and an older one. In both cases, I applied wood color and retouched some planks with different wood colors and, once everything was dry, coated the deck with hairspray. The old deck (left) had the hairspray applied straight from the can. On the newer one (right), the hairspray fluid was decanted, thinned with water (40%) and airbrushed over the deck. Since I wanted the deck stain moderately worn out, the weakened hairspray would make more difficult to remove the top coat of paint. With the hairspray layer completely dry I used a mix of Tamiya grays and blues over it. Then I sprayed water over the deck and started to remove paint using a flat brush. The dilution of the hairspray made the removal much more difficult (and diffused) than in the case of the old deck:
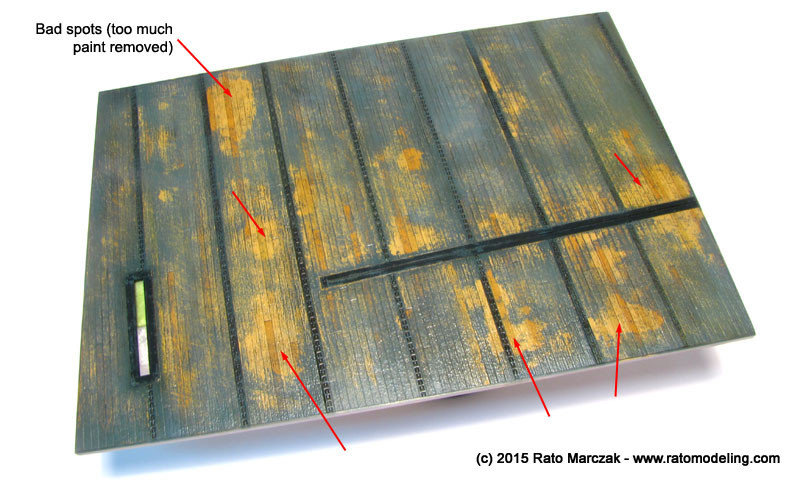
As a final example, let me show you how easily you can correct excessive paint removal. While working on the carrier deck for my 1/72 Panther diorama, I inadvertidly removed too much paint from certain areas of the deck:
Something
that article generally don't mention, is that the solution can be in
another chipping method, but used to add paint: the sponge method. I simply used a piece of sponge dampened with the Deck Blue
color and dabbed it over the areas where I removed too much paint.
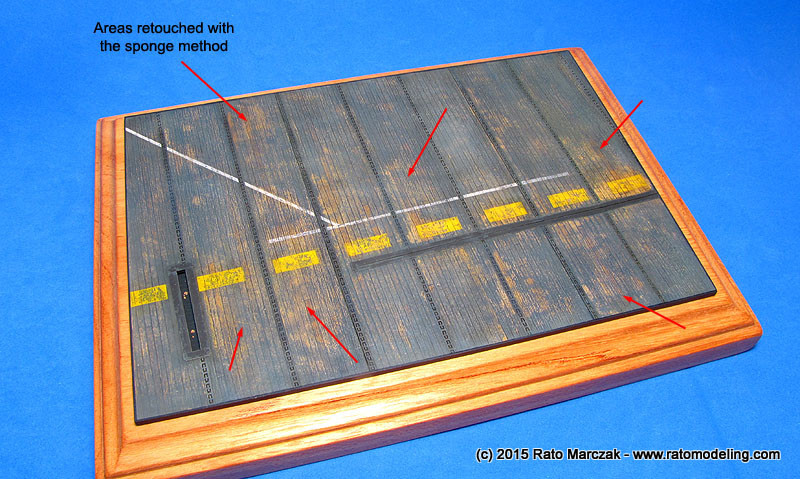
Airbrushing or hand brushing
would not work, but the sponge alleviated the problem so well that if I
don't tell, you wouldn't know:
Another example. Not counting the masking time, the wooden parts of this farmhouse were weathered with the hairspray method in half an hour:
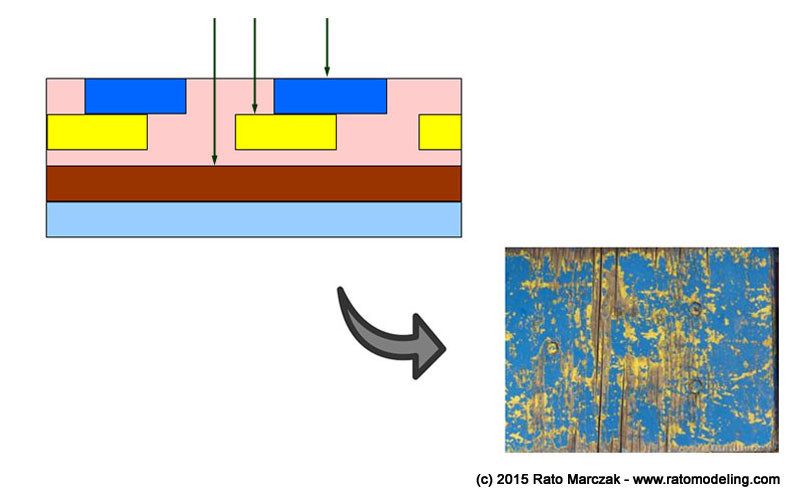
Finally, like most weathering methods, you can obtain interesting results by superimposing several applications of the method. In the example below, the wood plank was initially painted in yellow, and chipped. Then, it was repainted in blue and suffered chipping again. So, depending on where you look, you can see the blue, the yellow underneath or even the bare woood. The same situation happens in military subjects, where the blue would be a camouflage paint, the yellow would play the primer and the wood is the metal surface:
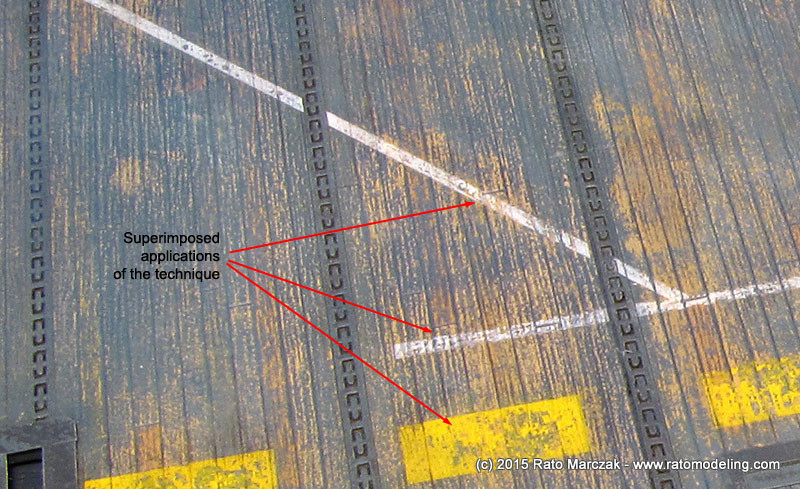
Back to one of my carrier decks (not the best example here), after chipping the deck, I sealed everything and repeated the method for the white and yellow markings. A simple example of superposition of the method:
Well, you got the idea. Last weekend we made a workshop on the hairspray method at our modeling club, and we prepared a not so informative, but funny video. I'm sorry that everything is in Portuguese. One day I'll add the translation captions. Or not...
Thanks to our club members, we had the opportunity to test some things, paint brands, etc. Here are the results of the workshop:
See you in the next workshop.
