| Tips on making
aircraft and vehicle lights - Part II |
Continuing from our previous article
on simulating lights in plastic models, here we cover aircraft and
vehicle lights with reflecting dishes and
texturized lenses. Again, our main focus are small scale models, since
large scales allow one to use other techniques to achieve the
desired result. Even comercial accessories can be easily found for
these scales. In 1/72 scale, however, the size of headlights and
landing lights leaves the modelers with the option of making his/her
own improved parts or living with kit parts. Please note that the now
famous M.V. lenses - a wonderful product, by the way - don't come with
texturized lenses, in case you are wondering...
1. Landing lights
Landing lights are commonly installed on the leading edge of one or both wings in most aircraft, although it is common to find retractable lights under the wings, too. In any case, the bulb is generally mounted over a reflective concave surface, or dish, in order to maximixe the intensity of the light projected forward. In this section I'll show you how I do these dishes, and of course you may find other uses for it.
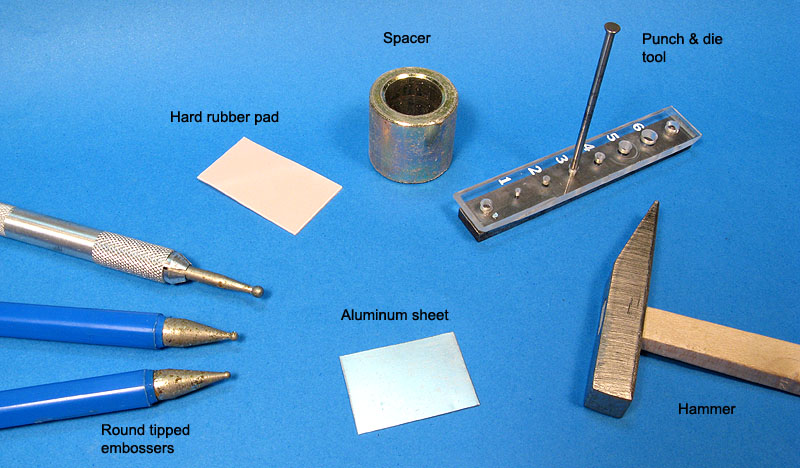
All you need to start is in the picture below. A good punch & die set is important. You will need dry-transfer burnishers or any metalic tool with a spherical tip roughly of the same diameter of the dish. I'm going to use Aluminum to make the parts, but in some instances plastic or brass can work too. A small rubber pad is handy, too. It is also a good idea to polish the Aluminum sheet before starting to better represent the reflective surface.
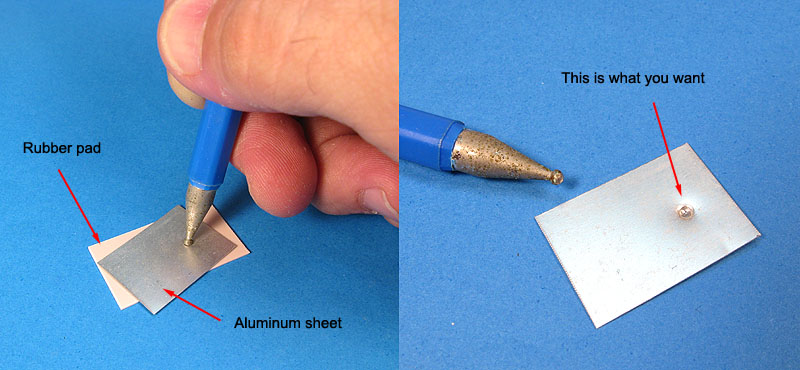
The first step is to emboss the dish embedded in the Aluminum sheet. For that, just lay the Aluminum sheet over the rubber pad and press it firmly using a suitable embosser. The result should be a well formed spherical depression:
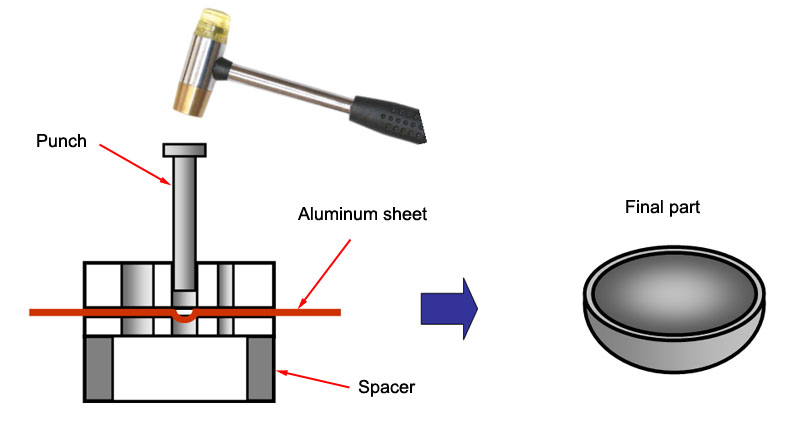
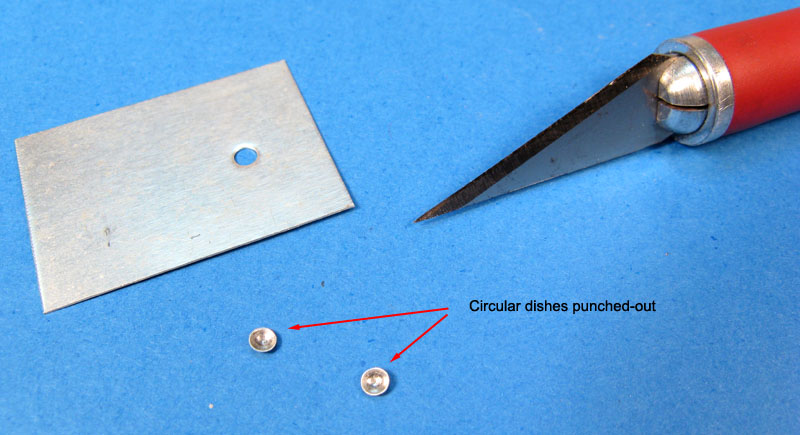
That is our dish. Problem is how to remove it from the sheet now. Simple: punch it out. But before you go, remember that if you're planning to punch it like when you do plastic disks, think again because the punch will smash our dish and it will return to its... well, flat form. The solution is to use a spacer to avoid the punch from hitting the surface you are working on. The picture below explains it better:
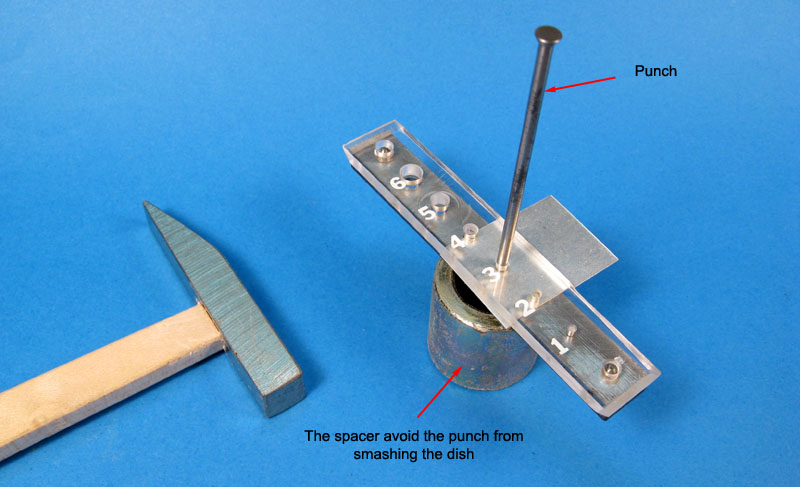
I use a piece of metal pipe under my Waldron set and it works fine. It is just a matter of fitting the Aluminum sheet over the suitable hole, in such a way that the dish slots in it:
Now we have perfect spherical Aluminum dishes:
The rest of the light installation will depend on your particular subject. You can use the solder ball trick from Part I of this article to simulate the bulb. If you have polished the dishes, a good idea is to brush a coat of Future to avoid oxidation. Once installed, you have to add the surrounding details, transparent covers and all. I used this method to make the wing root lights in my Revell Sea Hurricane in 1/72. After termoforming the transparence covers with a piece of styrene, they were installed on the wing root and sanded flush. Once you get an even leading edge, the cover can be polished using your favorite method.
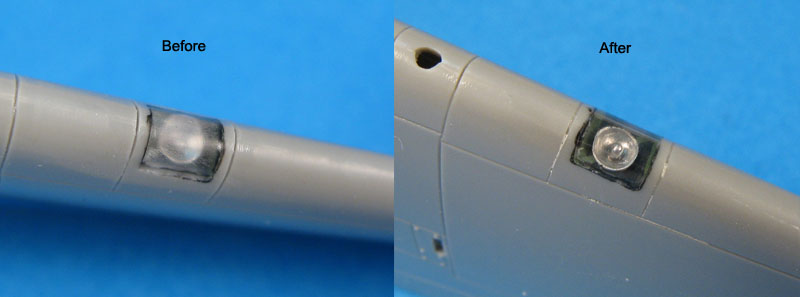
As I said, the cover was made of a thermoformed piece of styrene. I don't like acetate and similar plastics becouse they are very difficult to sand and polish, and styrene will allow liquid cements to firmly weld the cover in place. Sometimes you can use the kit parts (the Revell clear part in this case was terrible), but by scratchbuilding your own, you can make them slightly larger. In this way, during the painting phase the mask edges will not be unconfortably close to the glued borders of the transparency.
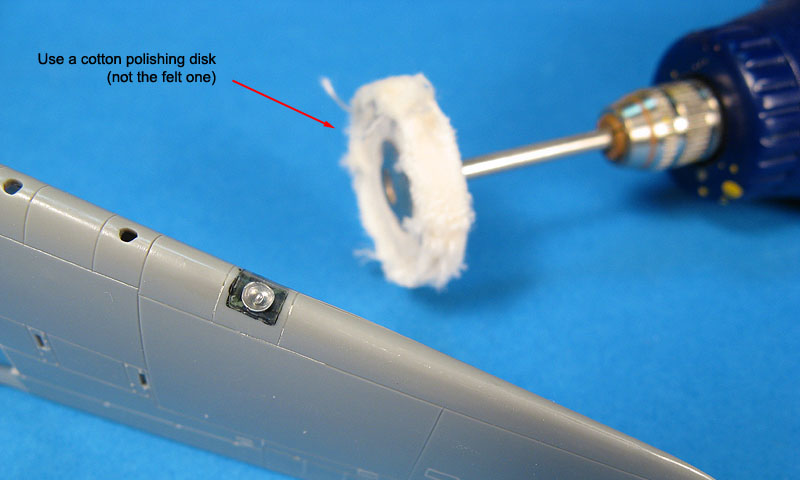
Another tip: when polishing clear parts with your rotatory tool, do not use the felt disks - they are too abrasive. Use the disks made of cotton cloth. They are much more soft and will produce a very translucent surface (I haven't even dipped my canopies in Future anymore).
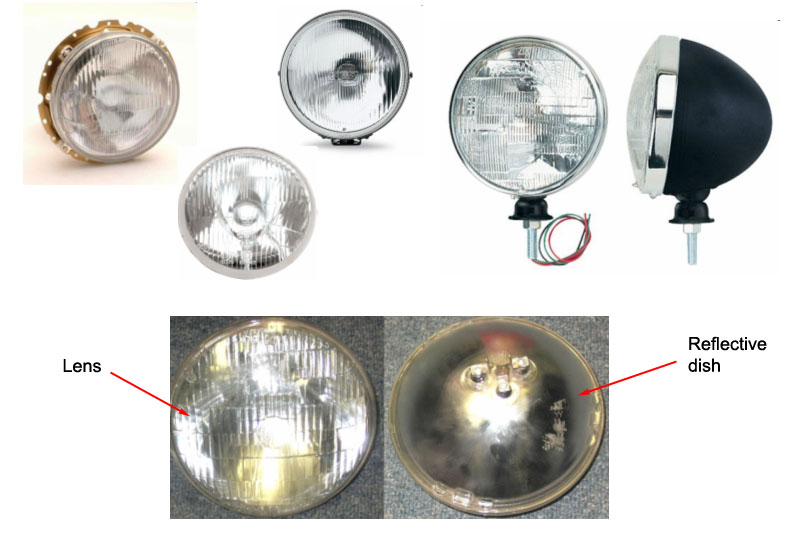
2. Lights with textured lens
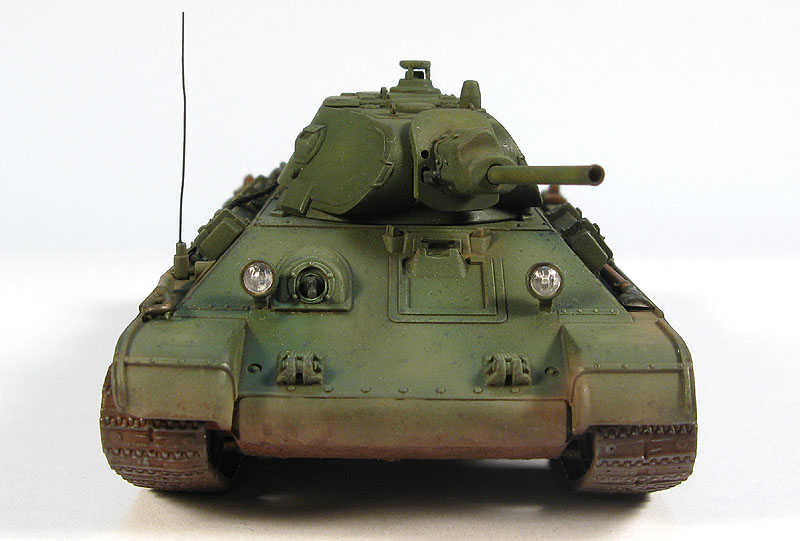
Another tuff thing to reproduce in small scales are lights with relief lens (texture). In 1/48 or larger scales, the manufacturers can inject clear parts with these details, but in small scales such as 1/72, it is very difficult to find kit parts with the same level of realism. I devised a method to reproduce such lens (a similar method was published in the Nov/2009 issue of FineScale Modeler magazine, but my Dragon's T-34 predates that artcile), which works really well.
Our problem is basically reproduce two things: the reflective dish (which can be made as described above) and the lens with raised texture. Of course there are a myriad of different patterns for the textures, from sport cars to landing lights in aircraft, and you don't want to be exact about the texture in 1/72 scale. The idea is to simulate the texture and let the optical illusion do the rest...
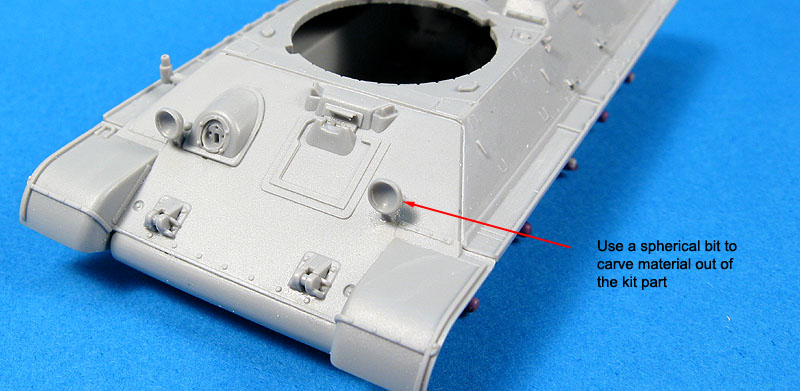
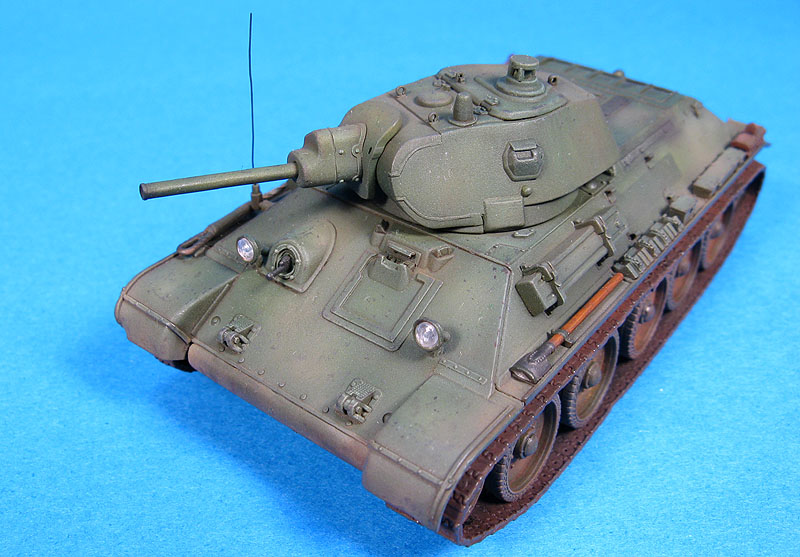
The method is essentially a thermoforming technique. I will use the images of my T-34 since it was documented step by step. Start by building new reflective dishes or modifying the kit parts by carving out the lights using a spherical bit:
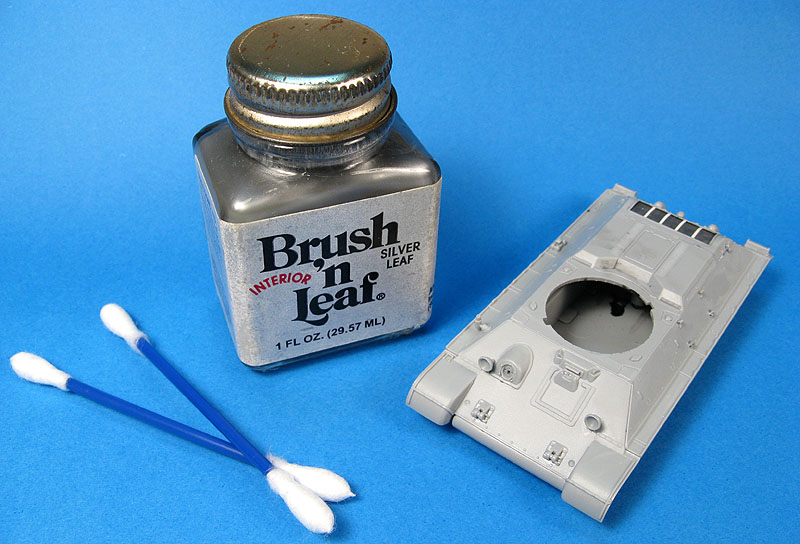
Next, you have to reproduce the highly reflective surface. You can use your favorite paint, Bare Metal Foil or even install the Aluminum dishes we just described. To save time, I just rubbed Brush & Leaf with a cotton swab over the internal area of the light:
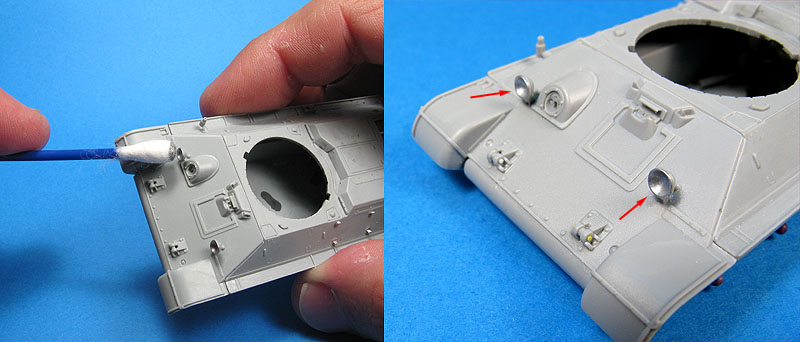
I then brushed a coat of Future to increase the brightness and installed the bulbs (made of melted solder) while the Future was still wet. Take your time to make a decent job here, as there is no point in making beautifull lens just to see a terrible interior. Now, let's start the fabrication of the lens.
You need essentially the following items:
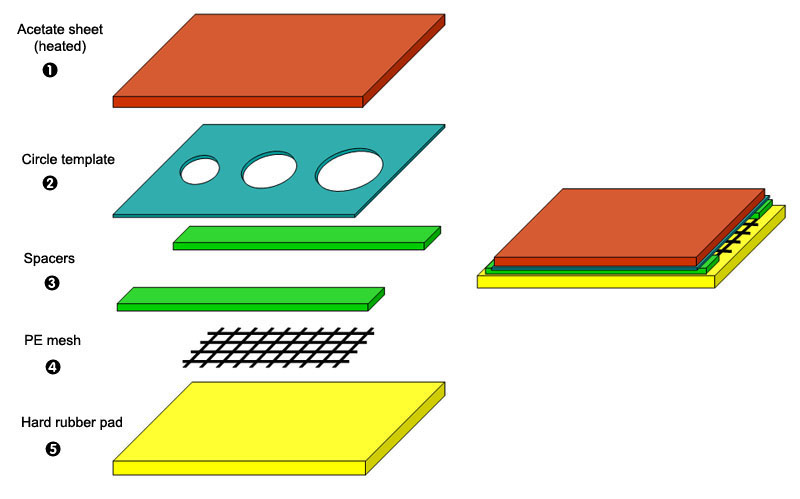
1. A small sheet of acetate. The sheet will be heated so avoid very thin ones. A thickness of 0.3 to 0.5 mm will be fine for 1/72 scale.
2. A circle template. You can use plastic drafting templates, but since we are going to lay a heated material over it, better to use a metalic one. Those metalic templates used for re-scribing are just perfect. You will work with the hole which match better the diameter of the lens.
3. A couple of plastic strips. Nothing thick, about 0.5 mm. These will act as spacers.
4. A photoetched mesh. This mesh is actually the negative of the relief we are going to copy in our lens. Choose one small enough to produce at least a few vertical and horizontal lines inside the diameter of the light. Remember that it will be bent, so it is better to use a left over item. Anyway, you can reuse it over and over.
5. A rubber pad. The pad will be used to press the mesh over all the surface of the embosser (see 6, below), as well as a stopper to the embosser to avoid damage to the PE mesh. Therefore, it must be soft enough to deform as much as the lens depth.
6. A rounded tip embosser or a brush handle. Choose one with a diameter slightly smaller than the one of the lens, to allow for the acetate thickness.
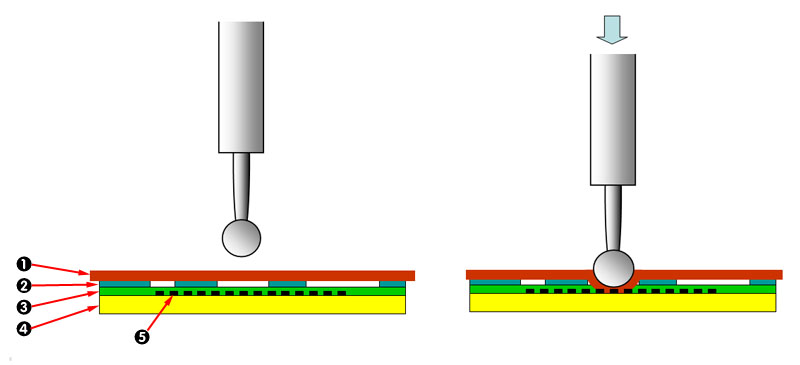
Now make a sandwich of the item 1-5 as illustrated below:
Here is how it works: Heat the acetate sheet just like you do when vacuum forming parts, but since this is a small part, there is no need for an oven - you can use a candle or a lighter. Once it is maleable, you must act fast. Lay the sheet over the hole of the circle template you selected for your lens (use a hole slightly larger than the diameter of the embosser, to allow the acetate thickness). Now use the embosser to push the acetate through the template until it reaches the PE mesh. Make sure the acetate is pressing the PE mesh over the rubber pad as uniformly as possible. Keep the pressure while the acetate cools. Here is the method in action:
The only real care you have to take is to avoid using too coarse meshes because the acetate can flow through the mesh opening making its removal difficult or impossible, and using excessive force that can break you mesh. Some of you may be thinking that the circle template is unecessary... more on that in a second. If it is sounding complicated, it is not. I managed to make pretty decent lens in my first attempt.
Well, continuing, disassemble the sandwich and remove the sheet. You probably have a little texturized lenz embossed in your acetate sheet similarly to the Aluminum sheet we used to make the dishes. Thanks to the circle template, the sheet is plain enough to allow you to punch the lens out ot the sheet exactly like we made above for the landing light. I forgot to take pictures of the sheets with the lens still in it, but here is the final result:
Evidently, whatever you use in place of the mesh will be transfered to the acetate, so there are countless possibilities to use this method. I'm sure you can adapt these tips to several other situations. Let me know what you got...
Rato
Marczak
© 20101. Landing lights
Landing lights are commonly installed on the leading edge of one or both wings in most aircraft, although it is common to find retractable lights under the wings, too. In any case, the bulb is generally mounted over a reflective concave surface, or dish, in order to maximixe the intensity of the light projected forward. In this section I'll show you how I do these dishes, and of course you may find other uses for it.
All you need to start is in the picture below. A good punch & die set is important. You will need dry-transfer burnishers or any metalic tool with a spherical tip roughly of the same diameter of the dish. I'm going to use Aluminum to make the parts, but in some instances plastic or brass can work too. A small rubber pad is handy, too. It is also a good idea to polish the Aluminum sheet before starting to better represent the reflective surface.
The first step is to emboss the dish embedded in the Aluminum sheet. For that, just lay the Aluminum sheet over the rubber pad and press it firmly using a suitable embosser. The result should be a well formed spherical depression:
That is our dish. Problem is how to remove it from the sheet now. Simple: punch it out. But before you go, remember that if you're planning to punch it like when you do plastic disks, think again because the punch will smash our dish and it will return to its... well, flat form. The solution is to use a spacer to avoid the punch from hitting the surface you are working on. The picture below explains it better:
I use a piece of metal pipe under my Waldron set and it works fine. It is just a matter of fitting the Aluminum sheet over the suitable hole, in such a way that the dish slots in it:
Now we have perfect spherical Aluminum dishes:
The rest of the light installation will depend on your particular subject. You can use the solder ball trick from Part I of this article to simulate the bulb. If you have polished the dishes, a good idea is to brush a coat of Future to avoid oxidation. Once installed, you have to add the surrounding details, transparent covers and all. I used this method to make the wing root lights in my Revell Sea Hurricane in 1/72. After termoforming the transparence covers with a piece of styrene, they were installed on the wing root and sanded flush. Once you get an even leading edge, the cover can be polished using your favorite method.
As I said, the cover was made of a thermoformed piece of styrene. I don't like acetate and similar plastics becouse they are very difficult to sand and polish, and styrene will allow liquid cements to firmly weld the cover in place. Sometimes you can use the kit parts (the Revell clear part in this case was terrible), but by scratchbuilding your own, you can make them slightly larger. In this way, during the painting phase the mask edges will not be unconfortably close to the glued borders of the transparency.
Another tip: when polishing clear parts with your rotatory tool, do not use the felt disks - they are too abrasive. Use the disks made of cotton cloth. They are much more soft and will produce a very translucent surface (I haven't even dipped my canopies in Future anymore).
2. Lights with textured lens
Another tuff thing to reproduce in small scales are lights with relief lens (texture). In 1/48 or larger scales, the manufacturers can inject clear parts with these details, but in small scales such as 1/72, it is very difficult to find kit parts with the same level of realism. I devised a method to reproduce such lens (a similar method was published in the Nov/2009 issue of FineScale Modeler magazine, but my Dragon's T-34 predates that artcile), which works really well.
Our problem is basically reproduce two things: the reflective dish (which can be made as described above) and the lens with raised texture. Of course there are a myriad of different patterns for the textures, from sport cars to landing lights in aircraft, and you don't want to be exact about the texture in 1/72 scale. The idea is to simulate the texture and let the optical illusion do the rest...
The method is essentially a thermoforming technique. I will use the images of my T-34 since it was documented step by step. Start by building new reflective dishes or modifying the kit parts by carving out the lights using a spherical bit:
Next, you have to reproduce the highly reflective surface. You can use your favorite paint, Bare Metal Foil or even install the Aluminum dishes we just described. To save time, I just rubbed Brush & Leaf with a cotton swab over the internal area of the light:
I then brushed a coat of Future to increase the brightness and installed the bulbs (made of melted solder) while the Future was still wet. Take your time to make a decent job here, as there is no point in making beautifull lens just to see a terrible interior. Now, let's start the fabrication of the lens.
You need essentially the following items:
1. A small sheet of acetate. The sheet will be heated so avoid very thin ones. A thickness of 0.3 to 0.5 mm will be fine for 1/72 scale.
2. A circle template. You can use plastic drafting templates, but since we are going to lay a heated material over it, better to use a metalic one. Those metalic templates used for re-scribing are just perfect. You will work with the hole which match better the diameter of the lens.
3. A couple of plastic strips. Nothing thick, about 0.5 mm. These will act as spacers.
4. A photoetched mesh. This mesh is actually the negative of the relief we are going to copy in our lens. Choose one small enough to produce at least a few vertical and horizontal lines inside the diameter of the light. Remember that it will be bent, so it is better to use a left over item. Anyway, you can reuse it over and over.
5. A rubber pad. The pad will be used to press the mesh over all the surface of the embosser (see 6, below), as well as a stopper to the embosser to avoid damage to the PE mesh. Therefore, it must be soft enough to deform as much as the lens depth.
6. A rounded tip embosser or a brush handle. Choose one with a diameter slightly smaller than the one of the lens, to allow for the acetate thickness.
Now make a sandwich of the item 1-5 as illustrated below:
Here is how it works: Heat the acetate sheet just like you do when vacuum forming parts, but since this is a small part, there is no need for an oven - you can use a candle or a lighter. Once it is maleable, you must act fast. Lay the sheet over the hole of the circle template you selected for your lens (use a hole slightly larger than the diameter of the embosser, to allow the acetate thickness). Now use the embosser to push the acetate through the template until it reaches the PE mesh. Make sure the acetate is pressing the PE mesh over the rubber pad as uniformly as possible. Keep the pressure while the acetate cools. Here is the method in action:
The only real care you have to take is to avoid using too coarse meshes because the acetate can flow through the mesh opening making its removal difficult or impossible, and using excessive force that can break you mesh. Some of you may be thinking that the circle template is unecessary... more on that in a second. If it is sounding complicated, it is not. I managed to make pretty decent lens in my first attempt.
Well, continuing, disassemble the sandwich and remove the sheet. You probably have a little texturized lenz embossed in your acetate sheet similarly to the Aluminum sheet we used to make the dishes. Thanks to the circle template, the sheet is plain enough to allow you to punch the lens out ot the sheet exactly like we made above for the landing light. I forgot to take pictures of the sheets with the lens still in it, but here is the final result:
Evidently, whatever you use in place of the mesh will be transfered to the acetate, so there are countless possibilities to use this method. I'm sure you can adapt these tips to several other situations. Let me know what you got...
