| Photoetching at
home - Part 1: Photoless photoetching |
Introduction
This article is not exactly about photoetching. Perhaps I
should call it simply "etching at home". I won´t write a
dissertation here about photoetching or PE parts. You know what it is
all about. After all, we spend a lot of money buying those marvelous
details, and it is generally a well invested money (well, not always),
since it adds a lot to our models. But what to do when we can´t
find a PE set that suits our needs? Sure, we can scratchbuild them in
plastic, metal or whatever. But, as always in scratchbuilding, we are
limited to what we can see and our tools can reach. This limitation is
somehow present in resin parts, too (a professional master is doing the
hard work for you, right?). That´s what makes PE parts a category
of them own: the subtlety of the details - in size and complexity. And
this also why not everything can be made by photoetching, remember
that.
What about making our own PE parts? Sounds intimidating, eh? It
should, because photoetching is indeed a difficult process,
particularly if you never tried it before. And dangerous too, as you
will work with corrosive substances.
What you mean by photoless?
In a nutshell: Experienced modelers know that photoetching involves chemical erosion (or chemical milling, or chemical etching, or whatever...) of appropriate materials (brass and nickel silver, typically). This means that the metal is immersed in a corrosive solution, which will actually etch the metal. But the etching must occur only where it is wanted. In general, the metal sheet is covered by a photo-sensitive varnish. Then a (negative or positive, depending on the varnish type) film with a precise drawing of the part is laid on the sheet, which is exposed to a UV light source. The light will not traverse through the black areas of the film, and so the corresponding varnished areas won´t be "cured". A bath in caustic soda solution will "develop" the varnish layer, that is, it will remove the varnish from all areas not exposed to light. Now the sheet can be immersed in acid to be etched, but the acid won´t attack the areas protected by the varnish. If the part is etched for a time long enough, the acid will remove the material all the way through its thickness. If the process is halted before that, the result is a sheet partially etched, with recessed details. The procedure can be applied to both sides of the metal sheet.There many internet sites and magazine articles explaining the technique in detail. Here, I want to share a simple way to etch very simple parts, without all the paraphernalia used to develop the image over the metal sheet. I´ll write another article about it one day (it is not overly complicated, if you have a laser printer with good resolution). For now, let´s try to keep it simple.
Developing the image
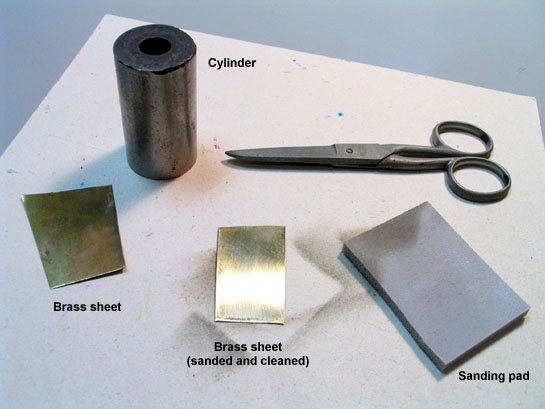
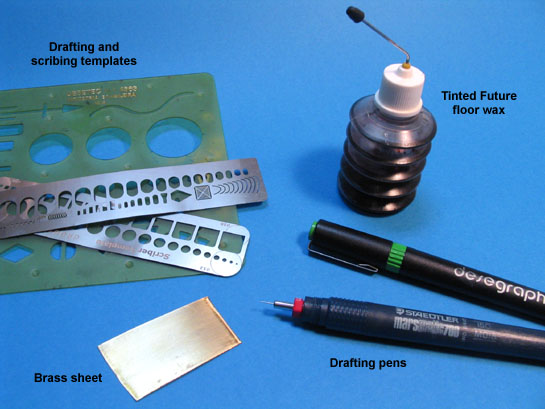
We want to avoid the photographic part of the process as this is our first etching section. Therefore, we need something to protect the areas that won´t be etched. The answer is probably on your workbench right now: Future floor wax. In fact, most paints will work. I prefer clear acrylics because it will resist better to the acid.Start finding a piece of brass sheet of suitable thickness. In general, 0.2 to 0.35 mm is the common thickness range (like most commercial PE frets). Avoid thickness larger than these, as they are difficult to bend and cut. Using a 1000 grit sanding paper, clean the brass sheet until you get a shiny surface. Rub some isopropyl alcohol or lacquer thinner to make sure there´s no trace of grease... Any residues there will ruin your work. Your sheet will be probably bent by now. Roll a cylinder over it to recover its flatness.
Grab some empty drafting pens. I use a couple: 0.2 mm and 0.6 mm. Fill them with Future tinted with ordinary ink. This will make your traces more visible.
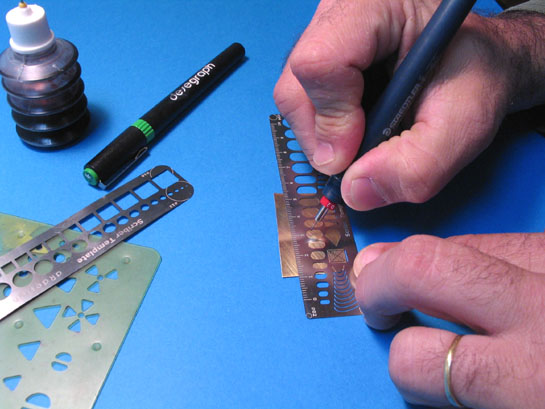
Now start drawing what you don´t
want to etch: your artwork will be the raised areas of the part to
be etched. You will need the aid of some old fashion drafting tools,
like
templates, but your scribing templates can be used as well. When using
templates, remember to stick small pieces of tape on the bottom side to
create a gap between the template and the drafting surface (our brass
sheet,
in this case). This simple action (a draftsman old trick) will prevent the wet traces from being blurred by the template.
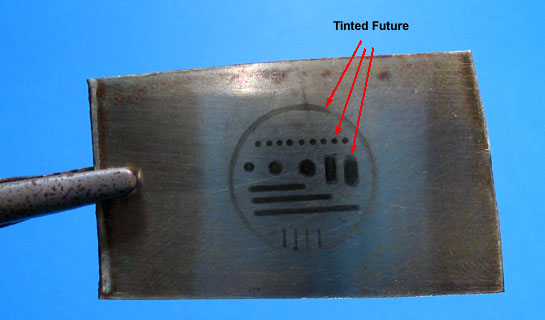
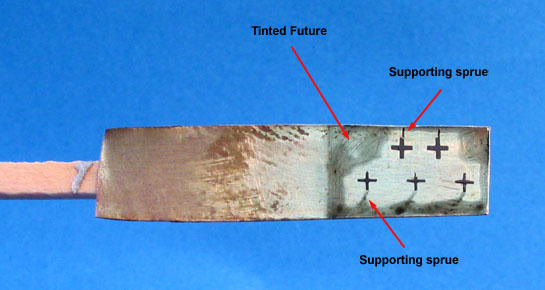
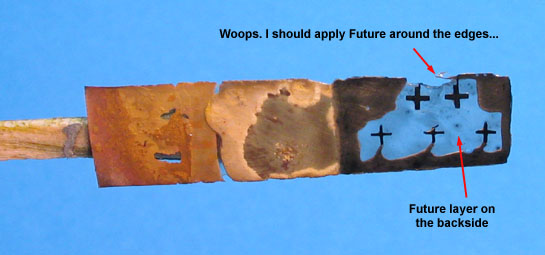
Use the drafting pens to draw the contour of the areas to be protected, and fill the inner areas with a liberal amount Future. In general, I use the 0.2 mm pen to draw the edges and the 0.6 mm pen for filling. Sometimes it is just a matter of using the right pen - no filling necessary. Rivets can be made with "dots" of Future. I made a fictitious drawing using some basic shapes for this example. Let it dry completely. Close exposure to a bulb will dry it well in a matter of minutes. I don´t recommend the use of a hair drier, as it can make the wet Future bleed. Here´s how it looks so far:
Eating metal
Now
that everything is set, let´s start etching our workpiece. I like
to use ferric chloride, because it
is not particularly dangerous as other solutions are. It is the
slowest of the common etching solutions, but you can accelerate the
process by preheating it. If you want to know more about how it works, take a
look here. It is a mild solution, but of course still a corrosive
chemical, and must be used with care and protection (use coverall,
rubber gloves and goggles). Although not absorbed through the skin, it
may eat your clothes fiercely. By the way, do yourself a favor
and
don´t buy the solid stuff (which must be dissolved in water - a
real
mess). Get the liquid one, ready for use. For your references, here´s a Material
Safety
Data Sheet for a typical ferric chloride solution.
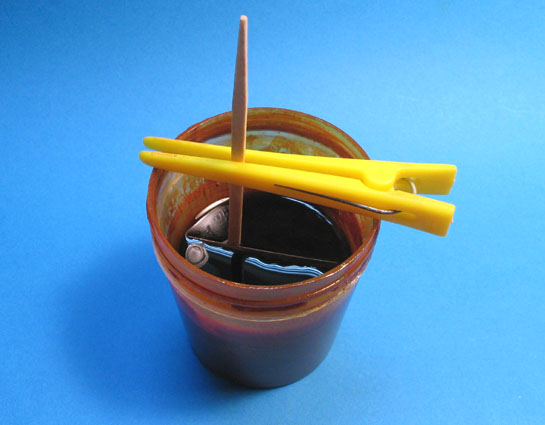
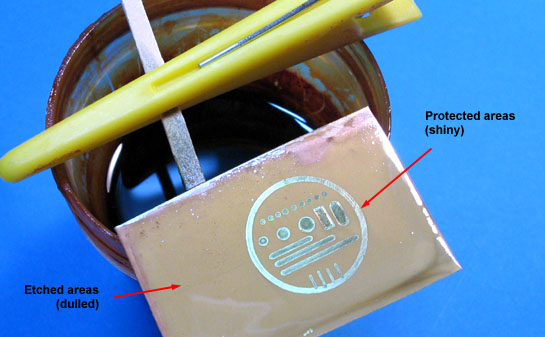
Wait about one minute or so and take a look on the brass. You will see the unprotected areas being etched (dull areas). Dip it again in the cup and monitor the etching from now on at each two or three minutes. At room temperature, it would take about 20 minutes to etch a 0.25 mm all the way through the thickness (this time is reduced to half of less if the solution is preheated). We don´t want that in our example. Our objective is to produce a relief detail, only. You can check the depth of the etching with a toothpick, but take care to not scratch the protected areas. It is also a good practice to agitate the workpiece (slowly) to speed the etching (watch the spills).
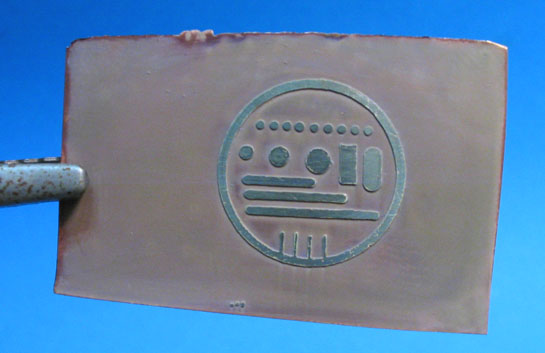
Once you are satisfied with the depth, remove the workpiece and rinse it in water to stop the etching. The protective layer of Future now can be removed with acetone or lacquer thinner. This job is finished.
Another approach
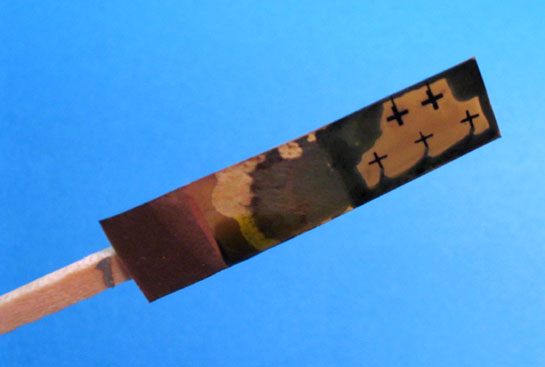
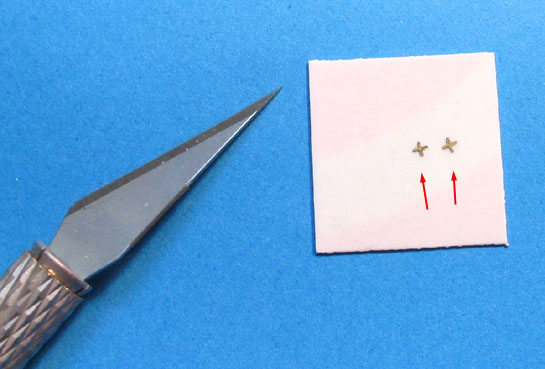
I know not many of us are talented for drafting. As another example, let´s try a different approach. This variation of the method avoid the drafting part. We will use dry transfers as our protective layer. The method is particularly attractive to etch bezels, handles, plates and other small details. In the case, I need to etch a couple of cross-shaped handles for my current Me-262 project. Fortunately, I found an old Letraset font whose plus sign was exactly the shape and size needed. So I burnished some of them on a small piece of brass, prepared and cleaned as before.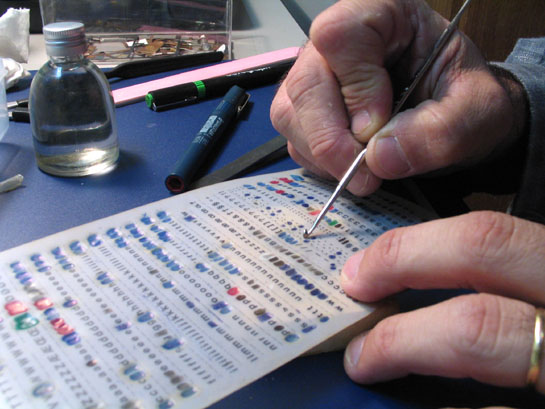
Be careful during the application of the dry-transfers. If there are any air bubbles, the acid will enter there and ruin the work. Once transferred to the sheet, I made the attachment arms using the 0.2 mm pen with tinted Future. I also painted some areas around to minimize the etching where it wasn´t needed. However, in this case we want to etch from one side to the other of the brass to detach the part from the fret when done.
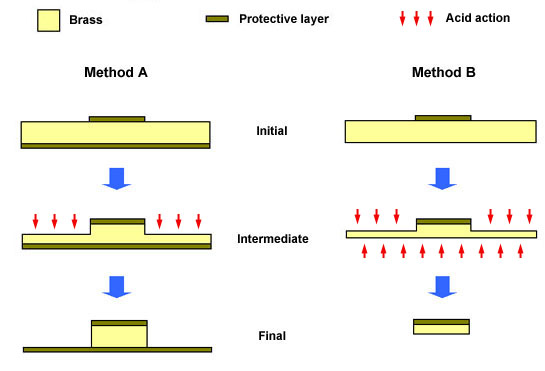
One possibility is to leave the back side of the brass without protection. Then the acid will act upon the rear of the plate as well as the unprotected areas of the front at about the same rate. This means that you will end up with a fret of half of the original thickness (method B). Since I´m using a thin sheet, I simply brushed a good hand of Future on the back side to etch the part from the front side, only (method A). This will preserve the original thickness.
Once satisfied with your artwork, start etching just like in the other example.
Check your work carefully. In the end, you will start to see holes in your workpiece, indicating that the thickness has been almost entirely corroded. Dip it again checking more frequently until there is no more areas to be etched.
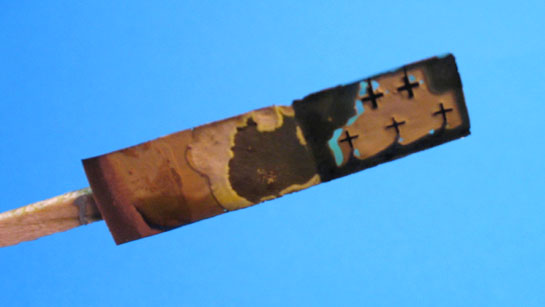
I then dipped the fret in acetone to remove all the dry Future. Well, this wasn´t the best example, but you got it. Here´s the result:
Future or dry transfers are weak products against acid solutions, particularly the later. So, it is interesting to keep the process as fast as possible. Sometimes it is better to use a thin sheet, etch, and thicken the part later with white glue. Besides, you must remember that the protective layer is preventing the acid action on the top of the sheet, but not on the ridge formed as the process evolve. In this case, the acid will progressively remove small amounts of our protective coat, making difficult to achieve perfectly straight boundaries.
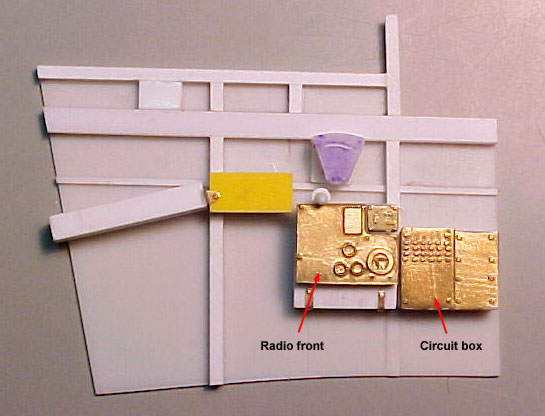
Of course, we can mix both approaches: draw the basic shapes and use dry transfers for more complicated things. The picture below shows a P-40B radio front I made a long time ago (one of my first PE projects). The bezels are small circles dry transferred, while the rivets on the right side of the circuit box are punctuation marks.
Another possibility is to etch the shape of the part in a first pass (in the case of parts too complex to cut) and then etch the raised details on it.
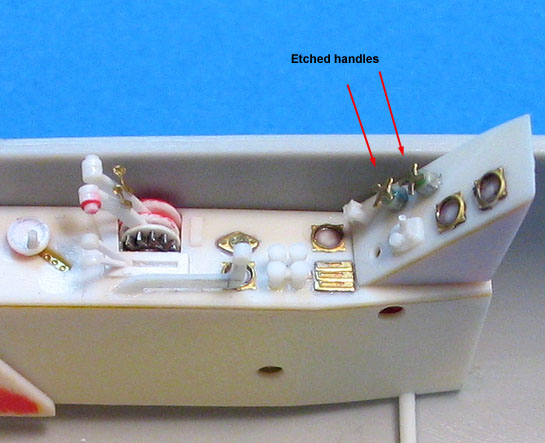
Sidewall of a 1/32 P-40B cockpit showing home-made etched parts.
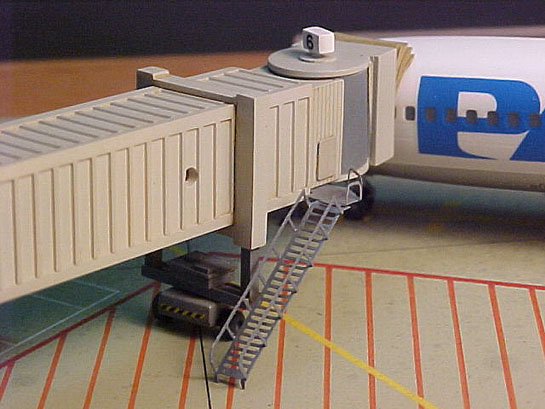
This maintenance stairs was etched and bent to shape. It is installed in a passenger finger of my Boeing 727 diorama in 1/280 scale.
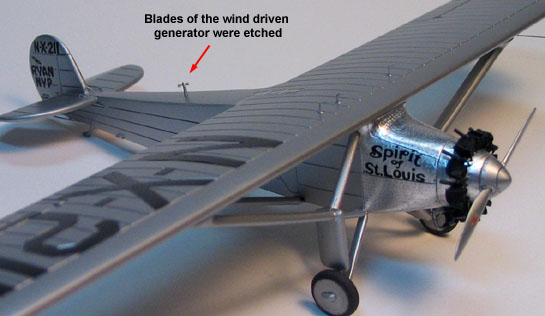
The method is fast and effective for simple and small parts like these. It is a Ryan NYP in 1/72.
The approach described here is probably the simplest possible variation of the photoetching technique. I like to make inner details of landing gear doors or cockpit walls in 1/72 with it. In 1/32 or larger scales, the possibilities are uncountable.
Over the years, I met a number of modelers who developed very complex apparatus for photoetching at home, with quality similar to many commercial products. I know from experience that after making your first parts with this method, you will want more. But then we have to enter in the real photoetching arena. Subject for another article.
The rule of thumb here is: not everything can be photoetched (or simply etched...) and result in a convincing detail part. But if it can be done, you probably won´t do better in plastic.
I hope this article will help you on your next project.
Rato Marczak © 2007
