| Making control panels and placards from aircraft manuals |
I
am sure every serious modeler who wants to pursuit high accuracy to
his/her models ends up adding resin bits and/or photoetched parts of
some sort, and possibly going even as further as rescribing panel
lines and adding rivets. These things burn us out to the point that
many times we just want our next model to be 'as OOB as it can
be'. You know the feeling: decompress, take my breath, clean up my mind for the next arduous project.
To be fair, few things in modeling can beat the sensation of finishing a quick & fun project, without worrying about the accuracy of every scale inch in the model. And it is a good feeling. But old habits die hard, and no matter how good your kit is, you probably will want to add a couple of bits to the cockpit, you know, just to make it look busier. In such cases, nobody wants to make a comprehensive research on the real aircraft. I for one will probably look a few pics from the internet, make the cockpit or the wheel wells a bit better than the kit parts, and close the fuselage. The point is to do something fast, maybe the better part of an hour, or we will find ourselves back in the trap. Personally, this kind of project educational: we all can leave with no spot-on-all-knobs-and-handles-dead-accurate-cockpit. The whole thing is to be fun and pleasantly finish something to put in our display shelf. And you know what? Model kits these days are so impressive that you don't need to hyper detail anything if you don't want to.
Well, this is not really new. Surely François Verlinden knew this back then with his 'gizmology' - the art of adding fake details to confuse the eyes of the viewer... I love it. If you are purist, you most probably are thinking: "Oh, but they are fake...".
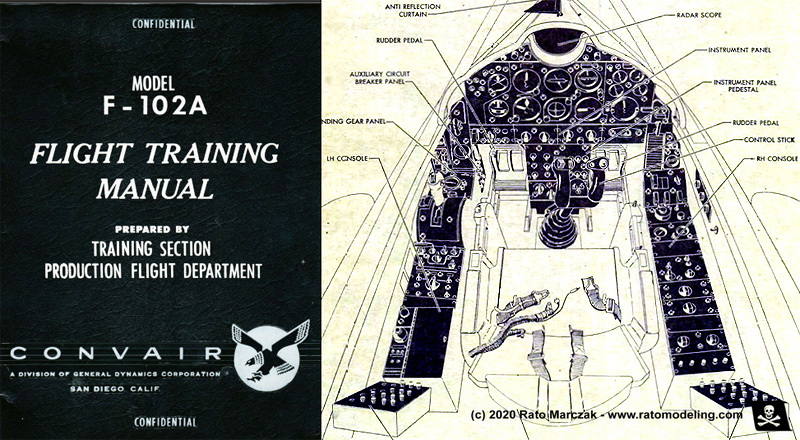
That is where this short article hopefully will contribute. Recently, I started Meng's F-102 (case X) Delta Dagger in 1/72 scale. A very good kit wih deep wheel wells and a detailed weapons bay. The cockpit, however, has a control panel in the form of a decal, but nothing else. It wouldn't bankrupt Meng if they have included a pair of decals to simulate the side panels of the cockpit. How could I add reasonably accurate side consoles without taking too long (remember, this is a quick & fun project)?
The idea couldn't be simpler. Use the drawings from the own aircraft manuals. These manuals usually bring diagrams of instruments in the cockpit for the pilot's reference, but they are generally drawn in perspective. Take a look at my case:
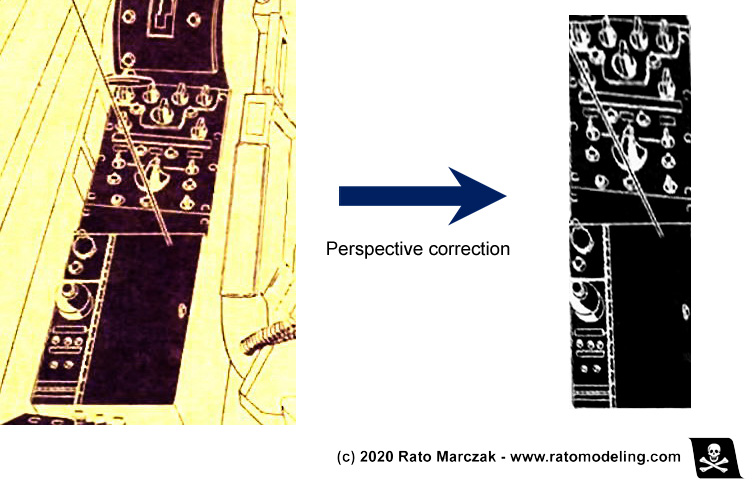
My idea was co used this drawing to make decals simulating the side consoles absent in the kit. Most photo editors these days have a tool called perspective correction. Using ACDSee Photo Studio I did exactly that - transformed the perspective drawing in rectangular consoles. You know you did it right when the ellipse instruments become more or less circular in the corrected drawing:

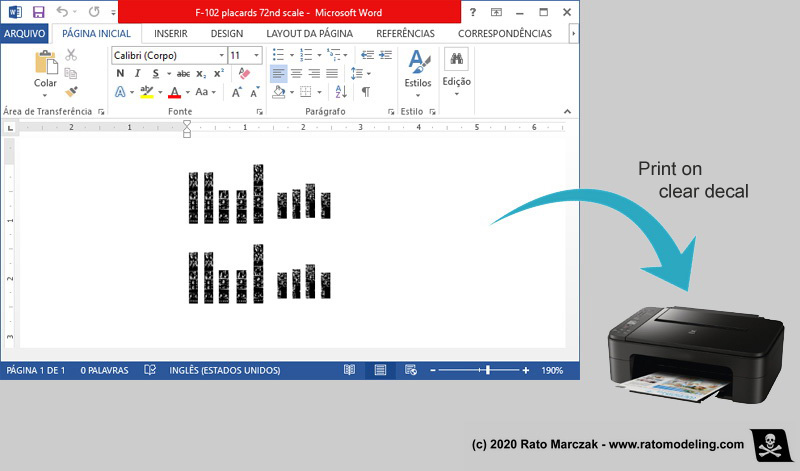
Next step: measure the console dimensions in the kit. You may need to make corrections to the above images, cropping here and there. I then printed then on a piece of clear decal using a common laser printer, plus a few extras:
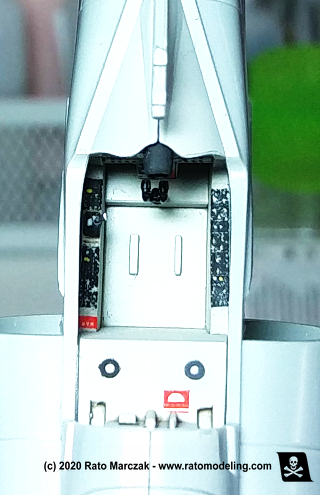
The decals were cut and applied as a usual decal. The kit consoles have some relief detail, so I used a decal softening solution, but it only brought complexity to the instruments. Once dry, I protected the decals with a coat of clear varnish and added a couple of red or yellow buttons here and there.
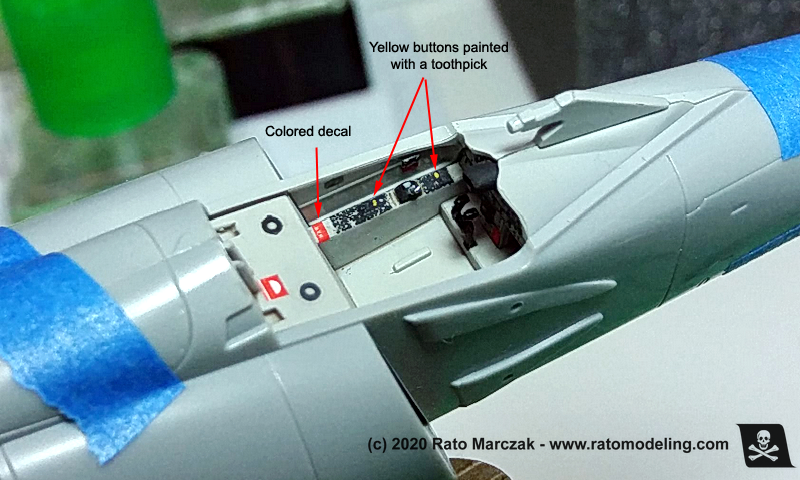
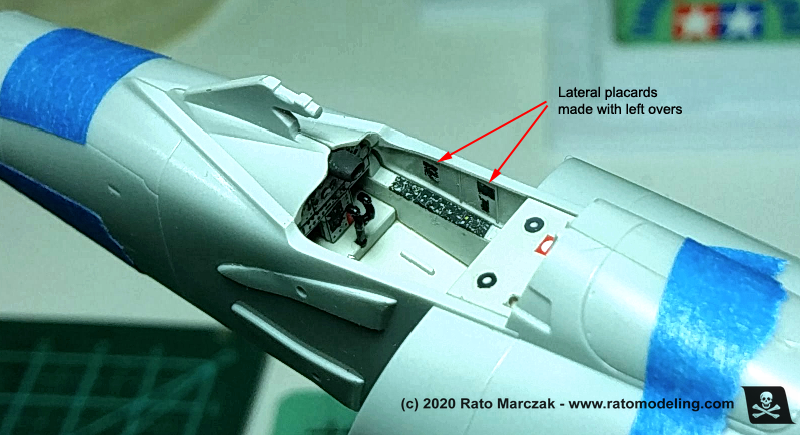
I also added a few of the extra decals to the sides so simulate placards. I found the effect quite convincing, particularly for a model that will have its canopy closed. The funny thing is: nobody can say t is wrong. In fact, it could not be more correct, considering it came from the manual of this very same aircraft...
And the best of all: the whole process it took me 40 minutes!
And there you have it. A simple, quick, and effective method to decorate cockpits with guaranteed accuracy.
Evidently, this technique works well for small scales, maybe up to 1/48. For larger scales, things become too big and three-dimensional to fool the viewer's eyes so easily.
I hope you find this article useful in your next project.
Rato
Marczak
© 2020To be fair, few things in modeling can beat the sensation of finishing a quick & fun project, without worrying about the accuracy of every scale inch in the model. And it is a good feeling. But old habits die hard, and no matter how good your kit is, you probably will want to add a couple of bits to the cockpit, you know, just to make it look busier. In such cases, nobody wants to make a comprehensive research on the real aircraft. I for one will probably look a few pics from the internet, make the cockpit or the wheel wells a bit better than the kit parts, and close the fuselage. The point is to do something fast, maybe the better part of an hour, or we will find ourselves back in the trap. Personally, this kind of project educational: we all can leave with no spot-on-all-knobs-and-handles-dead-accurate-cockpit. The whole thing is to be fun and pleasantly finish something to put in our display shelf. And you know what? Model kits these days are so impressive that you don't need to hyper detail anything if you don't want to.
Well, this is not really new. Surely François Verlinden knew this back then with his 'gizmology' - the art of adding fake details to confuse the eyes of the viewer... I love it. If you are purist, you most probably are thinking: "Oh, but they are fake...".
That is where this short article hopefully will contribute. Recently, I started Meng's F-102 (case X) Delta Dagger in 1/72 scale. A very good kit wih deep wheel wells and a detailed weapons bay. The cockpit, however, has a control panel in the form of a decal, but nothing else. It wouldn't bankrupt Meng if they have included a pair of decals to simulate the side panels of the cockpit. How could I add reasonably accurate side consoles without taking too long (remember, this is a quick & fun project)?
The idea couldn't be simpler. Use the drawings from the own aircraft manuals. These manuals usually bring diagrams of instruments in the cockpit for the pilot's reference, but they are generally drawn in perspective. Take a look at my case:
My idea was co used this drawing to make decals simulating the side consoles absent in the kit. Most photo editors these days have a tool called perspective correction. Using ACDSee Photo Studio I did exactly that - transformed the perspective drawing in rectangular consoles. You know you did it right when the ellipse instruments become more or less circular in the corrected drawing:
Next step: measure the console dimensions in the kit. You may need to make corrections to the above images, cropping here and there. I then printed then on a piece of clear decal using a common laser printer, plus a few extras:
The decals were cut and applied as a usual decal. The kit consoles have some relief detail, so I used a decal softening solution, but it only brought complexity to the instruments. Once dry, I protected the decals with a coat of clear varnish and added a couple of red or yellow buttons here and there.
I also added a few of the extra decals to the sides so simulate placards. I found the effect quite convincing, particularly for a model that will have its canopy closed. The funny thing is: nobody can say t is wrong. In fact, it could not be more correct, considering it came from the manual of this very same aircraft...
And the best of all: the whole process it took me 40 minutes!
And there you have it. A simple, quick, and effective method to decorate cockpits with guaranteed accuracy.
Evidently, this technique works well for small scales, maybe up to 1/48. For larger scales, things become too big and three-dimensional to fool the viewer's eyes so easily.
I hope you find this article useful in your next project.
