| Riveting Scale
Models - Part 1: Tools |
Introduction
Well, there has been a lot of ado lately about riveting. Riveting approaches are in the arsenal of scratchbuilders´ techniques for years. For some reason, the subject reappeared again. It is up to you whether rivet lines must be reproduced in your model or not. It is not difficult, but boring... very boring. However, if correctly accomplished, rivets will add a lot to the final aspect of an aircraft model.I´ve been receiving many e-mails inquiring where to buy this or that tool. There are a number of commercial tools available, but you don´t have to pay an arm for this sort of thing. That´s what I´ll try to show in this article. The text is focused on the tools. Another article focusing on the techniques will be addressed in the future.
Recessed rivets
This is obviously the easiest type of riveting technique. In actual aircraft, there´s no such type of rivets: they are of the buttonhead (raised, round) type (like those in a Grumman F4F or a Douglas SBD) or flushed type (Vought F4U, North American P-51...). Countersunk rivets are good representations of the later type. Many modelers use this technique regardless the rivet type, simply because it is easier to produce a small hole on the plastic surface than the contrary. Whatever is the case, the idea here is to produce an illusion of the real rivets. After a judicious wash, they will be highlighted, leaving the desired impression. In the case of fasteners and large screws, the recessed type is the obvious choice in most cases.There are a number of tools that can be used to produce recessed rivets. Depending on the area of the model, you have to make one by one. In other cases, you can speed the process up by making entire lines of rivets at once.
Making rivets one by one
The picture below shows some of the tools that I generally use to produce individual rivets and fasteners.
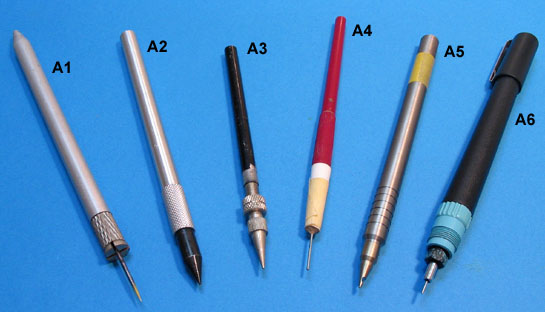
Here´s a short description of each one:
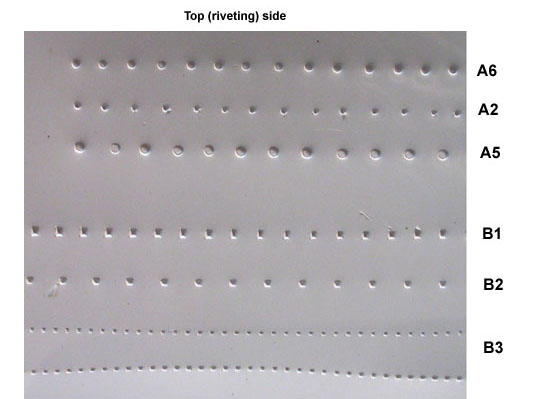
A1. Simply a compass needle mounded in a hobby knife handle. Pretty much like the tool used to rescribe your models. You don´t need to use a compass needle, but its metal has the advantage of being heat treated, and so it will last long enough. Of course, you can sharpen its end with an abrasive stone whenever necessary.
A2. This is a home-made riveter. I found some of these conical heads some time ago. They are made in high grade steel and its point seems to last forever. I simply mounted in an old handle.
A3.
This my home-made embosser. I use it primarily for embossing
plastic and brass sheets, but it can be used to produce nicely
countersunk "dots".
A4. Another
home-made riveting device (should I call it beading tool?). I´ve been reading a lot
about people spending money with commercial
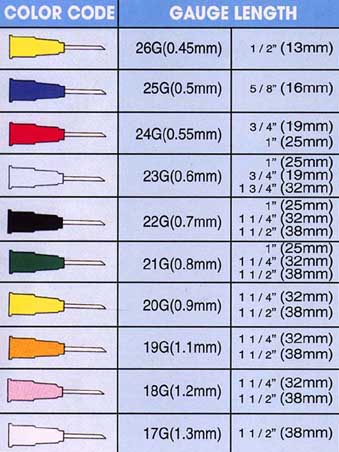
riveters (including me!). You can make your own using syringe
needles. Wait, this may be new for you: the secret is inside the
needle. Let me explain: Most folks cut the point of the needle and
bevel its edge to produce a sharp circular engraving tool. It is
difficult to achieve a perfectly beveled end in this way. Here´s
how I do:
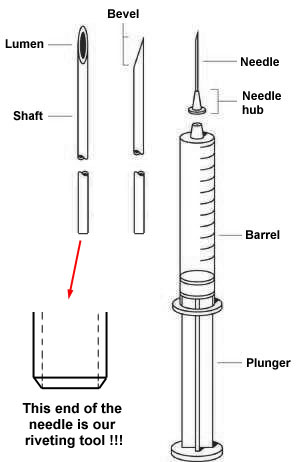
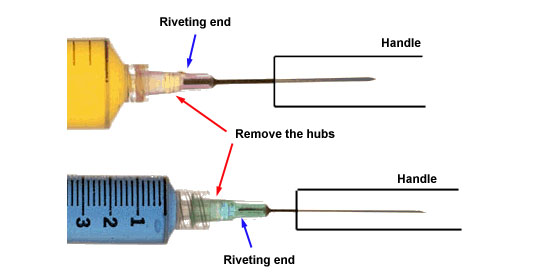
c.) Now, using a pair of pliers to
hold the shaft, remove the plastic hub on the rear part of the shaft with a knife. This will expose the beveled end
of the shaft - our riveting tool.
A5. This is the commercial Hasegawa rivet embosser, recently reviewed here.
A6.
This is something I discovered by accident. Mechanical ink pens are
excellent rivet embossers. It is just a matter of pressing it on the
plastic surface, and it will leave a nicely done circular depression.
Their ends are made of high strength alloy, because it must resist to
the abrasion against drafting papers. Another good news: a typical set
of these pens will range from 0.3 to 2.0 mm, so you are plenty of
options to fit your needs.
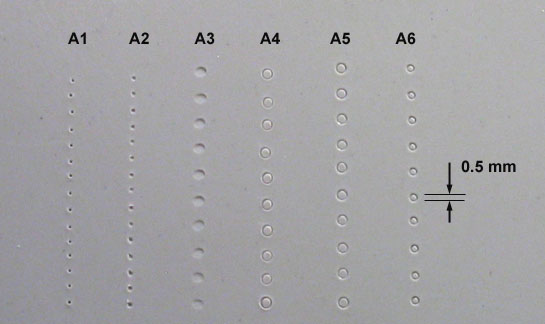
As you can see, different tools produce different results (what did you expect?). A few words about the sheet shown above. First, sharply pointed tools make small perforations on the plastic surface. The more sharp is the needle (tool A1), more deep is the hole and more plastic is forced upward (outside) the surface (more sanding, then). Note that the tool A2 have a more round tip, producing a larger and shallow hole (kinda Trumpeter rivet). The embosser (A3) produced a very interesting effect: the whole rivet is countersunk, not only its edge. In my opinion this is more correct for a flushed rivet than other tools. The tools A4 and A5 produced very similar results, but by opting for the A4 you probably will save money for another 1/32 model. The A6 tool (so to speak), here in its 0.5 mm version, is able to do the same job of A4 and A5, although you don´t have to ´manufacture´ the tool yourself - it is ready for use. You have the option of making a set of A4 or A6 tools of different diameters for your personal use.
Making rivet lines
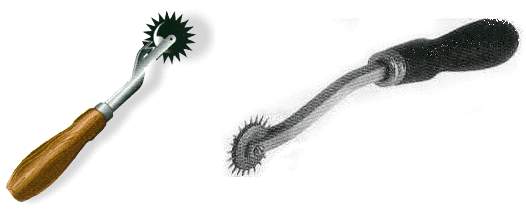
Although there are modelers crazy enough to cover an entire model with individually made rivets, most of you will prefer to speed the process up as much as possible. The most common solution are the so called pounce wheels. A number of variations is possible, as shown below.

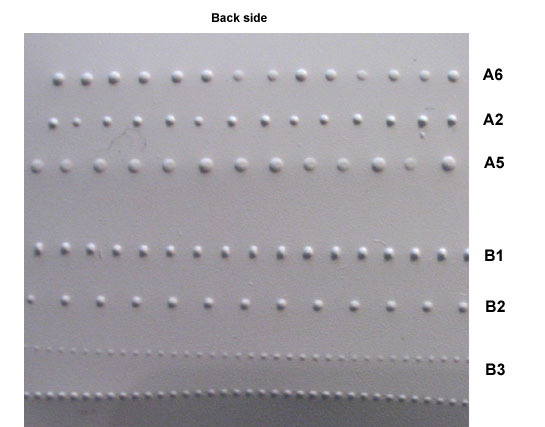
B1 & B2. These are examples of commercial "pounce wheels". The correct term is "pattern tracer", and they are widely used in the sewing industry to transfer drawings to woven fabrics. The B1 type depict a very popular model traded by MicroMark which is also used by RC modelers to transfer drawings to balsa wood sheets. Type B2 illustrates a typical dressmaker type. Both (B1 and B2) types have been heavily criticized by many modelers. I´ll try to explain the reason in a moment, but let me warn you that these are the ´ordinary types´ of pattern tracers. There are more expensive types called "needle point pattern tracers" that will perform much better. The bad news about this sort of tool is the lack of availability for different wheels (different pitch). However, let me add that pattern tracers are excellent tool to emboss rivets on pre-cut skin sections to be glued around fuselages and wings. In this case, the back side of the plastic sheet will show raised (buttonhead) rivets.
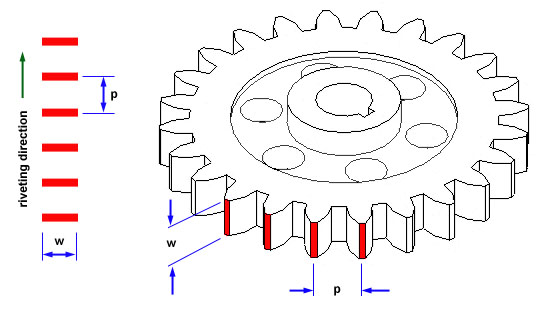
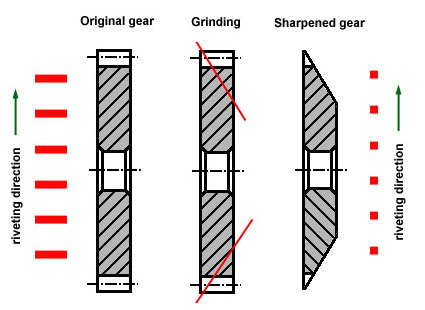
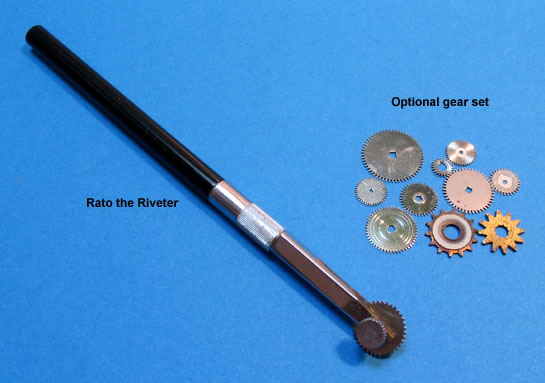
B3. This my own "Rosie the Riveter". I made it long before Petr Dousek started to sell his one. It is made out of watch and clock gears mounted on a handle. Contrary to Dousek´s riveter, mine allow interchangeable gears. Let me try to explain how to make yours at home.

B4. Armor modelers will claim this is a ´Zimmerit´ applicator. Nope. This is simply a tool made out of those saws that come with office tape holders. Their tooth are already very sharp and you can sharpen them even more with a file if necessary. The basic procedure is simply to press the saw along the rivet line. Try to distribute the pressure equally on the tooth.
And here´s a very basic test: I made a single line using each of the tools in hand. Let´s see the result:
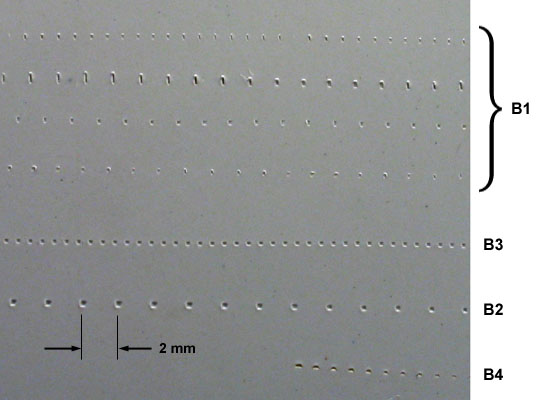
As you can see, of the four MicroMark pounce wheels, two are virtually unusable. They have the aforementioned gear width problem. Of course, they can be sharpened with the aid of a grinding stone or files. The dressmaker pattern transfer (B2) produced very convincing rivets. As I said before, finding the desired pitch may be a problem in this case. My home-made riveter (B3) is one of my favorites, resulting in very clean rivet lines that virtually dismiss sanding. The B4 tool has a limited use, but it is very handy for engraving rivet lines on landing gear doors and other small parts.
Personally, I´m always gathering new gears for my riveter. It works like a charm. I compared my version with Dousek´s "Rosie the Riveter". As you can see, this simple home-made tool holds its own very well. Besides, I saved around 40 bucks...

Raised rivets
Well, here´s something that has been bugging me for a while. I have read everything, even insane suggestions like applying fine sand (or cat litter) grains individually over a layer of wet glue. Some folks claim that a recessed rivet will fake a raised one ´perfectly´... I don´t think so. Let alone if you are interested in replacing molded on rivet lines partially sanded off during the assembly. Some others (psyco-)modelers are using miniature punched disks. We need something faster.Some time ago Archer Fine Transfers used to produce dry-transfers for rivets. It was kinda line of tiny, thick dry transfer dots that, once applied to the model and painted, looked like realistic buttonhead rivets. This line is discontinued now... Unfortunately, because I believe that was the perfect solution. I know a couple of folks experimenting with regular dry-transfers and silk-screened rivets. The later seems very promising, but I don´t have a positive answer so far. Besides, this is supposed to be fun, right?
Now if you are a scratchbuilder, most tools described here can be used to rivet pre-cut skin sections. Once riveted, these styrene skins are glued atop core fuselage and wings. The only difference is that the raised rivet will appear on the back side or the skin. Let´s see some examples below. I used a piece of 0.25 mm thick PVC sheet:
Note
that, when individually done, it´s
tuff to keep the pressure constant. Skinning an entire aircraft model
is
not for everyone... Few things in the modeling world can be more
frustating. On the other hand, the technique is a nice way to enhance
added-on access
panels, armor plating, fairings etc...
Well,
that´s it for now guys.
The objective of this article was to introduce you to some
possibilities
concerning riveting plastic models. Of course there are other
options/variations
of the tools presented here. How and where to use these tools is, as I
said
before, subject of another article.
And
remember: nothing can beat a creative
modeler approaching a given task with careful planning. We hope this
note
will help you on your next project.
Rato Marczak © 2007
