| Simulating tarmac seams |
Here
is another tip that you may find useful for your next diorama or
display base. It is a simple method to simulate tarmac seams in roads
and airstrips. I have been using scribed lines to simulate joints between concrete blocks of runways
for a long time. If the lines are scribed in a not so neat way,
after a wash with black paint the method look fairly realistic.
However, I've been looking for a method to reproduce those tar filled
joints and cracks so common in photos of runways and roads:
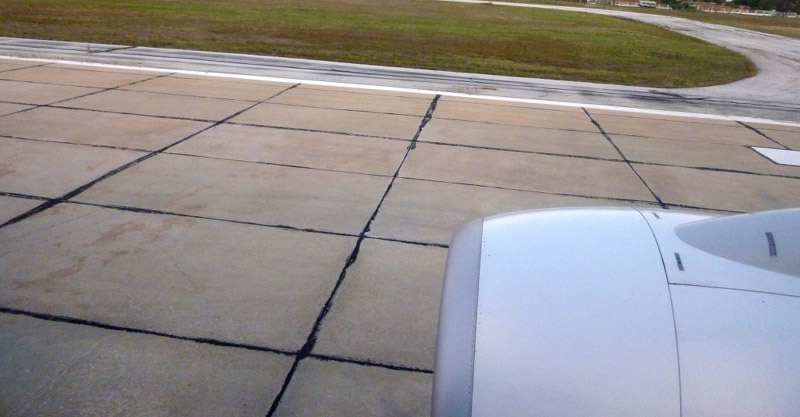
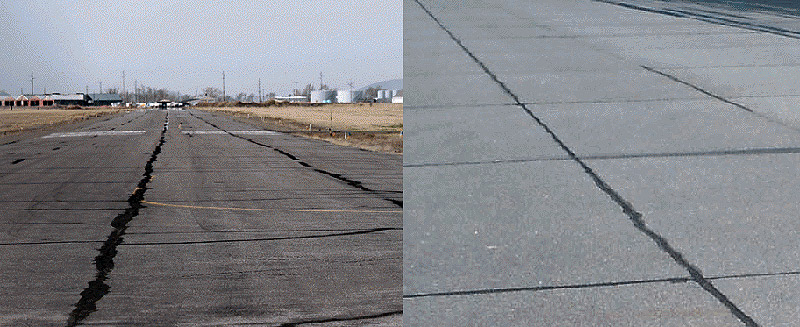
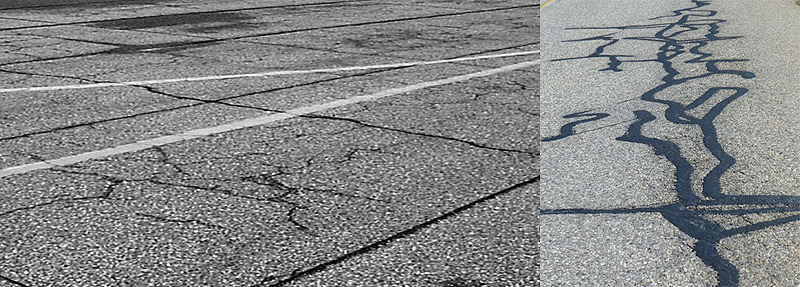
These joints are not a cosmetic measure, mind you. The joints are necessary to allow expansion of the blocks without cracking and a smooth rolling of the aircraft. If not filled, they are prone to cracking of the edges, water infiltration and dirt accumulation, all serious violations of aviation rules. That is why they must be filled with a flexible material. Tar is the most common and cheap option, but some types of rubber and other specific products are also used.

Under constant use, heavy loads and temperature variation, these seams deform heavily, what explains their ragged aspect tha we see not only at airports, but also along paved roads. If you look closely, these seams are actually a small bump, with the filler more spread in some places than in others. My goal was to simulate tar seams in a vignette which would represent the dispersion area of a small airport. I thought about a concrete pavement covered with asphalt that I used to see at my local airport when I was younger:
The method itself is so simple that you probably will get a good result already on your first try. It has been in my mind for quite a while, but only now I find a good excuse to test it.
Let me explain the basics first, and then I'll show you my results. You will need very simple tools: a syringe, some artists paint and a cylindrical object. It starts by filling the syringe with artists oils or acrylic paint - the type that comes in tubes. I used both in my project, and found out that the oils work a bit better. More on that later.
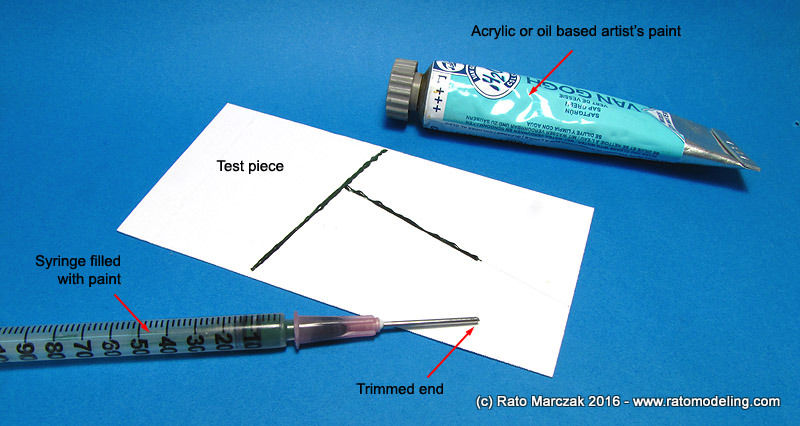
With the runway lines drawn or scribed on your base (I use a piece of plastic or cardboard), follow the lines with the syringe needle while you press the plunger, dispensing a string of paint as you go. Before we continue, pay attention on a few things:
(a) Cut off the beveled end of the needle with an abrasive disk. Not only it is safer, but in this way the needle will run more easily along the surface and you will have more control over the paint flow.
(b) The needle diameter will depend on the width of the seam, and so the scale you are working with. I found out that needles 23G to 26G work fine for 1/72 or 1/48 scales (see a needle reference table here).
(c) Avoid paints too thin or too dry. It is important that the paint don't level out, but yet flows easily from the needle. Think about the consistency of a toothpast. Good oils can be used straight from the tube.
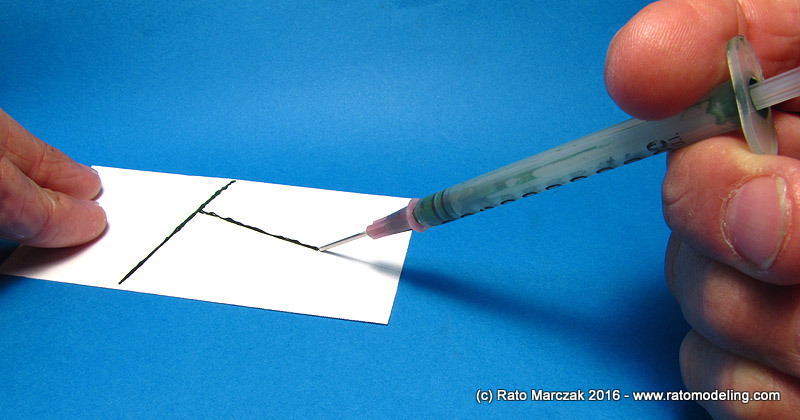
(d) The seam lines don't need to be perfectly straight. It depends on what you want, an edge or a repaired crack. If you don't have a scribed line, it is a good idea to use a stepped ruller.
(e) Don't bother with the small blobs of paint. It is virtually impossible to avoid them, and they will add realism to the seam later.
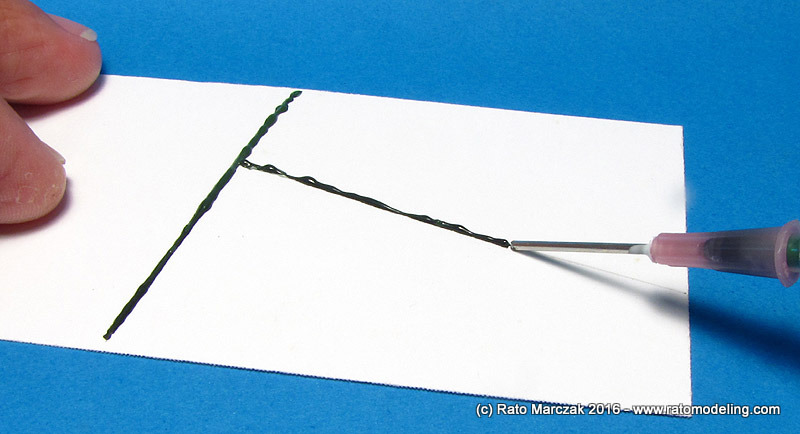
After taking care of all the seams and cracks, put your base aside and let it dry at room temperature for 24 hours. Do not use a hair dryer.
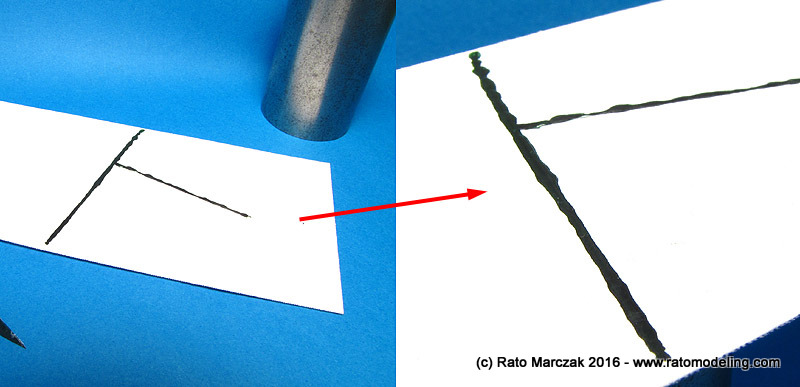
The next step is to flatten the paint strings down. I use a heavy duty steel tube rolled longitudinally over each line. The amount of pressure necessary will depend on how hard the paint is. In my experience, 24 hours is enough to continue if oils are used, but keep in mind that acrylics may require less time. As always, make some tests before trying in your definitive base.
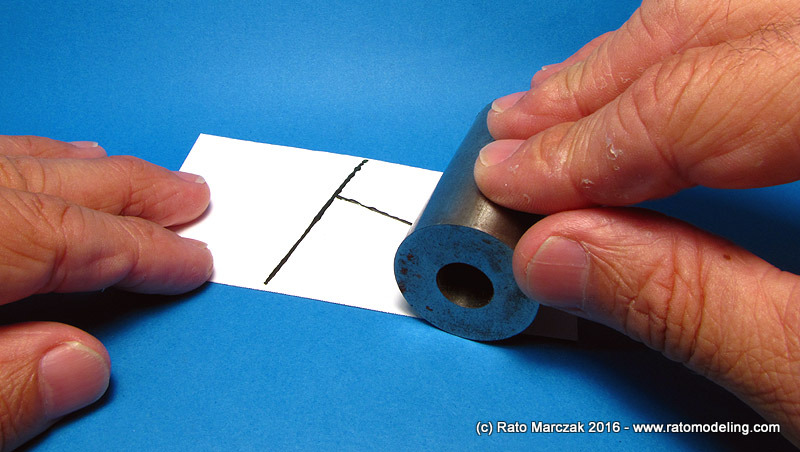
The objective here is to transform the strings of paint in the flattened seams that we see in the real thing. That is why the lines don't need to be perfectly straight, and also why the blobs of paint are useful: when flattened by the cylinder, the unavoidable blobs of paint becomes wider tar patches, producing the jagged aspect and adding randomness to the seam:
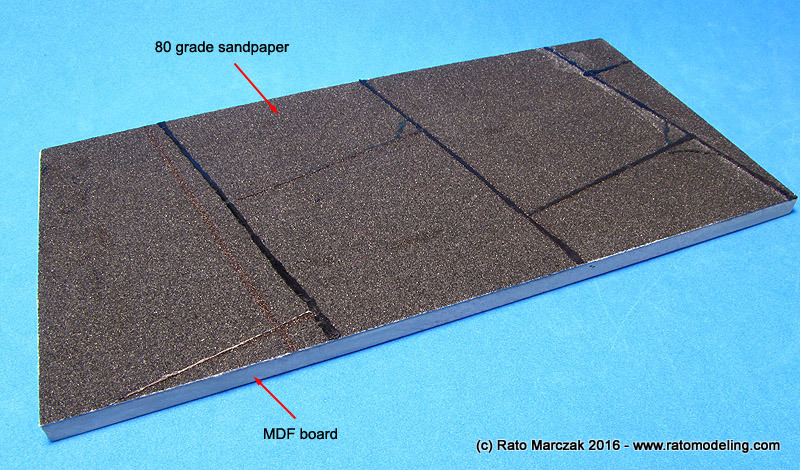
Now that you got the idea, let me show you a real application of the technique. As I said, my display base would depict a paved small aircraft parking area. The scale is 1/72, and I opted for using a piece of 80 grade sandpaper to simulate the asphalt, which was glued to a MDF board. After drawing the seam lines on the sandpaper, I followed the steps described above. I also included a few cracks on the corners of selected blocks:
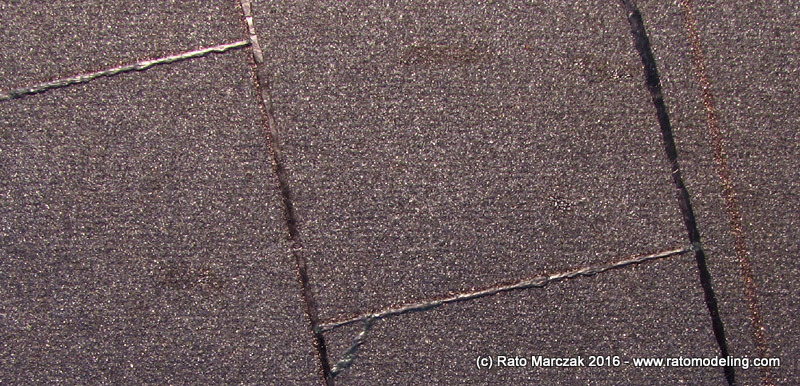
At this point the result was checked. I had to press more the seams on a few spots. Once satisfied with the overall aspect, I left the base drying for further 24 hours:

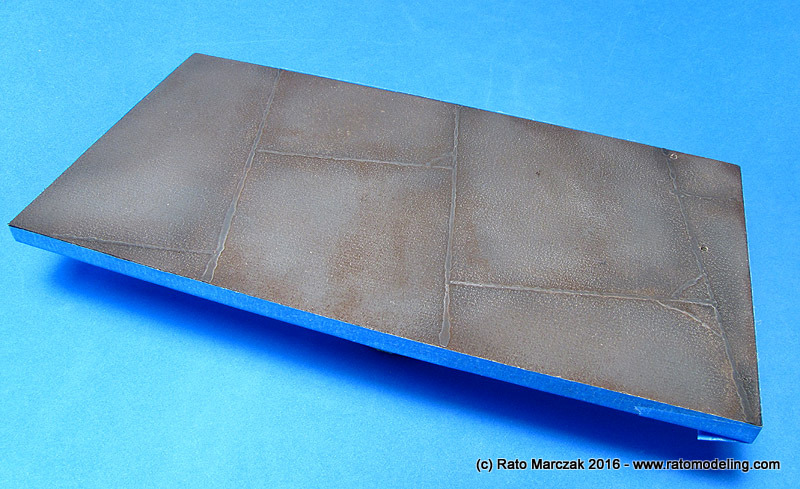
In the next day I primed the base with a spray can followed by an overall coat of dark grey color. Then I added highlights with a lighter shade of gray, mainly on the center of the blocks, followed by a liberal wash of dark brown oils applied over the whole base. It naturally concentrated along the seams. Once everything was dry, a flat clear was airbrushed to remove shiny spots. Lastly, a large flat brush was used to drybrush medium grey in order to highlight the texture of the pavement:
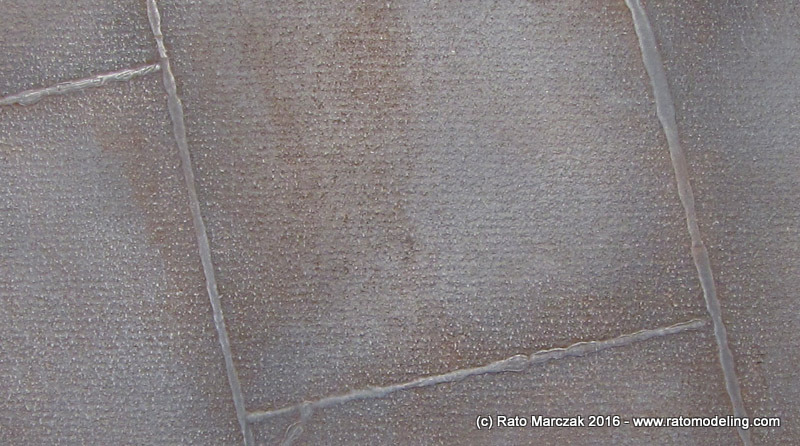
Unfortunately, the drybrush also highlighted the edges of the seams, but it would be impossible to avoid it:
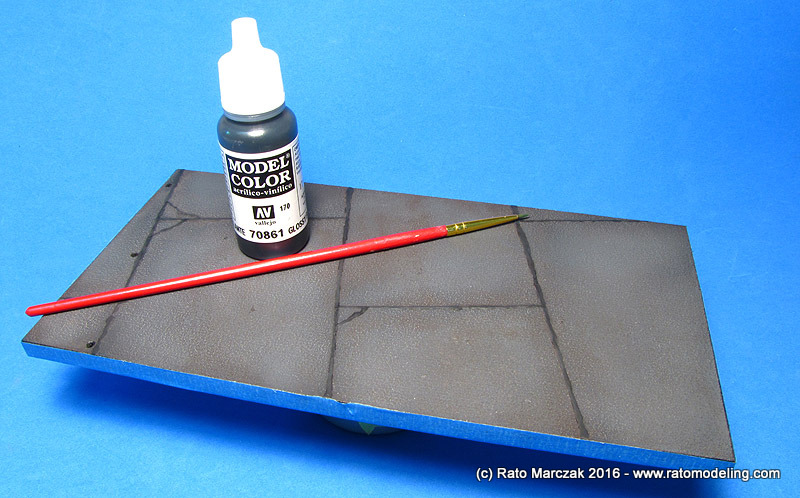
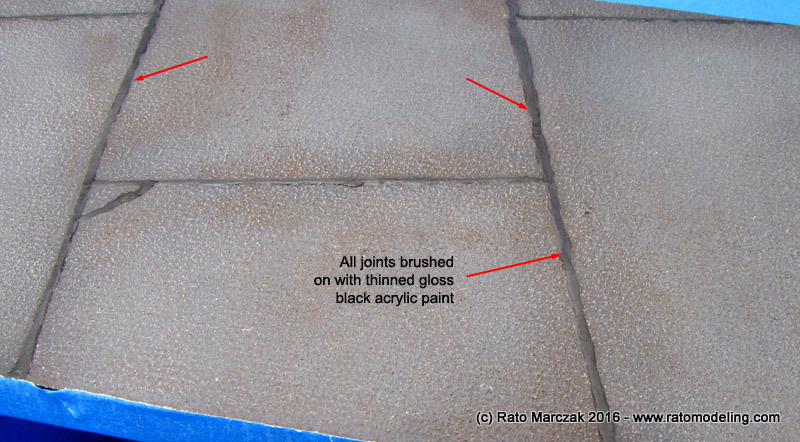
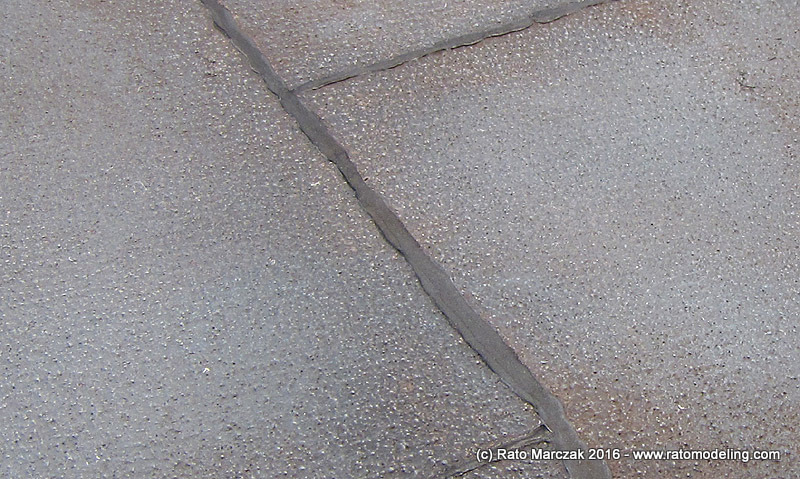
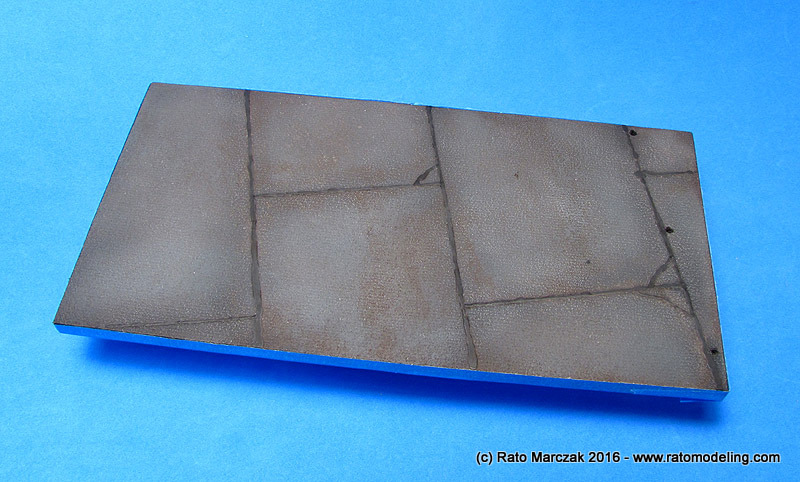
The solution was to brush on a thin glossy black acrylic along the seams. Not only it corrected the side effect, but also increased the contrast of the seams to the pavement, exactly as I wanted:
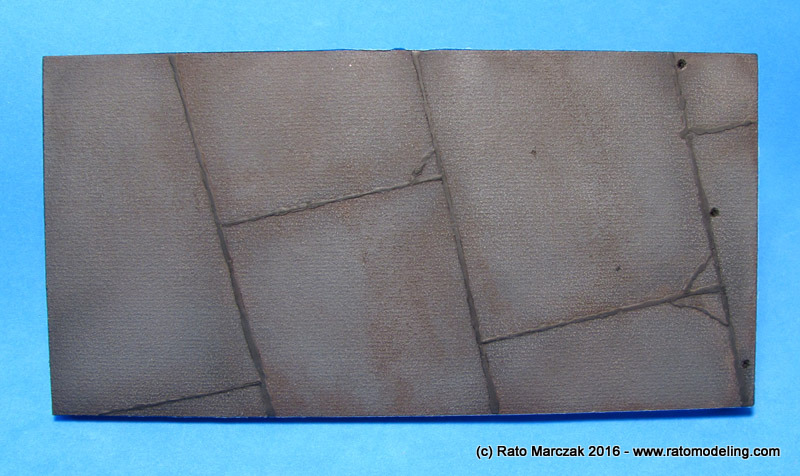
Here is the result (the holes were drilled to install my rendition of galvanized fence poles later):
So, there you have it. Not perfect, but the technique is so simple that deserves a try during your next diorama.
I hope you find this article useful in your next project.
Rato
Marczak
© 2016These joints are not a cosmetic measure, mind you. The joints are necessary to allow expansion of the blocks without cracking and a smooth rolling of the aircraft. If not filled, they are prone to cracking of the edges, water infiltration and dirt accumulation, all serious violations of aviation rules. That is why they must be filled with a flexible material. Tar is the most common and cheap option, but some types of rubber and other specific products are also used.
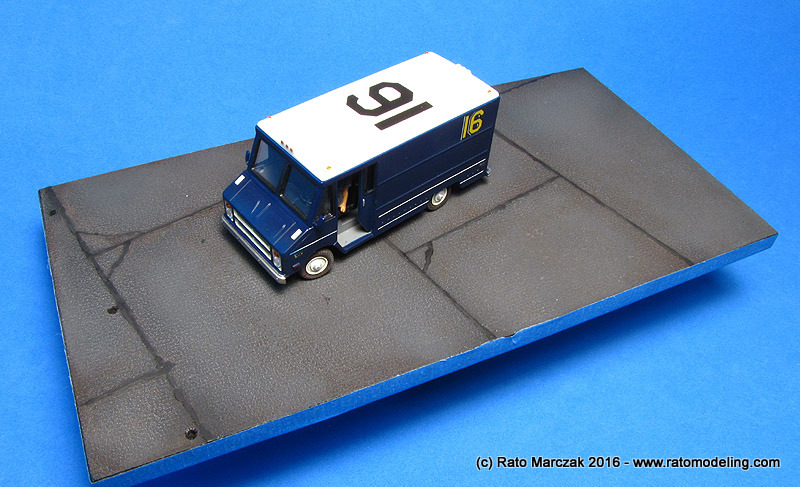
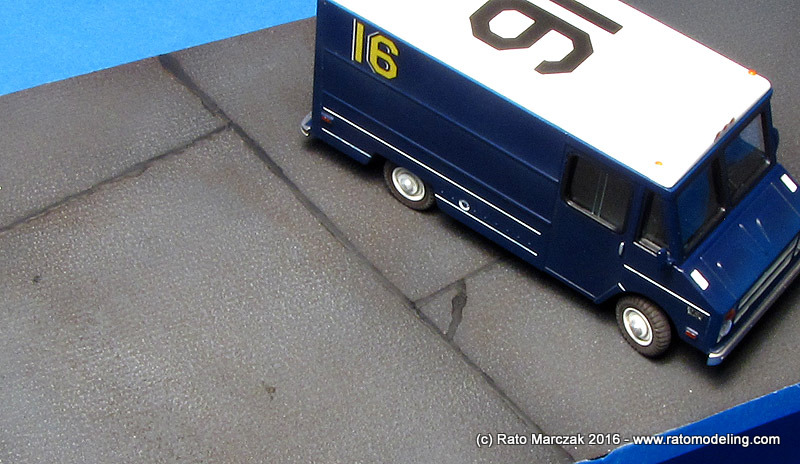
Under constant use, heavy loads and temperature variation, these seams deform heavily, what explains their ragged aspect tha we see not only at airports, but also along paved roads. If you look closely, these seams are actually a small bump, with the filler more spread in some places than in others. My goal was to simulate tar seams in a vignette which would represent the dispersion area of a small airport. I thought about a concrete pavement covered with asphalt that I used to see at my local airport when I was younger:
The method itself is so simple that you probably will get a good result already on your first try. It has been in my mind for quite a while, but only now I find a good excuse to test it.
Let me explain the basics first, and then I'll show you my results. You will need very simple tools: a syringe, some artists paint and a cylindrical object. It starts by filling the syringe with artists oils or acrylic paint - the type that comes in tubes. I used both in my project, and found out that the oils work a bit better. More on that later.
With the runway lines drawn or scribed on your base (I use a piece of plastic or cardboard), follow the lines with the syringe needle while you press the plunger, dispensing a string of paint as you go. Before we continue, pay attention on a few things:
(a) Cut off the beveled end of the needle with an abrasive disk. Not only it is safer, but in this way the needle will run more easily along the surface and you will have more control over the paint flow.
(b) The needle diameter will depend on the width of the seam, and so the scale you are working with. I found out that needles 23G to 26G work fine for 1/72 or 1/48 scales (see a needle reference table here).
(c) Avoid paints too thin or too dry. It is important that the paint don't level out, but yet flows easily from the needle. Think about the consistency of a toothpast. Good oils can be used straight from the tube.
(d) The seam lines don't need to be perfectly straight. It depends on what you want, an edge or a repaired crack. If you don't have a scribed line, it is a good idea to use a stepped ruller.
(e) Don't bother with the small blobs of paint. It is virtually impossible to avoid them, and they will add realism to the seam later.
After taking care of all the seams and cracks, put your base aside and let it dry at room temperature for 24 hours. Do not use a hair dryer.
The next step is to flatten the paint strings down. I use a heavy duty steel tube rolled longitudinally over each line. The amount of pressure necessary will depend on how hard the paint is. In my experience, 24 hours is enough to continue if oils are used, but keep in mind that acrylics may require less time. As always, make some tests before trying in your definitive base.
The objective here is to transform the strings of paint in the flattened seams that we see in the real thing. That is why the lines don't need to be perfectly straight, and also why the blobs of paint are useful: when flattened by the cylinder, the unavoidable blobs of paint becomes wider tar patches, producing the jagged aspect and adding randomness to the seam:
Now that you got the idea, let me show you a real application of the technique. As I said, my display base would depict a paved small aircraft parking area. The scale is 1/72, and I opted for using a piece of 80 grade sandpaper to simulate the asphalt, which was glued to a MDF board. After drawing the seam lines on the sandpaper, I followed the steps described above. I also included a few cracks on the corners of selected blocks:
At this point the result was checked. I had to press more the seams on a few spots. Once satisfied with the overall aspect, I left the base drying for further 24 hours:
In the next day I primed the base with a spray can followed by an overall coat of dark grey color. Then I added highlights with a lighter shade of gray, mainly on the center of the blocks, followed by a liberal wash of dark brown oils applied over the whole base. It naturally concentrated along the seams. Once everything was dry, a flat clear was airbrushed to remove shiny spots. Lastly, a large flat brush was used to drybrush medium grey in order to highlight the texture of the pavement:
Unfortunately, the drybrush also highlighted the edges of the seams, but it would be impossible to avoid it:
The solution was to brush on a thin glossy black acrylic along the seams. Not only it corrected the side effect, but also increased the contrast of the seams to the pavement, exactly as I wanted:
Here is the result (the holes were drilled to install my rendition of galvanized fence poles later):
So, there you have it. Not perfect, but the technique is so simple that deserves a try during your next diorama.
I hope you find this article useful in your next project.
