| Revell (ex-Matchbox) Dornier Do-28D Skyservant in 1/72 |
|
Started: September/2014 Finished: October/2014 |
I'm
pretty sure we all have bought a kit in a LHS by impulse at least one
time in our modeling careers. I for one did it repeated times, but in this
case I just can't explain why... This is the 35+ years old Matchbox
Do-28 in 1/72 scale, boxed and reboxed.
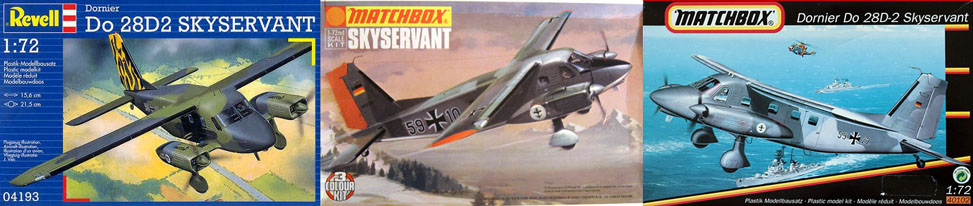
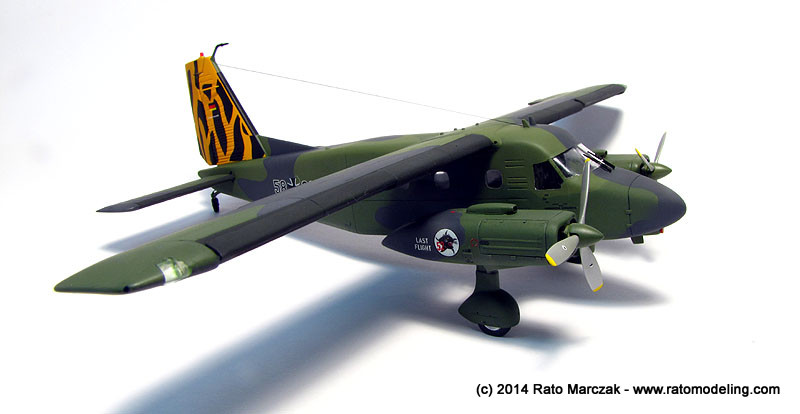
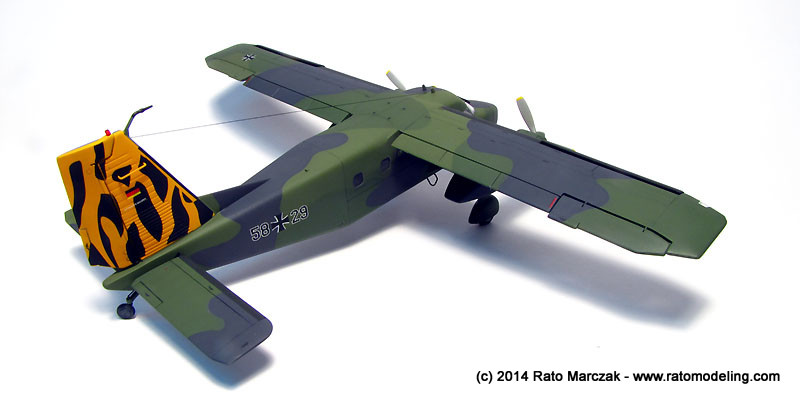
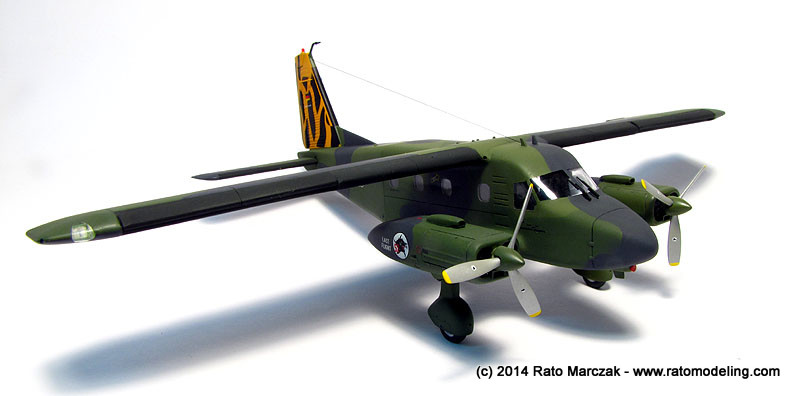
I got the Revell offering, probably it is something related to the 1979 Matchbox catalogue that I still have and brings me so fond memories, or because I just wanted a weekend project (like if there was one for me...). Anyway, this is an interesting aircraft. Soon I found that I could not build it in CIA livery as used in 'Nam, so the box version was my choice, depicting a commemorative livery of the last flight of the Skyservant with the modern Luftwaffe.
As any old kit, it has terrible joints to work, but not much flash. There are several important features missing, including landing light, air intake under the nacelles, pilot/co-pilot doors, emergency hatch, several antennas and almost no panel lines, to name a few from memory. However, the kit has potential if you are willing to do some work. Here is the proof (more can be found at the DPMV Konvent 2011 - Galerie Do 28 Projekt, here and here):
I confess I was not aware of so many versions of this aircraft... Did you?
Well, back to the workbench, work started with the cockpit/passenger cabin and progressed fairly well. I just added tape seat belts and scatchbuilt the control columns for the pilot and co-pilot, absent in the kit. Once the fuselage was closed, two big troubles became apparent: the windscreen had a terrible fit to its opening, and the panel lines around the cargo door was so big that a scale suitcase would pass through it. The windscreen was subjected to a intensive job including shimming, puttying, sanding and polishing until an acceptable result was achived. In fact, I learned not to fear fairing windscreens to the fuselage anymore. Just need a re-stock of sanding pads. One useful trick is to use black CA glue and black colored plastic as shims first, and then true everything with your regular putty. This way the weird colors of modeling putties won't be visible.
As for the cargo door, I used the same method described to refine the fitting of the engine cowling in my Heinkel He-170 project, using Bare Metal Foil and CA glue. Since the job required the installation of the windows at this stage of the assembly and serious sanding, the nice molded-on hinge details did not resist, and I had to scratchbuilt new ones using plastic bits and stretched sprue:

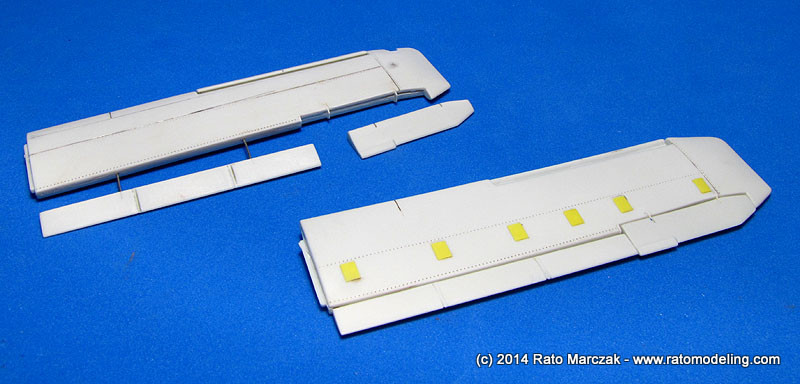
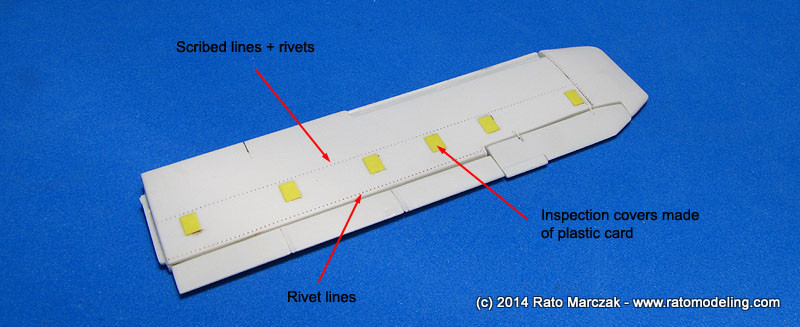
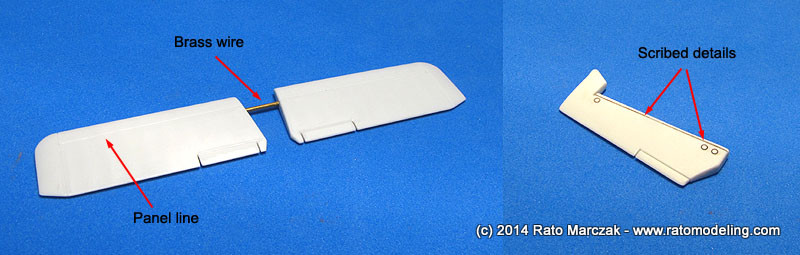
The flaps were removed, as well as the ailerons to be posed in a more casual attitude later. I also added several access hatchs on the underside of the wings, scribed a few panel lines and riveted a couple of lines for interest. The landing light on the tip of the starboard wing is missing, so I cut the opening to receive a piece of clear sprue later. I installed the fixed slats in a slightly protuding position, which is wrong:

I also reworked the stabilators, and used a thick brass wire to allow their installation as in the prototype. The rudder had scribed lines and inspection hatches added:
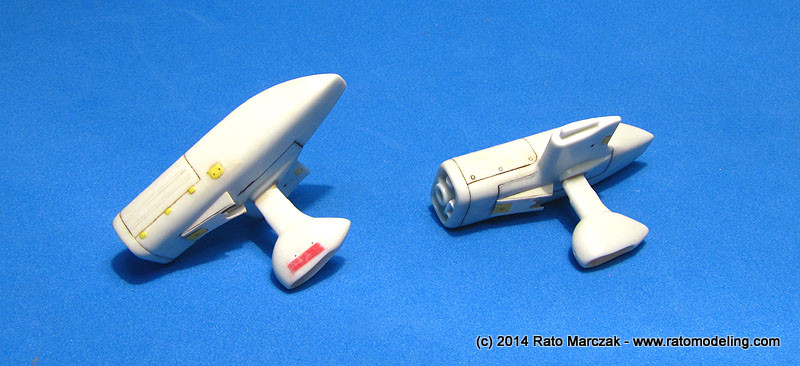
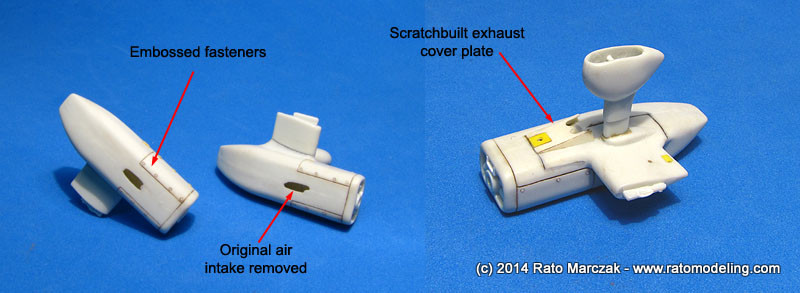
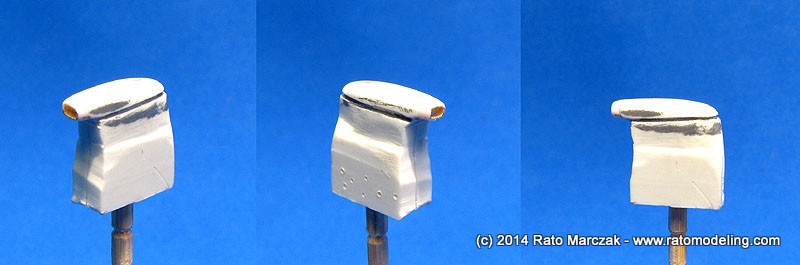
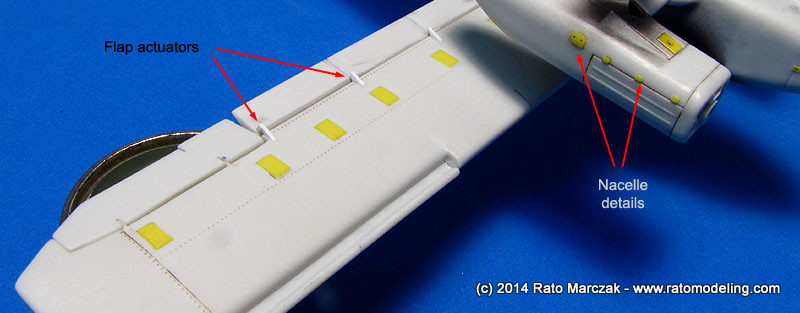
Next came the engine nacelles. In the Skyservant unique design, they protude from the lower fuselage, and have no connection to the wings. So I assembled them with the wheel spats, emobossed fasteners and added several raised panels following photos of the real thing. A small rectangular aperture in front of the nacelle (probably oil cooler intake) is missing. I added that with a small rectangular box made of plastic card. It is not identical to the prototype, and I didn't like the way Matchbox molded the engine details, neither, but then I would have to scratchbuilt a completely new front cowling to be faithful to the real thing. However, the air intake on the top of the nacelles and the exhaust covers were too ugly to live with. I removed the intakes in favor of new scratchbuilt ones, and played with plastic card to make better exhaust covers:
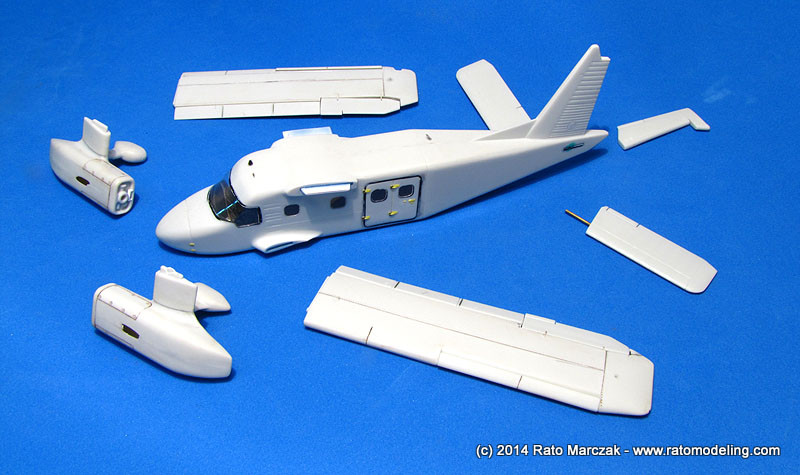
At this point the basic subassemblies were done, and I moved my attention to the smaller details:
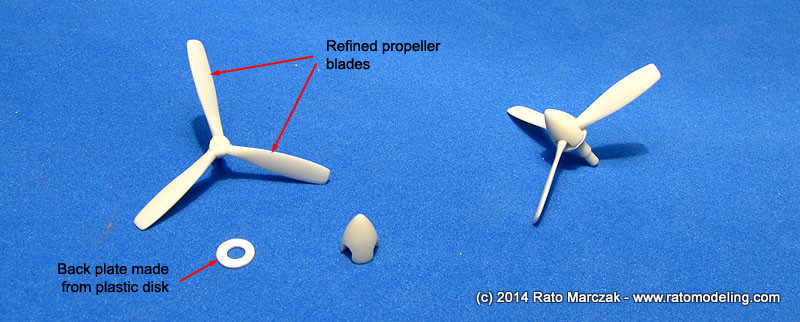
The kit's propellers are usable, but they deserve a good sanding job to make the blades thinner. The spinners are separated parts, and a backplate improved its final aspect:
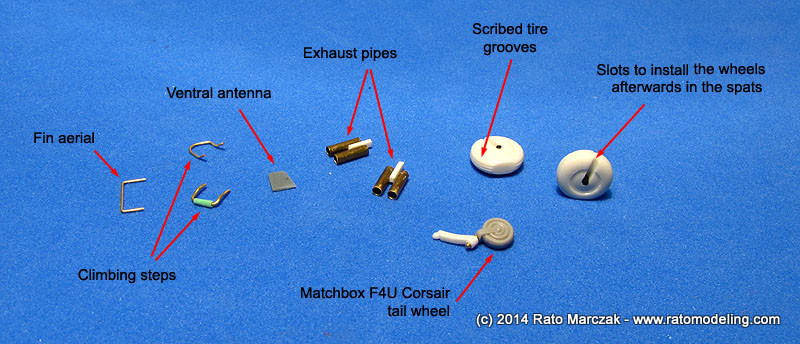
I made the missing fin antennas and climbing steps from brass wire. The solid, awkward exhaust pipes molded with the nacelles were removed in the previous steps, so I made new ones from brass pipe. The tailwheel is terribly thin, and was replaced by the tailwheel of an old Matchbox F4U-4 in order to keep the genetic heritage of the kit. I scribed the grooves in the tires, and carved slots in the wheels to allow their installation after painting the model (otherwise you have to paint and install them with the spats, making the masking difficult). This was possible because the spinning axle of the wheels are inside the spats, and therefore the slots I carved won't be visible. There are also a number of fin-type aerials that I added with pieces of plastic card cut to shape:
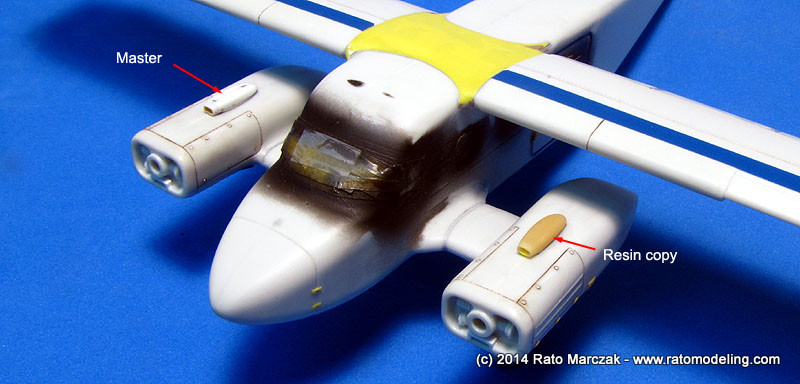
The new engine air intake was carved from a solid piece of styrene to produce a master. It was later duplicated in resin:
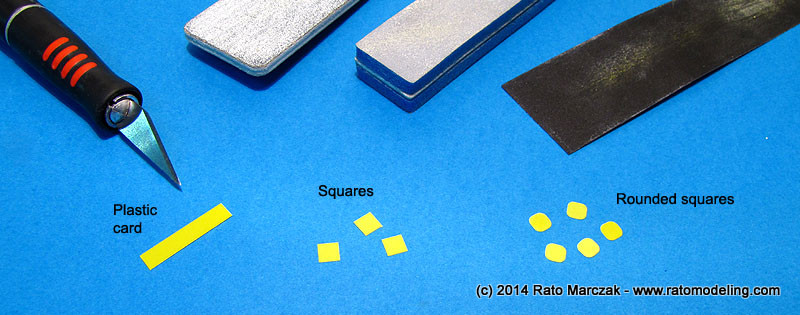
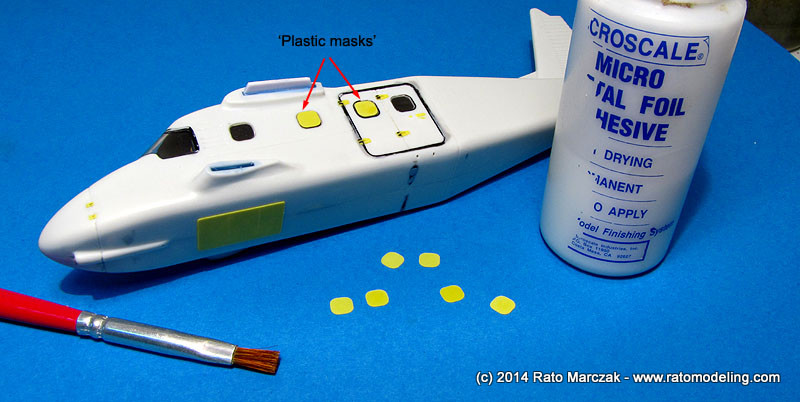
With the painting phase approaching, I had to deal with the masking of the rounded square (passenger) windows. Cutting eight identical masks with that shape was beyond my skills, so I used an old trick: plastic masks. I cut squares of the dimensions of the windows and sanded the corners to round them as in the clear parts:
The windscreen was masked using the conventional method. I sprayed s coat of semi-gloss black to seal all windows and the windscreen masks, and installed the wings. The molds are showing their age as there visible gaps at the wingroots to be worked on. Of note is the absolute lack of dihedral in this aircraft, so a steel rule was used to keep both wings in level while the glue was setting.
My resin copies of the engine air intake didn't result great (overdue resin shelf life?), but I was able to save one, so I had to use the master as well. I doubt I'll be building another Do-28 soon, anyway:
Since the wings are devoid of surface details, I used a couple of techniques here to simulate overlapping panels. Over the wings, I used a decorative tape I found in a craft store. It's like a colored Scotch Magic tape - it has almost no flexibility, so it is difficult to use it on compound curves. But this is its best quality, because it is made of a polymer closer to styrene than vinyl as most adhesive tapes. Therefore it stands well against paints and thinners, and does not shrink with time. Yes, I tested it on other models.
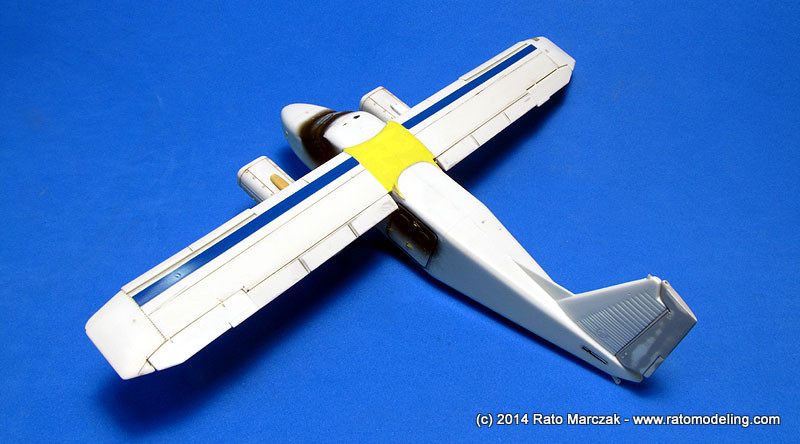
Another trick used was the curved fairing over the fuselage, connecting both wings. There I used a piece of 0.15 mm plastic sheet. It conformed well to the top fuselage, and the edges produces nice steps after sanding. This is ideal to simulate overlapping panels:

Flaps actuator arms were made of plastic bits and installed on the underside of the wings, six per wing. They are very prominent in the photos of the aircraft:
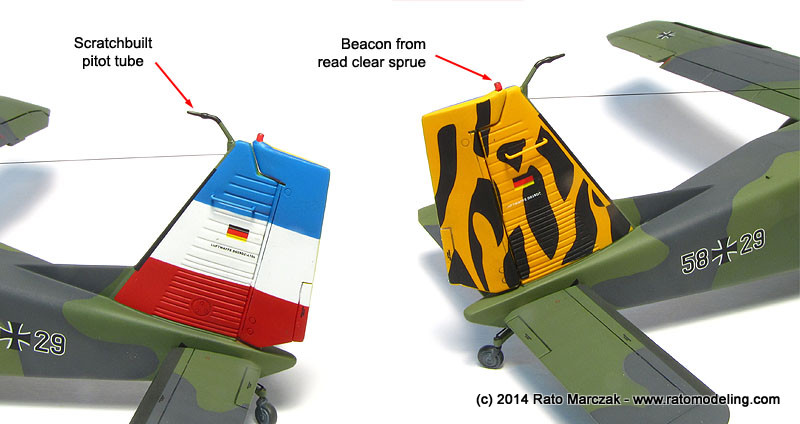
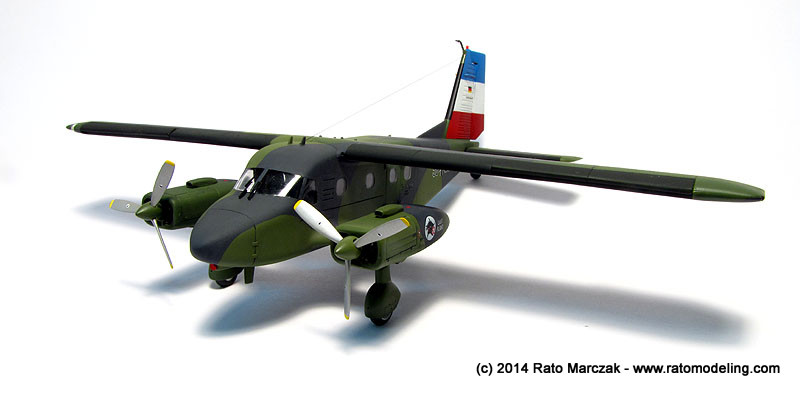
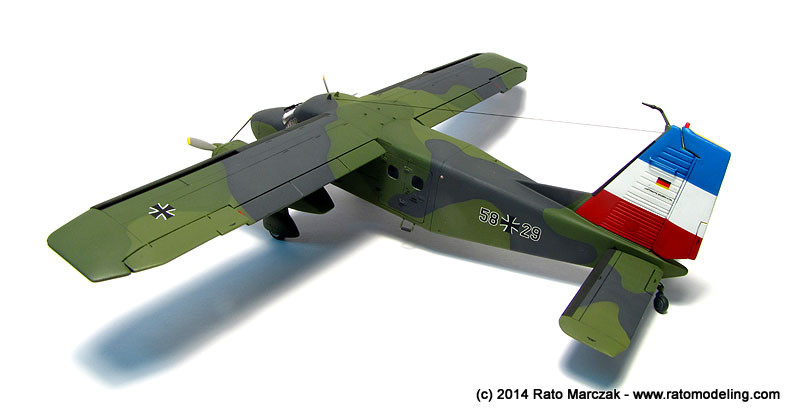
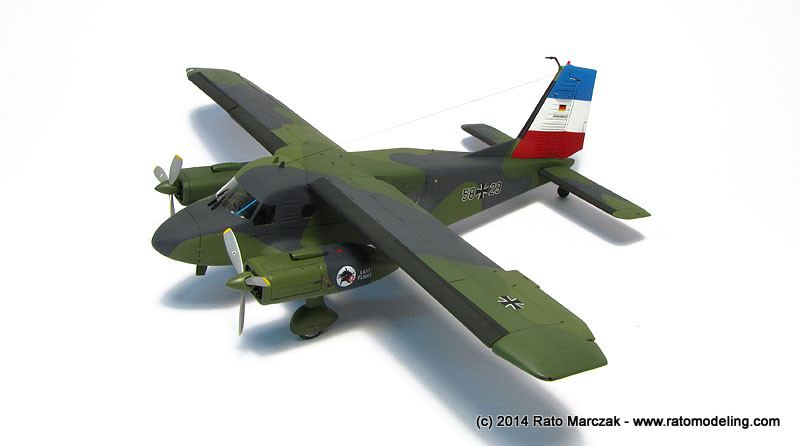
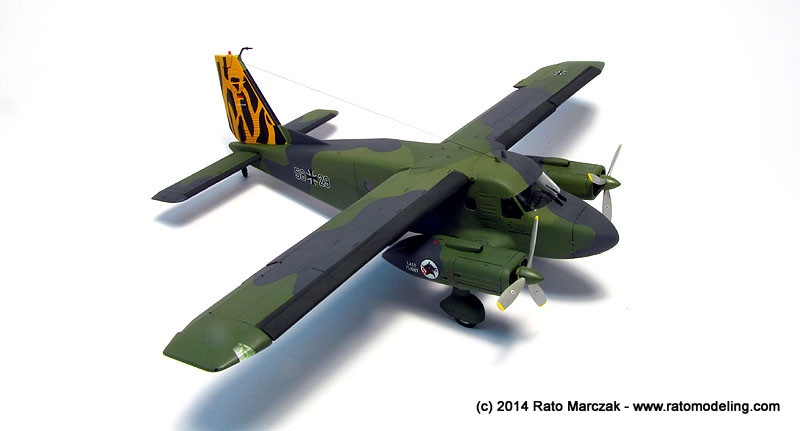
To make a long story short, I decided for Vallejo paints to do all the three-color camouflage. Before them, though, I applied the blue/white/red stripes on the port side of the vertical stabilizer, and yellow on the starboard side. These areas were masked while the main colors were applied.
Both greens were mixed using several greens, yellows and grays, and the gray is straight Dark Grey from Vallejo line. The boundaries of each camouflage color were outlined using a pinstriping-type brush. Whenever possible, I filled the inner area of the color using the airbrush, but I had to hand paint most areas under the wings, front fuselage and engine nacelles. It wasn't easy as I anticipated: I got used to Vallejo paints for small areas and figures, but this was an entirely different story, and I could see brush marks all over the model. Future floor was was used to prepare the model for decals and fortunately it alleviated the problem.
Decals came next. I applied the big ones, then started to apply the countless stencils, just to find the entire decal sheet floating on the water bowl. Don't ask! All I'll say is that this was my fastest decal application on a model, ever!
Other bits installed at this point were the pitot tube, made of brass wire, the clear red transparent beacon light, wheels, tailwheel and the exhaust pipes.
The model received two coats of flat clear, making any brush mark invisible. God bless flat coats! The masks were removed just to discover a lot of sanding residue scattered inside. That really pissed me off, as I hermetically sealed the model after closing the fuselage. I added scratchbuilt windscreen wipers, and almost went blind doing them, but it is a nice touch.
In conclusion, to turn such a poor kit into a show stopper would require more work than I was willing to do. Afterall, this should be a weekend project, right?
I didn't like the final result, and this is probably my worst model in years. I'm blaming the kit, but it made me wonder: am I losing my touch?
I got the Revell offering, probably it is something related to the 1979 Matchbox catalogue that I still have and brings me so fond memories, or because I just wanted a weekend project (like if there was one for me...). Anyway, this is an interesting aircraft. Soon I found that I could not build it in CIA livery as used in 'Nam, so the box version was my choice, depicting a commemorative livery of the last flight of the Skyservant with the modern Luftwaffe.
As any old kit, it has terrible joints to work, but not much flash. There are several important features missing, including landing light, air intake under the nacelles, pilot/co-pilot doors, emergency hatch, several antennas and almost no panel lines, to name a few from memory. However, the kit has potential if you are willing to do some work. Here is the proof (more can be found at the DPMV Konvent 2011 - Galerie Do 28 Projekt, here and here):
I confess I was not aware of so many versions of this aircraft... Did you?
Well, back to the workbench, work started with the cockpit/passenger cabin and progressed fairly well. I just added tape seat belts and scatchbuilt the control columns for the pilot and co-pilot, absent in the kit. Once the fuselage was closed, two big troubles became apparent: the windscreen had a terrible fit to its opening, and the panel lines around the cargo door was so big that a scale suitcase would pass through it. The windscreen was subjected to a intensive job including shimming, puttying, sanding and polishing until an acceptable result was achived. In fact, I learned not to fear fairing windscreens to the fuselage anymore. Just need a re-stock of sanding pads. One useful trick is to use black CA glue and black colored plastic as shims first, and then true everything with your regular putty. This way the weird colors of modeling putties won't be visible.
As for the cargo door, I used the same method described to refine the fitting of the engine cowling in my Heinkel He-170 project, using Bare Metal Foil and CA glue. Since the job required the installation of the windows at this stage of the assembly and serious sanding, the nice molded-on hinge details did not resist, and I had to scratchbuilt new ones using plastic bits and stretched sprue:
The flaps were removed, as well as the ailerons to be posed in a more casual attitude later. I also added several access hatchs on the underside of the wings, scribed a few panel lines and riveted a couple of lines for interest. The landing light on the tip of the starboard wing is missing, so I cut the opening to receive a piece of clear sprue later. I installed the fixed slats in a slightly protuding position, which is wrong:
I also reworked the stabilators, and used a thick brass wire to allow their installation as in the prototype. The rudder had scribed lines and inspection hatches added:
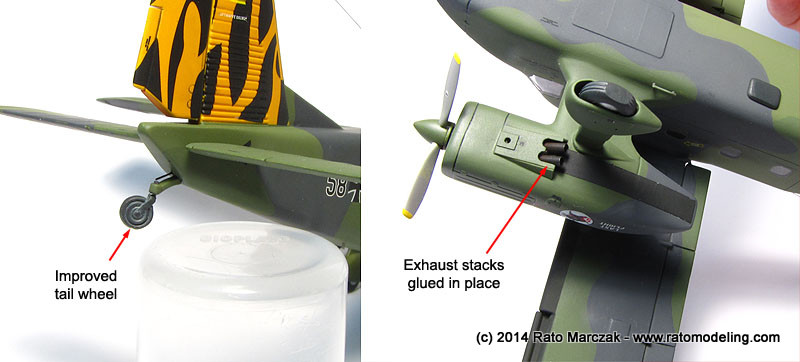
Next came the engine nacelles. In the Skyservant unique design, they protude from the lower fuselage, and have no connection to the wings. So I assembled them with the wheel spats, emobossed fasteners and added several raised panels following photos of the real thing. A small rectangular aperture in front of the nacelle (probably oil cooler intake) is missing. I added that with a small rectangular box made of plastic card. It is not identical to the prototype, and I didn't like the way Matchbox molded the engine details, neither, but then I would have to scratchbuilt a completely new front cowling to be faithful to the real thing. However, the air intake on the top of the nacelles and the exhaust covers were too ugly to live with. I removed the intakes in favor of new scratchbuilt ones, and played with plastic card to make better exhaust covers:
At this point the basic subassemblies were done, and I moved my attention to the smaller details:
The kit's propellers are usable, but they deserve a good sanding job to make the blades thinner. The spinners are separated parts, and a backplate improved its final aspect:
I made the missing fin antennas and climbing steps from brass wire. The solid, awkward exhaust pipes molded with the nacelles were removed in the previous steps, so I made new ones from brass pipe. The tailwheel is terribly thin, and was replaced by the tailwheel of an old Matchbox F4U-4 in order to keep the genetic heritage of the kit. I scribed the grooves in the tires, and carved slots in the wheels to allow their installation after painting the model (otherwise you have to paint and install them with the spats, making the masking difficult). This was possible because the spinning axle of the wheels are inside the spats, and therefore the slots I carved won't be visible. There are also a number of fin-type aerials that I added with pieces of plastic card cut to shape:
The new engine air intake was carved from a solid piece of styrene to produce a master. It was later duplicated in resin:
With the painting phase approaching, I had to deal with the masking of the rounded square (passenger) windows. Cutting eight identical masks with that shape was beyond my skills, so I used an old trick: plastic masks. I cut squares of the dimensions of the windows and sanded the corners to round them as in the clear parts:
The
plastic round squares then received a coat of Microscale Foil Adhesive
on one side and left aside. Once dry, their tackiness was reduced by pressing
them against a piece of clean glass and peeled off repeated times. The
results are plastic, custom made, self-adhesive masks. They were
finally pressed against the windows. After painting, I'd just remove them
as a regular mask. It is the only method where the masks allow
sanding/trueing that I know, but works great:
The windscreen was masked using the conventional method. I sprayed s coat of semi-gloss black to seal all windows and the windscreen masks, and installed the wings. The molds are showing their age as there visible gaps at the wingroots to be worked on. Of note is the absolute lack of dihedral in this aircraft, so a steel rule was used to keep both wings in level while the glue was setting.
My resin copies of the engine air intake didn't result great (overdue resin shelf life?), but I was able to save one, so I had to use the master as well. I doubt I'll be building another Do-28 soon, anyway:
Since the wings are devoid of surface details, I used a couple of techniques here to simulate overlapping panels. Over the wings, I used a decorative tape I found in a craft store. It's like a colored Scotch Magic tape - it has almost no flexibility, so it is difficult to use it on compound curves. But this is its best quality, because it is made of a polymer closer to styrene than vinyl as most adhesive tapes. Therefore it stands well against paints and thinners, and does not shrink with time. Yes, I tested it on other models.
Another trick used was the curved fairing over the fuselage, connecting both wings. There I used a piece of 0.15 mm plastic sheet. It conformed well to the top fuselage, and the edges produces nice steps after sanding. This is ideal to simulate overlapping panels:
Flaps actuator arms were made of plastic bits and installed on the underside of the wings, six per wing. They are very prominent in the photos of the aircraft:
The
model was then ready for priming and painting. As you probably guess,
it would be impossible to use an airbrush on the sides of the fuselage
and under the wing roots. Any attempt to airbrush paint there would
result in a coarse paint layer, think about airbrushing wing roots,
just worse in this case. Therefore I took the decision to hand
brush the model, something I haven't been doing in years.
To make a long story short, I decided for Vallejo paints to do all the three-color camouflage. Before them, though, I applied the blue/white/red stripes on the port side of the vertical stabilizer, and yellow on the starboard side. These areas were masked while the main colors were applied.
Both greens were mixed using several greens, yellows and grays, and the gray is straight Dark Grey from Vallejo line. The boundaries of each camouflage color were outlined using a pinstriping-type brush. Whenever possible, I filled the inner area of the color using the airbrush, but I had to hand paint most areas under the wings, front fuselage and engine nacelles. It wasn't easy as I anticipated: I got used to Vallejo paints for small areas and figures, but this was an entirely different story, and I could see brush marks all over the model. Future floor was was used to prepare the model for decals and fortunately it alleviated the problem.
Decals came next. I applied the big ones, then started to apply the countless stencils, just to find the entire decal sheet floating on the water bowl. Don't ask! All I'll say is that this was my fastest decal application on a model, ever!
Other bits installed at this point were the pitot tube, made of brass wire, the clear red transparent beacon light, wheels, tailwheel and the exhaust pipes.
The model received two coats of flat clear, making any brush mark invisible. God bless flat coats! The masks were removed just to discover a lot of sanding residue scattered inside. That really pissed me off, as I hermetically sealed the model after closing the fuselage. I added scratchbuilt windscreen wipers, and almost went blind doing them, but it is a nice touch.
In conclusion, to turn such a poor kit into a show stopper would require more work than I was willing to do. Afterall, this should be a weekend project, right?
I didn't like the final result, and this is probably my worst model in years. I'm blaming the kit, but it made me wonder: am I losing my touch?
| Technical file | |
| Kit:
|
- Revell #04193 |
| Additions:
|
|
| Basic
colors: |
-
Primer: automotive acrylic gray primer - Camouflage: various mixes of Vallejo paints - Flat black: Tamiya XF-1 - Silver: GSI Creos H-8 Silver - Gloss clear: Future Floor Wax - Flat finish: Testors Dullcote lacquer |
| Notes: |
-
A few scratchbuilt details (see text). |
Rato Marczak © 2014
