| Trumpeter Railway gondola in 1/35 |
|
Started: December / 2013 Finished: January / 2016 |
This
project is a continuation of the Leaving the Tunnel diorama, which will also use Trumpeter's WR360 engine. The idea was a WR360 pulling a flatbed car out
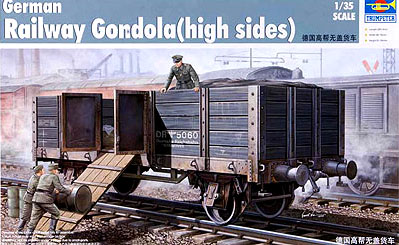
of a gypsum tunnel with a partially assembled He-162 on top of it. My kit is this one:
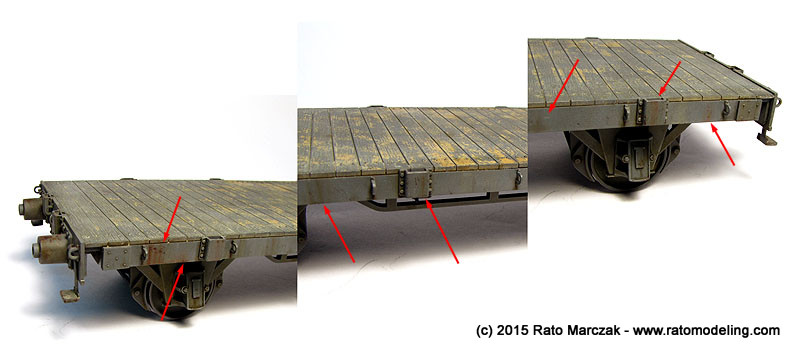
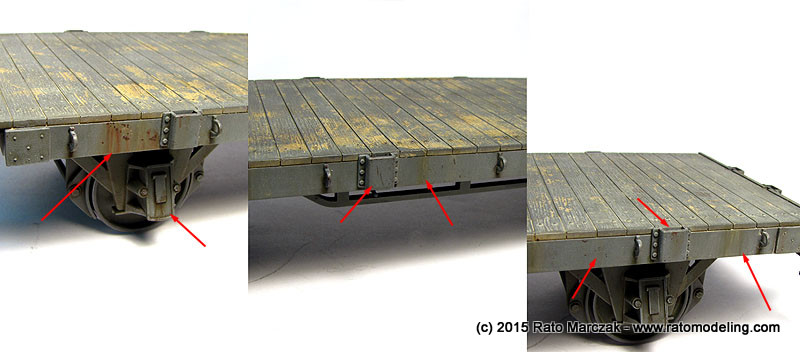
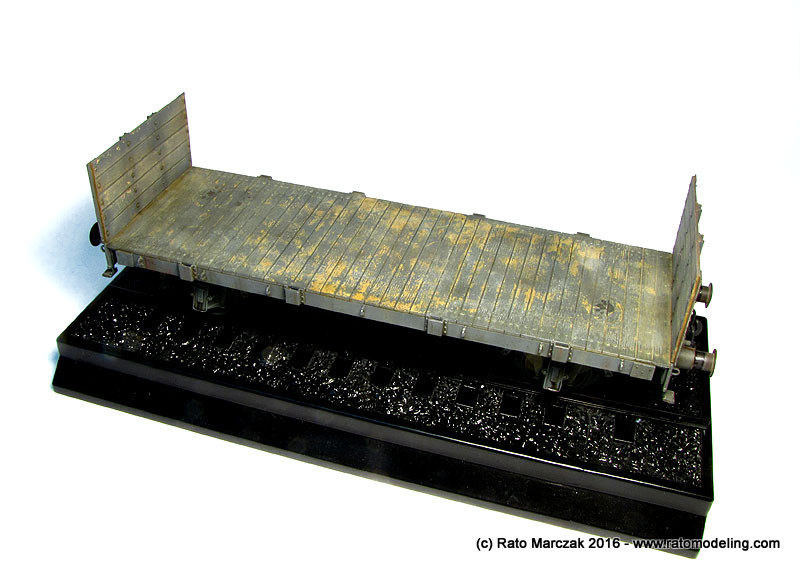
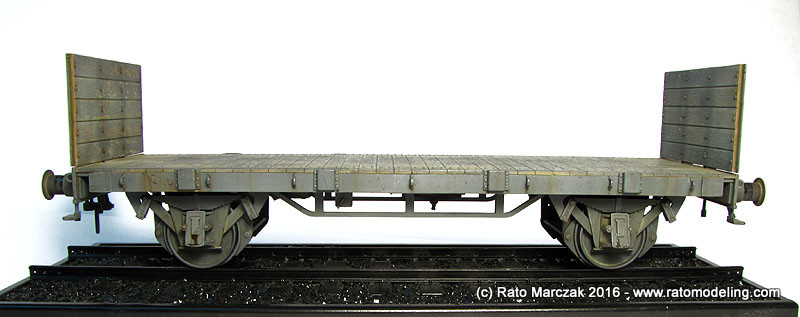
The gondola is a very simple kit, and was assembled in one day, except for smaller details that I left out in order to make painting easier. I also made the wheel/axle assembly removable.
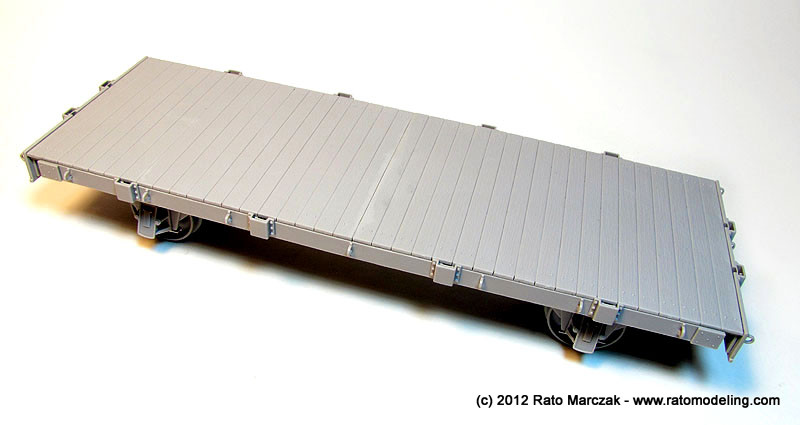
Of course a dedicated modeler could add several details on the underside - you railroad modelers know there are quite a few of them, but I'm trying to focus on the diorama and therefore anything that can't be seen on the final scene is not worth (my opinion). The only care I took was to scrape a saw along the ends of the planks to simulate the wood grain texture there, since those areas are molded flat.

In general, however, Trumpeter has done a nice job on the gondola. The wood texture is convinging, there are nice rivets and bolt heads here and there, and also you can install the sides without using glue, just like the real thing. I probably will use the front and rear walls, leaving the side ones out, but I'm not sure if the He-162 will fit in there with the walls installed:
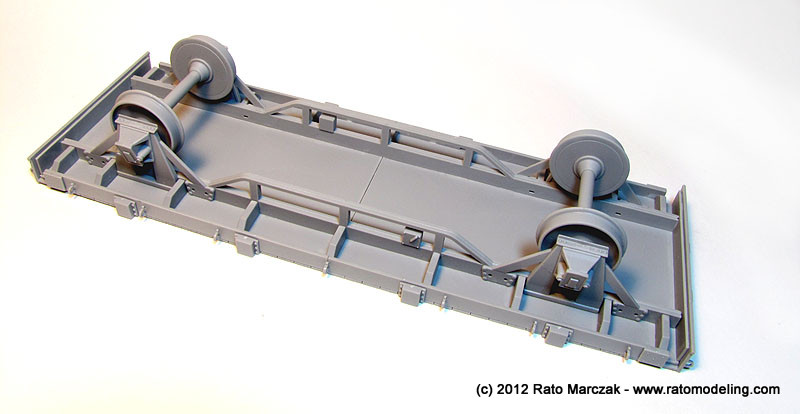
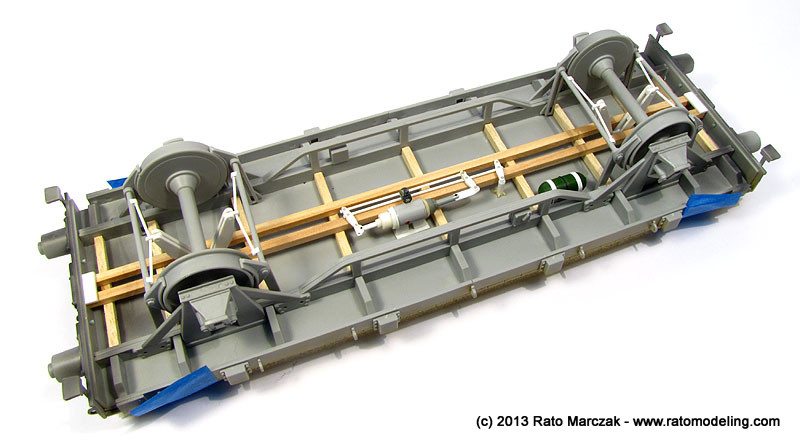
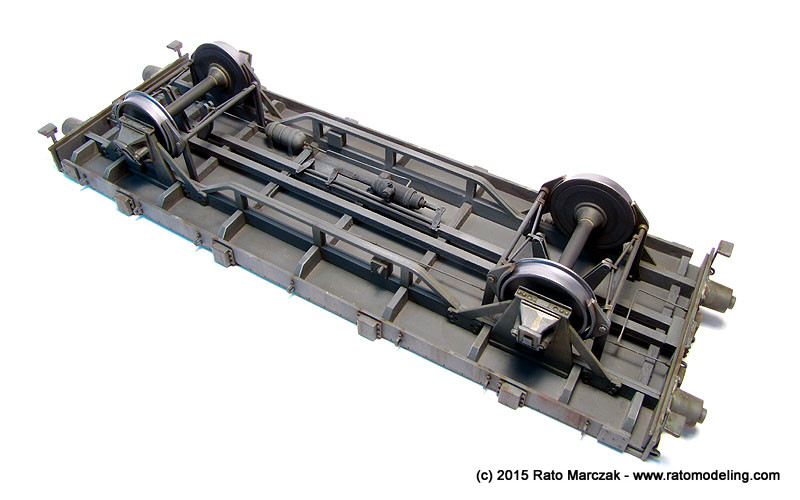
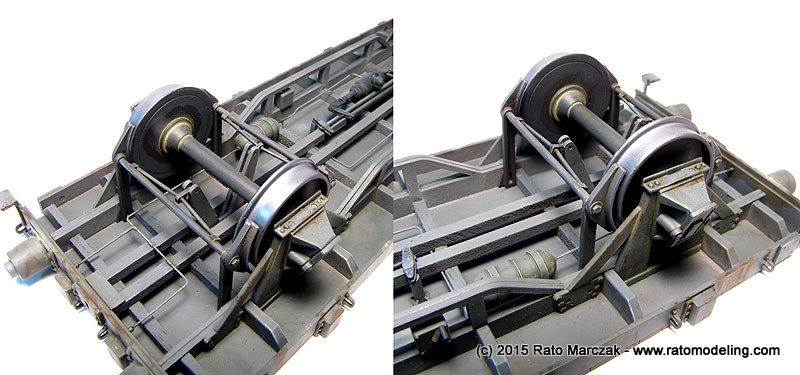
Ok, ok, I lied. I wasn't satisfied with the underside of the flatbed car, completely devoid of details. In a diorama setting, not much of it would be visible, but I recall from my childhood playing around the real thing how you can effectively see the silouettes of the brake system when looking from the side. I had do add something...
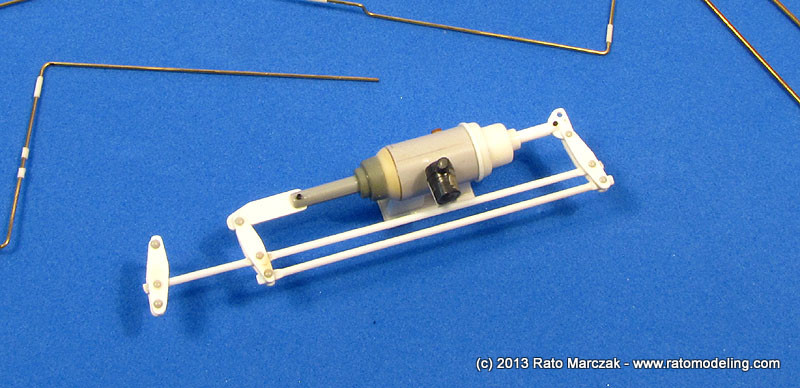
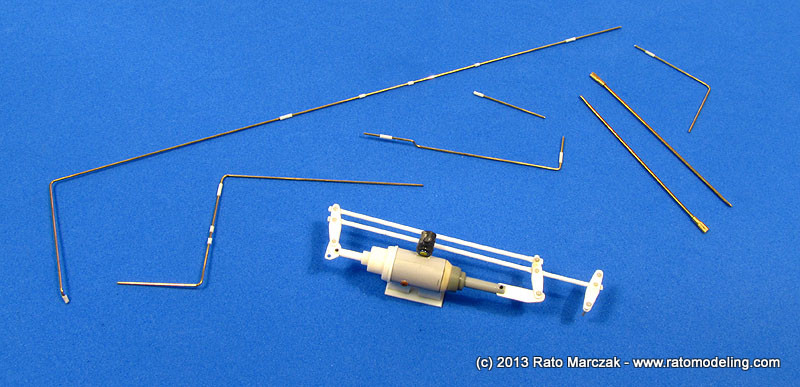
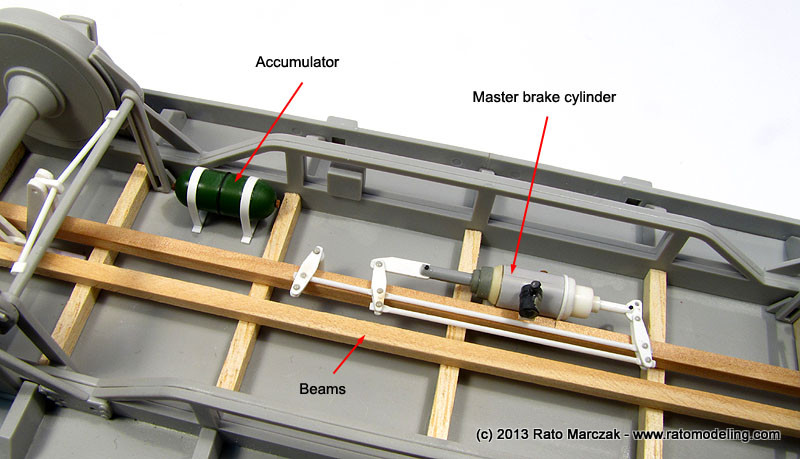
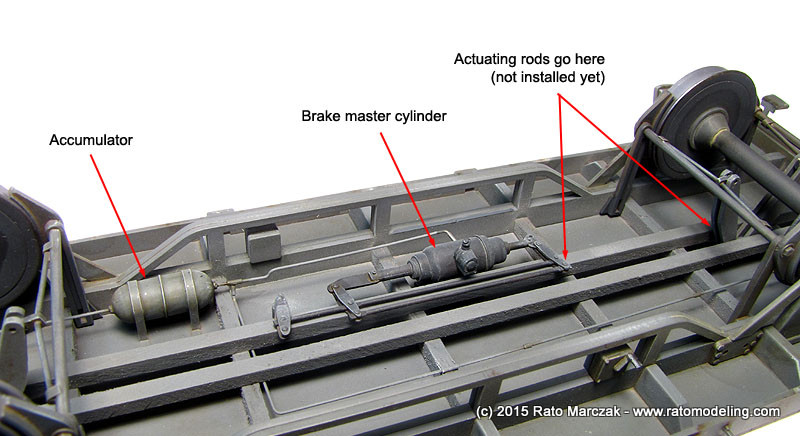
I decided to include the most important features: the brake system and the associated vacuum/vapor plumbing. The first step was to complete the structural details missing, using the molded on ones as a reference. I had several wood sticks for architectural models laying around, so I used them to make the two main longerons and the missing (central) part of the transverse beams. Next, I scratchbuilt a main cylinder actuator, its mechanism, and a vacuum accumulator. The brake actuators of this type of equipment varied a lot, so I made mine using what I have in my spares box and plastic bits. The actuating arms were connected with stretched sprue mushroomed to allow a working mechanism and some adjustment when gluing it to its final position:
The added items were laid in position using railroad modeling plans as general reference, and the piping was cut and shaped with brass wires.
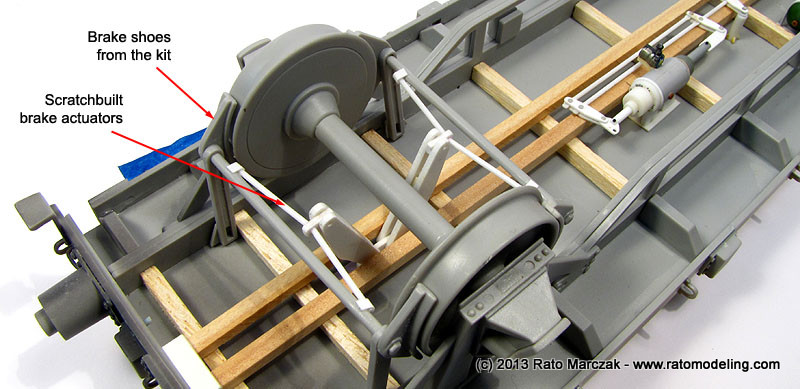
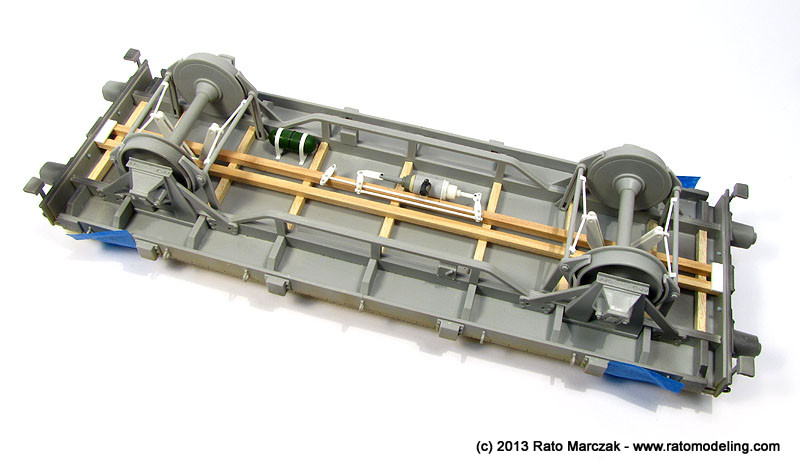
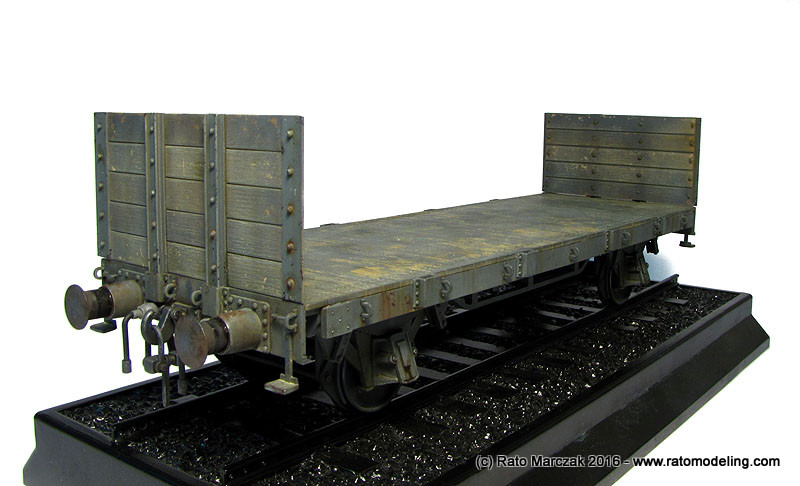
The kit provided the brake shoes and their connecting rods, but that's all. I made the respective pulling arms from plastic sheet and rod. Everything was eyeballed following photos and drawings of similar flatbeds, but the pulling arms resulted so oversized that they could be installed in a BR52 engine! I decided to keep them:
Expect for the plumbing, this is all that I added to the gondola:
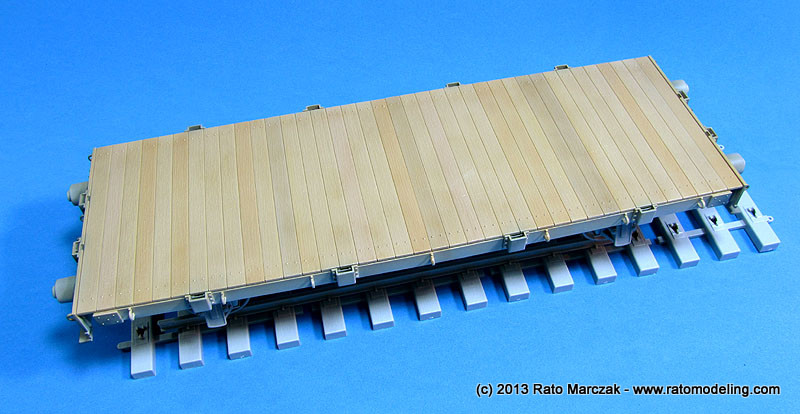
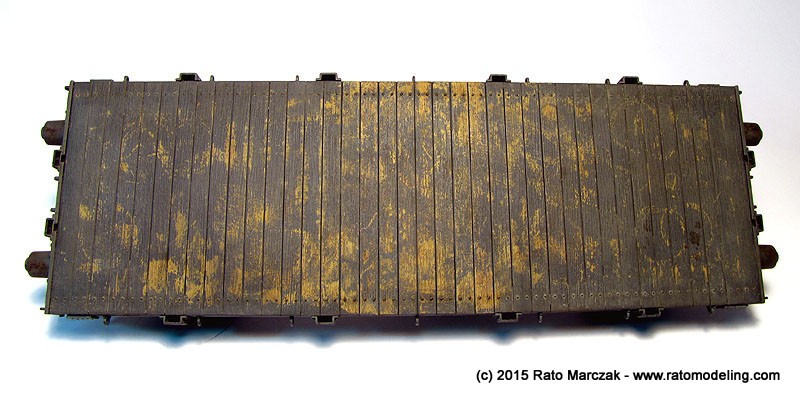
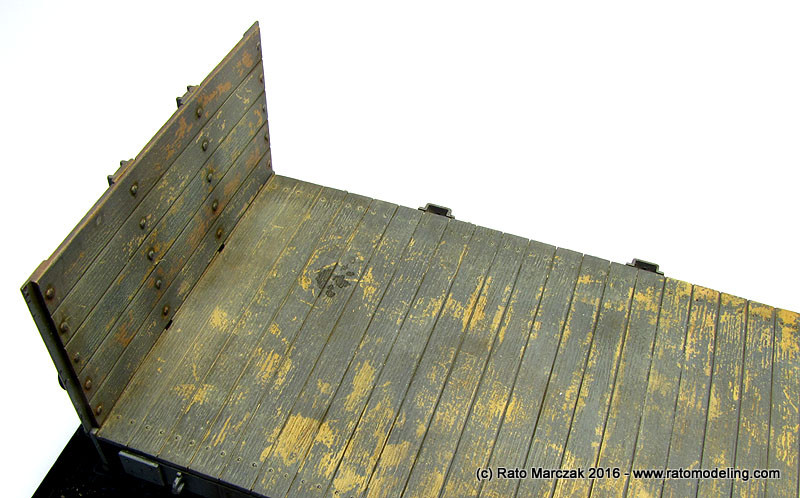
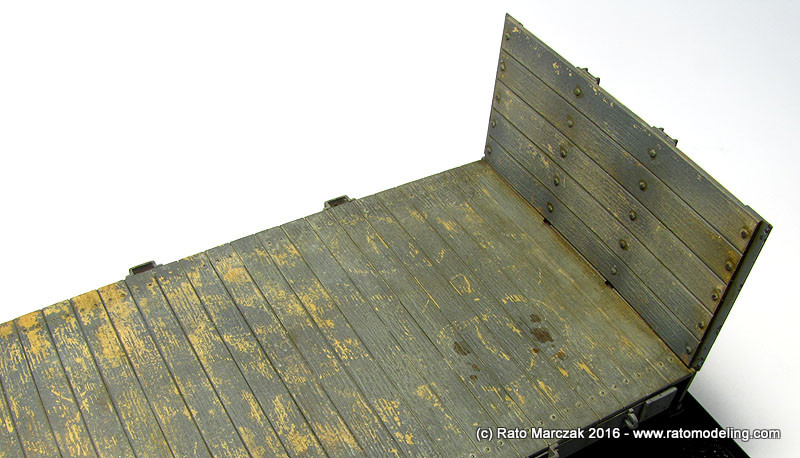
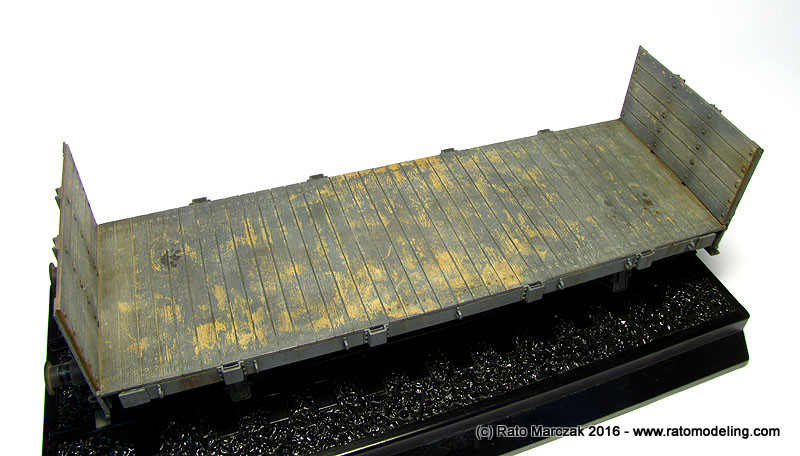
The planking molded on the top of the flatbed (parts A10) is convincing enough. It was painted with several shades of Vallejo paint and sealed with a good layer of automotive gloss varnish in preparation for the hairspray chipping that will follow later:
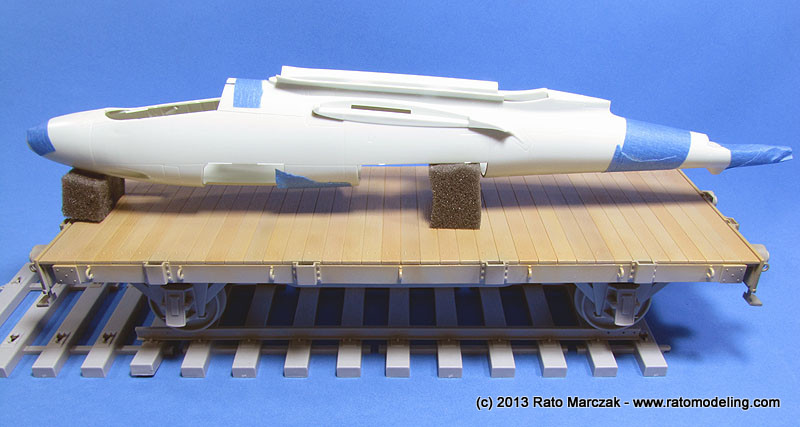
And of course, I couldn't resist and checked how the He-162 would sit on it:
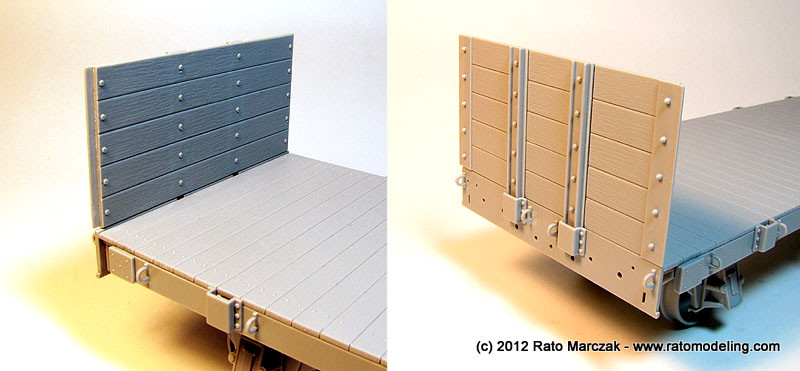
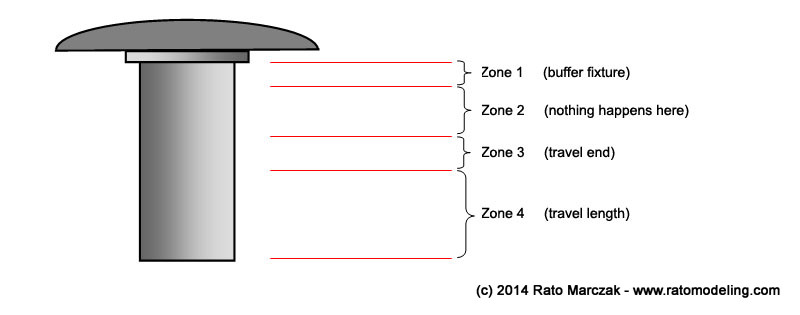
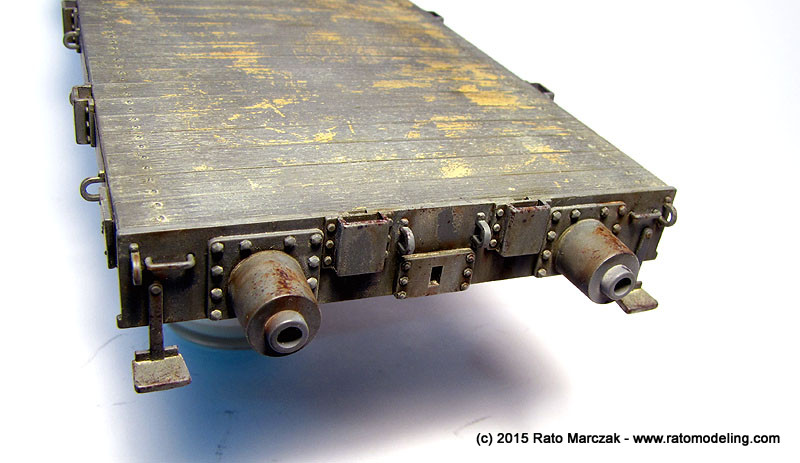
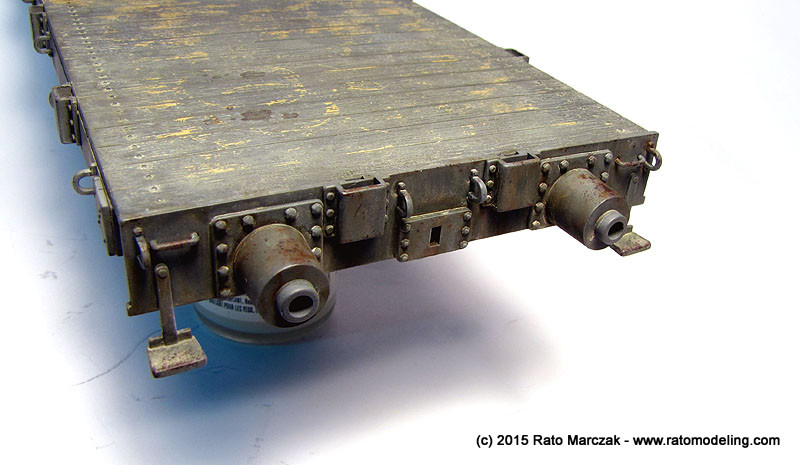
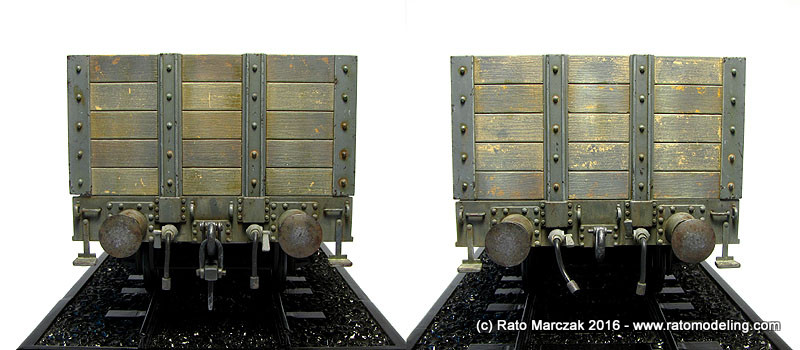
Unlike their counterparts in the WR360 engine, the buffers were not replaced by resin improvements. The round and flat buffers (parts B17 and B18) were painted and weathered along with the engine buffers, as well as the coupling parts. Parts B16 were glued to the flatbed front and aft ends. I used the same weathering sequence to finish the buffers, using the 4-zones approach::
- Zone 1 is basically the flange that connects the buffer to the cylinder. Therefore, it only collects dust and grime, and may show traces of the panzer grey.
- Zone 2 is the portion of the inner cylinder that never enters into the outer one. It may rust a bit, but may also show some remains of the polished steel due to grease stains.
- Zone 3 is the complicated one, because it marks the end of the travel length of the buffer system. Then, after some time in service, all the grease used to lubricate the cylinders end up in a messy smudge ring around zone 3, plus grime, dust, grass, deck cards, cigarette butts, engagement rings, you name it... Lost something? Try looking there!
- Zone 4 is the working length of the cylinder, which actually enters into the outer one during operation. It is common to apply grease in large quantities around this area, but most of it is pushed forth to Zone 3. The attrition between the cylinders and the lubricant make this zone mostly exposed metal.
Please, refer to my WR-360 build photos to see the finished buffers.
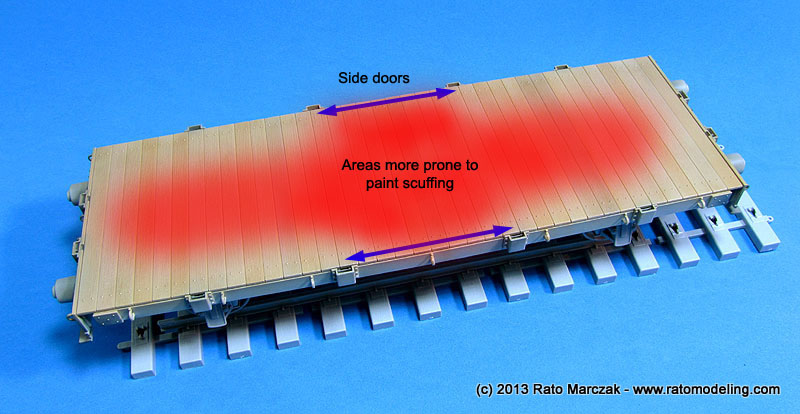
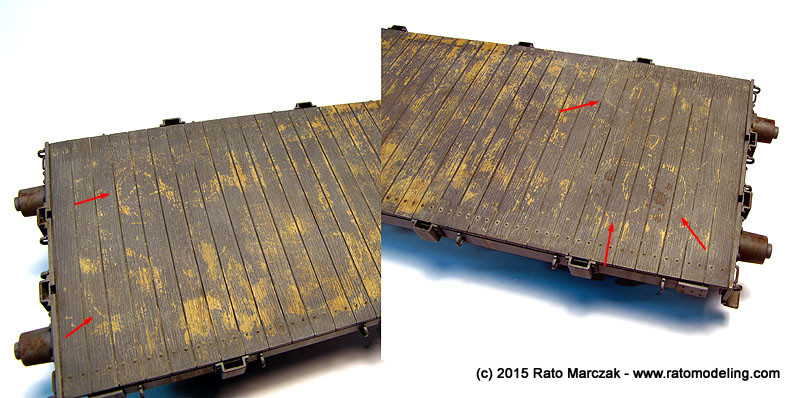
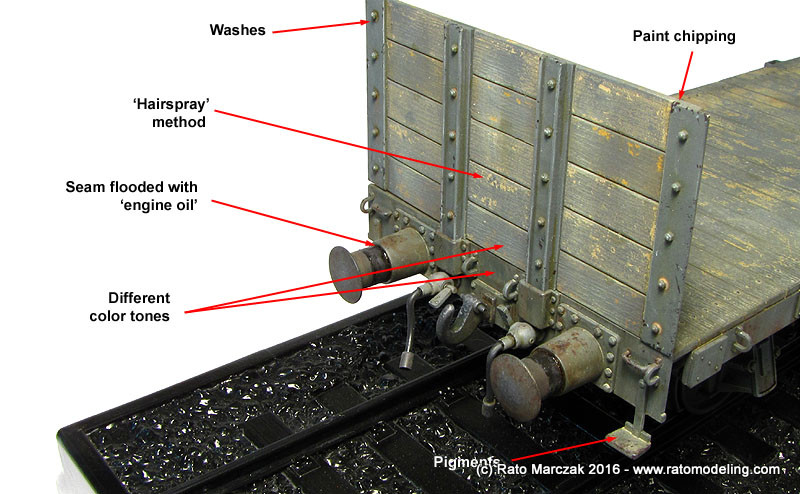
Since the buffers and coupling would be installed later on, I used the hairspray method to weather the flatbed planking. It was pretty much the same sequence used when I weathered the engine driver's cabin floor. I reasoned that, when the sidewalls were installed the flatbed had only two entries for the cargo - the side doors. The idea, therefore, was to concentrate most of the paint chipping/scuffing along the areas highlighted in red below:
After applying the well known hairspray technique, this is what I got:
I also played with the method 'on the fly' and scrubed a round cap here and there to simulate the paint removed by fuel/oil barrels while being loaded on the car - or was it a Tiger wheel?
I installed the underside plumbing and brake devices, but left the wheel/axle assemblies (formed by parts B19, B23 and B24) and the modified brake shoes out for easy painting. Before I started painting, I brush painted Vallejo Dark Grey (#90994) over hidden spots and difficult areas where I knew the can spray wouldn't reach. The planked bed was masked and Panzer Grey applied over the whole model using Tamiya's TS-4 rattle can, including the underside of the car. The underside was probably black in the prototype, but...
The rail/wheel contact surfaces were treated with Humbrol Polished Steel (#27003) from their Metal Cote range - the stuff is perfect for this kind of thing.
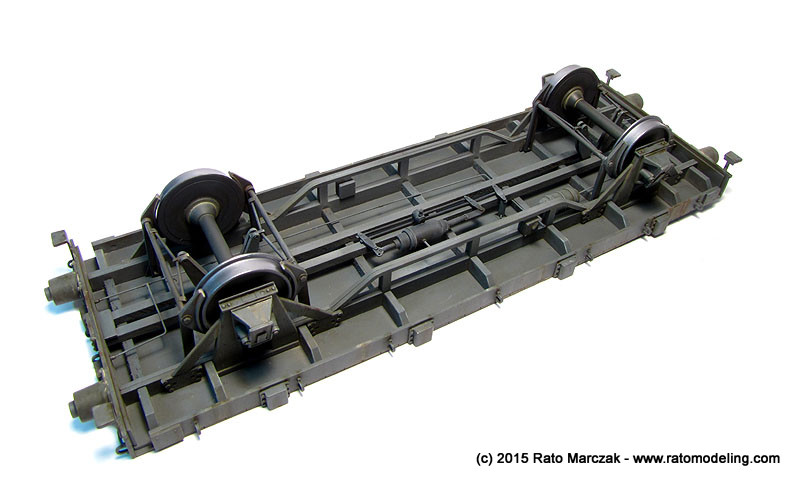
I did a general drybrushing with light grey oils over the whole understructure and its details. Didn't go mad as this will be a dark area in the diorama. At this point, I discovered that I completely forgot the leaf spring assemblies. Found them still unpainted in a small box with several 1/72 left over parts from my Famo project. That's one of the problems with taking so long to finish a project. Fortunately, the leaf springs could be glued later on without any interference. The photos below are still without the springs. Even so, the rolling components already looked busy enough:
I removed the planking masks and applied semi-gloss automotive clear over the flat bed in preparation for the weathering. The areas covered with TS-4 didn't need protective coating as it is lacquer. I started with an oils wash over the planking to enhance the plank joints and wood grain. Then I proceeded with a dark colored wash over the metal parts of the body. I didn't bothered much with the undersides, though. Once dry, the model was flat coated. Next, the model received a dry-brushing with pale yellow over the planking and light grey over the metal areas. This not only enhanced the wood grain and surface details, like bolts and plates, but also prepared the model for the filters and paint chipping. Rust streaks were added on a few spots.
The steps sequence I used were basically the following - note that the sequence was not the same used on the WR-360 engine:
1. Primer
2. Panzer grey: this was the camouflage color probably overpainted on the factory finish. I used Tamiya TS-4 German Grey straight from the rattle can.
3. Oils wash: AK dark brown washes, sometimes further thinned with white spirits, and applied over the metalic areas of the car.
4. Flat coat: Testors Dullcote lacquer. I overthinned it, as I didn't wanted a dead flat finish.
5. Dry-brushing: light grey oils were dry-brushed on steps, edges, and bolt heads. The wood planking received a light yellow dry brushing.
6. Paint chipping: liberal application of very dark brown from Vallejo paints, using the sponge method.
7. Light rust: CMK pigments applied with a fine pointed brush on selected spots, concentrating on the front and aft chassis.
8. Dark rust: older rust spots were simulated using Vallejo paints and CMK and AK pigments. The effect was applied on selected spots previously rusted in step 7.
9. Metal pitting: Pitting was simulated by hitting a 6B pencil and brown/grey Gundam pens randomly over corners, bolts, edges, etc.
10. Dusting: light dust AK pigments thinned with Windex was generously applied over the whole model, basically. Once dry, excess was partially removed with a flat brush. A light mist of Floquil Dust (#70.820) was airbrushed on the sides and underside of the model.
11. Grease/oil: Besides the treatment on the buffers using a mix of Tamiya Smoke (X-19) and Humbrol Smoke pigment, Ammo Fresh Engine Oil (1408) was sparingly brushed around inspection hatches and movable parts.
I would sometimes go over steps 3-11, depending on the effect I wanted. Remember that this is not a new rail stock. Instead, it is probably an old car - maybe the only - in service in tha gypsum mine:
Weathering has been a long learning curve for me, but I must confess that it is way more fun to be accomplished in 1/35 scale than my little 1/72 crawlers. You 1/35 AFV builders, don't take me wrong, but it really is more fun and controllable and, more imporantly, more forgiving to weather a model in larger scales...
Once satisfied with the weathering, I could install the leaf springs, coupling parts, hoses, and proceed with the final dusting. For that I used a heavily thinned mix of Tamiya's XF-57 Buff applied with an airbrush. I concentrated the dusting to the lower part of the vehicle, occasionaly switching to XF-52 Flat Earth or washing AK's Dust Effects enamel with a round brush. I used hairdryer to speed up the job.
The front and aft walls were actually painted during a workshop on the hairspray method that I offered at our model club. After that, I had to apply the remaining necessary steps to finish off the weathering in a consistent way.:
The coupling parts were finally attached (afterall, they were finished and ready to be installed since the work on the WR-360 engine was finished). The vacuum/steam hoses come perfectly straight with the kit, so I bent them a bit to look more realistic. I didn't installed the coupling parts of one of the sides, the one which goes attached to the engine. They will be glued in place only at the time of putting both models together.
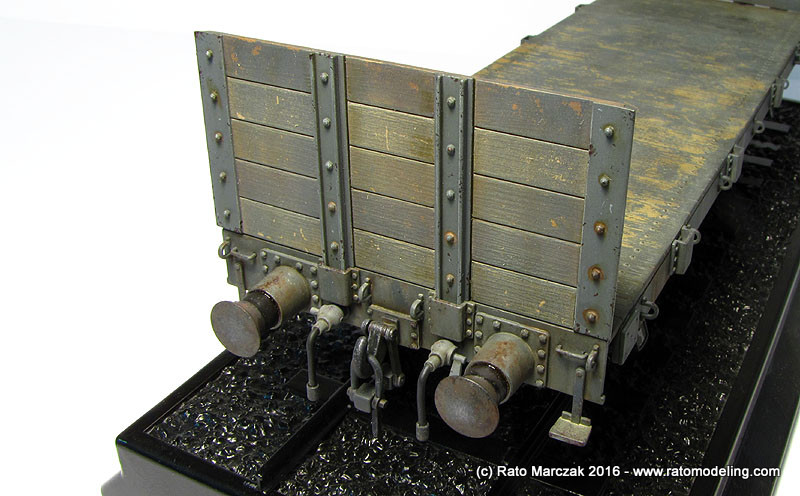
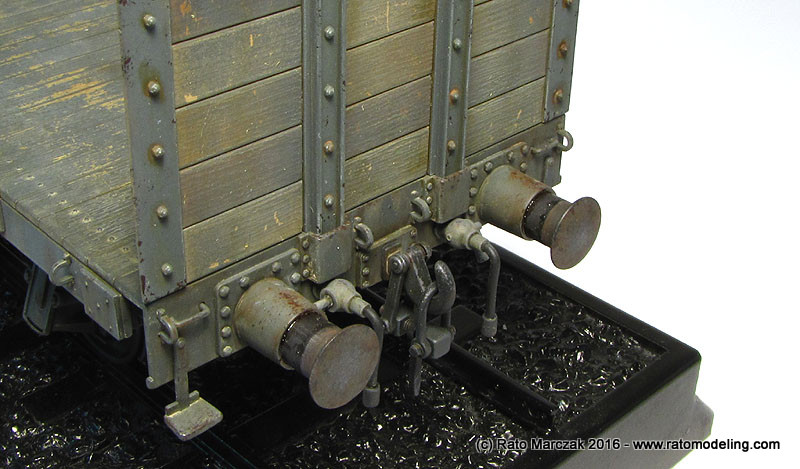
Trumpeter designed the buffers (parts B17 and B18) to be butt-joined with their supports (part B16). This makes the difficult to conceal the seam and make the assembly looking like a telescopic fitting. I solved the problem by flooding the seam with Ammo Engine Oil enamels, which blended perfectly with my previous lubricant mix. Summing everything up, all these steps really added realism to the model:
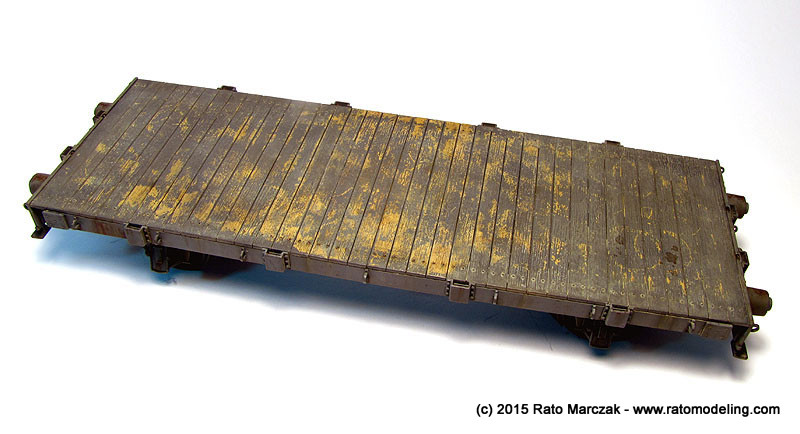
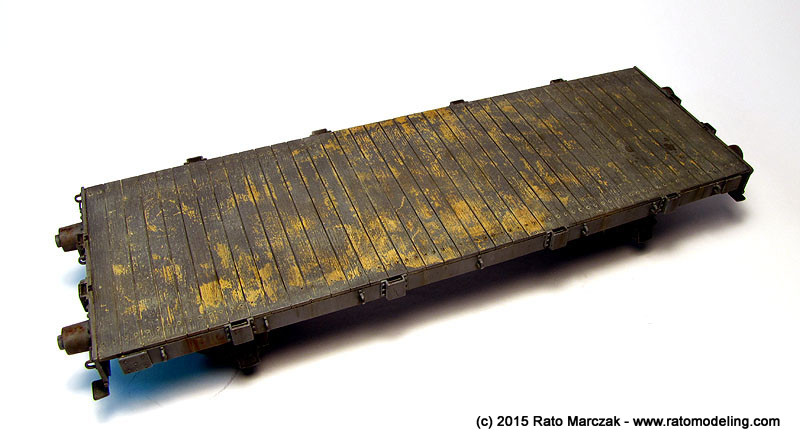
So, there you have it. My battered flatbed is finally finished.

I will not show photos of the engine coupled with the flatbed yet. For now, I still have a lot of work ahead with the Revell He-162...
| Technical file | |
| Kit:
|
-
Trumpeter #1517 |
| Additions:
|
|
| Basic
colors: |
-
Primer: automotive gray primer. - Semi-gloss and gloss black: automotive lacquer. - Flat black: Floquil Engine Black (#60106) enamel and Tamiya XF-1. - Dark gray: Tamiya TS-4 German Gray lacquer. - Wood color: various Vallejo and Andrea acrylic paints. - Flat finish: Testors Model Master Acryl flat and Testors Dullcote lacquer. |
| Notes: |
- Scratchbuilt brake system details details (see text). |
Rato Marczak © 2016
