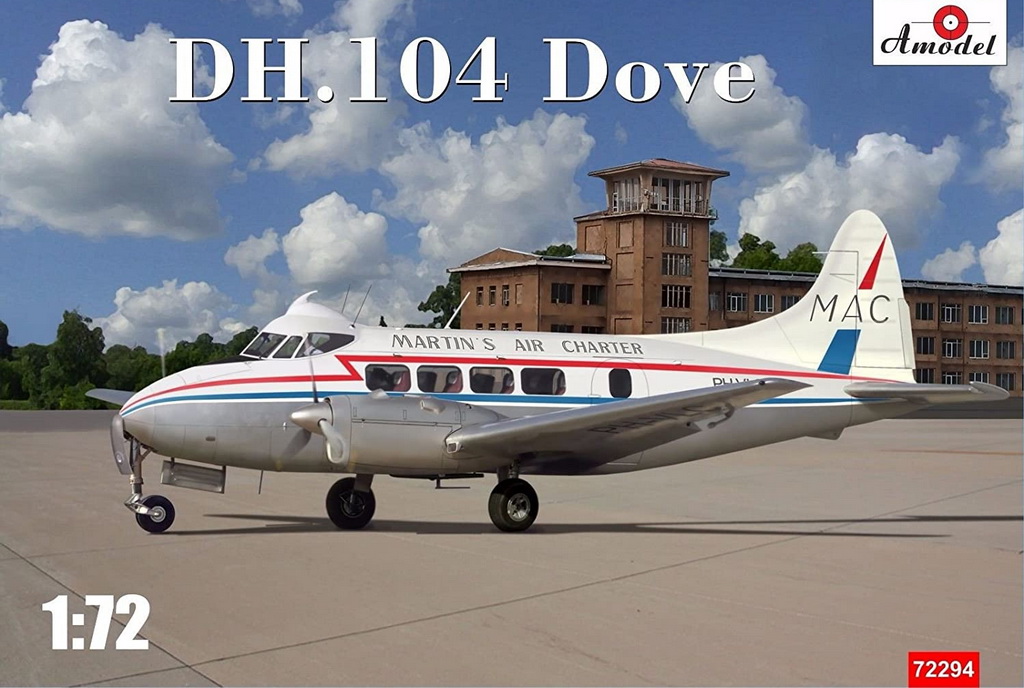
| Amodel D.H. 104 Dove in 1/72 scale - Part 1 |
| Finished: January/2022 |
I
don't consider myself an airliner modeler. Over the years,
however, I've built some small civilian aircraft and ships as
well, the last being the RWD-8 trainer a year ago. But like many of you, I have my share of fondness for
racers, airliners, firefighters, and flying boats. The De Havilland Dove
is certainly one of them, along with its military brother the Devon,
and its four-engine cousin, the Heron. Scale models of the Dove existed
in the past in the form of resin and vacuum-formed kits, but I think the
Amodel release of 2017 is the first injected kit of this important
aircraft.
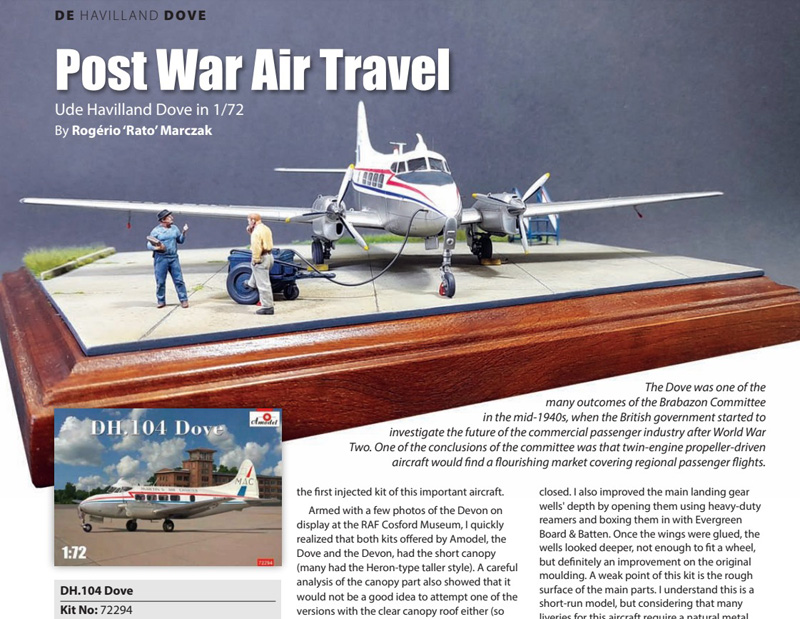
The Dove is one of the many outcomes of the Brabazon Committee in the mid-1940s when the British government started to investigate the future of the commercial passenger industry after World War II. One of the conclusions of the committee was that twin-engine, propeller-driven aircraft would find a wealthy market covering regional passenger flights. Another outcome of the committee led to the Comet, but its catastrophic debut years changed the course of airliner history - a talk for another opportunity.
So, when Amodel released their DH 104, I grabbed one as soon as I could.
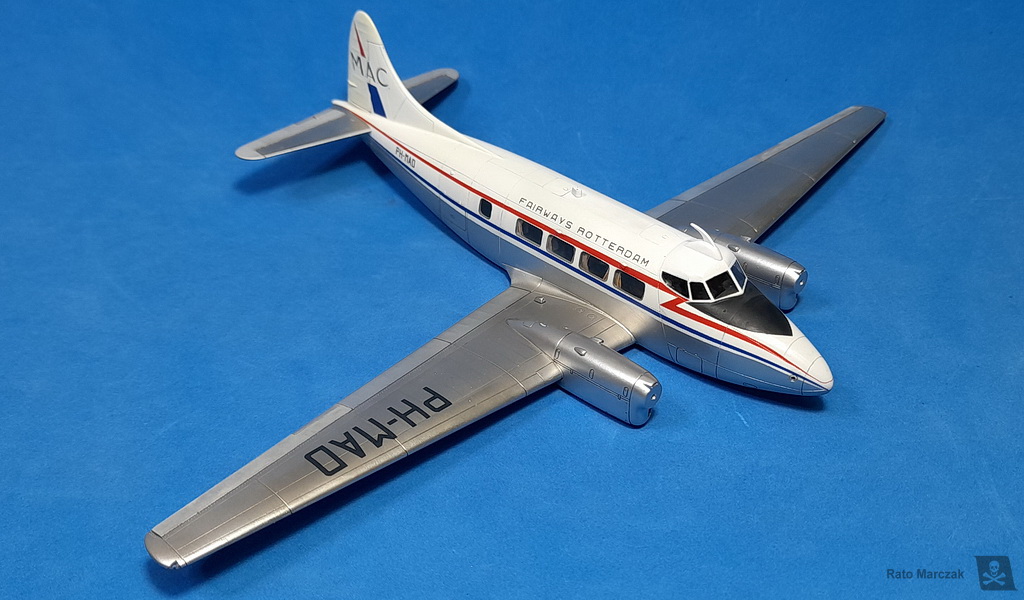
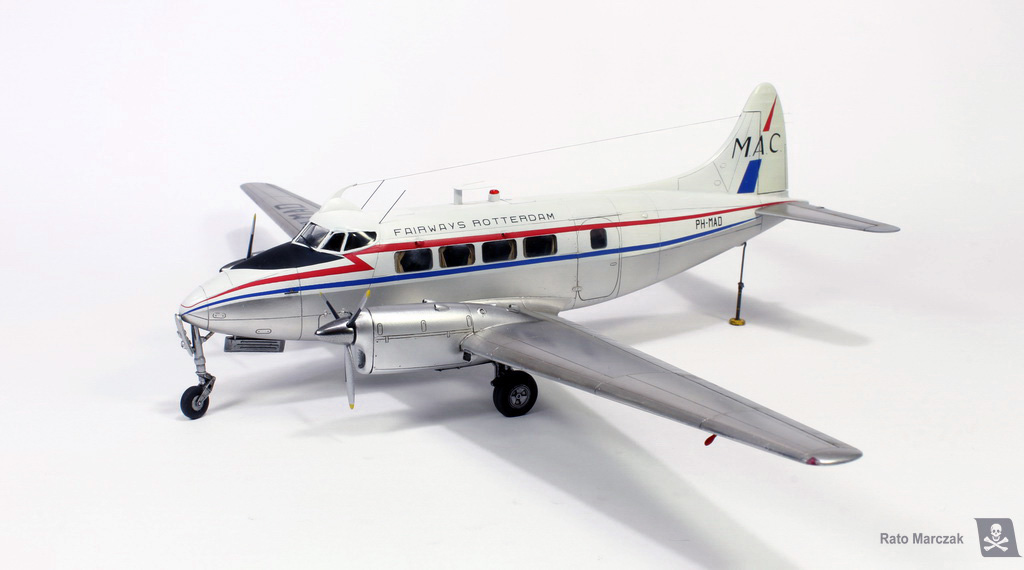
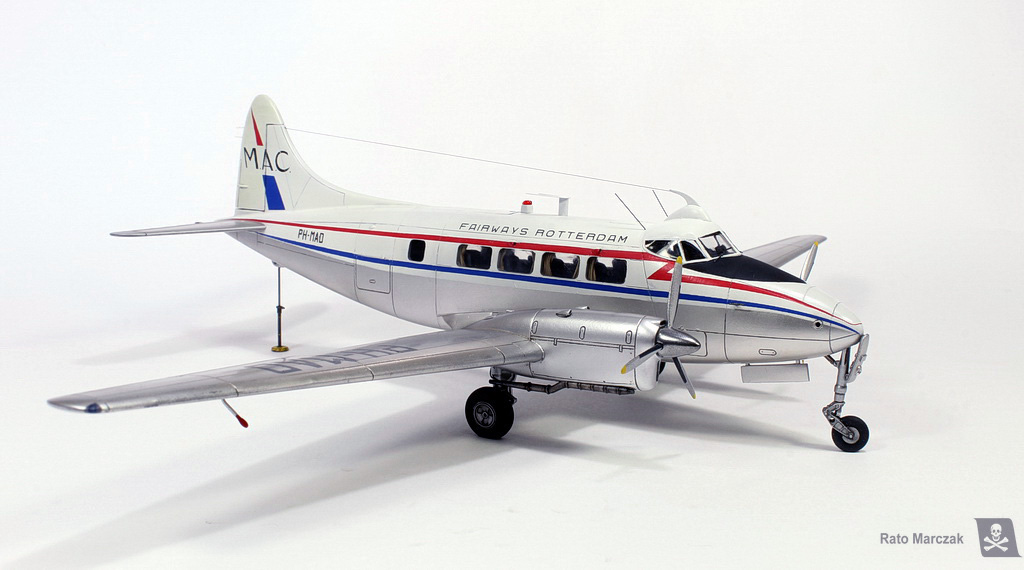
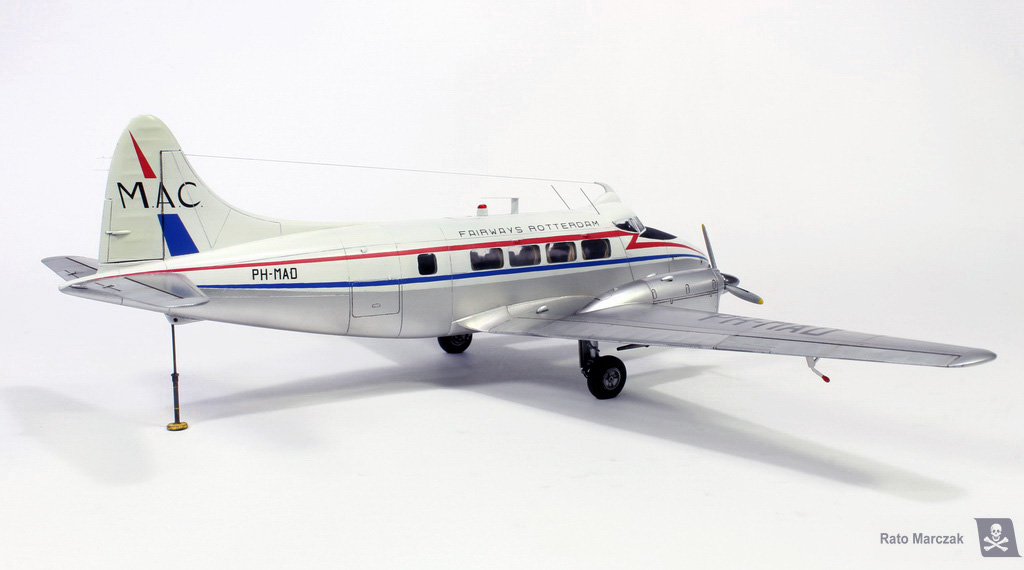
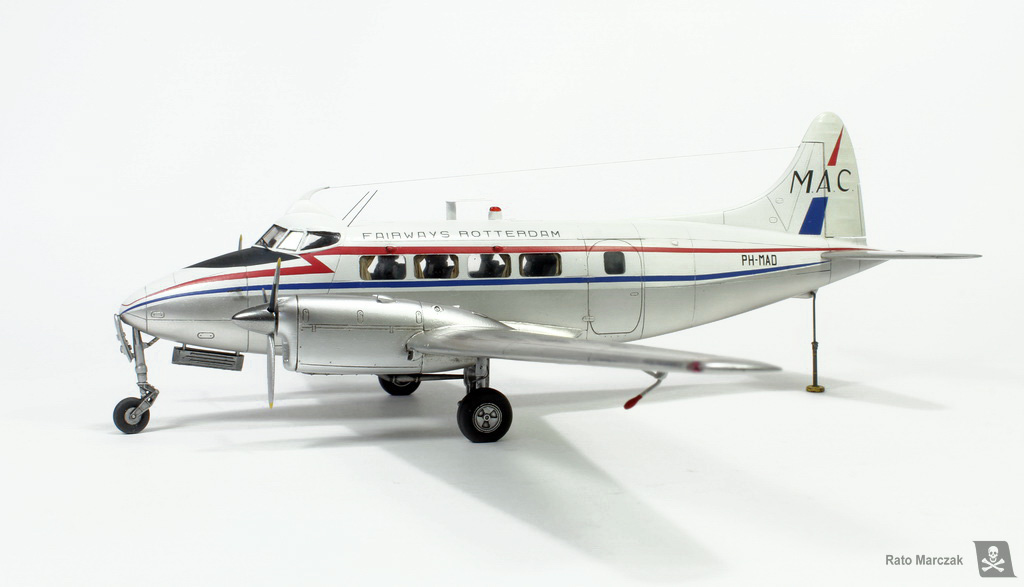
Armed with a few photos from the Devon on display at RAF Cosford Museum, I quickly realized that both kits offered by Amodel, the Dove and the Devon, had the short canopy (many had the tall one, Heron-type, installed). A careful analysis of the canopy part also showed that it would not be a good idea to model one of the versions with a clear canopy roof, neither (oh... forget those beautiful green/white Devons of the Royal Navy). All these things narrowed significantly the number of versions that I could do. After studying many internet photos, I ceded to the charms of a civilian version, incidentally, one of the three decal versions in the kit. My choice was this DH 104 Dove 1 serial #04453, PH-MAD of Martin's Air Charter (the boxart version), on loan to Fairways Rotterdam. The photo that caught me was this one, at the Southampton (Eastleigh) ramp in 1964 (and for some strange reason, the stairs caught my interest almost as much as the Dove itself):
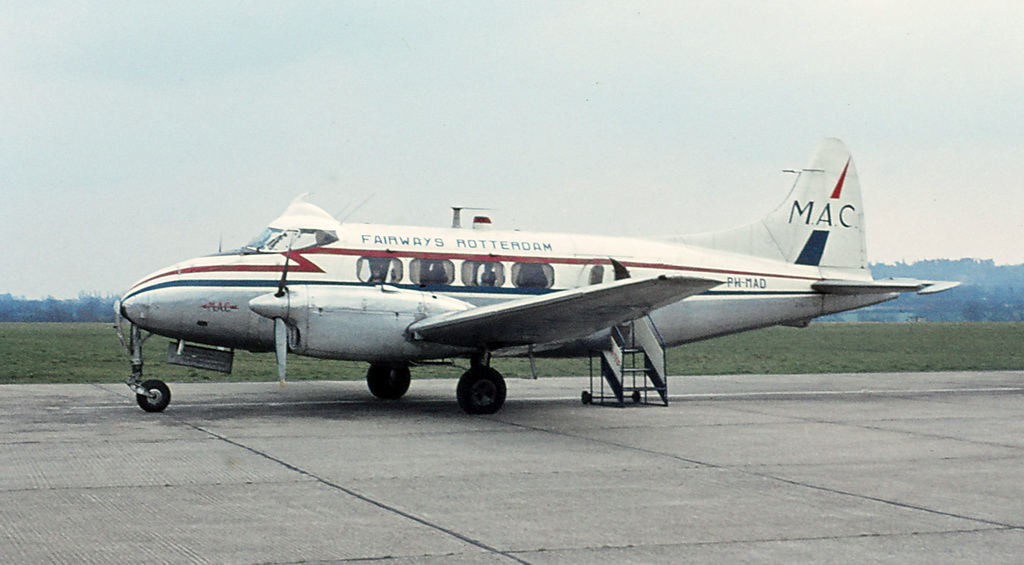
PH-MAD of Martin's Air Charter at Southampton, 1964. Barry Friend collection.
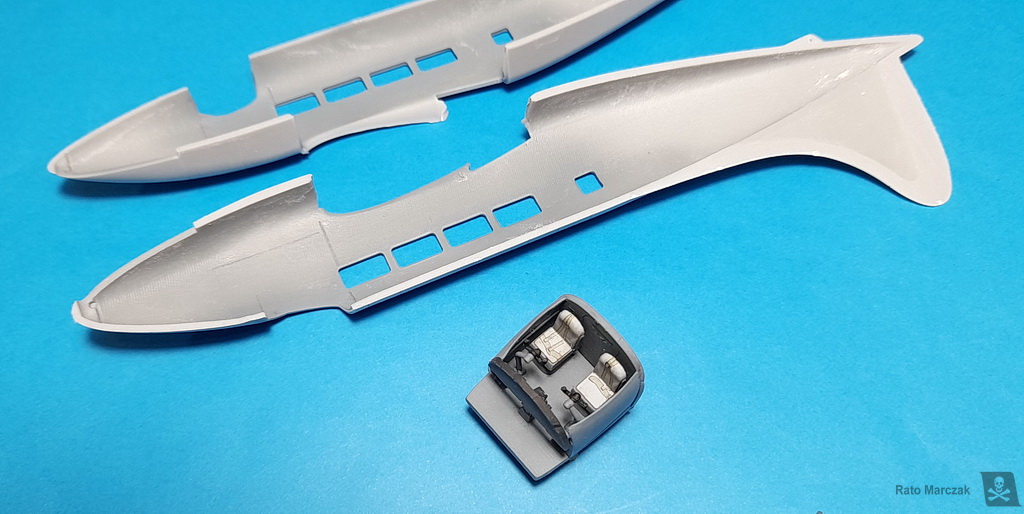
The construction started by cleaning the fuselage halves and building the basic cockpit. I even found a use for some leftover seat belt decals. Very little of it would be visible through the cockpit windows, I deduced, so the only real addition was a couple of gauges installed on top of the instrument panel after the fuselage was closed.
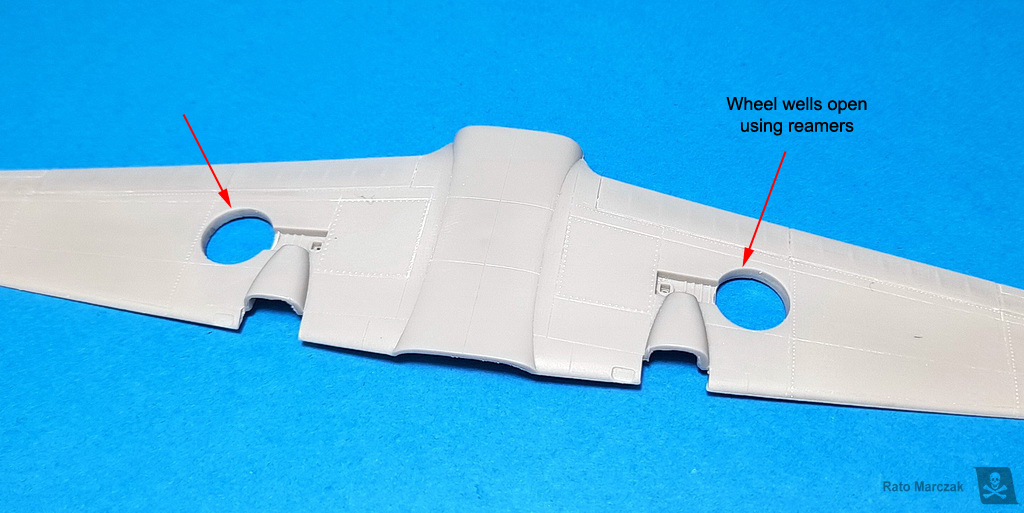
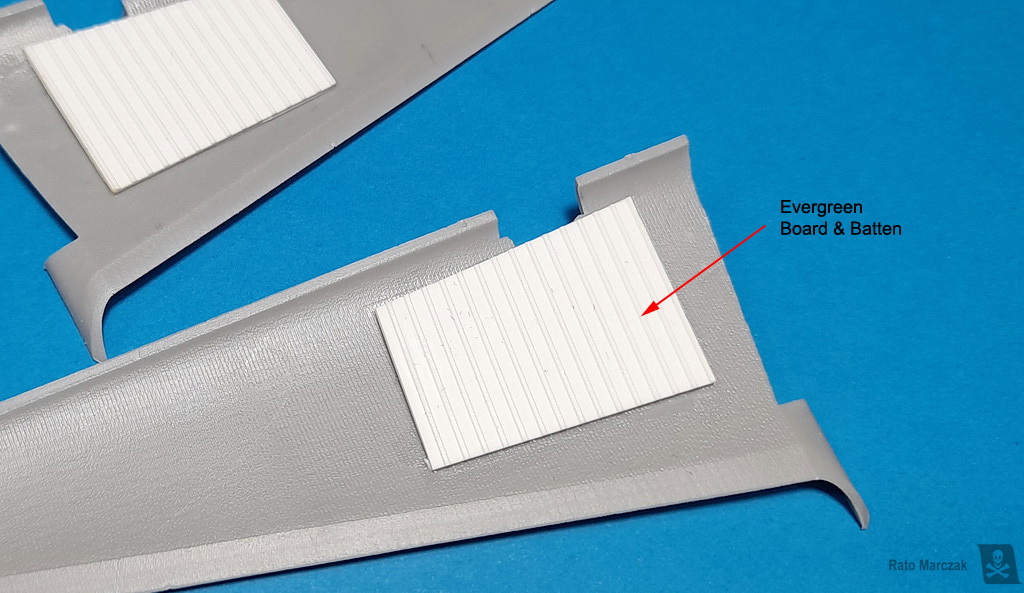
One thing that annoys me in an aircraft model is (too) shallow landing gear bays. I understand that due to manufacturing limitations, it is not always possible to make them dimensionally accurate, but some of them as so shallow that I prefer to do something about them. In this case, I was not interested in rebuilding a whole wheel well, but to make it look more credible by increasing its depth. I reasoned that if I remove the ceiling of the bottom wing part it would add the thickness removed to the depth of the well, and I could detail the top wing part to play the roof (as in the real thing). I did it by simply opening the wheel bay using heavy-duty reamers. As for the top of the well, I simply glued a piece of Evergreen board & batten. Once the wings were glued, the well looked deeper, not enough to fit a wheel, but definitely better than the original kit part.
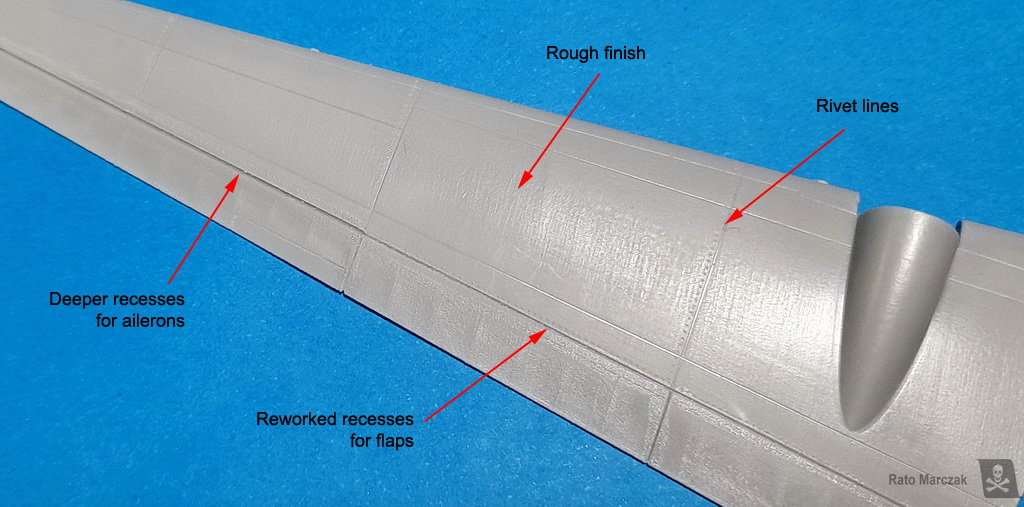
Another deception with this kit was the rough surface of the big parts. I understand this is a short-run model, but considering that many liveries of this aircraft are natural metal finish, Amodel could have worked a bit more on the molds. I had to sand all major parts before assembling them, and even after the model was primed, later on, I had to spend a few hours preparing the surface - more on that in a minute.
I also added some rivet lines. Just the more important ones, not all of them. I didn't want the rivets competing with the NMF. I also reworked the control surfaces lines by rescribing deeper lines for the ailerons and shallow ones for the flaps. This is important to differentiate them from the skin panel lines. In the end, given that some panel lines were inconsistent, I ended up lightly scoring all the kits' panel lines with a scriber.
Another point to consider: Amodel, strangely, molded scalloped flaps, like if they were fabric covered. As far as I can tell, they were not, but I thought it would be too much trouble to correct them.
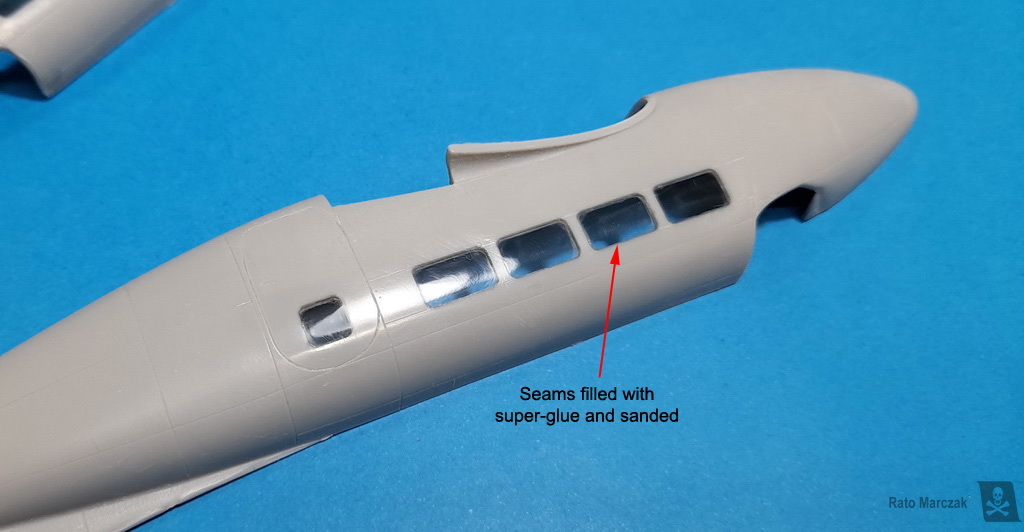
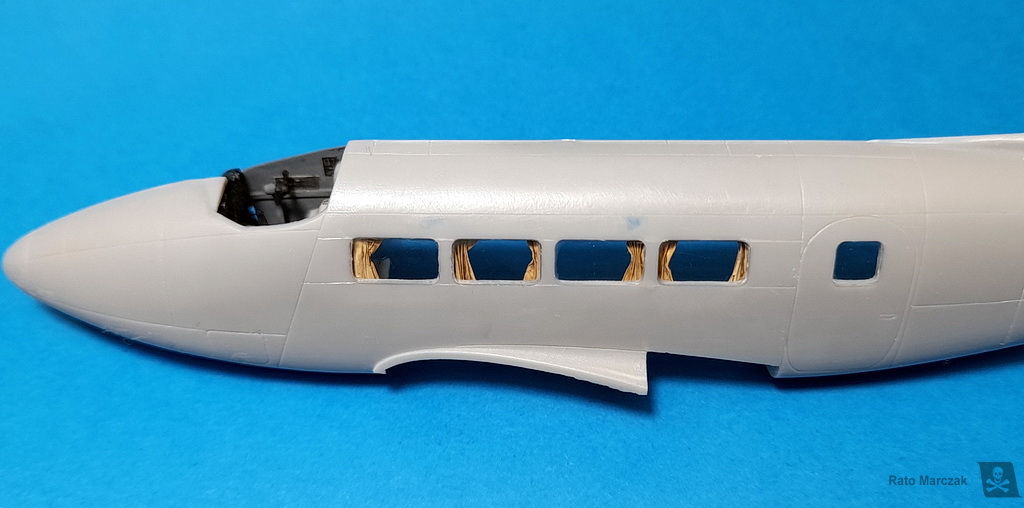
At this point, I had to install the passenger windows. I really wanted to do a decent job with them, for I think they are a characteristic of passenger aircraft. To me, nothing worse than an airliner model with the windows blurred and lazily masked.
First, I sanded the border of the clear parts just enough to make them plug tightly into the openings. Liquid cement was applied only on the fuselage parts and waited to dry for a few seconds, then I pressed the windows in place. I purposedly left the windows a fraction of a millimeter raised, so that I had some material to sand later on. Once the glue had hardened, I applied a continuous bead of superglue around all the perimeter of the windows and hit them with the accelerator. Finally, I sanded all the windows until they were flush with the fuselage. Only then did I start with progressively finer sandpaper until the windows were almost polished. I think all the work was worth it. Now I had a nice starting point for well defined-windows:
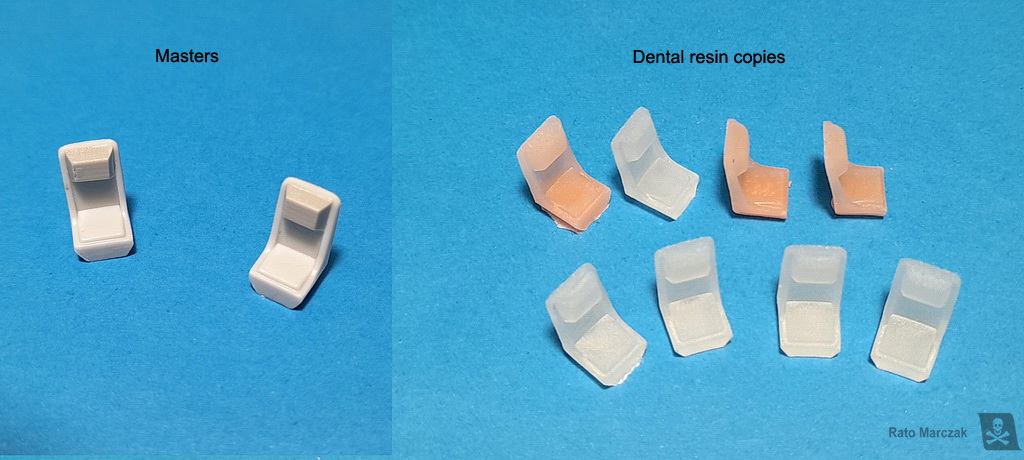
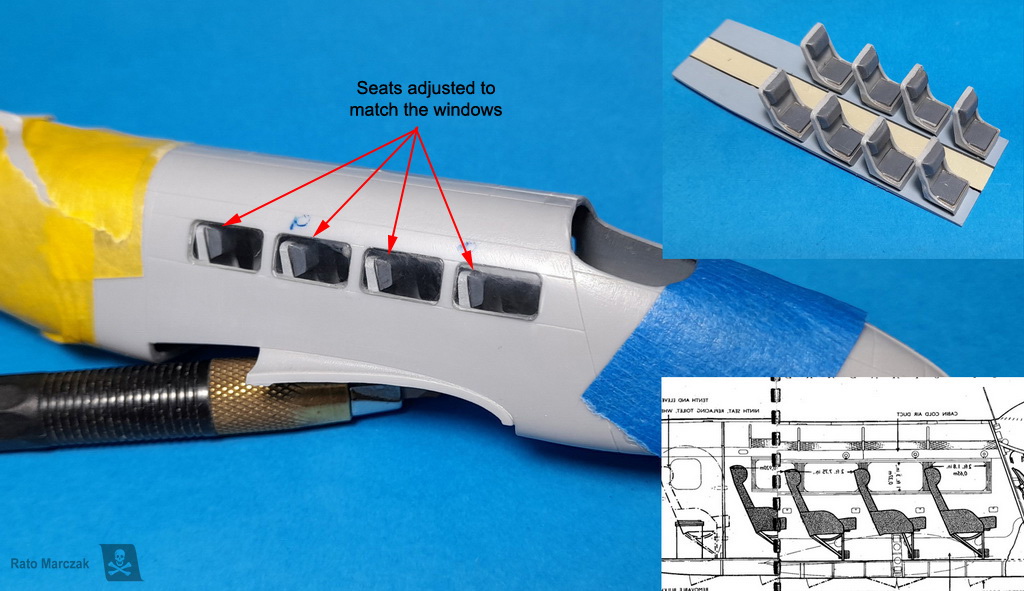
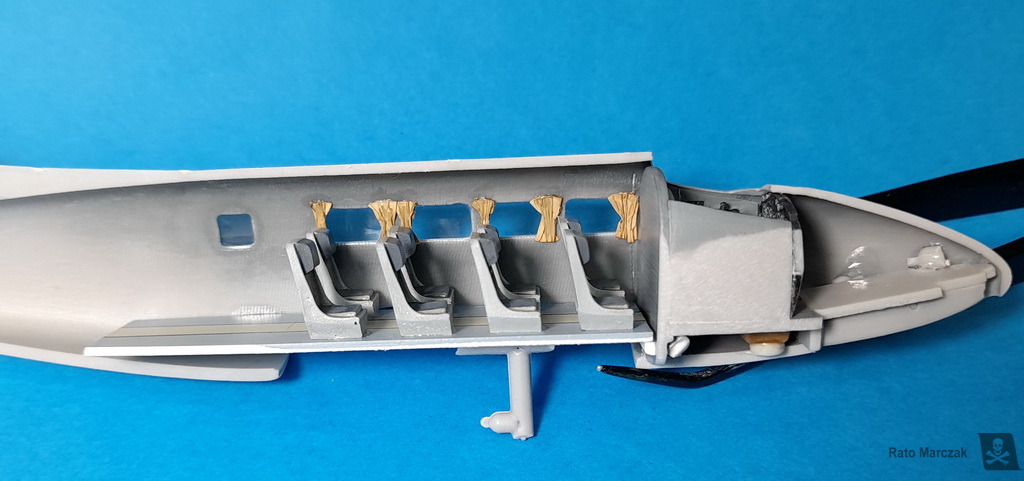
Before closing the fuselage, I decided to add some basic interior for the passenger cabin. The kit brings none. Using factory drawings, I scratchbuilt a couple of seats loosely resembling the Dove seats. Then I copied enough of them in dental resin and painted them with colors from my mind. The cabin floor was cut from a 0.75 mm plastic card and adjusted to fit inside the fuselage through the wing opening after it is closed. I marked the position of the eight seats with tape on the floor. The seats were glued with acrylic glue and, with the fuselage temporarily closed with tape, I inserted the floor+seats assembly in its position inside the fuselage. The slow-setting acrylic glue gave me some time to make final adjustments to each seat position, if necessary.

Another thing that I miss in airliner models is the curtains... they are so characteristic that I invented a method to simulate them using aluminum foil. It worked fine, but the seats must leave some room between them and the windows. Now I could finally close the fuselage:

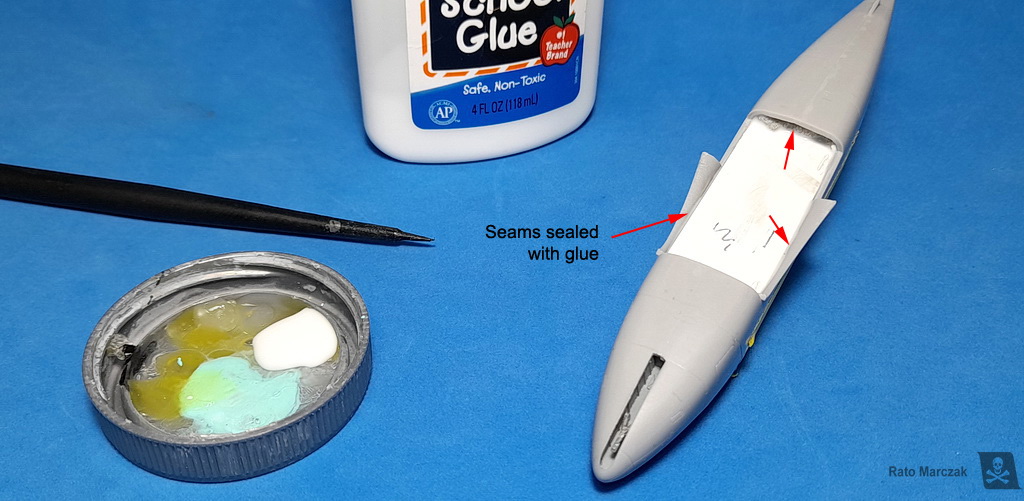
After all that work with the windows and seats, I anticipated that a good deal of sanding and surface preparation would come next. The last things I would like to see were dust and sanding residue entering the fuselage and sticking to the windows... I decided to play safe and sealed all the entrances to the interior of the fuselage with white glue.
Oh, and don`t forget to add weight to the nose. I did, and I had to open a hole in the nose to insert white metal balls, one by one, later on. Duh!
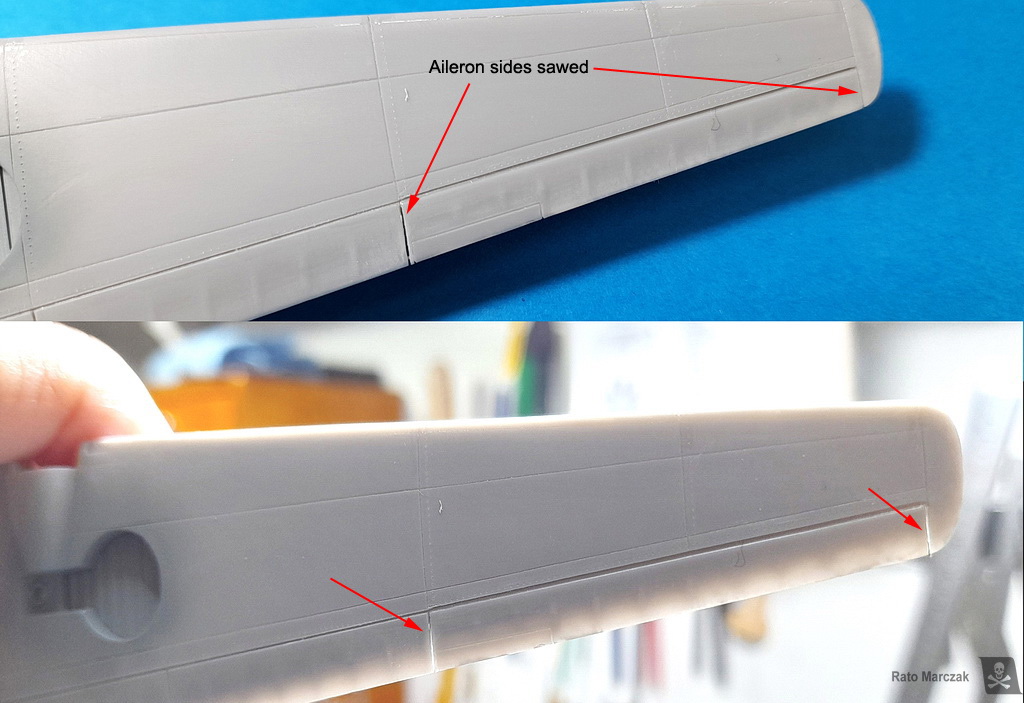
With the fuselage closed, I could cement the wing parts together and start working on its details. The ends of the ailerons were sawed to make them look more like movable parts. The see-through there makes a lot of difference.
The engine nacelles fitted well, but upon inspecting photos of preserved Doves, I found several small details missing. I added what I think is the oil tank cap on the port side of each nacelle, as well as a visible access hatch aft the engine. Raised details play an important part in the final texture of the models. I for one don't like scale models incorporating exclusively recessed details, as much as I didn't like the old ones with only raised details. Fortunately, modern kits are accurately balancing this issue.
Another detail missing in the kit wing is the landing light. I scribed the details there and drilled a dish to accept the light/lens later on.


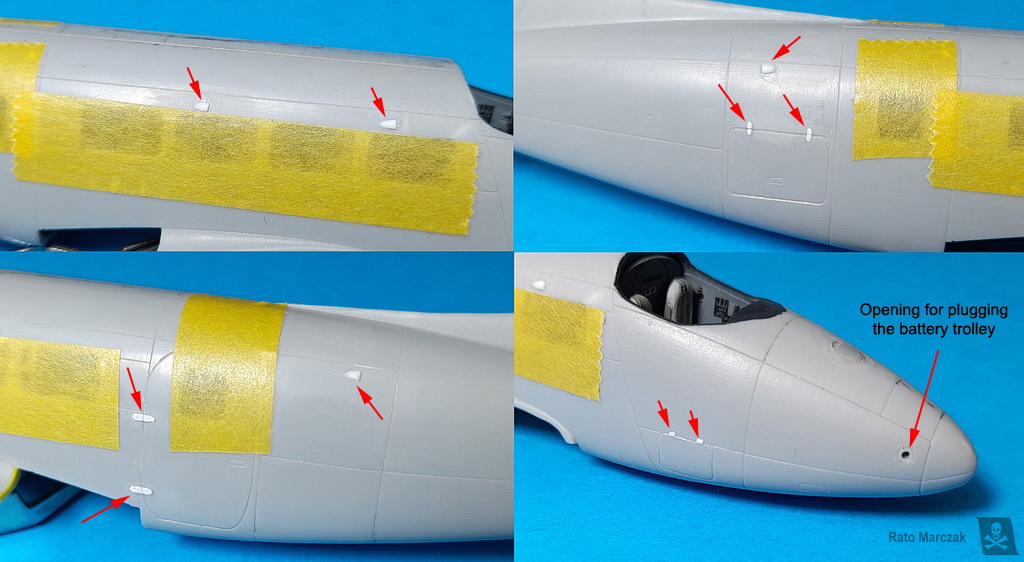
After sanding further the fuselage and wings to attenuate the pebbly surface finish, the several air inlets/outlets molded on the fuselage, removed earlier during the project, were replaced by new ones. I also added the hinges of the passenger and cargo doors, as well as maintenance hatches. An opening to attach the starter cart was drilled on the starboard side of the nose.
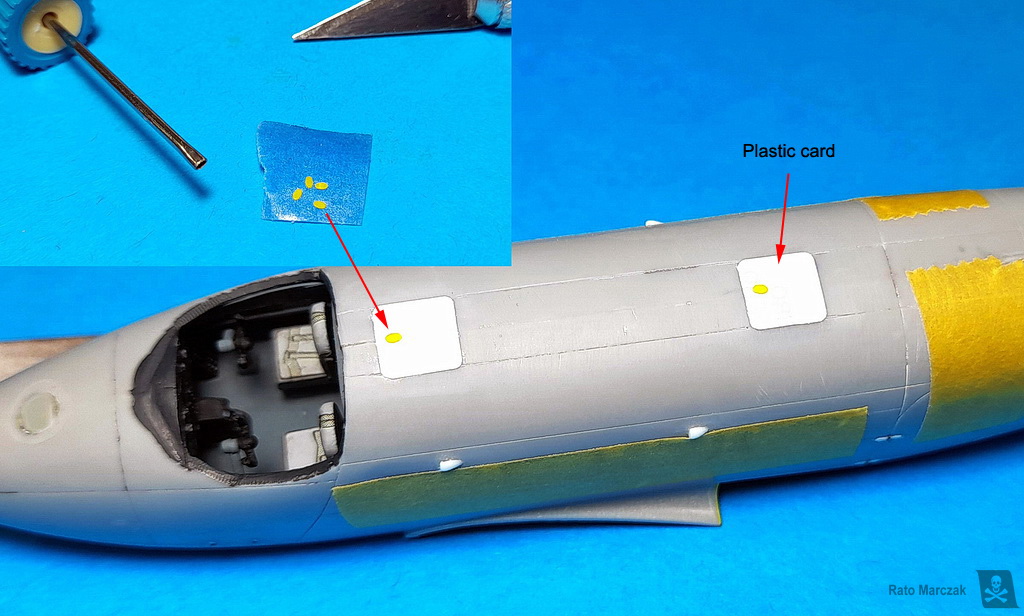
In the same vein as the raised/recessed detail subject described above, the two rectangular panels on the top of the fuselage (I assume they house VHF antennas) were recessed in the kit. I replaced them with an overlapping 0.2 mm thick plastic card and decorated them with an ellipsoidal detail punched out from 0.15 mm plastic card. These are the kind of detail that we see clearly in real airplanes, and if you visit airports regularly you know what I mean. These texture details make a huge difference in the final appearance model.
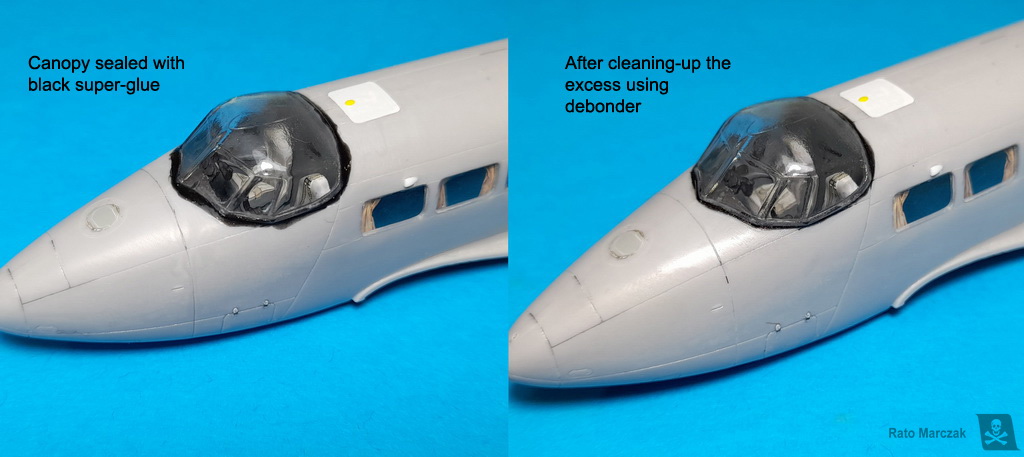
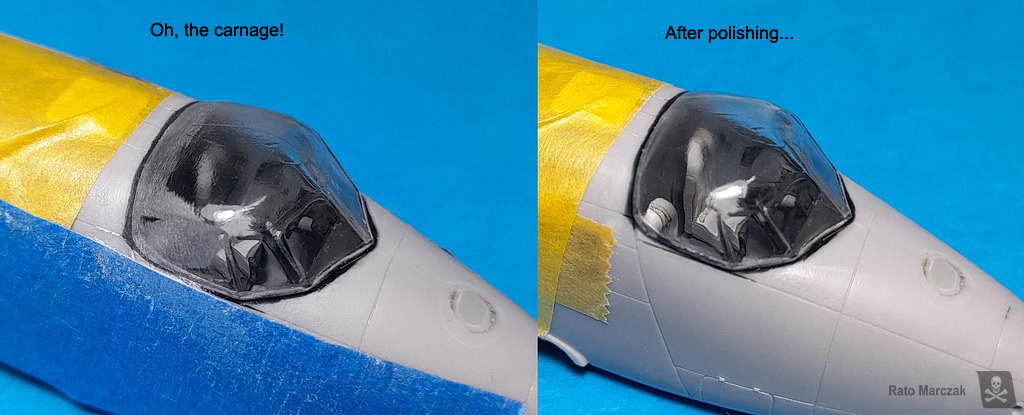
Ok, time to glue that canopy. After gluing it in position, I let it dry well. Next, the seam along the perimeter of the canopy was flooded with black superglue, sealing the cockpit. Debonder was used to remove the excess, making my life much easier. But unfortunately, the canopy was a tad too wide, leaving an annoying step on both sides. I had to resource files to correct things. Once the step was reduced to an acceptable panel line, I rescribed the affected panel lines and polished the canopy. Job well done... I feel good.
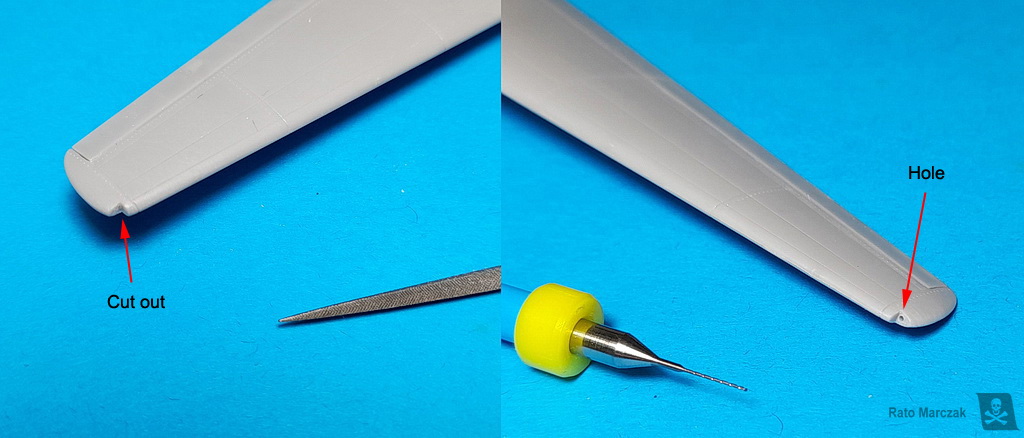
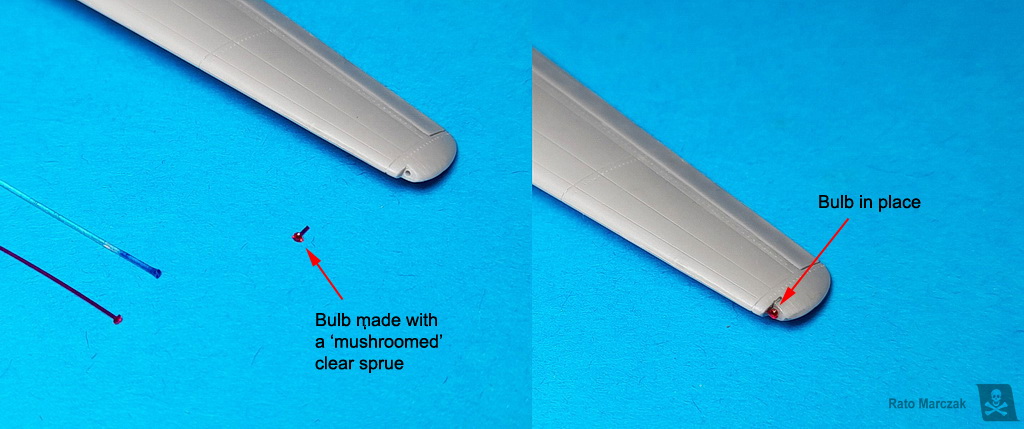
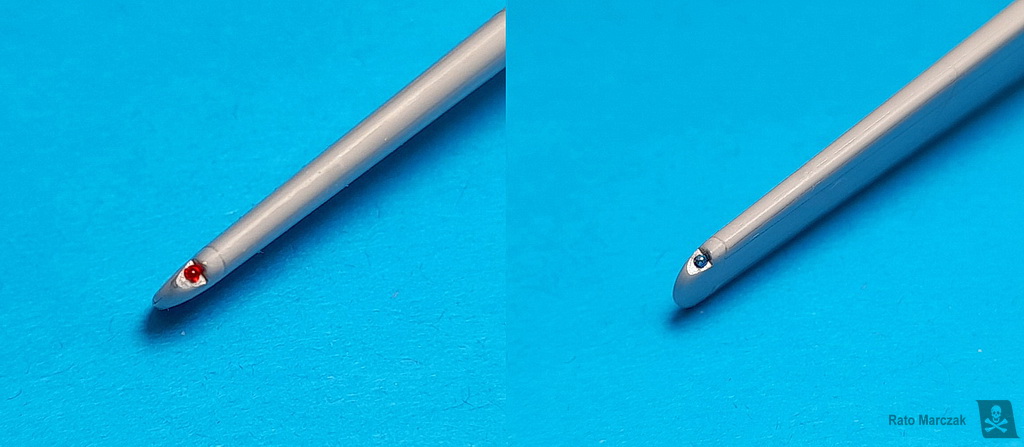
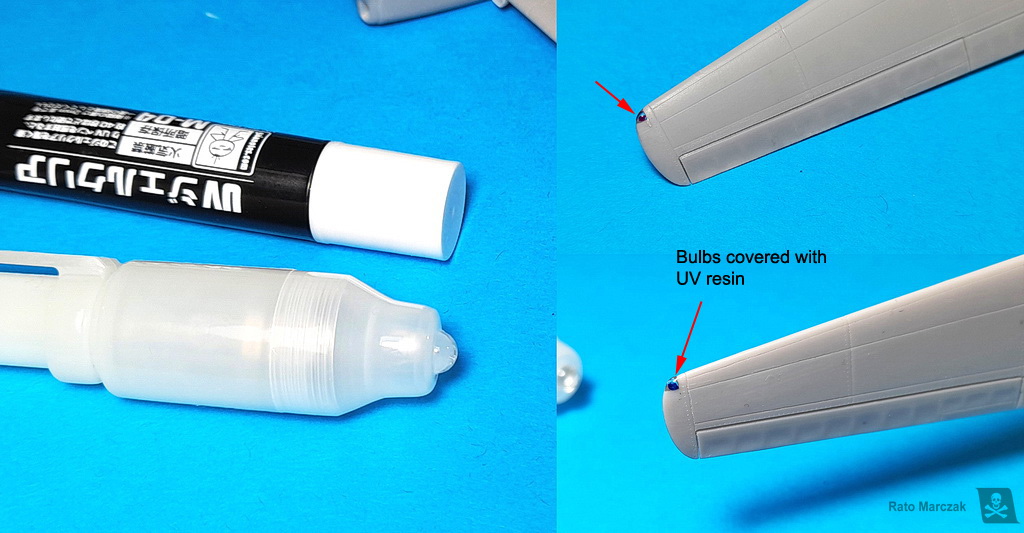
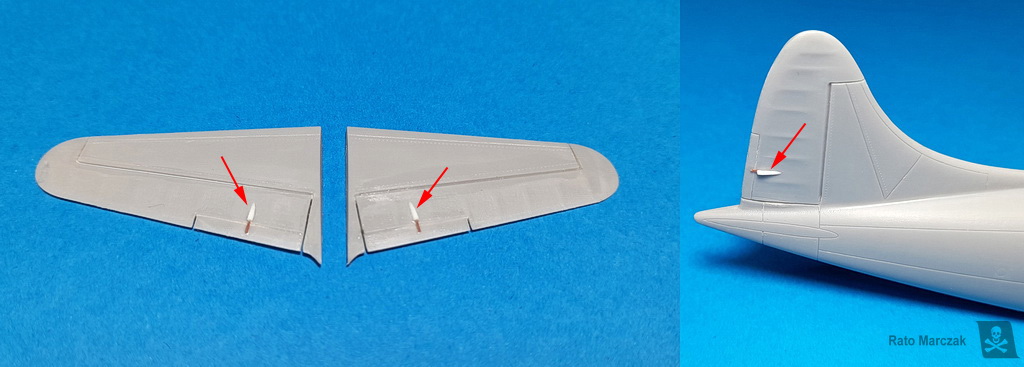
And finally one last step before gluing the wings to the fuselage: navigation lights. This time I abandoned my usual way to make wingtip lights and opted for using UV curing resin instead of clear pieces. I started making the square cut that will receive the light. I then drilled a hole and inserted a mushroomed red/blue stretched sprue. The wingtip was then filled with UV curing resin and sanded to shape and polished. This method gave me clear wingtips with colored bulbs inside them, instead of the usual colored wingtip:
And then the wing was glued to the fuselage, at last. It's funny that only after all that work I could appreciate the Dove lines in the model - Amodel did a good job on the general shape.
I had to work hard on the wing roots, and rescribe some details, but in the end, I almost got a perfect dihedral... nothing that some brute force won't solve, though. The rudder and the elevators received actuator arms for the trim tabs as they are absent in the kit.
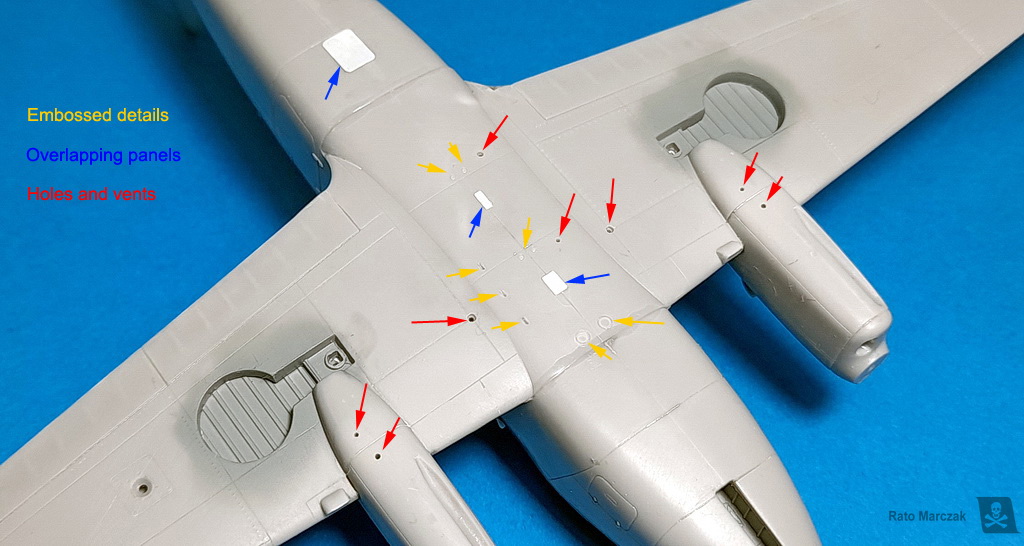
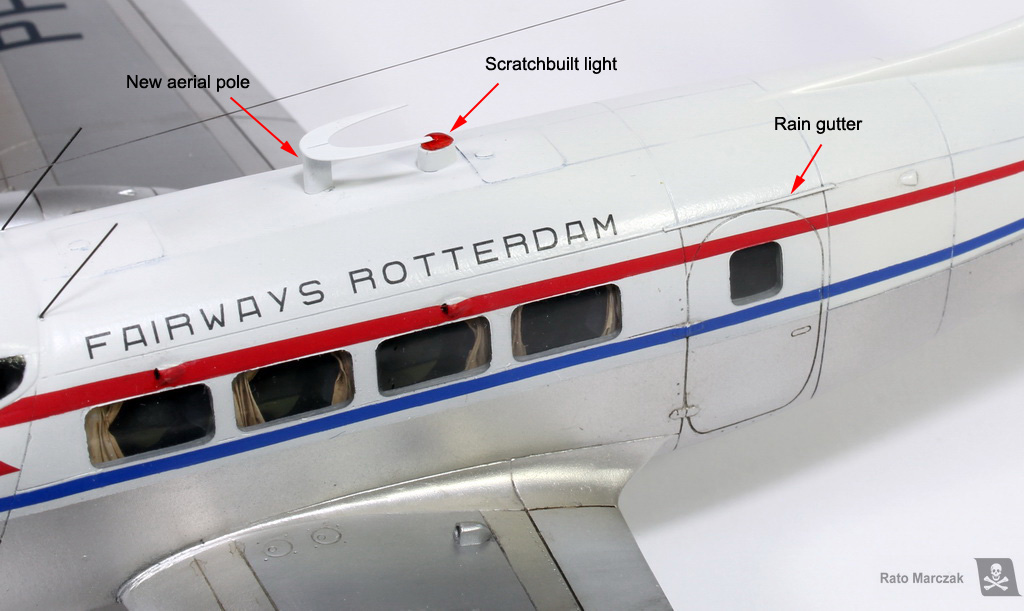
On the underside of the airplane, I referred to photos and drawings to add panels, vents, holes, etc... They added some interest to an otherwise boring area. On the top of the door, the Dove had a thin rod that worked as a gutter. The kit does not bring the detail, but it was just a matter of gluing a piece of stretched sprue to represent it.
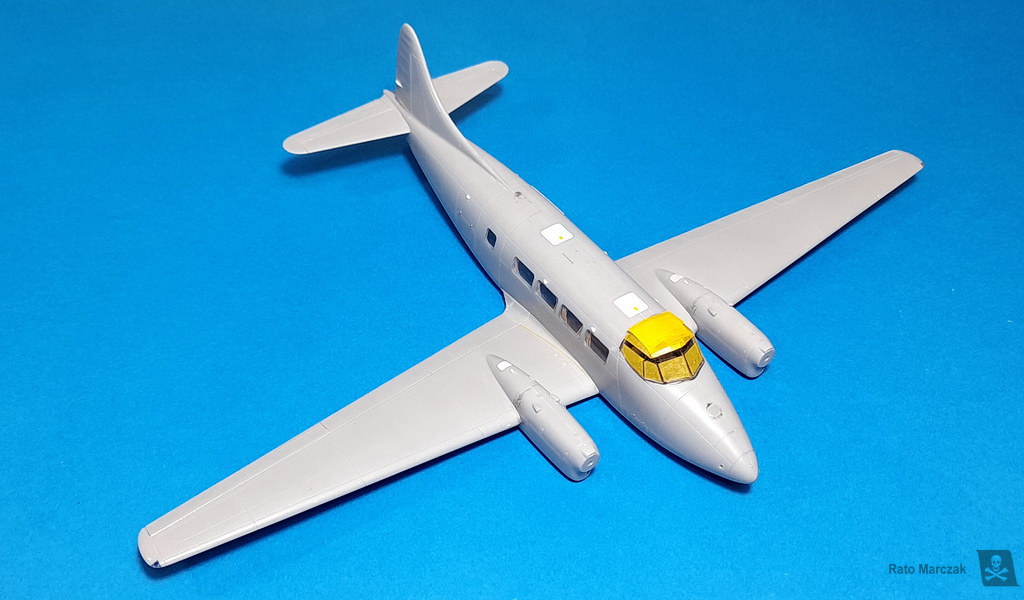
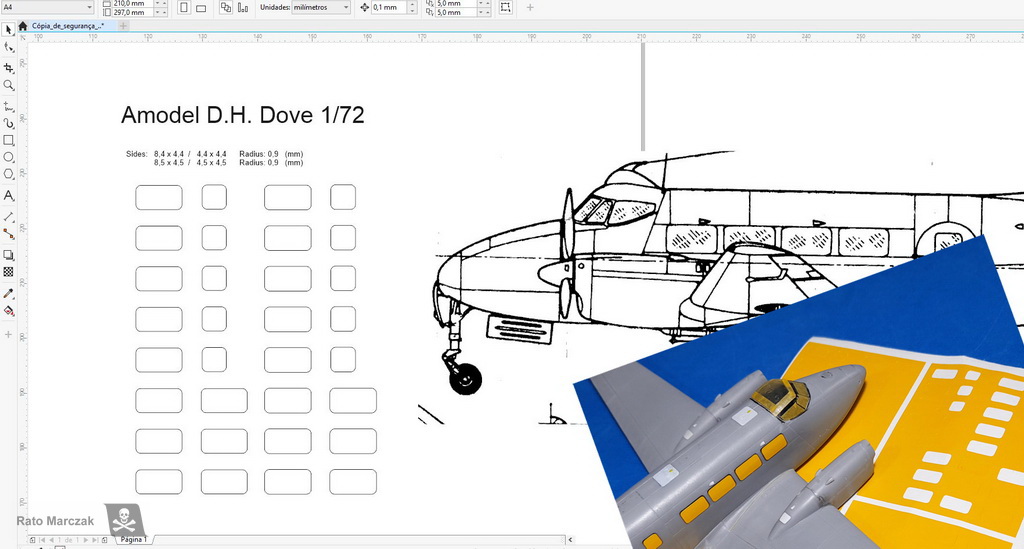
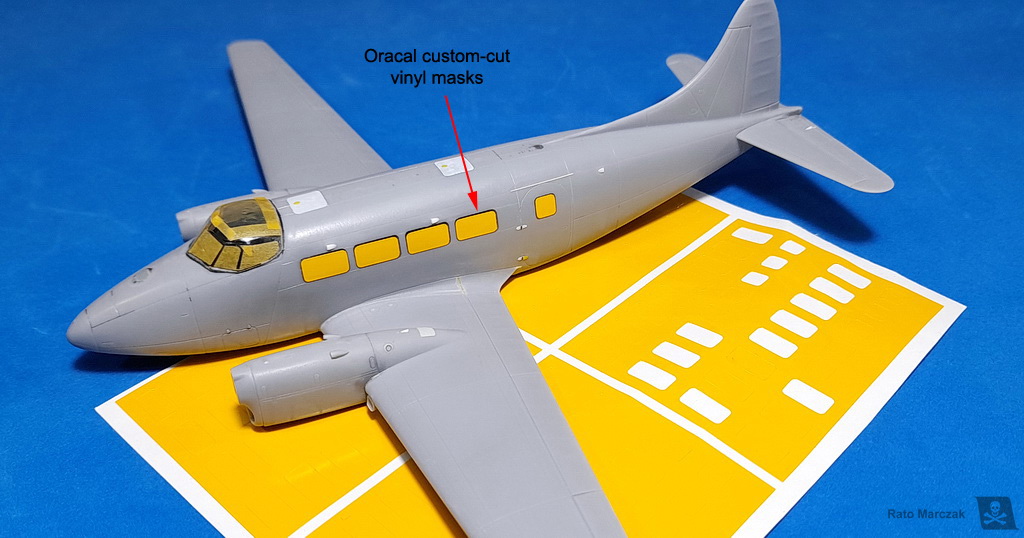
With all major components assembled, the cockpit windows were masked, and then I have to face the problem (for me) of making eight perfectly rectangular, with perfectly round corners, perfectly identical, perfectly placed masks for the passenger windows:
I decided not to take any risks and prepared precise drawings to cut the windows masks in a plotter cutter. I made two sets, one of them shrunk by 0.1 mm, just in case. I sent the drawings to my friend Ralphy Hiroshi, who did a perfect job in cutting the masks in Oracal vinyl.
If you are interested in the files to cut your own masks too, here are them, in two formats:
After a final check (I'm getting old and forgetting things...) the model was finally primed. I found many spots to fix and had to sand virtually everything again to eliminate completely the rough finish from the molds...
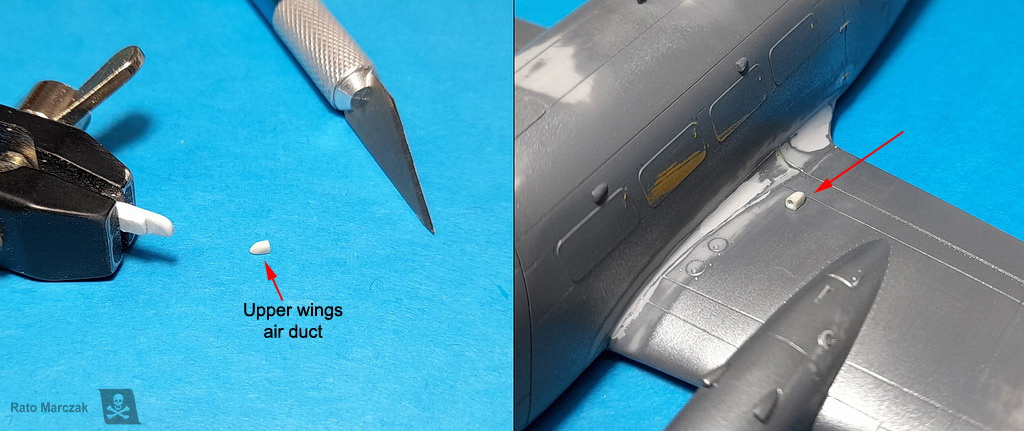
Before applying the second round of primer, I added the air inlets which go on top of each wing, close to the fuselage. Amodel omitted completely this detail, and I added them late because I had to rework the wing root joints too and they would be in the way.
Then a second coat of primer was applied, but it wouldn't be the last... A third round of primer was necessary until I was satisfied. All primers were Mr.Surfacer 1200, but the last one was mixed with Mr. Surfacer Black 1500, to distinguish the last coat from the previous ones. Wet sanding with fine grit sandpaper prepared the little Dove to receive paint:

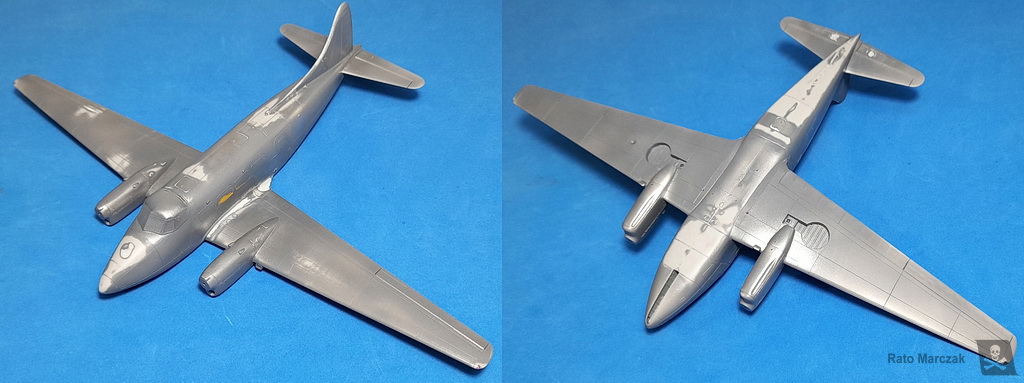
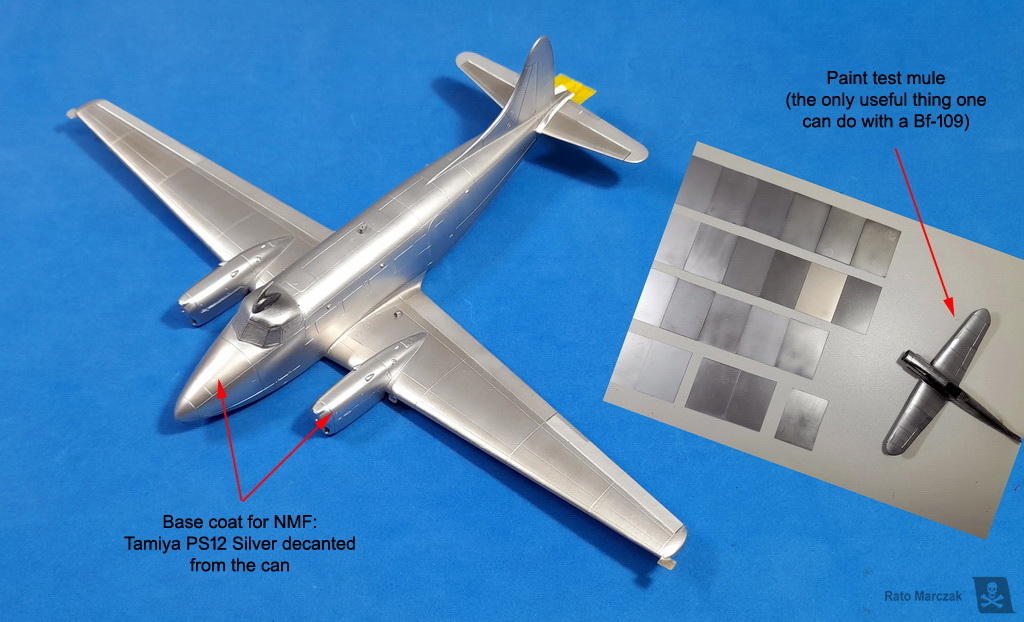
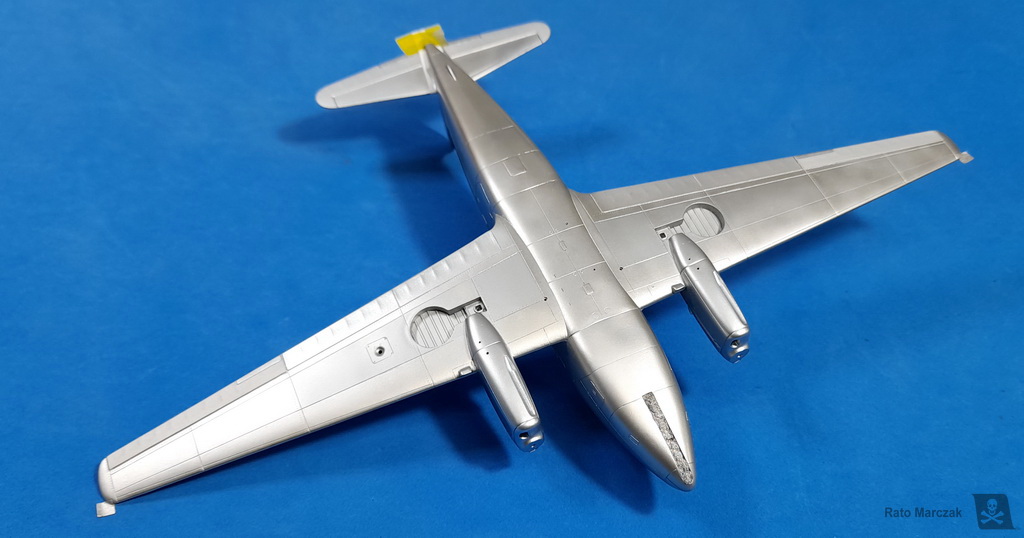
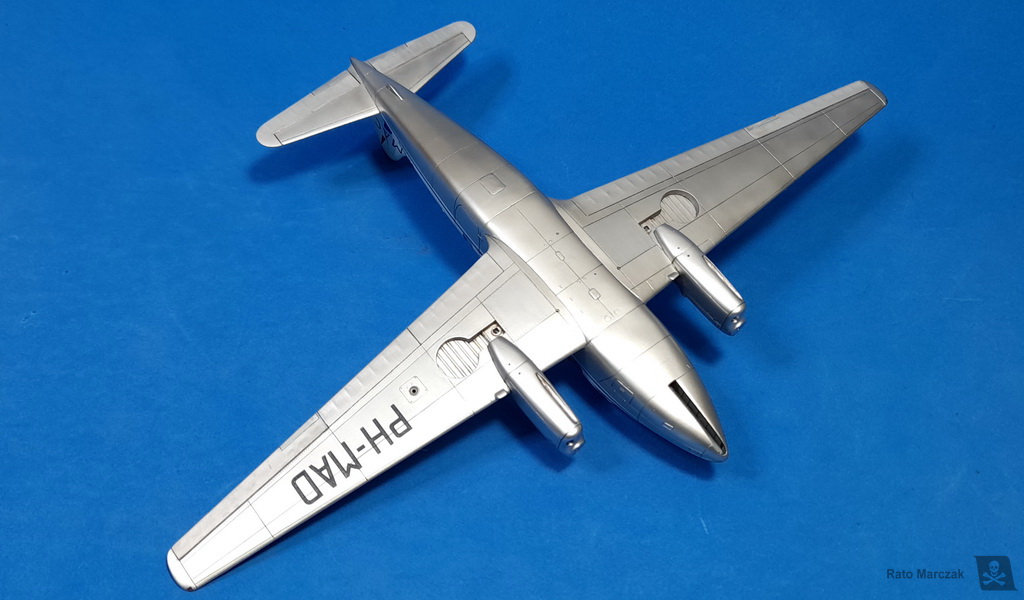
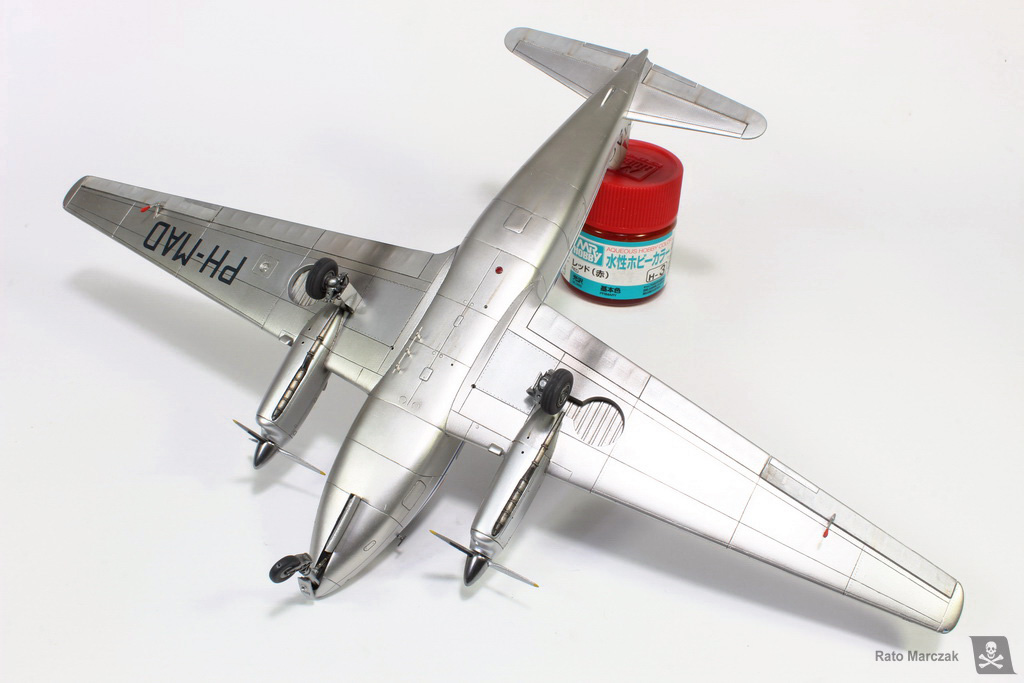
The base coat for the NMF was Tamiya PS12, decanted from the spray can. It dries fast, is durable, and great preparation for definitive metallic paints.
Once the base coat was dry, I applied an overall light coat of GSI Titanium, from their Super Metalic range. This color has a very subtle gold tint in it, and after many tests, I found out that it kind of captures better the aspect of aluminum in 1/72... in my opinion at least. Don't be fooled, though, as you can barely distinguish this paint from regular aluminum.
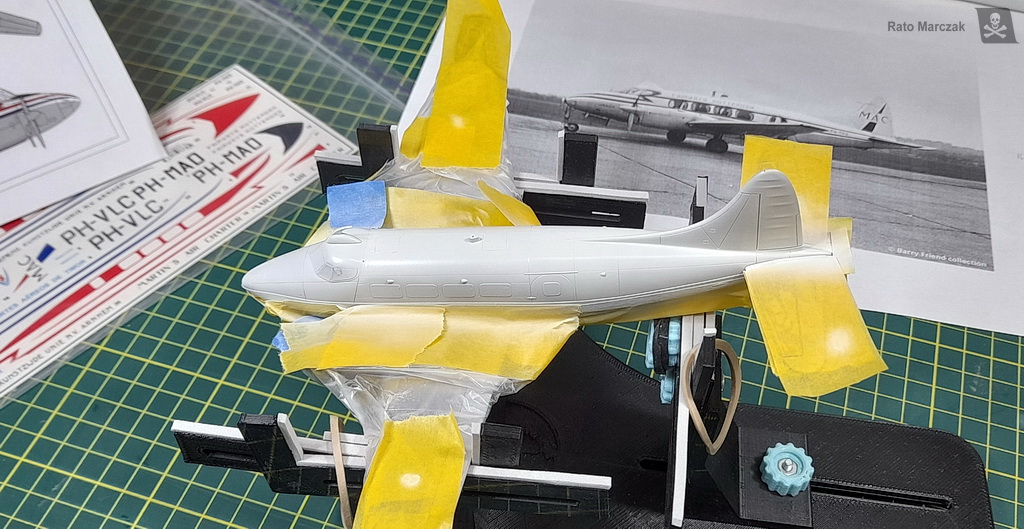
Since I had decided for the PH-MAD, masking was needed to isolate the NMF from the white top. A couple of passes of automotive white lacquer did the job. Once dry, the rudder was painted with GSI Off White to leave it with a slightly different hue than the fuselage, given it was fabric-covered.
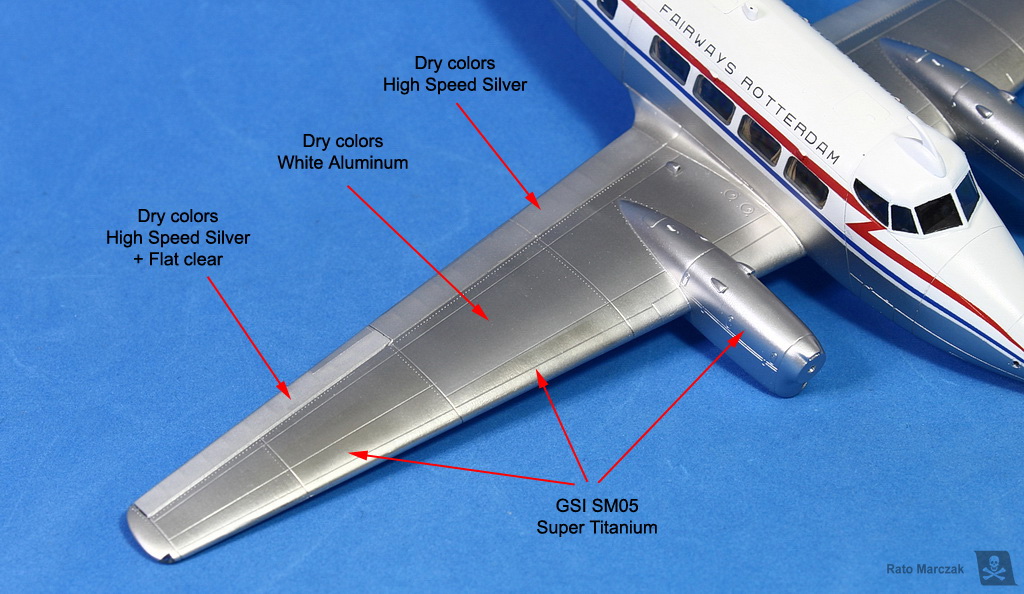
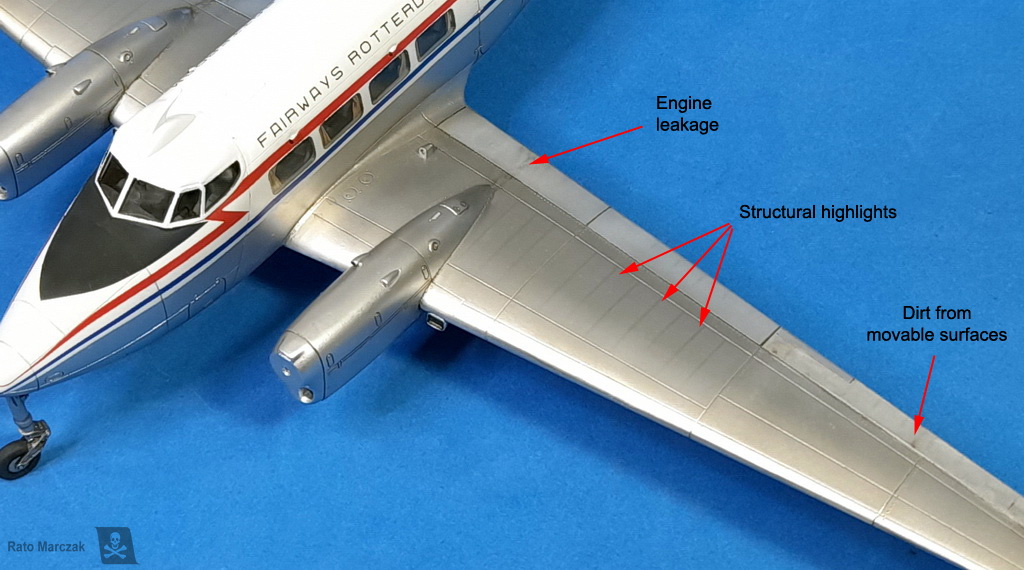
The NMF was tweaked a bit with other metallic shades. The big panels on the wings over the fuel tanks were masked and painted with White Aluminum, from Dry Colors. The movable surfaces were painted with High-Speed Silver, also from Dry Colors. The ailerons and elevators, however, were further airbrushed with flat clear to distinguish them from the flaps:
The decals are from the kit. They are not of the best quality and have a very weak adhesive. I needed three night-sessions to apply them in groups because I felt that it was better to let a group set completely first and then proceed to the next. When all decals from the white area were in place, I re-masked the NMF area end sealed the decals with a semi-gloss varnish.
The clear film was removed from the registration codes on the wings since they would not receive any protective clear coat and I didn't want the film visible.
At this point the model was put aside and work started on the landing gear, the last major assembly to be built. The kit parts are OK but can be refined here and there. Using photos as reference, I was able to improve the struts by adding holes, bolts, etc...
I also made the nose landing gear swivel.

The tires received a well-known treatment to simulate the grooves. I painted the tires black and masked the about-to-be grooves with 0.5 mm masking tape stripes. I would like to make 4 or 5, but my fat fingers allowed me to mask only three grooves. Then a rubber/dark grey color was airbrushed over the wheel and the masks were removed. The result is an optical illusion that the tire really has grooves. Work well when observed with bare eyes:

The model received an application of oil paint wash with varying intensity along the panel lines. This enhanced all the small details added during the construction.
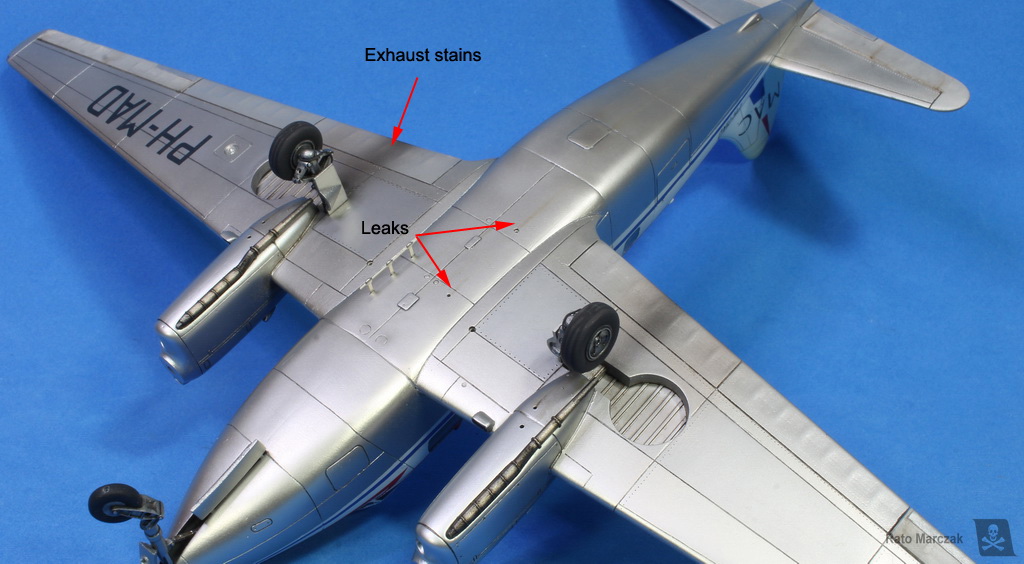
Even being an airliner, minimal weathering should be applied to the model. I limited myself to make a few streaks with oils, running from vents and alike. The exhaust stains are barely visible in real Doves, but I assumed that after a long haul flight they could have accumulated some under the wings aft the exhausts.
Some dirt was simulated around movable parts as well. The process was finished with aluminum powder scrubbed along lines of selected panels to simulate structural details (a tip stole from the late modeler Les Sundt). I should use more this tip in my models...
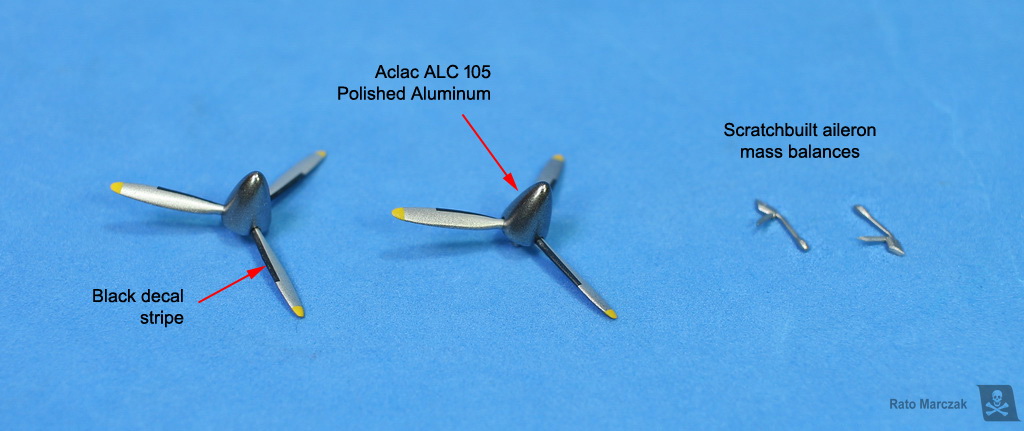
The propellers were painted with metallic paints. I opted for a more lustering finish for the spinners. I don't know why... things like these seem to be what makes them look like airliners. The black stripes on the leading edges of the blades are thin pieces of black decal applied with lots of setting solutions.
Oh, I forgot to mention that the kit does not bring the mass balances for the ailerons. I had to scratchbuilt them and install them at the very end of the project, thanks to my habit of holding my models by the wings.
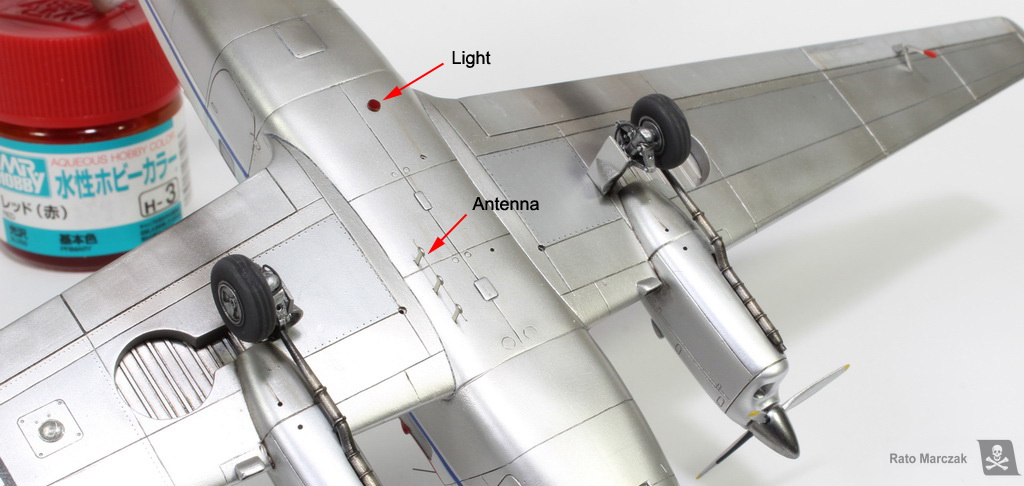
One good thing about this kit is the small fret of PE details. It made my life much easier. The antenna under the fuselage is one of the kit PEs. I also added a taxi light. The aileron mass balances were installed using acrylic glue to avoid any chances of me smudging the metal finish with stronger glues. And the landing light received a bulb and was finally covered with a clear disk.

Many other small details make a big difference when you look closer at the model. The windscreen wipers are PEs from the kit. The big light on the top of the fuselage was scratchbuilt, as was the pole holding the horseshoe-shaped antenna, another PE part.
One tip that you may find useful: the fuselage and engine air inlets are all solid. It would be impossible to open everyone using drill bits. In such cases, I just painted the opening with a technical pen. I bet you thought they were hollowed...
The antennas were installed last, and although the PE fret brings a set of electric dischargers, I couldn't see them in photos of Doves from the 60s. I installed just a couple in the rudder. I goofed with the amount of weight installed in the nose: I forgot that the glue used to fix the weights dries, actually leaving less weight than you initially thought. My Dove is not a tail sitter, but a breath is all that it needs to sit on its tail. So I also scratchbuilt a tail support. It is telescopic, so I can use it with other models (the Dove will be pinned to its diorama base later).
And there you have it. My first airliner since a B727 that I built 20+ years ago... Now, perhaps I find some mood to finish that Airfix Bristol Freighter in the shelf of doom.

I hope you liked this model. See you in the next one.
Link to Part 2
Another version of this article was published on Scale Aircraft Modelling magazine in June/2022. It is a wonderful modeling magazine. Consider subscribing it...
The Dove is one of the many outcomes of the Brabazon Committee in the mid-1940s when the British government started to investigate the future of the commercial passenger industry after World War II. One of the conclusions of the committee was that twin-engine, propeller-driven aircraft would find a wealthy market covering regional passenger flights. Another outcome of the committee led to the Comet, but its catastrophic debut years changed the course of airliner history - a talk for another opportunity.
So, when Amodel released their DH 104, I grabbed one as soon as I could.
Armed with a few photos from the Devon on display at RAF Cosford Museum, I quickly realized that both kits offered by Amodel, the Dove and the Devon, had the short canopy (many had the tall one, Heron-type, installed). A careful analysis of the canopy part also showed that it would not be a good idea to model one of the versions with a clear canopy roof, neither (oh... forget those beautiful green/white Devons of the Royal Navy). All these things narrowed significantly the number of versions that I could do. After studying many internet photos, I ceded to the charms of a civilian version, incidentally, one of the three decal versions in the kit. My choice was this DH 104 Dove 1 serial #04453, PH-MAD of Martin's Air Charter (the boxart version), on loan to Fairways Rotterdam. The photo that caught me was this one, at the Southampton (Eastleigh) ramp in 1964 (and for some strange reason, the stairs caught my interest almost as much as the Dove itself):
PH-MAD of Martin's Air Charter at Southampton, 1964. Barry Friend collection.
The construction started by cleaning the fuselage halves and building the basic cockpit. I even found a use for some leftover seat belt decals. Very little of it would be visible through the cockpit windows, I deduced, so the only real addition was a couple of gauges installed on top of the instrument panel after the fuselage was closed.
One thing that annoys me in an aircraft model is (too) shallow landing gear bays. I understand that due to manufacturing limitations, it is not always possible to make them dimensionally accurate, but some of them as so shallow that I prefer to do something about them. In this case, I was not interested in rebuilding a whole wheel well, but to make it look more credible by increasing its depth. I reasoned that if I remove the ceiling of the bottom wing part it would add the thickness removed to the depth of the well, and I could detail the top wing part to play the roof (as in the real thing). I did it by simply opening the wheel bay using heavy-duty reamers. As for the top of the well, I simply glued a piece of Evergreen board & batten. Once the wings were glued, the well looked deeper, not enough to fit a wheel, but definitely better than the original kit part.
Another deception with this kit was the rough surface of the big parts. I understand this is a short-run model, but considering that many liveries of this aircraft are natural metal finish, Amodel could have worked a bit more on the molds. I had to sand all major parts before assembling them, and even after the model was primed, later on, I had to spend a few hours preparing the surface - more on that in a minute.
I also added some rivet lines. Just the more important ones, not all of them. I didn't want the rivets competing with the NMF. I also reworked the control surfaces lines by rescribing deeper lines for the ailerons and shallow ones for the flaps. This is important to differentiate them from the skin panel lines. In the end, given that some panel lines were inconsistent, I ended up lightly scoring all the kits' panel lines with a scriber.
Another point to consider: Amodel, strangely, molded scalloped flaps, like if they were fabric covered. As far as I can tell, they were not, but I thought it would be too much trouble to correct them.
At this point, I had to install the passenger windows. I really wanted to do a decent job with them, for I think they are a characteristic of passenger aircraft. To me, nothing worse than an airliner model with the windows blurred and lazily masked.
First, I sanded the border of the clear parts just enough to make them plug tightly into the openings. Liquid cement was applied only on the fuselage parts and waited to dry for a few seconds, then I pressed the windows in place. I purposedly left the windows a fraction of a millimeter raised, so that I had some material to sand later on. Once the glue had hardened, I applied a continuous bead of superglue around all the perimeter of the windows and hit them with the accelerator. Finally, I sanded all the windows until they were flush with the fuselage. Only then did I start with progressively finer sandpaper until the windows were almost polished. I think all the work was worth it. Now I had a nice starting point for well defined-windows:
Before closing the fuselage, I decided to add some basic interior for the passenger cabin. The kit brings none. Using factory drawings, I scratchbuilt a couple of seats loosely resembling the Dove seats. Then I copied enough of them in dental resin and painted them with colors from my mind. The cabin floor was cut from a 0.75 mm plastic card and adjusted to fit inside the fuselage through the wing opening after it is closed. I marked the position of the eight seats with tape on the floor. The seats were glued with acrylic glue and, with the fuselage temporarily closed with tape, I inserted the floor+seats assembly in its position inside the fuselage. The slow-setting acrylic glue gave me some time to make final adjustments to each seat position, if necessary.
Another thing that I miss in airliner models is the curtains... they are so characteristic that I invented a method to simulate them using aluminum foil. It worked fine, but the seats must leave some room between them and the windows. Now I could finally close the fuselage:
After all that work with the windows and seats, I anticipated that a good deal of sanding and surface preparation would come next. The last things I would like to see were dust and sanding residue entering the fuselage and sticking to the windows... I decided to play safe and sealed all the entrances to the interior of the fuselage with white glue.
Oh, and don`t forget to add weight to the nose. I did, and I had to open a hole in the nose to insert white metal balls, one by one, later on. Duh!
With the fuselage closed, I could cement the wing parts together and start working on its details. The ends of the ailerons were sawed to make them look more like movable parts. The see-through there makes a lot of difference.
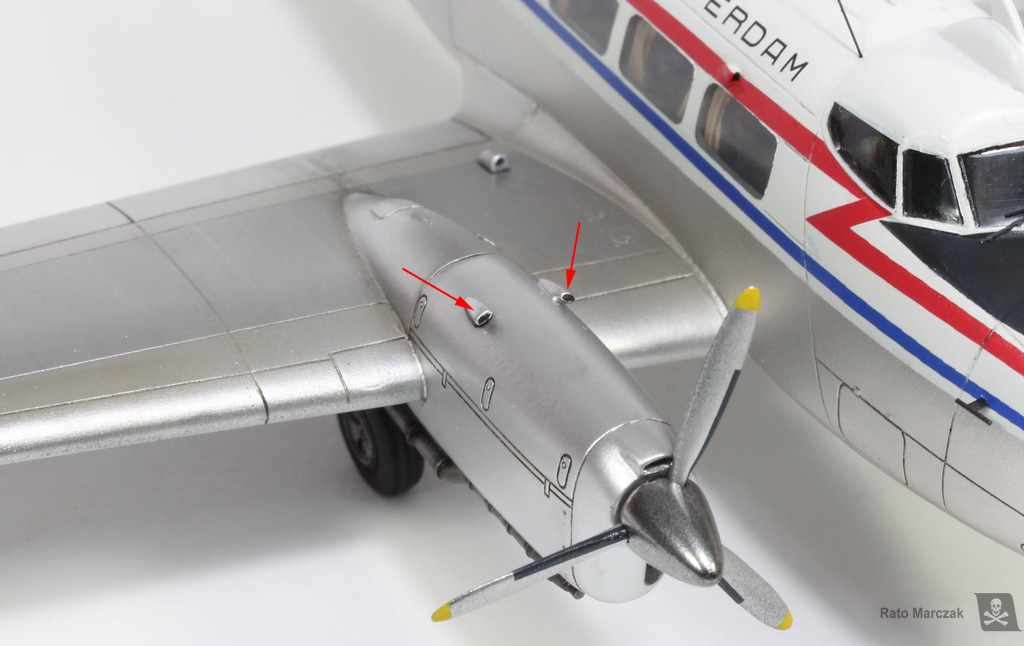
The engine nacelles fitted well, but upon inspecting photos of preserved Doves, I found several small details missing. I added what I think is the oil tank cap on the port side of each nacelle, as well as a visible access hatch aft the engine. Raised details play an important part in the final texture of the models. I for one don't like scale models incorporating exclusively recessed details, as much as I didn't like the old ones with only raised details. Fortunately, modern kits are accurately balancing this issue.
Another detail missing in the kit wing is the landing light. I scribed the details there and drilled a dish to accept the light/lens later on.
After sanding further the fuselage and wings to attenuate the pebbly surface finish, the several air inlets/outlets molded on the fuselage, removed earlier during the project, were replaced by new ones. I also added the hinges of the passenger and cargo doors, as well as maintenance hatches. An opening to attach the starter cart was drilled on the starboard side of the nose.
In the same vein as the raised/recessed detail subject described above, the two rectangular panels on the top of the fuselage (I assume they house VHF antennas) were recessed in the kit. I replaced them with an overlapping 0.2 mm thick plastic card and decorated them with an ellipsoidal detail punched out from 0.15 mm plastic card. These are the kind of detail that we see clearly in real airplanes, and if you visit airports regularly you know what I mean. These texture details make a huge difference in the final appearance model.
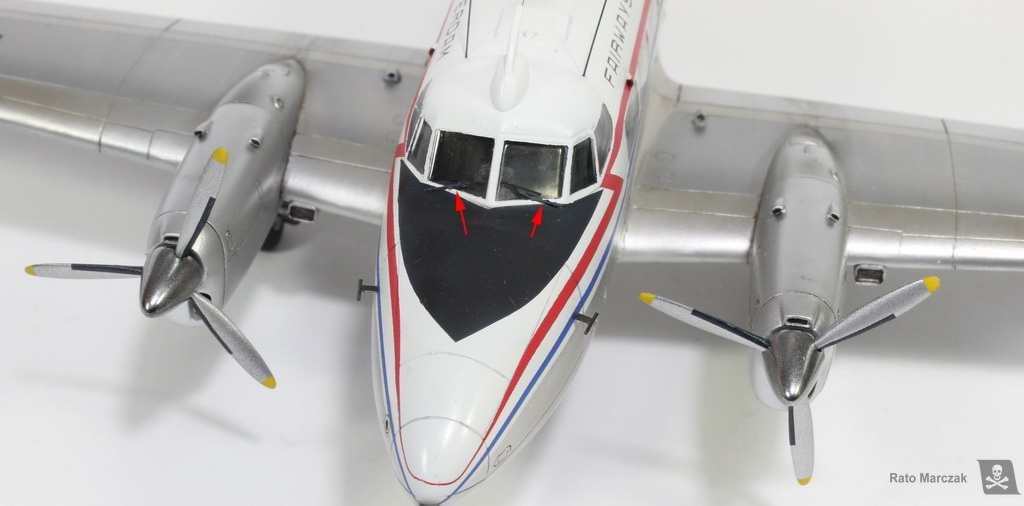
Ok, time to glue that canopy. After gluing it in position, I let it dry well. Next, the seam along the perimeter of the canopy was flooded with black superglue, sealing the cockpit. Debonder was used to remove the excess, making my life much easier. But unfortunately, the canopy was a tad too wide, leaving an annoying step on both sides. I had to resource files to correct things. Once the step was reduced to an acceptable panel line, I rescribed the affected panel lines and polished the canopy. Job well done... I feel good.
And finally one last step before gluing the wings to the fuselage: navigation lights. This time I abandoned my usual way to make wingtip lights and opted for using UV curing resin instead of clear pieces. I started making the square cut that will receive the light. I then drilled a hole and inserted a mushroomed red/blue stretched sprue. The wingtip was then filled with UV curing resin and sanded to shape and polished. This method gave me clear wingtips with colored bulbs inside them, instead of the usual colored wingtip:
And then the wing was glued to the fuselage, at last. It's funny that only after all that work I could appreciate the Dove lines in the model - Amodel did a good job on the general shape.
I had to work hard on the wing roots, and rescribe some details, but in the end, I almost got a perfect dihedral... nothing that some brute force won't solve, though. The rudder and the elevators received actuator arms for the trim tabs as they are absent in the kit.
On the underside of the airplane, I referred to photos and drawings to add panels, vents, holes, etc... They added some interest to an otherwise boring area. On the top of the door, the Dove had a thin rod that worked as a gutter. The kit does not bring the detail, but it was just a matter of gluing a piece of stretched sprue to represent it.
With all major components assembled, the cockpit windows were masked, and then I have to face the problem (for me) of making eight perfectly rectangular, with perfectly round corners, perfectly identical, perfectly placed masks for the passenger windows:
I decided not to take any risks and prepared precise drawings to cut the windows masks in a plotter cutter. I made two sets, one of them shrunk by 0.1 mm, just in case. I sent the drawings to my friend Ralphy Hiroshi, who did a perfect job in cutting the masks in Oracal vinyl.
If you are interested in the files to cut your own masks too, here are them, in two formats:
After a final check (I'm getting old and forgetting things...) the model was finally primed. I found many spots to fix and had to sand virtually everything again to eliminate completely the rough finish from the molds...
Before applying the second round of primer, I added the air inlets which go on top of each wing, close to the fuselage. Amodel omitted completely this detail, and I added them late because I had to rework the wing root joints too and they would be in the way.
Then a second coat of primer was applied, but it wouldn't be the last... A third round of primer was necessary until I was satisfied. All primers were Mr.Surfacer 1200, but the last one was mixed with Mr. Surfacer Black 1500, to distinguish the last coat from the previous ones. Wet sanding with fine grit sandpaper prepared the little Dove to receive paint:
The base coat for the NMF was Tamiya PS12, decanted from the spray can. It dries fast, is durable, and great preparation for definitive metallic paints.
Once the base coat was dry, I applied an overall light coat of GSI Titanium, from their Super Metalic range. This color has a very subtle gold tint in it, and after many tests, I found out that it kind of captures better the aspect of aluminum in 1/72... in my opinion at least. Don't be fooled, though, as you can barely distinguish this paint from regular aluminum.
Since I had decided for the PH-MAD, masking was needed to isolate the NMF from the white top. A couple of passes of automotive white lacquer did the job. Once dry, the rudder was painted with GSI Off White to leave it with a slightly different hue than the fuselage, given it was fabric-covered.
The NMF was tweaked a bit with other metallic shades. The big panels on the wings over the fuel tanks were masked and painted with White Aluminum, from Dry Colors. The movable surfaces were painted with High-Speed Silver, also from Dry Colors. The ailerons and elevators, however, were further airbrushed with flat clear to distinguish them from the flaps:
The decals are from the kit. They are not of the best quality and have a very weak adhesive. I needed three night-sessions to apply them in groups because I felt that it was better to let a group set completely first and then proceed to the next. When all decals from the white area were in place, I re-masked the NMF area end sealed the decals with a semi-gloss varnish.
The clear film was removed from the registration codes on the wings since they would not receive any protective clear coat and I didn't want the film visible.
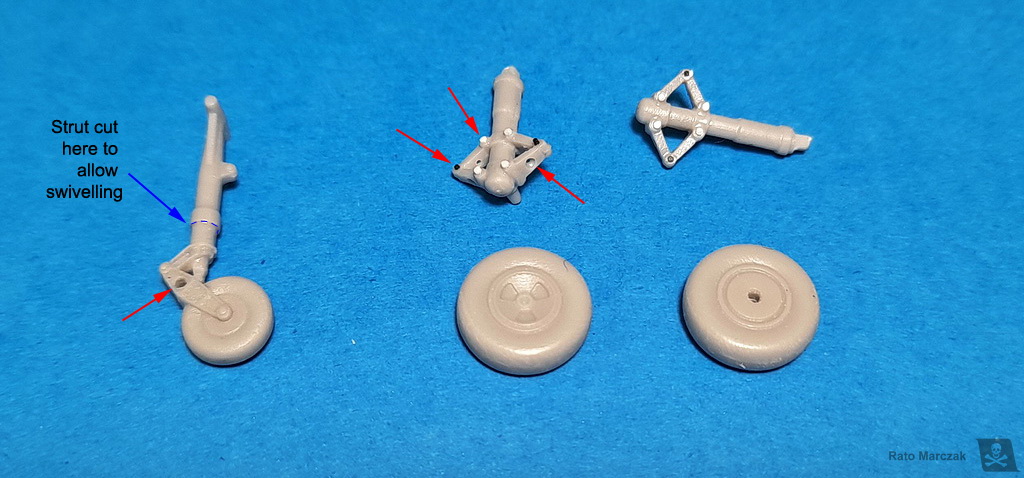
At this point the model was put aside and work started on the landing gear, the last major assembly to be built. The kit parts are OK but can be refined here and there. Using photos as reference, I was able to improve the struts by adding holes, bolts, etc...
I also made the nose landing gear swivel.
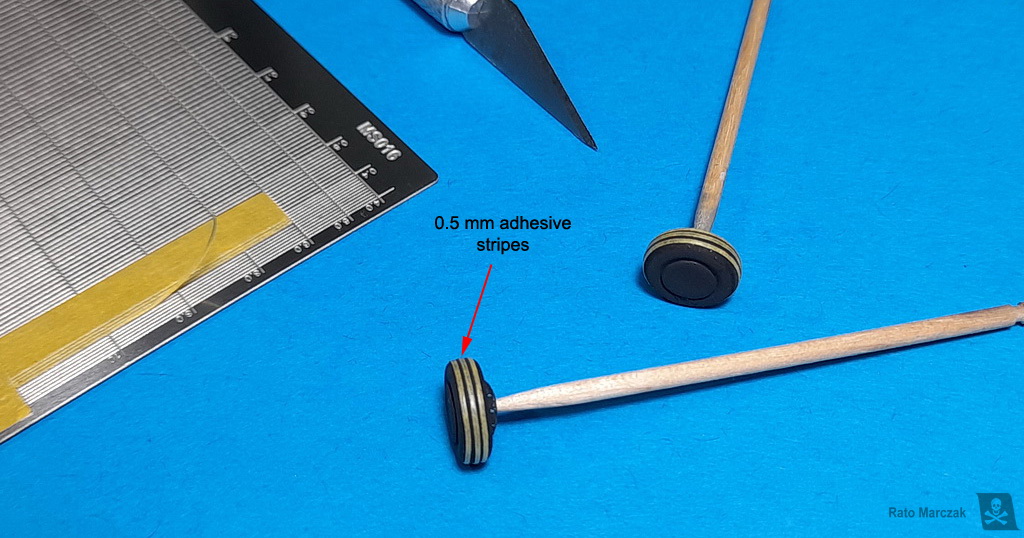
The tires received a well-known treatment to simulate the grooves. I painted the tires black and masked the about-to-be grooves with 0.5 mm masking tape stripes. I would like to make 4 or 5, but my fat fingers allowed me to mask only three grooves. Then a rubber/dark grey color was airbrushed over the wheel and the masks were removed. The result is an optical illusion that the tire really has grooves. Work well when observed with bare eyes:
The model received an application of oil paint wash with varying intensity along the panel lines. This enhanced all the small details added during the construction.
Even being an airliner, minimal weathering should be applied to the model. I limited myself to make a few streaks with oils, running from vents and alike. The exhaust stains are barely visible in real Doves, but I assumed that after a long haul flight they could have accumulated some under the wings aft the exhausts.
Some dirt was simulated around movable parts as well. The process was finished with aluminum powder scrubbed along lines of selected panels to simulate structural details (a tip stole from the late modeler Les Sundt). I should use more this tip in my models...
The propellers were painted with metallic paints. I opted for a more lustering finish for the spinners. I don't know why... things like these seem to be what makes them look like airliners. The black stripes on the leading edges of the blades are thin pieces of black decal applied with lots of setting solutions.
Oh, I forgot to mention that the kit does not bring the mass balances for the ailerons. I had to scratchbuilt them and install them at the very end of the project, thanks to my habit of holding my models by the wings.
One good thing about this kit is the small fret of PE details. It made my life much easier. The antenna under the fuselage is one of the kit PEs. I also added a taxi light. The aileron mass balances were installed using acrylic glue to avoid any chances of me smudging the metal finish with stronger glues. And the landing light received a bulb and was finally covered with a clear disk.
Many other small details make a big difference when you look closer at the model. The windscreen wipers are PEs from the kit. The big light on the top of the fuselage was scratchbuilt, as was the pole holding the horseshoe-shaped antenna, another PE part.
One tip that you may find useful: the fuselage and engine air inlets are all solid. It would be impossible to open everyone using drill bits. In such cases, I just painted the opening with a technical pen. I bet you thought they were hollowed...
The antennas were installed last, and although the PE fret brings a set of electric dischargers, I couldn't see them in photos of Doves from the 60s. I installed just a couple in the rudder. I goofed with the amount of weight installed in the nose: I forgot that the glue used to fix the weights dries, actually leaving less weight than you initially thought. My Dove is not a tail sitter, but a breath is all that it needs to sit on its tail. So I also scratchbuilt a tail support. It is telescopic, so I can use it with other models (the Dove will be pinned to its diorama base later).
And there you have it. My first airliner since a B727 that I built 20+ years ago... Now, perhaps I find some mood to finish that Airfix Bristol Freighter in the shelf of doom.
I hope you liked this model. See you in the next one.
Link to Part 2
Another version of this article was published on Scale Aircraft Modelling magazine in June/2022. It is a wonderful modeling magazine. Consider subscribing it...
| Technical file | |
| Kit:
|
- Amodel 72294 |
| Additions:
|
- None commercial |
| Basic
colors: |
- Primer: GSI Mr. Surfacer. - Aluminum: Tamiya PS12 Silver, GSI SM05 Titanium, Dry Colors White Aluminum and High Speed Silver. - White: Automotive lacquer, GSI YYY Off White - Clear coat: Testors Model Master Acryl semi-gloss. |
| Notes: |
- Several scratchtuilt items (see text). |
Rato Marczak © 2023
