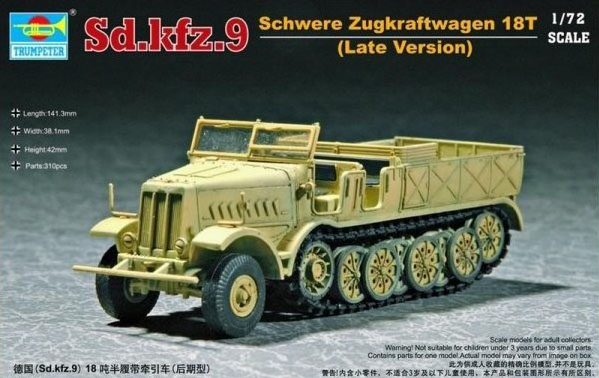
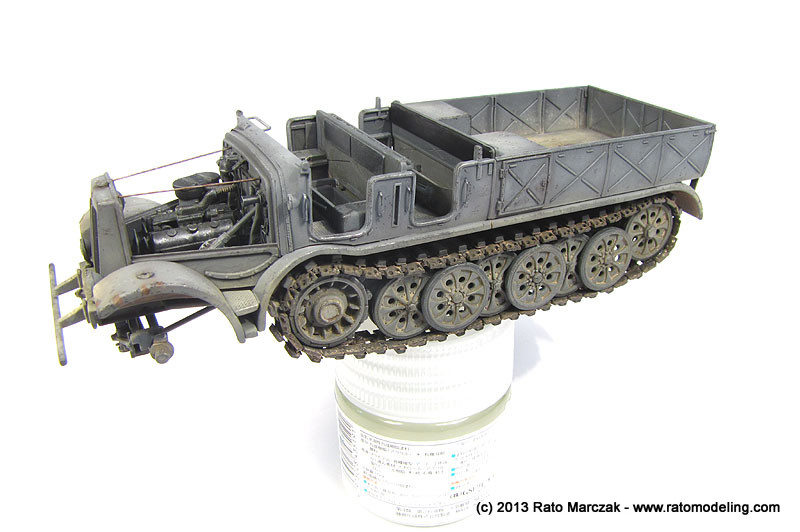
| Trumpeter Sd.Kfz.9 Famo 18 ton truck in 1/72 |
| (re)Start: January / 2013 Finish: August / 2013 |
Following the Revell 17 cm Kanone 18,
I kept my drive towards the Kursk retreat diorama. The next job was to
put something to tow the Kanone. I chose the Trumpeter Famo, which is a
nice kit. I know the Famo was not the correct towing vehicle for
that cannon, but the diorama would depict a hasty retreat of Wehrmacht
after the defeat at Kursk, so I guess everything goes in such
situation. As a side note, not even the cannon would be transported
assembled in regular situations. Well, that's war... (I'm lying, the Famo was the only half track I had in my stash)
Trumpeter's Famo is a very detailed kit, but it requires a lot of parts cleaning in some areas, particularly mold lines and countless ejection pin marks (many of them in visible areas). The Revell offering is an option, but I think Trumpeter's is more accurate overall (for a comparison between these two kits, refer to a nice comparative review of both at Cybermodeler). Besides my personal opinion, Trumpeter brings a realistic engine - which I would show by opening the side panels of the engine compartment, and Revell front wheels are way wrong. Be also aware that Trumpeter has two versions of the Famo in this scale. I'm using item #7252, which is the late version. There is also item #7203, depicting the early version.
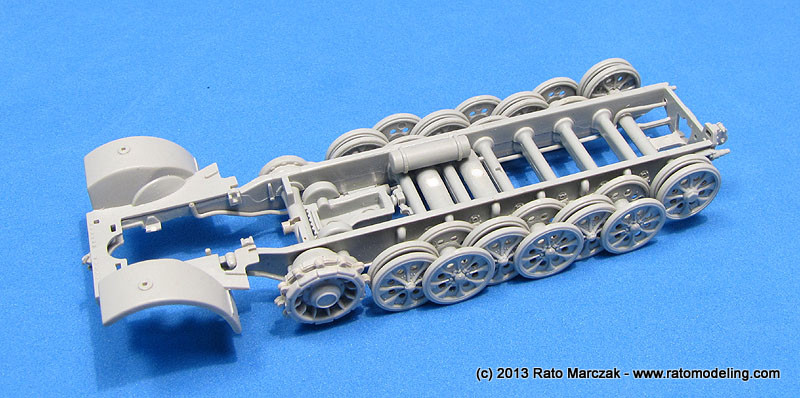
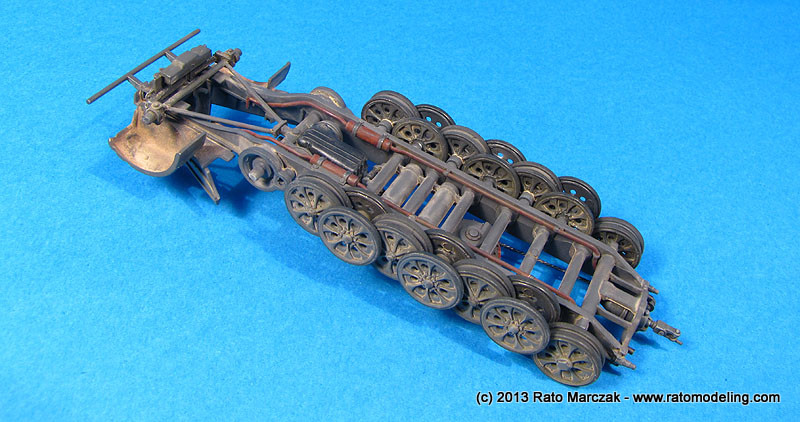
I roughly followed the kit's instructions, except for small parts, and that the track wheels were glued with white glue a this point:
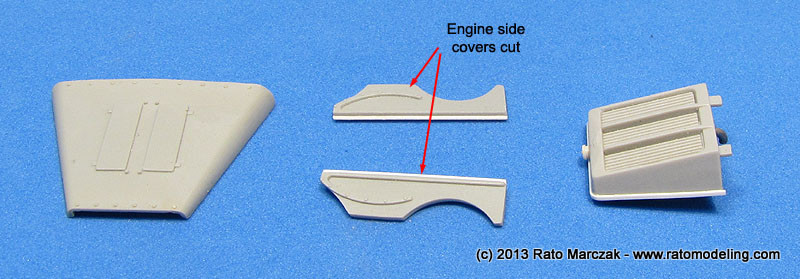
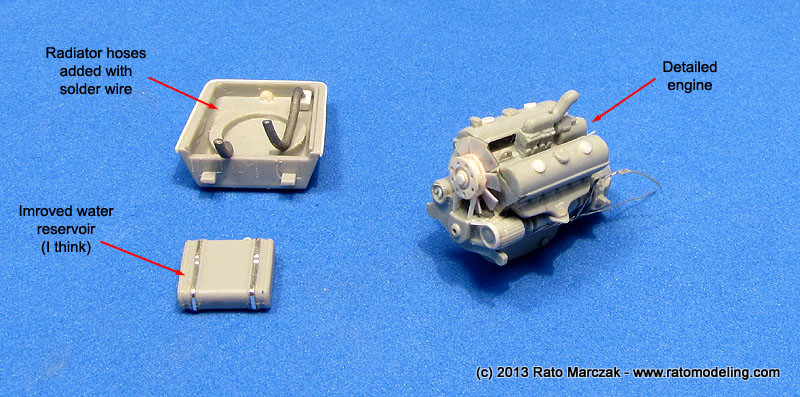
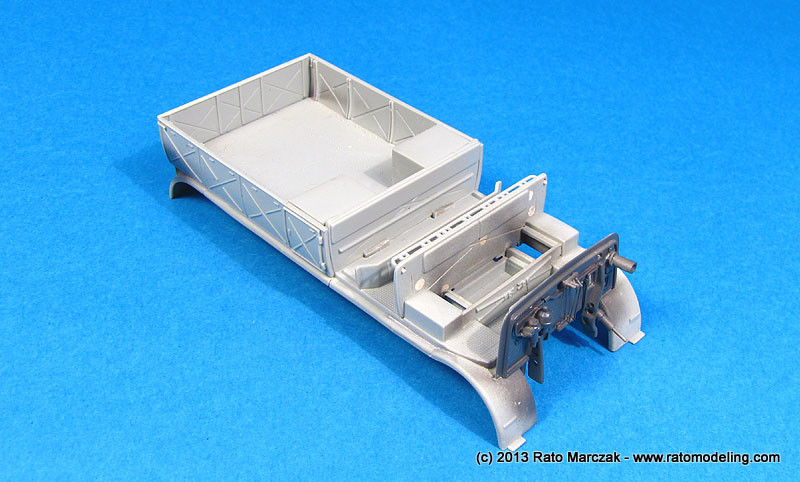
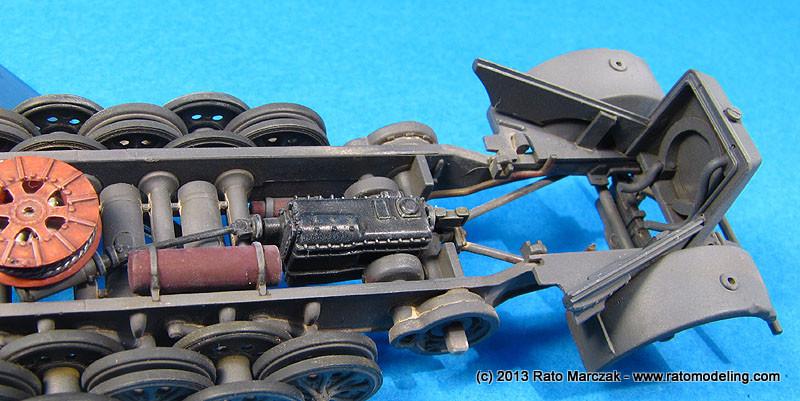
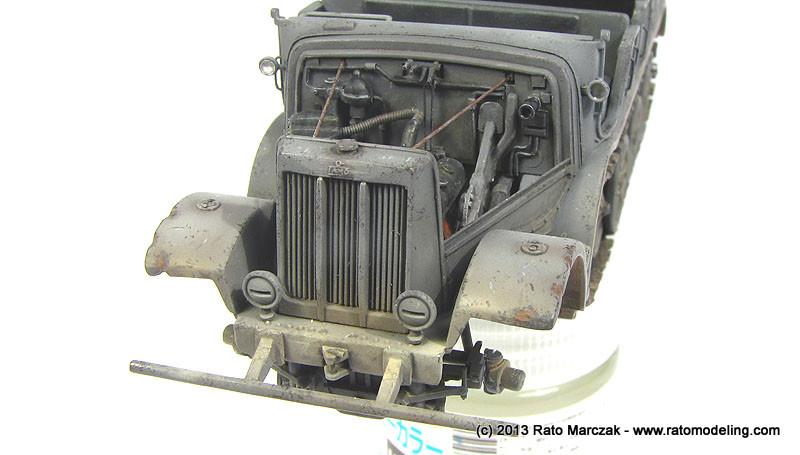
I also detailed the radiator (part D3), and cut the side panels, parts C22 & C23, to show off the engine. Famos without these panels were actually very common, particularly during hot times of the year, to help to improve the engine cooling.:
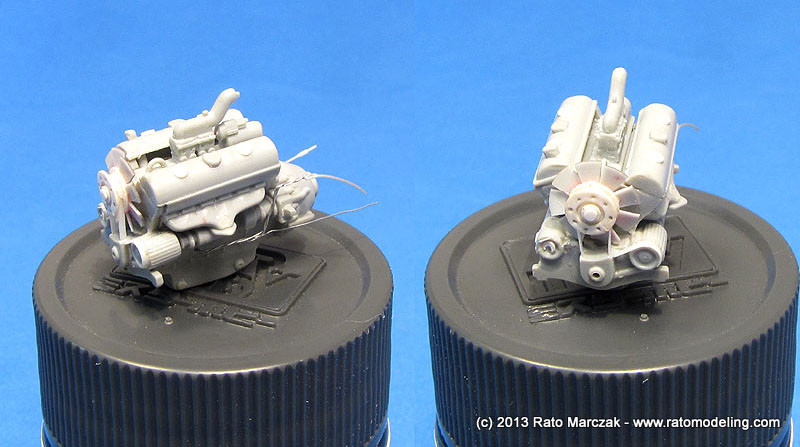
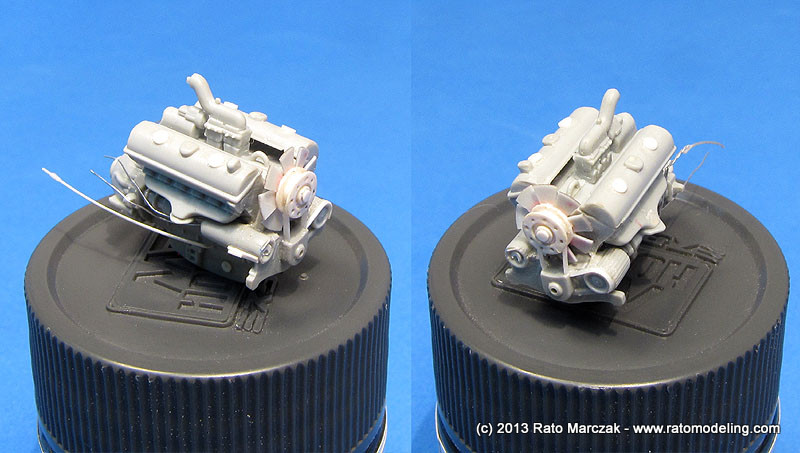
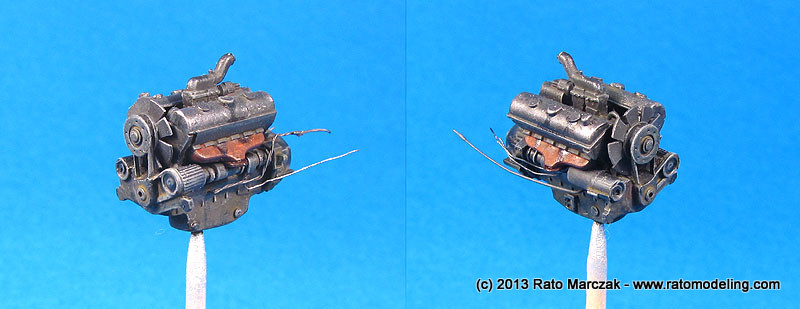
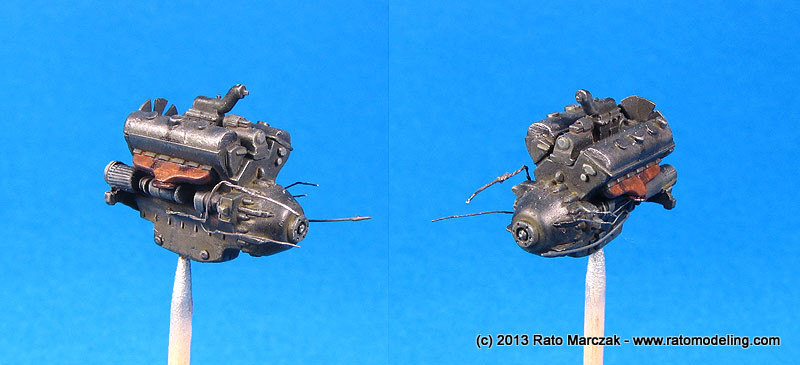
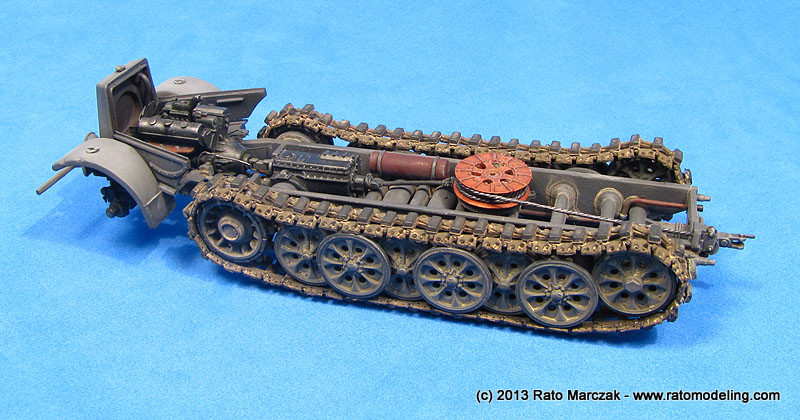
The radiator received hoses from thick solder wire, and I went overboard with the engine. I detailed it as much as I could without discarding the kit parts. I added generator belts, a new cooling fan, caps and cables using plastic bits. The fan was not exactly prototypical (I used a scratchbuilt one for another project, lying in my spares box) but the final aspect of the engine is much better than stock.
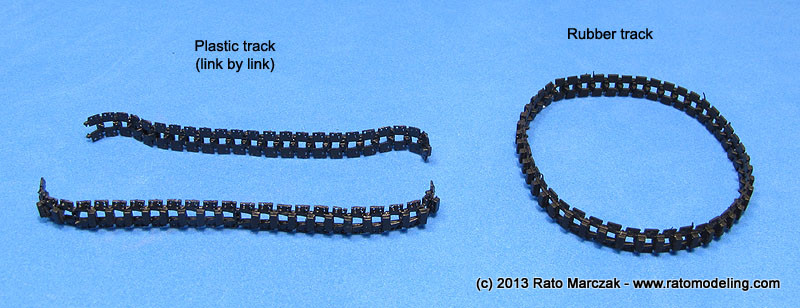
Trumpeter gives you the choice of rubber and plastic (link by link) tracks. I thought that the lbl tracks were better detailed, and would allow me to simulate the sag easier than the rubber option. It was a real core to assemble the track, though, not to mention that the rubber shoes are separate parts. I used 48 links on each track. They were assembled using the jig provided by Trumpeter (part D11) in two halves (upper and lower), and adjusted against the wheels while the glue was still wet. Once dry, they were removed and set aside. I also finally could remove the wheels to paint them separetely.
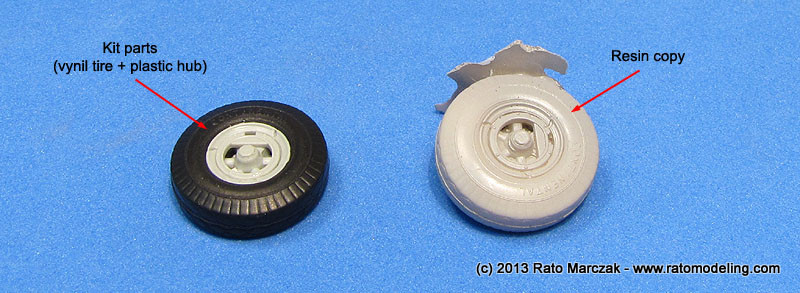
The front wheels have separate hub and vynil tires. I don't like vynil parts, so I made a couple of copies of the assembled wheels in resin, just in case. At this point, I still didn't know if I was going to use the vynil tires or the resin copies. The detaill on the tires is nice, though, being readable under a magnifying glass.
Before proceeding further with the build, I airbrushed dark gray in areas where I wasn't sure the airbrush spray would reach later on after assembling more parts.
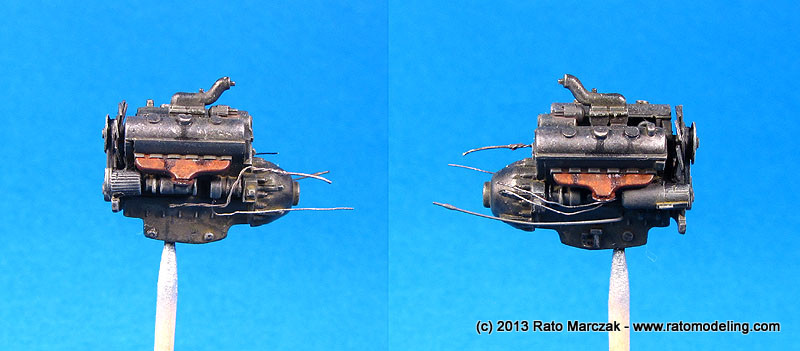
The engine was painted next. I used Floquil Engine Black as a base coat, drybrushed with gray oils and picked the details with silver, dark gray and pure black. The exhaust collector was rusted with paint, pigments and Rustall. The valve cover was drybrushed with silver and some details rubbed with powdered graphite. The final touch was to simulate oil leaks using Tamiya Smoke (X-19) and Lifecolor Tensochrom Oil (TSC12):
I then painted the body and the chassis using Tamiya XF-62 German Grey lightened with XF-2 Flat White for scale effect. I added Gunze H-30 to the mix in order to make it semi-gloss to spare a further coat of gloss varnish in preparation for the weathering (it also makes Tamiya flat colors less grainy). I liberally faded the overall Panzer gray by adding a few drops of XF-2 to the airbrush cup, further thinning the mix, and applying it to the top of the fenders and areas that would be more directly exposed to the sun. Please note that there were parts still to be attached to the chassis, so touch ups will be necessary after glueing these missing parts. The wheels were also painted, with the rubber areas hand painted using the late Aeromaster Tire Rubber color.
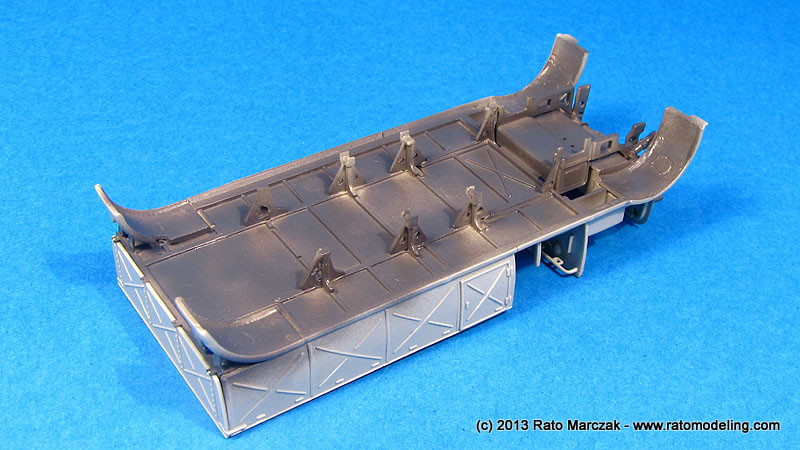
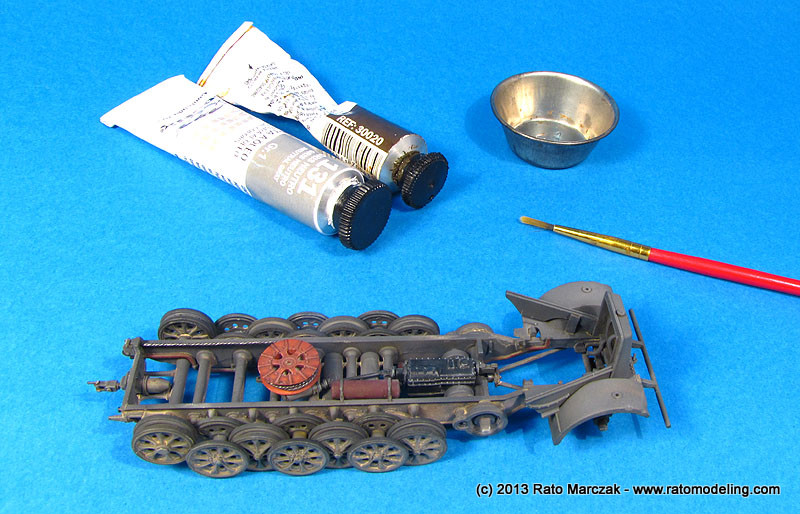
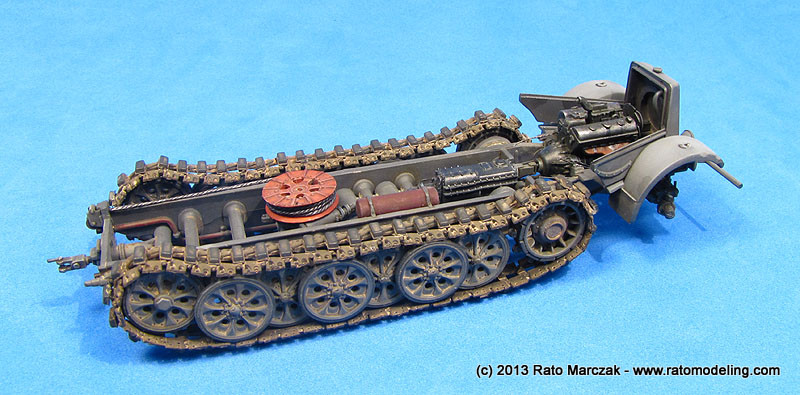
The next step was to apply a preliminary dusting on the chassis. I reasoned that much of it would be impossible to reach later with the tracks and body glued in place, so dust was applied even before any paint chipping. But before that I applied a general wash with highly thinned dark brown oils to produce shadows and highlight details, and drybrushed the front suspension details too:
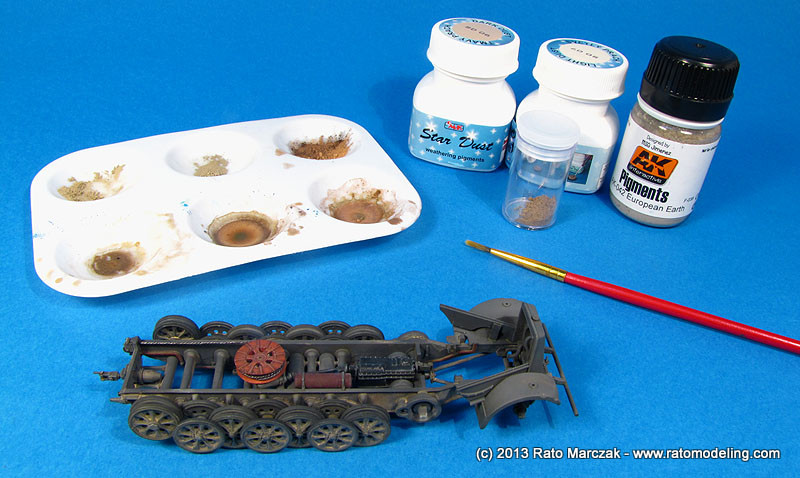
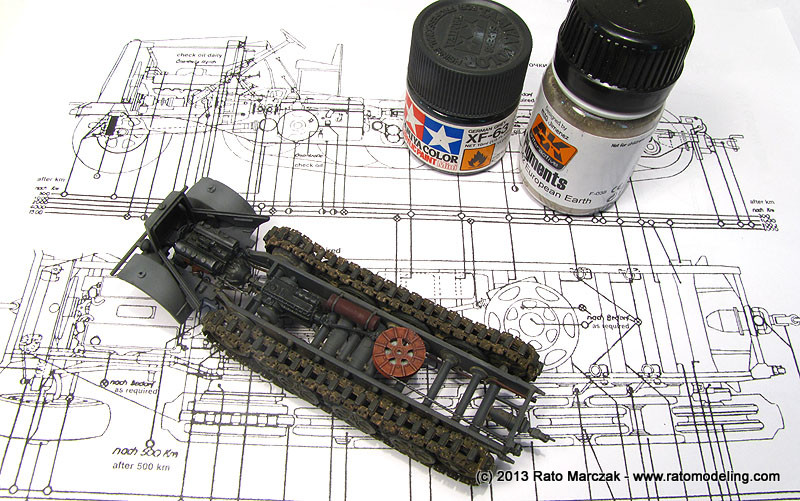
Once dry, I used CMK and AK earth colored pigments. The first, being coarser, is ideal to simulate dry mud and debris stuck under the chassis, wheel etc. I fixed the pigments with Testors thinner.
AK European Earth diluted with Windex came next, to simulate light dust collected in corners etc. I like to use this recipe for general dusting because after dry you can remove any excess using a stiff brush, if necessary. As mentioned before, this was a first pass of dirt, but after assembling the tracks and body it would be impossible to reapply the dust in certain areas.
The idler and road wheels were actually weathered separetely and only then glued to the suspension arms. I was very satisfied with the weathering at that point, for I really didn't want my Famo carrying a half ton of dry mud, and I don't think this is easy to be realistically simulated in 1/72 scale neither, but that's another story. I finished the driving sprockets as well, but if you are bulding this kit, pay attention to step 4 of the instructions. I didn't and I swapped parts A15 and A16, so the rubber pads of my sprockets are not aligned... Duh! The rollers at the end of each wheel teeth were treated with a silver pencil:
Trumpeter's Famo is a very detailed kit, but it requires a lot of parts cleaning in some areas, particularly mold lines and countless ejection pin marks (many of them in visible areas). The Revell offering is an option, but I think Trumpeter's is more accurate overall (for a comparison between these two kits, refer to a nice comparative review of both at Cybermodeler). Besides my personal opinion, Trumpeter brings a realistic engine - which I would show by opening the side panels of the engine compartment, and Revell front wheels are way wrong. Be also aware that Trumpeter has two versions of the Famo in this scale. I'm using item #7252, which is the late version. There is also item #7203, depicting the early version.
I roughly followed the kit's instructions, except for small parts, and that the track wheels were glued with white glue a this point:
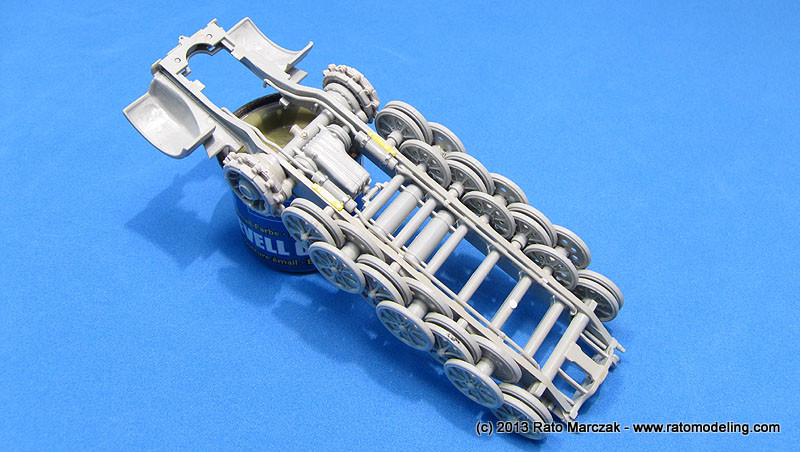
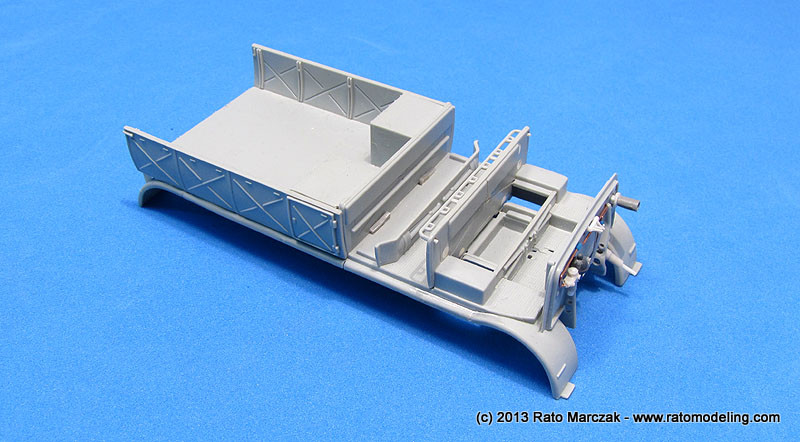
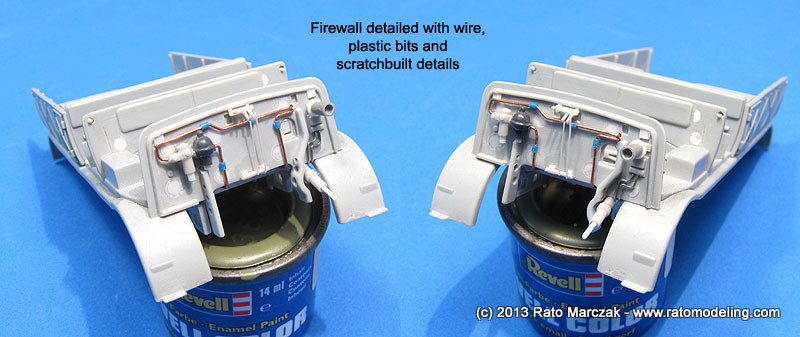
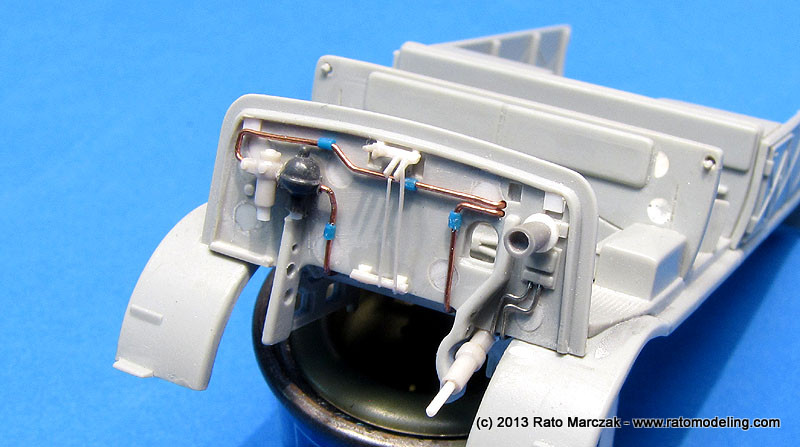
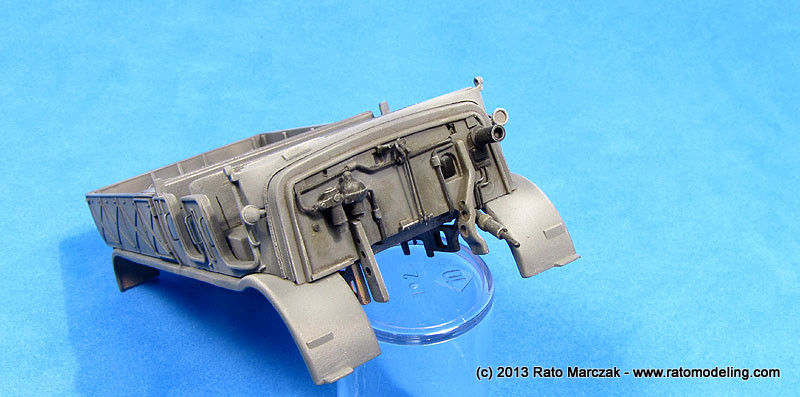
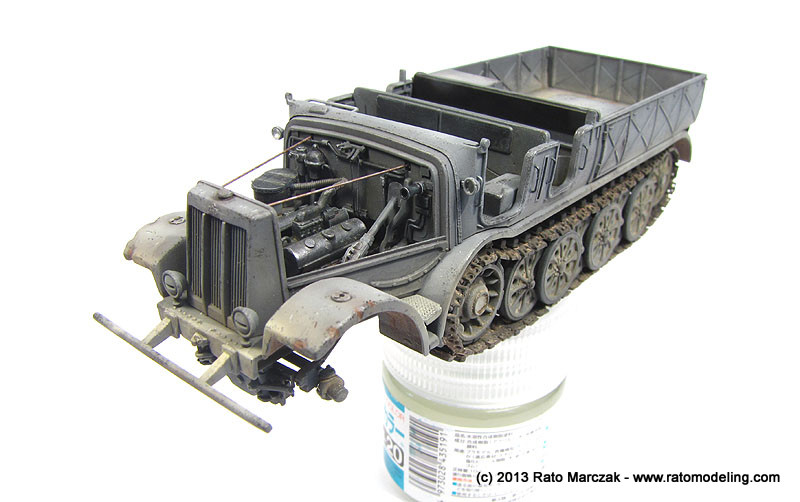
My plan was to leave the body
separete from the chassis until after the painting. Like I said, I
planned to detail the engine compartment to leave it visible, so the
firewall, which is devoit of any detail in the kit, was detailed with
the most prominent parts. I added filters, pumps, a horn, throttle
links and some plumbing following many walkarounds available on the
internet and books. Although the engine would be exposed, not
everything will be quite visible, so I kept the detailing at mental
sanity levels:
I also detailed the radiator (part D3), and cut the side panels, parts C22 & C23, to show off the engine. Famos without these panels were actually very common, particularly during hot times of the year, to help to improve the engine cooling.:
The radiator received hoses from thick solder wire, and I went overboard with the engine. I detailed it as much as I could without discarding the kit parts. I added generator belts, a new cooling fan, caps and cables using plastic bits. The fan was not exactly prototypical (I used a scratchbuilt one for another project, lying in my spares box) but the final aspect of the engine is much better than stock.
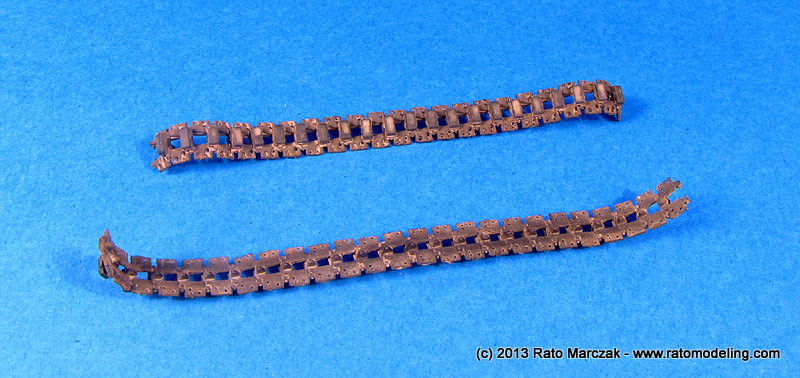
Trumpeter gives you the choice of rubber and plastic (link by link) tracks. I thought that the lbl tracks were better detailed, and would allow me to simulate the sag easier than the rubber option. It was a real core to assemble the track, though, not to mention that the rubber shoes are separate parts. I used 48 links on each track. They were assembled using the jig provided by Trumpeter (part D11) in two halves (upper and lower), and adjusted against the wheels while the glue was still wet. Once dry, they were removed and set aside. I also finally could remove the wheels to paint them separetely.
The front wheels have separate hub and vynil tires. I don't like vynil parts, so I made a couple of copies of the assembled wheels in resin, just in case. At this point, I still didn't know if I was going to use the vynil tires or the resin copies. The detaill on the tires is nice, though, being readable under a magnifying glass.
Before proceeding further with the build, I airbrushed dark gray in areas where I wasn't sure the airbrush spray would reach later on after assembling more parts.
The engine was painted next. I used Floquil Engine Black as a base coat, drybrushed with gray oils and picked the details with silver, dark gray and pure black. The exhaust collector was rusted with paint, pigments and Rustall. The valve cover was drybrushed with silver and some details rubbed with powdered graphite. The final touch was to simulate oil leaks using Tamiya Smoke (X-19) and Lifecolor Tensochrom Oil (TSC12):
I then painted the body and the chassis using Tamiya XF-62 German Grey lightened with XF-2 Flat White for scale effect. I added Gunze H-30 to the mix in order to make it semi-gloss to spare a further coat of gloss varnish in preparation for the weathering (it also makes Tamiya flat colors less grainy). I liberally faded the overall Panzer gray by adding a few drops of XF-2 to the airbrush cup, further thinning the mix, and applying it to the top of the fenders and areas that would be more directly exposed to the sun. Please note that there were parts still to be attached to the chassis, so touch ups will be necessary after glueing these missing parts. The wheels were also painted, with the rubber areas hand painted using the late Aeromaster Tire Rubber color.
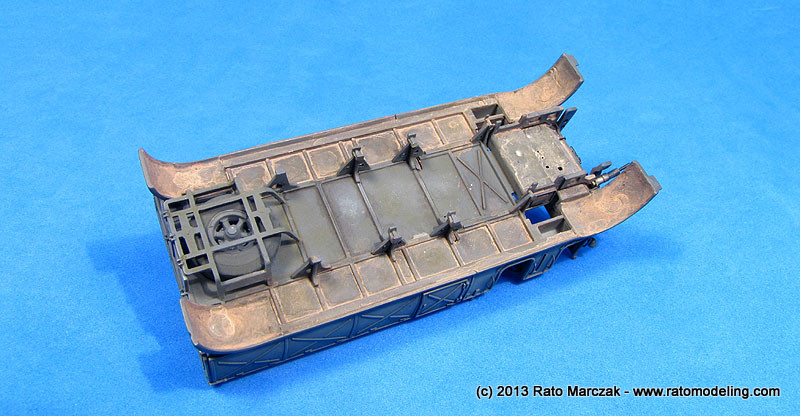
The next step was to apply a preliminary dusting on the chassis. I reasoned that much of it would be impossible to reach later with the tracks and body glued in place, so dust was applied even before any paint chipping. But before that I applied a general wash with highly thinned dark brown oils to produce shadows and highlight details, and drybrushed the front suspension details too:
Once dry, I used CMK and AK earth colored pigments. The first, being coarser, is ideal to simulate dry mud and debris stuck under the chassis, wheel etc. I fixed the pigments with Testors thinner.
AK European Earth diluted with Windex came next, to simulate light dust collected in corners etc. I like to use this recipe for general dusting because after dry you can remove any excess using a stiff brush, if necessary. As mentioned before, this was a first pass of dirt, but after assembling the tracks and body it would be impossible to reapply the dust in certain areas.
The idler and road wheels were actually weathered separetely and only then glued to the suspension arms. I was very satisfied with the weathering at that point, for I really didn't want my Famo carrying a half ton of dry mud, and I don't think this is easy to be realistically simulated in 1/72 scale neither, but that's another story. I finished the driving sprockets as well, but if you are bulding this kit, pay attention to step 4 of the instructions. I didn't and I swapped parts A15 and A16, so the rubber pads of my sprockets are not aligned... Duh! The rollers at the end of each wheel teeth were treated with a silver pencil:
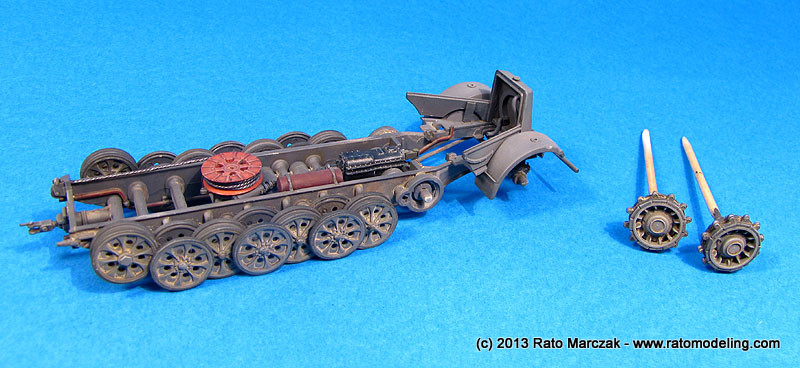
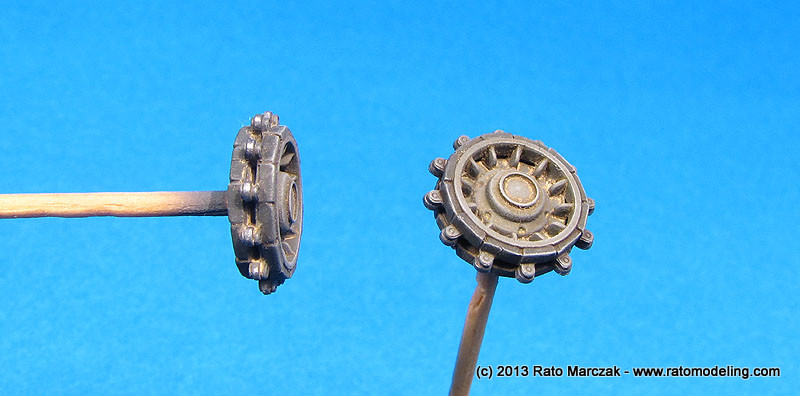
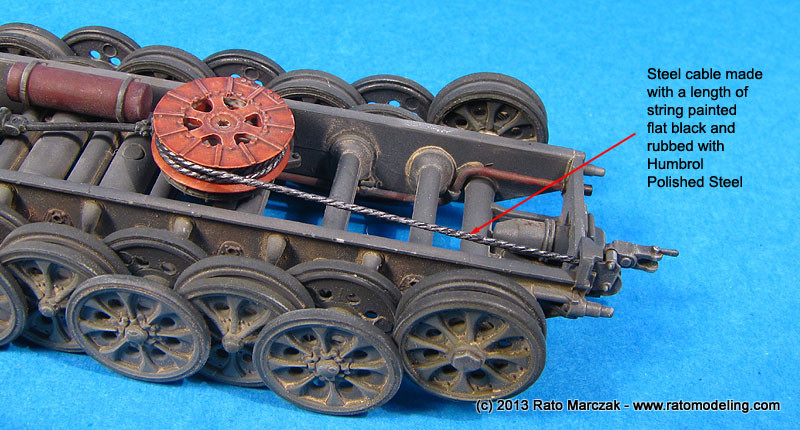
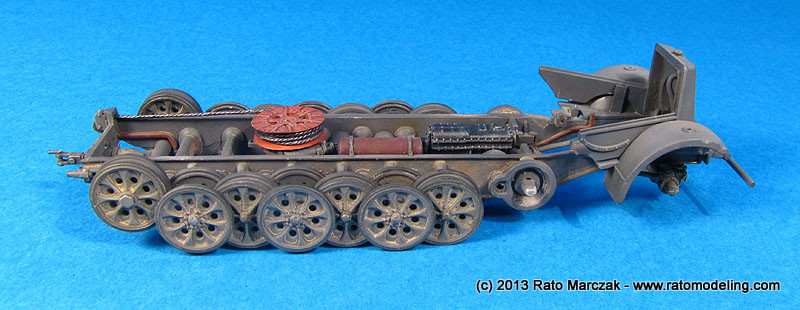
The winch reduction case, cable wheel and other details were picked up separetely using Vallejo acrylics, pin-washed and drybrushed. At the end I would add grease and oil leaks to the wheels and front suspension.
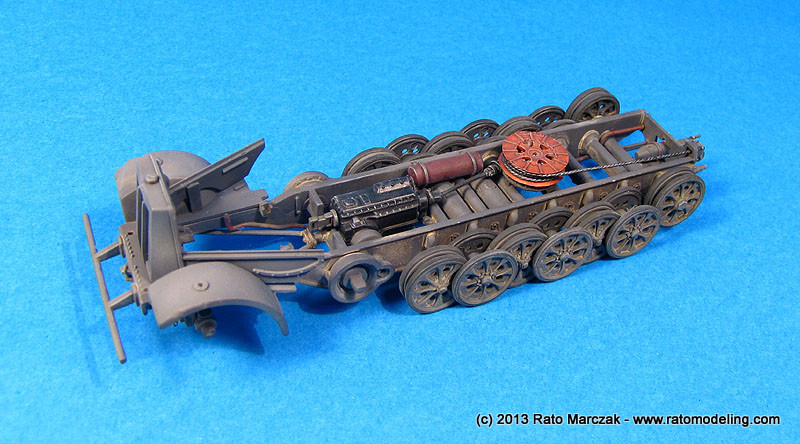
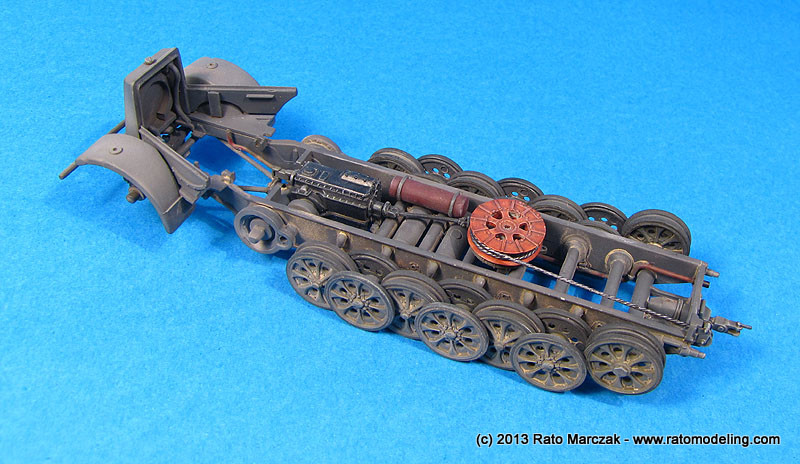
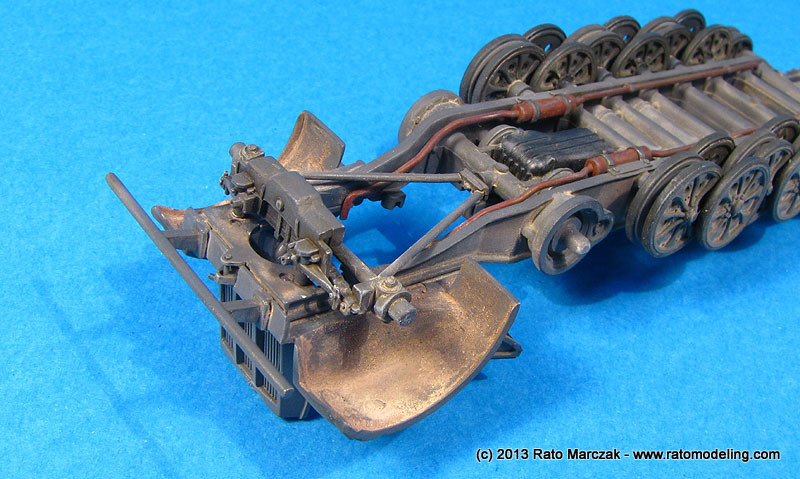
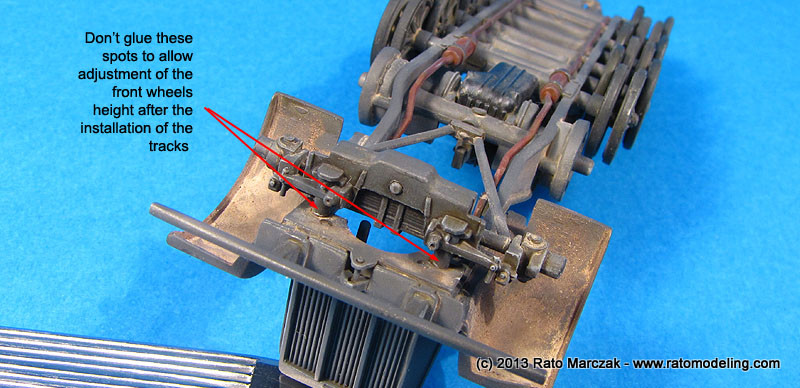
One important thing that I noted while test fitting the tracks to the road wheels was that it would be impossible to have the front wheels touching the ground. Part of the problem was due to the misalignment of the track rubber shoes, which were individually glued. The use of the rubber tracks would reduce somewhat the problem, but the front wheels still would float. I found a couple of modelers discussing this problems in modeling forums, so I guess the problem was not mine (or not only mine). To solve the issue, I detached the front suspension anchor points to accept small disks to raise the front axle. Of course this can be done only after permanently installing the tracks, but be aware of this issue:
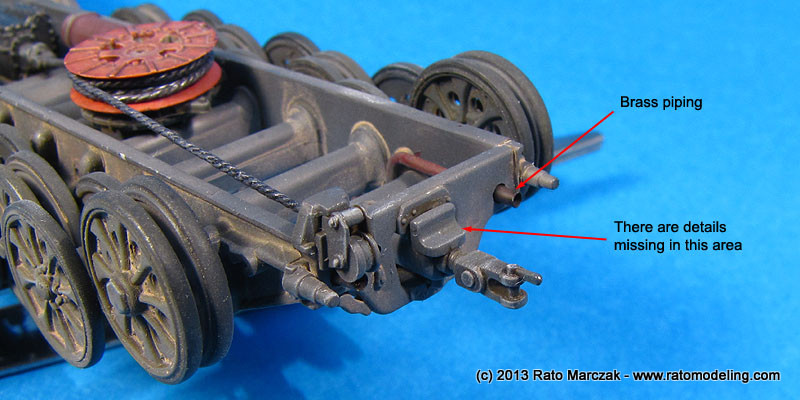
The winch reduction case was drybrushed with silver to highlight the bolts. Trumpeter provided a length of thread to be used as the steel cable, but it fuzzed even after a coat of paint, so I picked another type of thread for that. It was painted semi-gloss black and rubbed with Humbrol Metal Cote Polished Steel. The end of the cable hanging outside the rear would be added later on. Another addition was a small piece of brass tubing to simulate the end of the exhaust pipes. After examining wartime photos, I found out that the towing coupling was oversimplified by Trumpeter (part A29), and I would add a couple of handles there after the main assembly in finished.
With the chassis ready, I could start working on the body and tracks:

The tracks were painted with Testors Track Brown (#2150) enamel, while the rubber shoes were painted with Aeromaster Tire Rubber using a fine brush. Once dry, I applied the same pigments used on the chassis, and rubbed some black pigment along the inner side of the tracks to reproduce teh result of the friction with the road wheels.
The painting of the body was less straighforward than the lower chassis. I didn't want to repeat my mistakes with previous models which ended too dark with the panzer gray. After the base coat, I added white to the mix and highlighted the finish, as usual. But this time I tried something different. After the pin wash with very dark brown (almost black), I drybrushed the raised details with oils and then went back again with the airbrush and an even more lightened panzer gray was applied on the sides and the cargo area. I liked the result, and the contrast between the darker and lighter shades became more noticeable. This is important, considering that the dusting that was about to come would even the finish considerably...

On the underside, I applied a mix of earth tones pigments where it would be impossible to reach after attaching the body to the chassis. Note that the spare tire was already in place:
The details on the firewall were painted with panzer gray and black, and purposely not highlighted. I drybrushed the details with oils, though. Here I deviated from the instructions. After glueing the side plates, parts C24 and C25, I installed the control panel. This should be done on step 17 of the instructinos. Only then I went back and tried to install the top of the console, part C28, which should be done in step 12. I guess Trumpeter has chosen this sequence because you can enforce the side plates to touch the sides of part C28. However, this would cause a serious warping of parts C24/C25 and compromise the installation of the driver's windows later. In summary, I found out that C28 is too short. I ended with 0.5mm gaps on both sides, which required shimming with plastic and judicious sanding to keep the round shape preserved. In the process I destroyed the raised lines depicting the characteristic gap between the firewall and the drivers console. In the real thing, this is sealed with canvas or rubber strips. As I didn't want the detail as molded, I used a piece of thin adhesive tape to simulate it, saving me the work of restoring the raised details sanded off.
I should also mention that this was the first critical step of the assembly, and although the fit of the parts was generally good, I applied Mr.Surfacer on several seams to make them less noticeable.
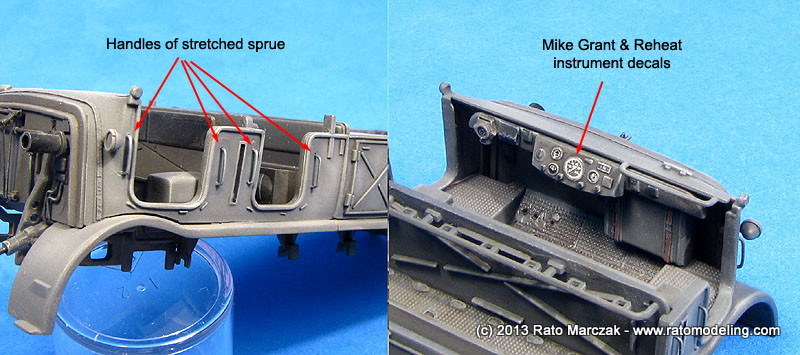
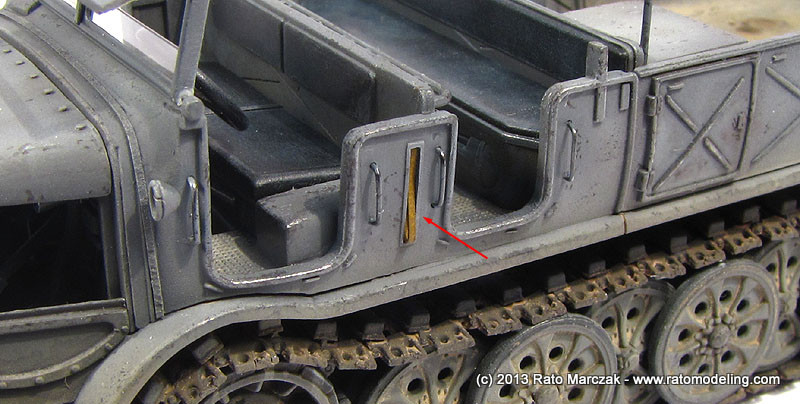
Trumpeter
has ignored outrightly the entrance handles on the side plates. I'm
starting to think whether all late version Famos had them or not...
Anyway, I added them using stretched sprue cooked to shape
and glued to shallow holes drilled along the side plates (at this
point, I preferred to use plastic parts assuring a strong bond to the
already painted body). Since Trumpeter doesn't provide any decal (at
all) with this kit, I enhanced the drivers panel using Mike Grant
and Reheat instrument decals. After a flat coat and drybrushing, a
drop of clear nail enamel on top of the instruments made them
look real. I also added a few placards, following what I found in
walkaround photos. The molded on pedals were removed to be replaced by
scratchbuilt items later:
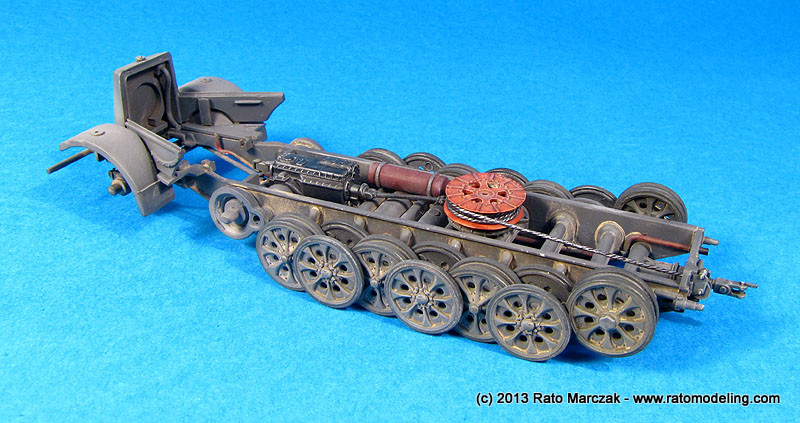
Then I turned back to the chassis. The engine was glued in place, without any hurdles. Next, the tracks were finally installed. No problems whatsoever here neither, except for a couple of rubber pads which came loose. As a bonus, all the handling during the installation of the tracks incidentally cleaned up most of the pigments from the pads, making them look more realistic. If you have an eagle eye, you will also note that the front axle ends are slightly steered:
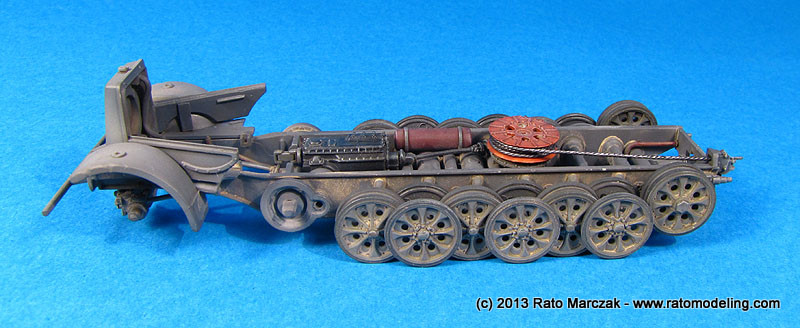
The whole chassis assembly made this tired mechanical engineer proud of the results so far. Years ago, when I bought this kit, I planned to assemble it as an exploded view, with the subparts supported by clear acrylic racks.
For a moment, I considered that possibility again...
...but then I went back to the original plan. I was affected by that 'wasted time' feeling because most of the work on the engine would not be much visible. More on that later.
The next major assembly step was to mount the body to the chassis. It went without problems, but once fitted to the chassis main beams, I had to slide the body forward a milimeter or so and hold it in position until the glue was set. This was necessary to enforce the tracks' mudguards to dock correctly under the curved rear of the engine louvers. Moreover, if misplaced, the distance between the track and front mudguards would prevent a tight fit of the corrugated metal steps connecting both (parts A19, A21, A24 and A30 in step 15 of the instructions).
Then I started the long - and sometimes boring - weathering road. Basically, I had to chip the paint, expose metal, produce scratches, dust the frame, and dirty the load compartment. I started by further drybrushing essential areas with light gray oils. I also played a bit with a lightened shade of the camouflage color followed by what I call 'airwash', a post shading of dark brown applied with a fine pointed airbrush on recesses, panel lines, joints and wherever I wanted to produce false shadows or simulate accumulated grime. I haven't took 'in progress' pics, so I will try to explain the important steps, but this was the result by then:
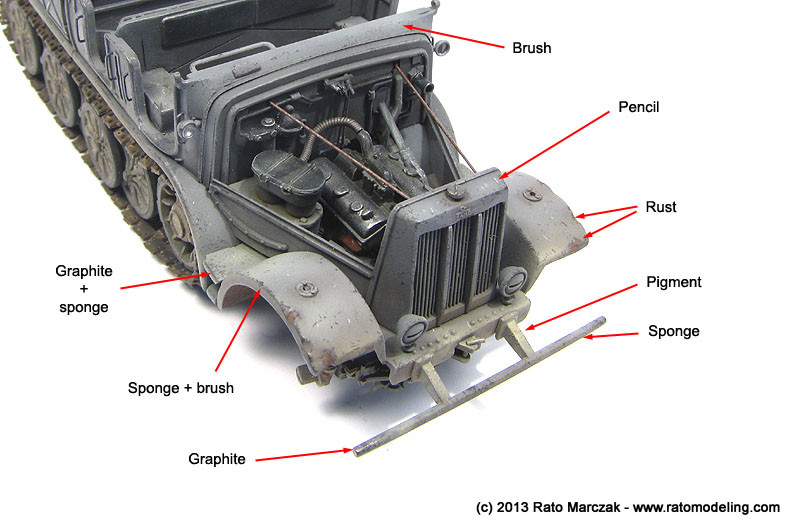
I'll use some shortcuts to describe the methods applied to weather the model. They are:
- Brush: means very dary gray paint applied with a fine pointed brush to simulate paint chipping. I used a mix of Vallejo paints for that.
- Pencil: different shades of gray pencils used to simulate recent scratches. I used a couple of Prismacolor pencils.
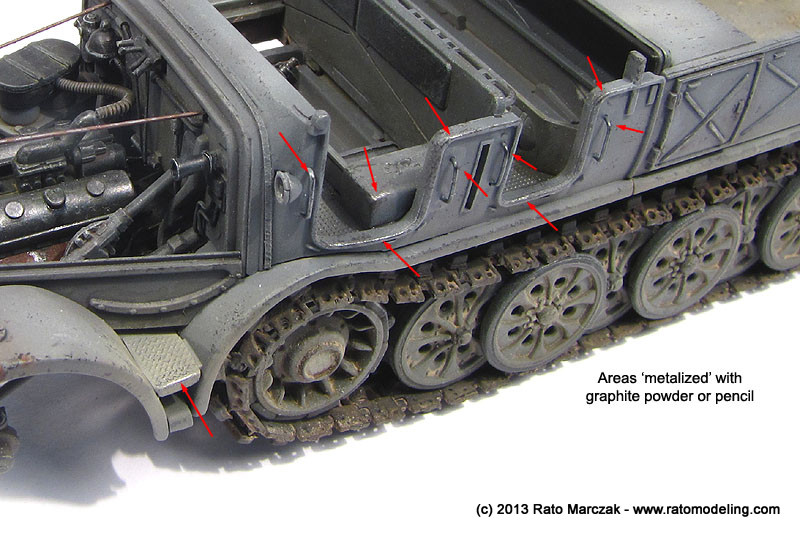
- Graphite: soft graphite pencil or powdered graphite to represent heavy traffic areas where the underneath metal is exposed.
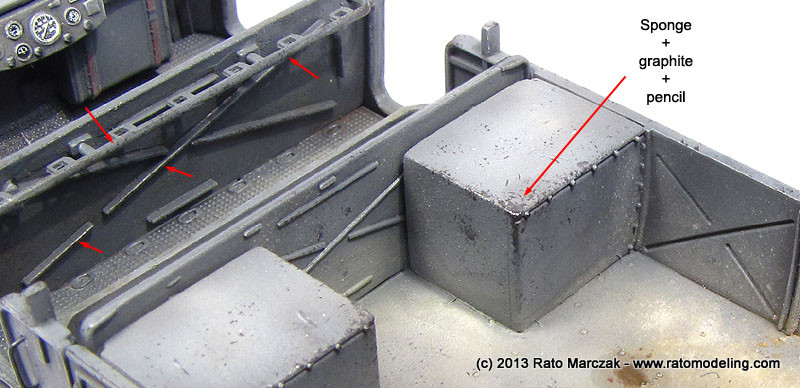
- Sponge: the well known almost-dry sponge method to save time and produce random paint chipping. It is used in conjunction with the brush.
- Pigment: pigments applied dry and fixed in place with fixer. I used Mig, AK, and CMK produtcs.
- Rust: rust colored watercolor pencils and Rustall used on bents and dents.
There is no particular order to apply the above effects. Later on, I would dust even more the model, and if you want you can re-chip the paint here and there to produce a nice contrast between new and old chipping.
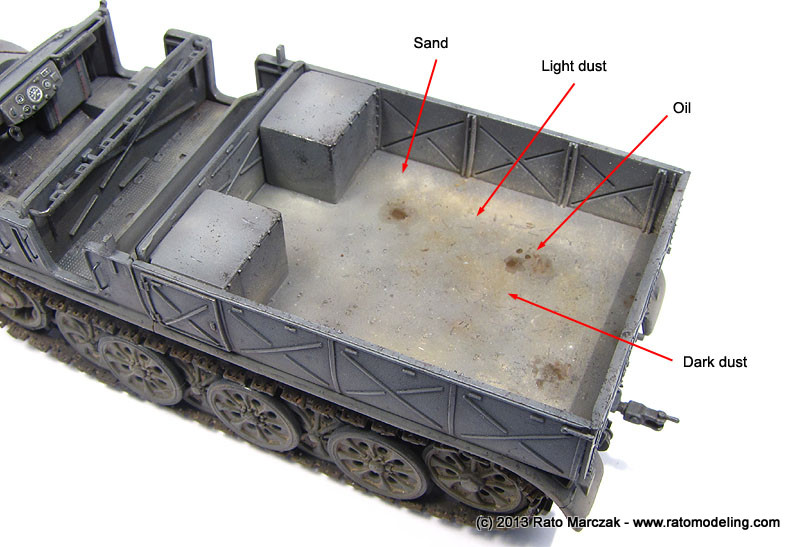
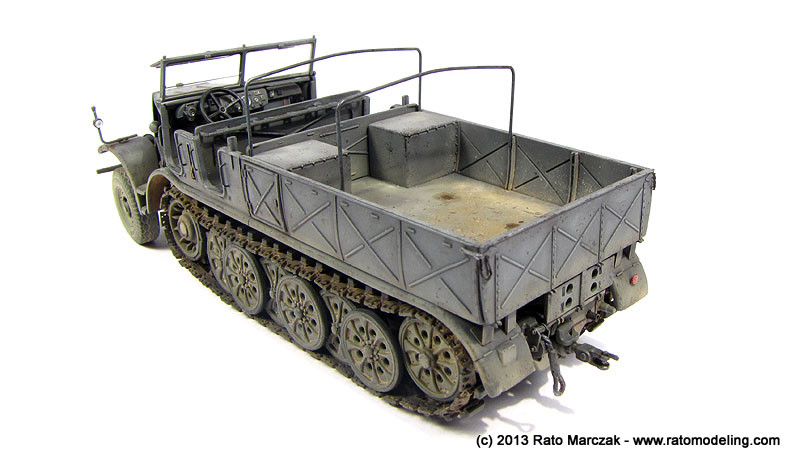
I applied a light paint chipping on the load compartment, as I would make it more dirty than the rest of the vehicle most of the paint chipping there would disappear. So I would come back later to scratch more the paint there. And talking about it, the load compartment was worked out with sand and earth colored pigments. I applied them dry and then poured pigment fixer with a round brush, dabbing the brush to blend the pigments at certain spots (don't do it all over the place). If overdone, I would let it dry and smudge the excess with a short bristle brush. Once finished with the pigments, I applied oil pools using Lifecolor tensochrom acrylic effects:
Only then I went back and retouched the paint chipping, particularly around corners, and on the floor also, simulating the scratches produced by heavy parts pushed/pulled over the cargo bed:
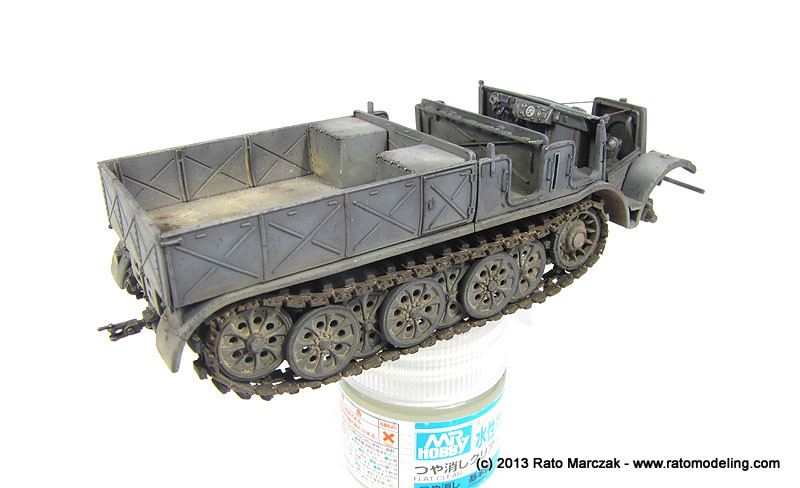
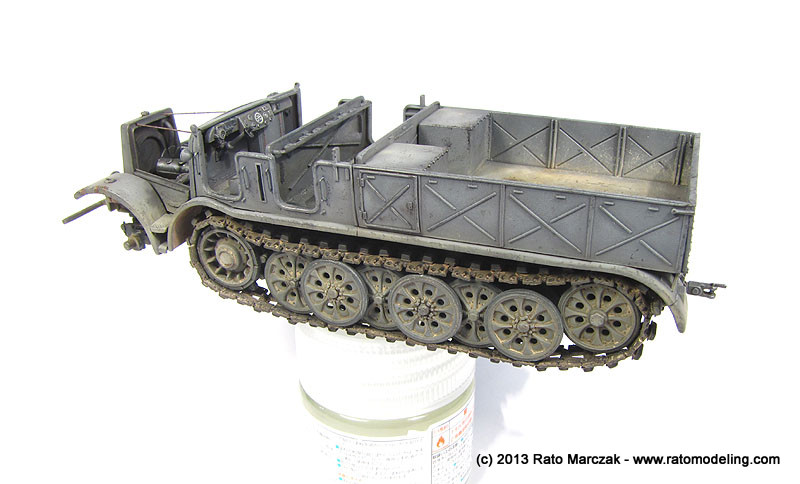
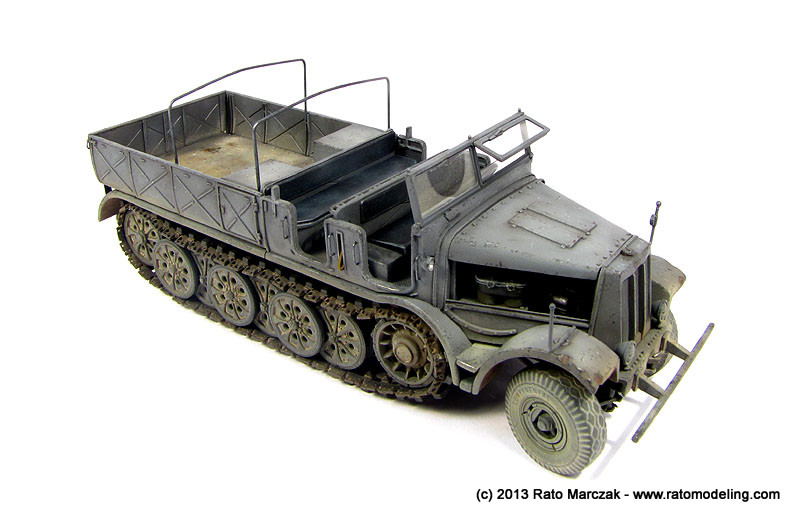
Once satisfied with the paint chipping, I could proceed with the final dusting around the Famo. For that I used a heavily thinned mix of Tamiya's XF-57 Buff applied with an airbrush. I concentrated the dusting to the lower part of the vehicle, occasionaly switching to XF-52 Flat Earth or washing AK's Dust Effects enamel with a round brush. I used hairdryer to speed up the job:

By building up layers of dust randomly, a fine overall effect can be obtained when superimposed with the pigments previously used. It is important to remember where dust usually accumulates on a vehicle, but it is even more important to restrain the effect because this is 1/72 scale. Everything slightly exaggerated in the weathering will be exponentially visible on the final model. Of course, my task was hugely simplified by the fact that I was depicting a vehicle running on dusty roads, mostly. A Famo in a rainy winter would be an entirely different story...
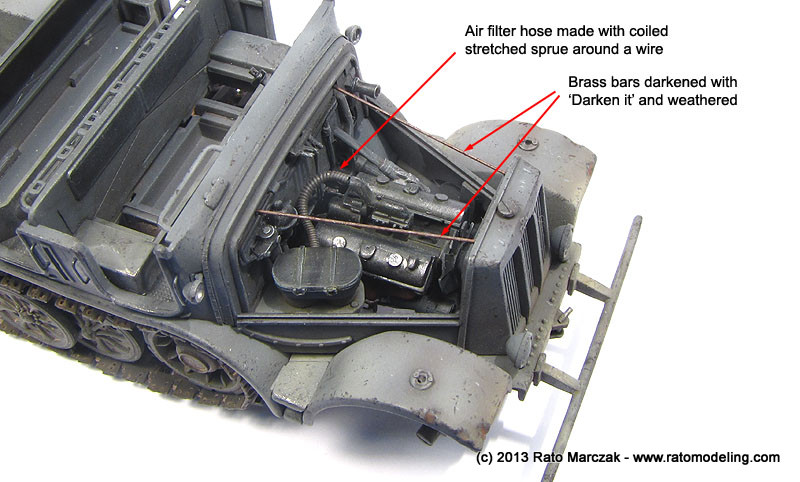
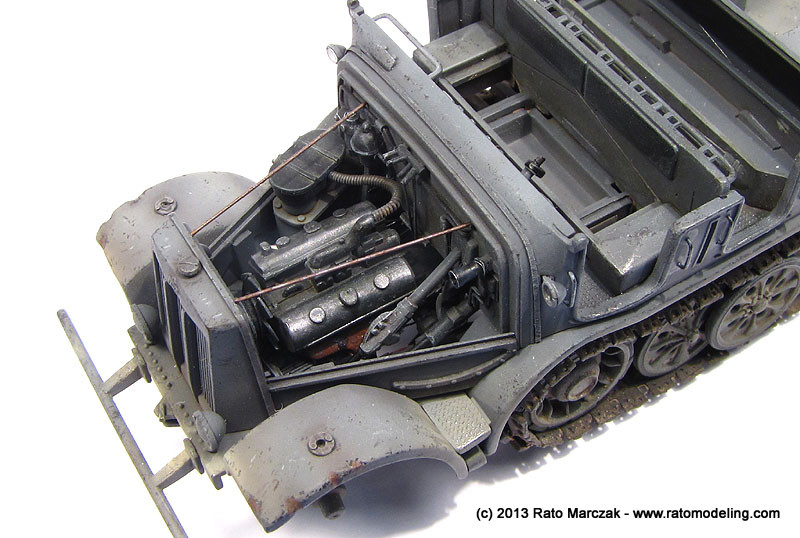
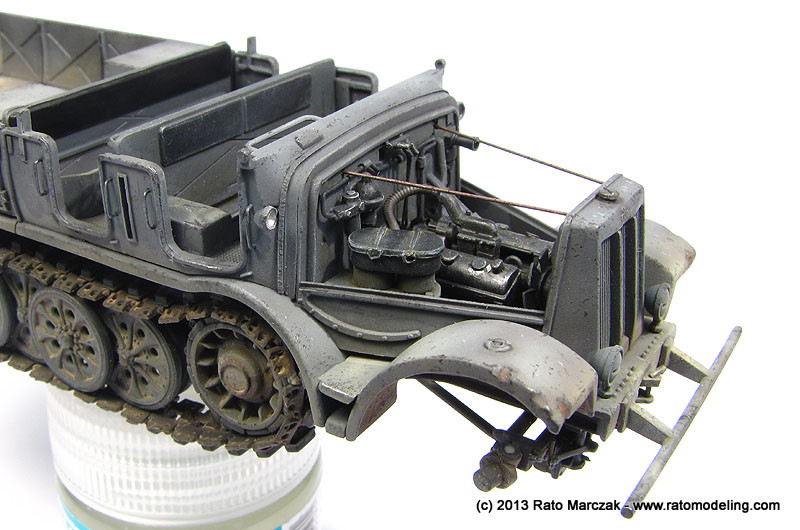
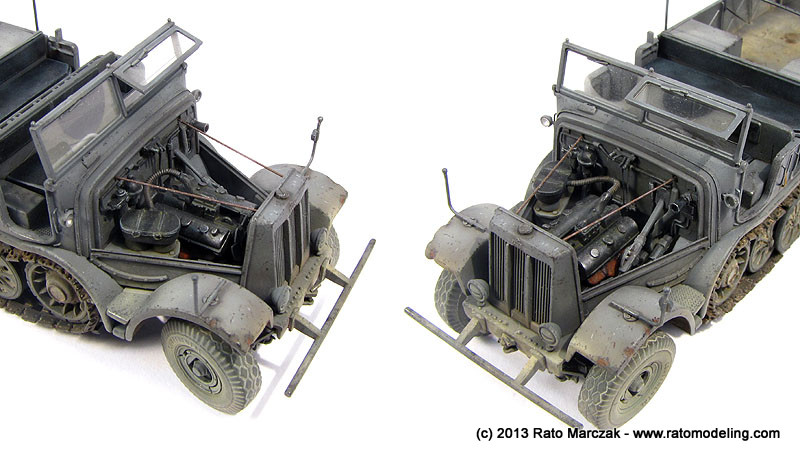
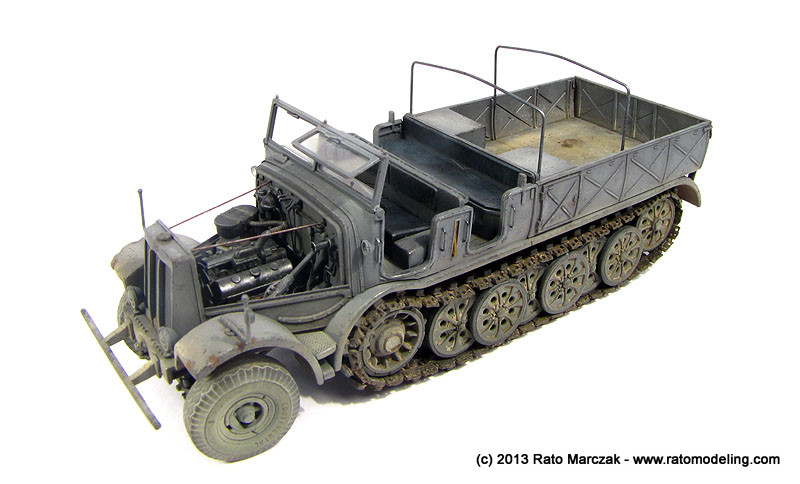
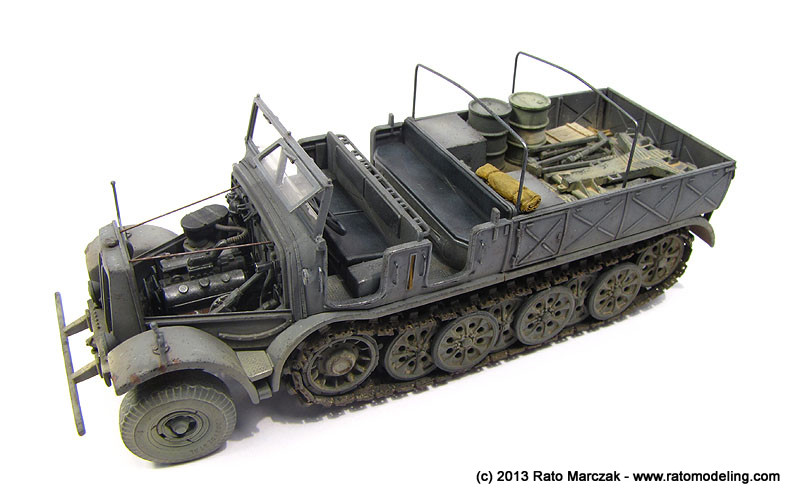
Some final detail bits were added at this point. The engine received an air filter hose made with stretched sprue coiled around a piece of wire. This way I could shape the hose to connect engine to the air filter properly. The characteristic support bars below the hood were made fromf lengths of brass wire darkened with Darken It, weathered and inserted in holes previously drilled on the firewall and radiator:
Remember when I mentioned that I was still in doubt about closing the engine compartment? Even with the side louvers open, not much of the engine would be visible. I found several photos of Famos without the engine hood, so at that point I was considering to leave it out, or leave it next to the model... let's see. It is not an easy decision, because had I planned to remove the hood, I would have added a few more details. I haven't, and now I want to leave it open. Typical case of bad planning...
Fortunately, I believe there is a threshold level of detail which, once achieved by the modeler, will confuse the brain of the viewer enough to prevent the perception of missing details or flaws (but never, under any circunstances, tell it to the judges in a contest). Talk about modeling theory, eh?
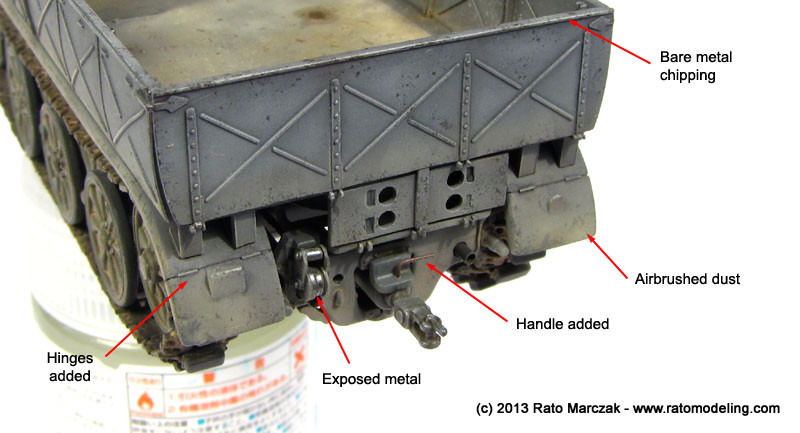
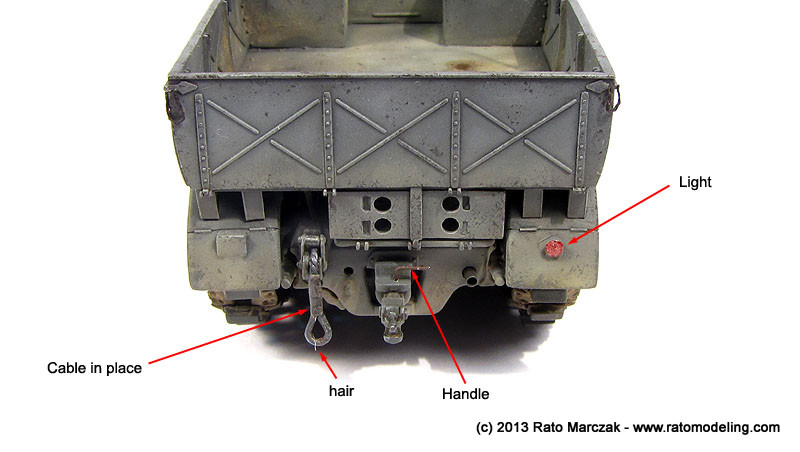
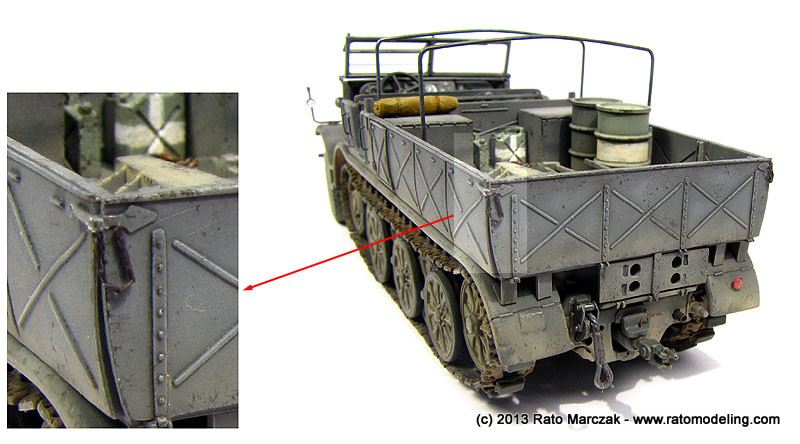
The rear of the Famo received some enhancements, too. I added a missing handle to the towing arm, hinges of stretched sprue and simulated the exposed metal on the pulleys which will hold the towing cable later (still have to add the brake light to the right mudguard). I may come back later and dust a tad more this area:
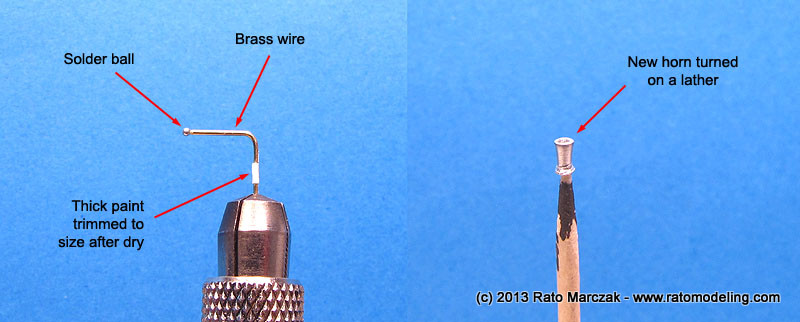
The sprues were almost empty by then. The missing details were treated next. The stock parts for the width indicators (parts A61 and A62) were too rough, so I made new ones using basically metal. I forgot to mention, but the horn I originally made was too big - you could see it protruding out the limits of the engine bay when looking from above, so I turned a new one, smaller, on a lathe. The one you see in the photos of the assembled vehicle is the one of the photo below:
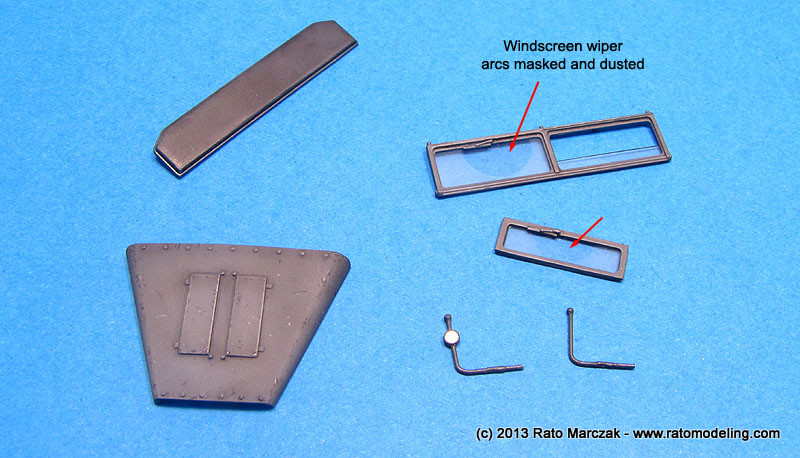
I painted and weathered the engine hood (even thouth I didn't know if I was going to use it) and the windscreens. Trumpeter provided acetate sheets to be cut and used as glasses. It worked nice, but before attaching them to their frame, I masked the windscreen wiper arcs and misted them with XF-57.
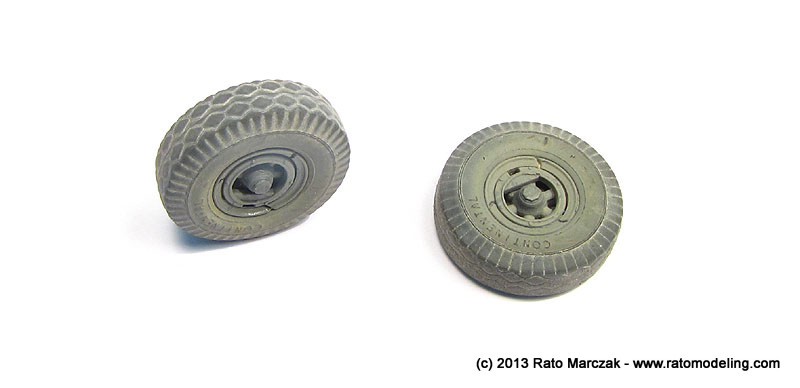
I used the rubber tires provided with the kit, and the split mold marks were sanded off easily using a coarse sandpaper. Let's see how it wil stand the test of time. The wheel assemblies were painted and weathered with pigments and acrylic paints:
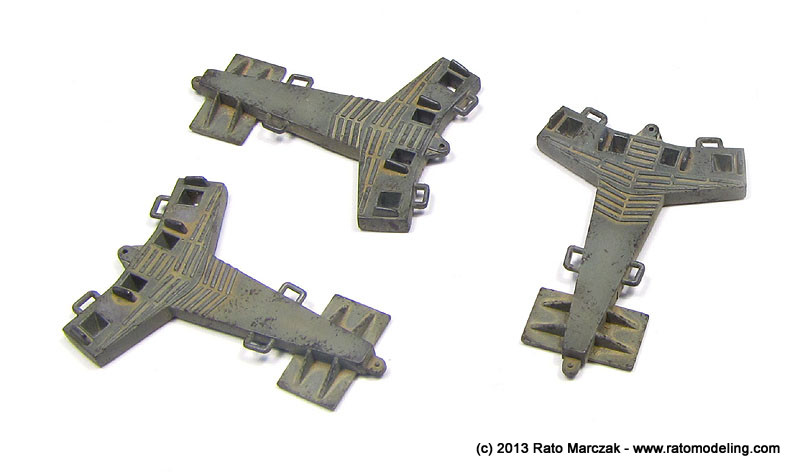
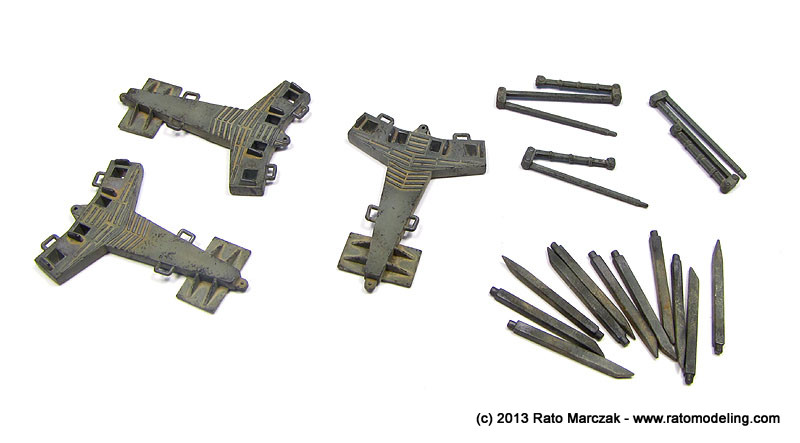
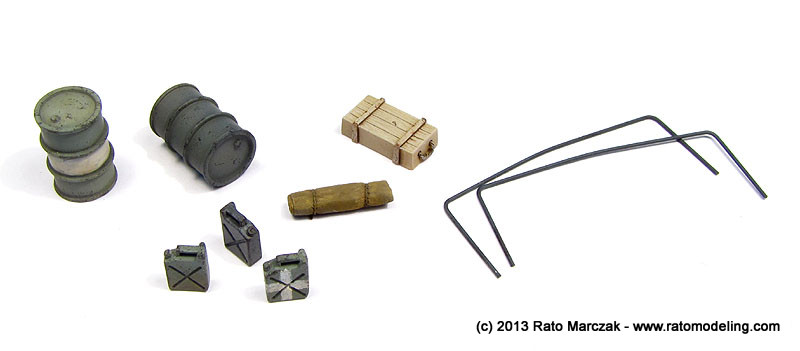
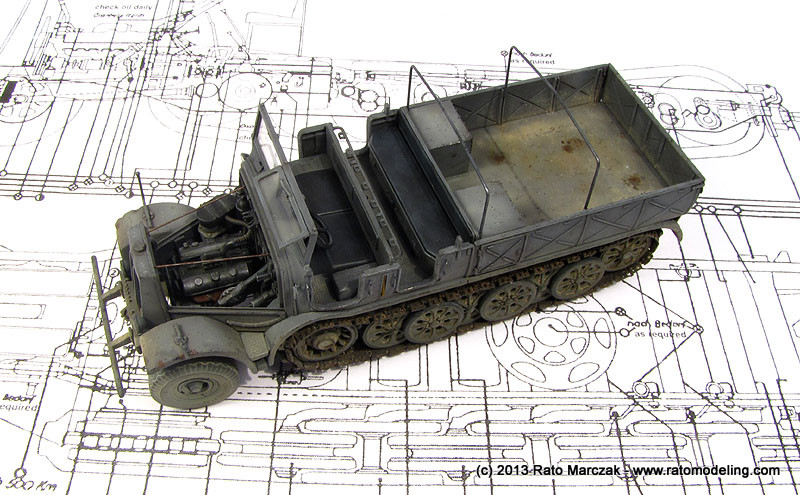
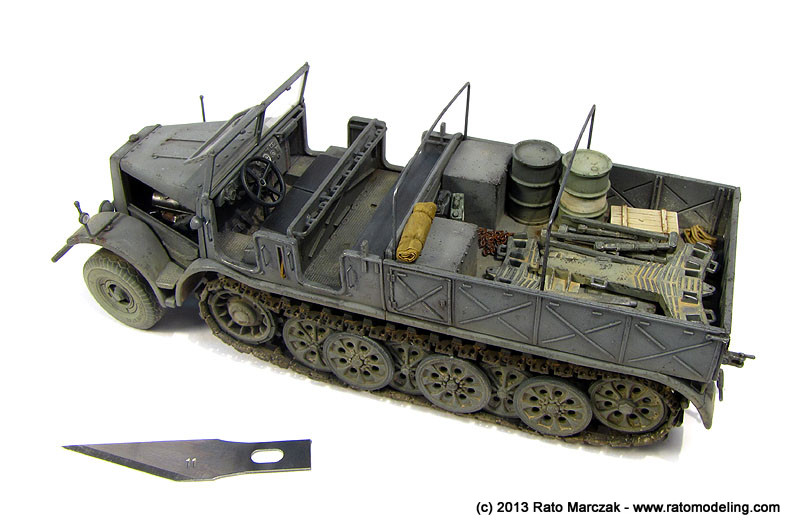
At this point the model was almost done, but I still had to address the cargo stuff. This model will be displayed in a diorama, towing the Revell Kanone 18, so it was natural to stuff there some accessories belonging to the latter. It was boring to repeat all the painting/weathering steps on them, but I had to. I used the Kanone parts used to secure it in place when firing. When in use, these heavy metal parts are always laying on the ground, so I abused of the chipping and dusting. It was challenging to try to simulate the earth and mud stuck to all twelve tiny metal stakes. I also used Humbrol Polished Steel Metal Cote to expose the metal in the end hammered by the soldiers when sticking it in the ground:
Other items to be used in the cargo were a couple of fuel drums from the Hasegawa Isuzu Fuel truck, fuel/water cans, a wooden box, and a canvas tarp. The individual supporting struts for the cargo canvas of the Famo are not provided by Trumpeter (they give you all five struts packed together - part C21) . Instead, they provide a jig to make your own (part C30, see step 18 of the instructions). I passed. Instead, I used 0.5mm brass wire to eyeball a couple:
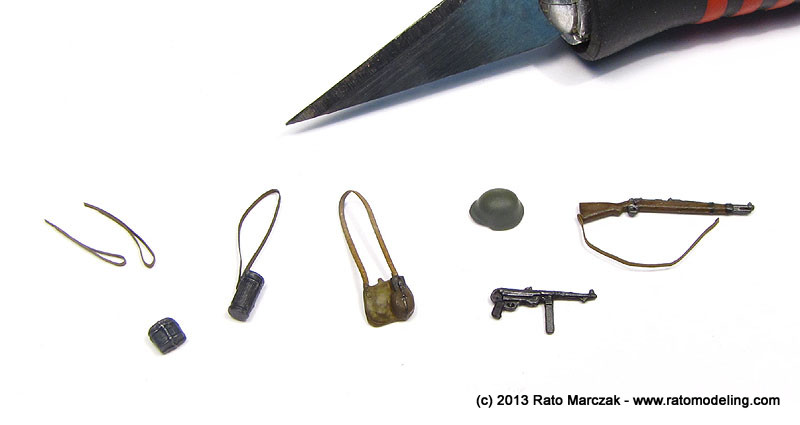
And since this will be in a diorama, I also worked on a few personal gear scattered around the Famo. They were a rifle, a MP-40 machine gun, a helmet and other standard Wehrmatch items. The slings were made of ordinary paper painted with acrylic paint. They will be more naturally shaped once I figure out where they go. The two small loops on the left side of the photo below are the leather climbing handles found on both sides of Famos.
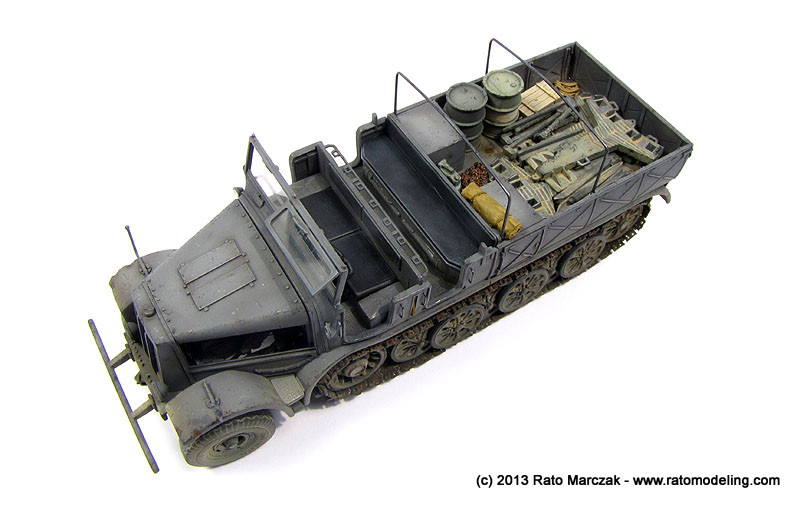
With all items ready, I proceeded with the final assembly. The front wheels were glued in place, and I added the missing details to the rear: towing cable, a small handle and a scratchbuilt brake light:
I also glued the width spacers, the windshields (in open position), and smaller details such as the leather lookp on the doors and the chains of the cargo door. The latter were made with the known method of pressing a braided wire with flat pliers:
I replaced the pedals by scratchbuilt items (I've carved out the molded on ones earlier), but I didn't like the final position of the steering wheel. I'll have to figure out a way to put a driver there later, because there is not much space left between it and the seat. I left the engine hood unglued, so I can pose it in place or out, showing the engine.
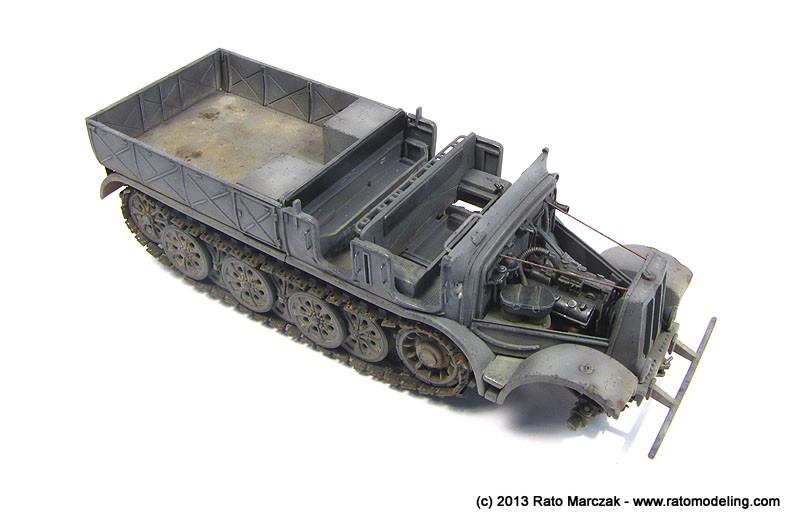
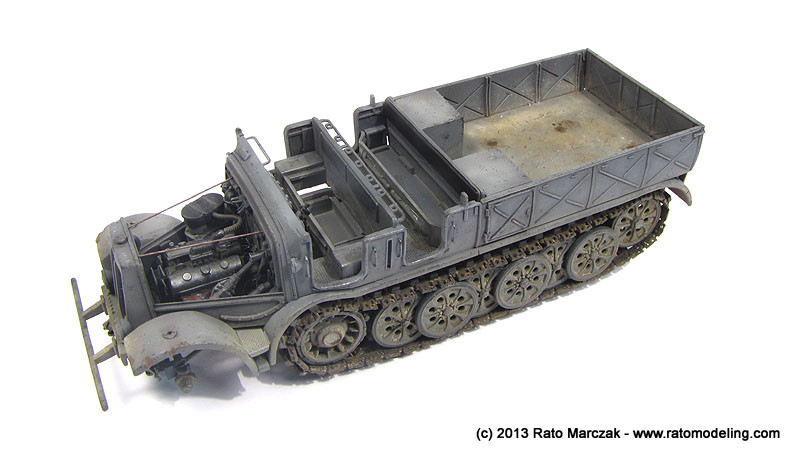
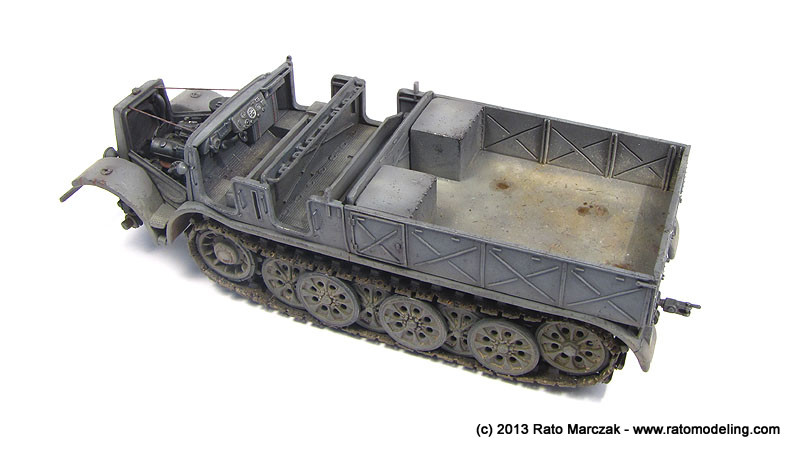
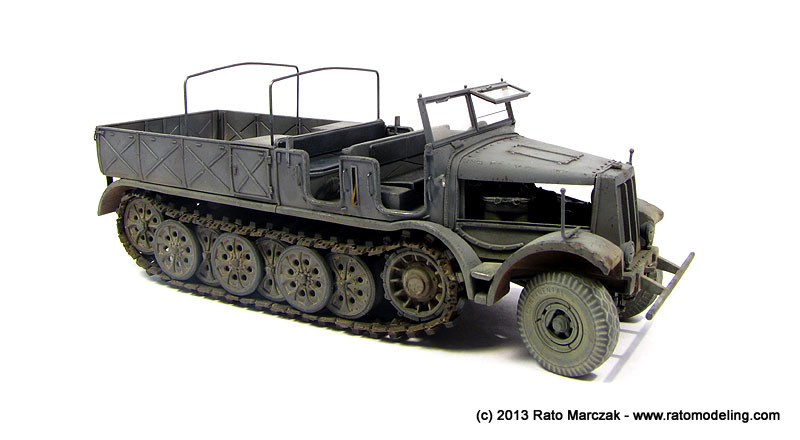
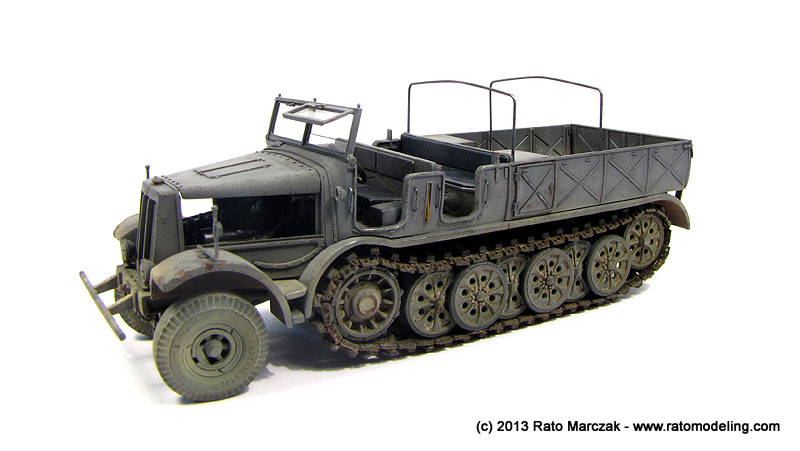
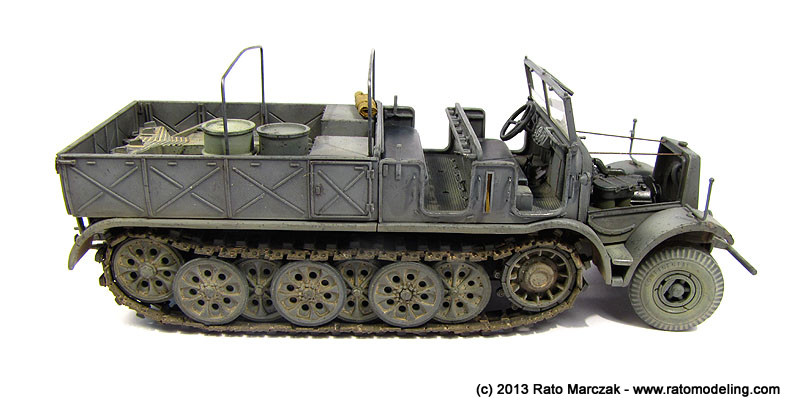
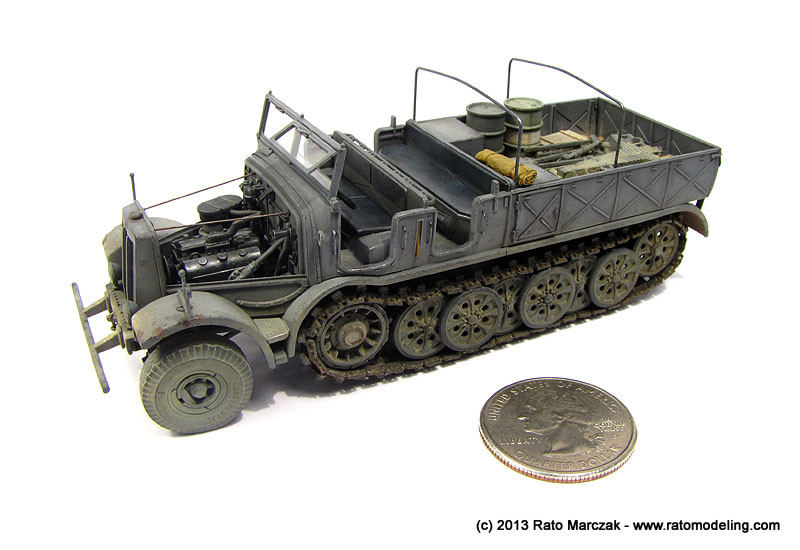
Even without its cargo load, it was already a nice little truck:
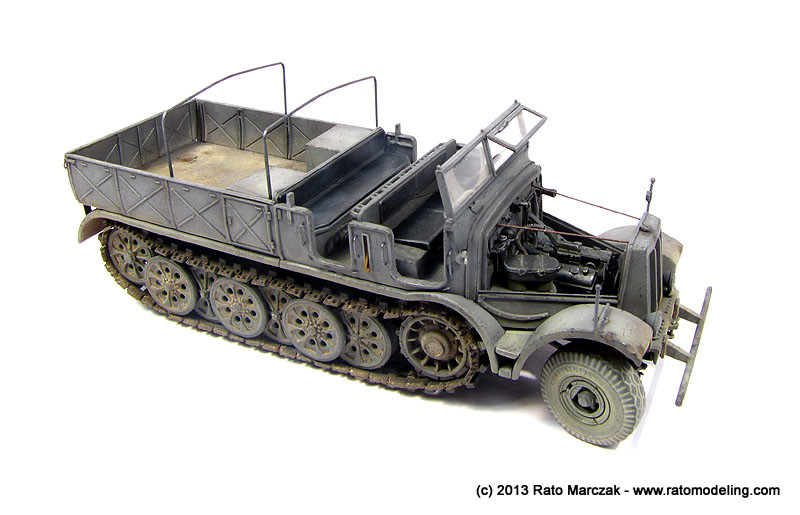
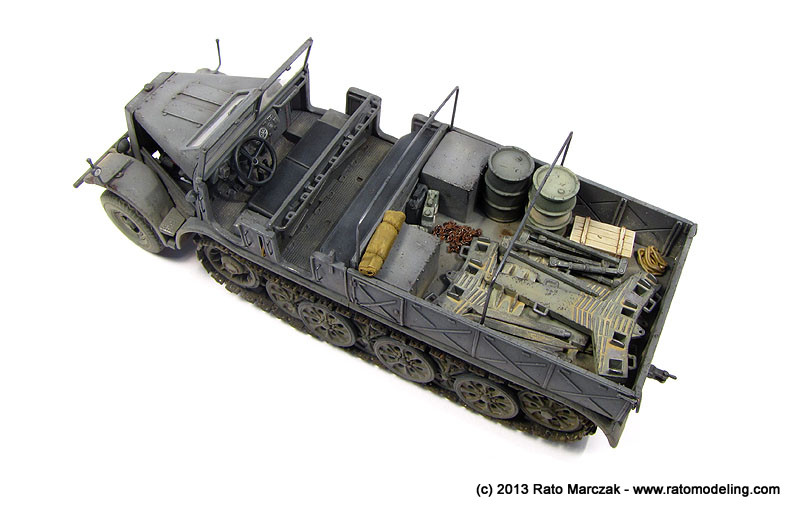
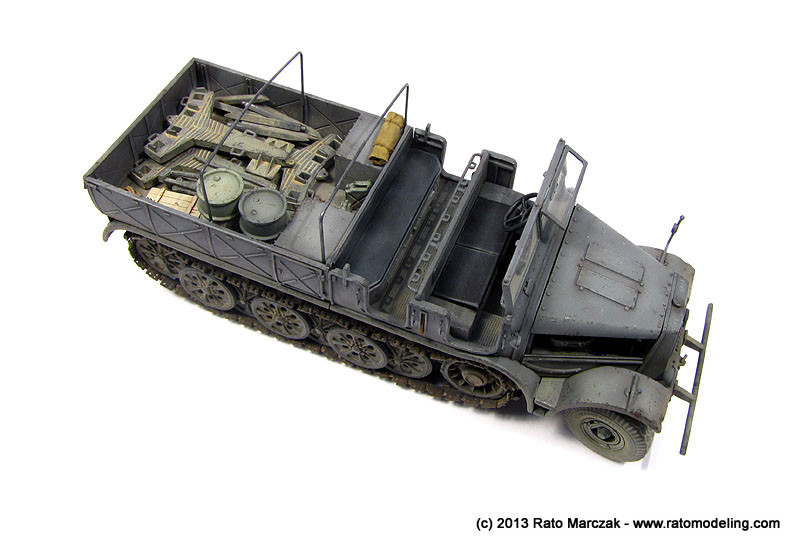
I dry tested a number of configurations for the cargo items, and settled with something that pleased my eyes and looked realistic. Besides the items described above, I also added a coiled rope and a rusted chain:

And that was it. I will not install the personal gear stuff because I still didn't know the diorama context in all details. Anyway, I declared my Famo done:
I hope you like it.
| Technical file | |
| Kit:
|
- Trumpeter #7252 |
| Additions:
|
|
| Basic
colors: |
- Primer: none - Panzer Gray: 5 parts Tamiya XF-63 + 2 parts Tamiya XF-2 + 3 parts Gunze H-30. - Flat coat: Humbrol Flat Cote |
| Notes: |
-
Several scratchbuilt enhancements were added to the model (see text). |
Rato Marczak © 2013
