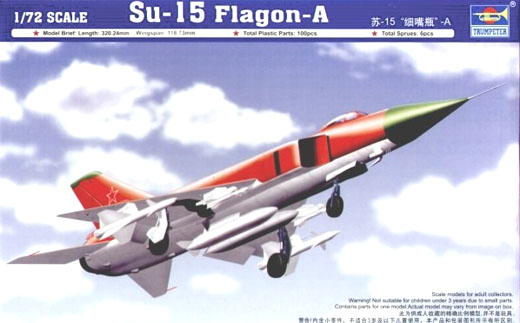
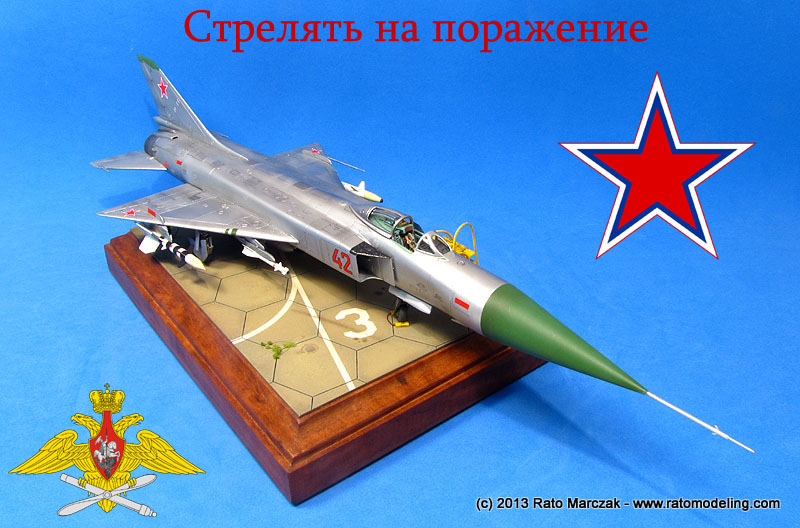
| Trumpeter Sukhoi Su-15 Flagon A in 1/72 |
| Started: February / 2013 Current state: Painting |
I
like to think about the Su-15 as the ultimate Soviet interceptor of the
cold war. Crudely made, brute force powered, and killer-dart looking
summarizes my personal idea of such planes. Only then come MiG-21s
or any other, for that matter. The Su-15 has its history plagued by its
involvement in several incidents with civilian aircraft tresspassing
the Soviet airpace, including the Korean Air Lines Flight 902 and the infamous Korean Air Lines Flight 007, which resulted in 269 passengers/crew casualties.
Trumpeter's 1/72 kit of the Flagon A replaces older options which don't even deserve mention, so difficult they were to deliver a decent replica. Apparently, Trumpeter has corrected a number of goofs from their 1/48 Flagons (the nose incidence being the most noticeable) before downsizing them, but several mistakes are still present. In short, Trumpeter's Flagon is the best modeler friendly kit available, not the most accurate.
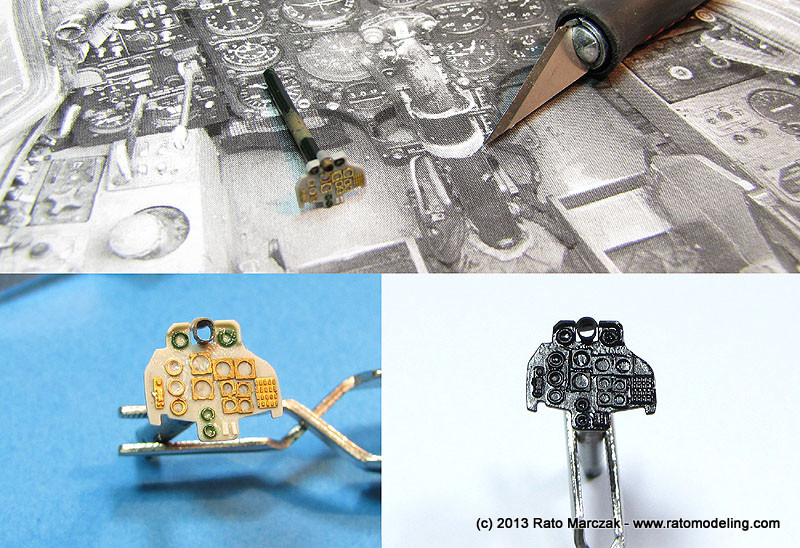
The control panel was improved by adding PE instrument dials one by one, following reference photos. It also will be glued in place later, after receiving instrument decals:
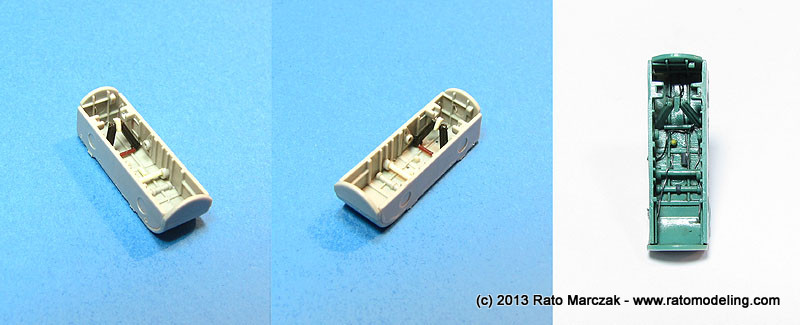
The nose wheel well is cleverly molded in three pieces, and a careful painting and drybrushing would probably suffice. I went a bit further by adding the retraction arms (missing in the kit), a bit of gizmology, and solder wire randomly placed to simulate hydraulics and electric cables. I suspect the wheel well is the same for the TM version, which has a different nose undercarriage, because there are a couple of slots not used by the single wheel strut of the Flagon A. Everything was glued so that the landing gear strut could be installed afterwards. The final aspect is the 'busy' look I was after:
Trumpeter's 1/72 kit of the Flagon A replaces older options which don't even deserve mention, so difficult they were to deliver a decent replica. Apparently, Trumpeter has corrected a number of goofs from their 1/48 Flagons (the nose incidence being the most noticeable) before downsizing them, but several mistakes are still present. In short, Trumpeter's Flagon is the best modeler friendly kit available, not the most accurate.
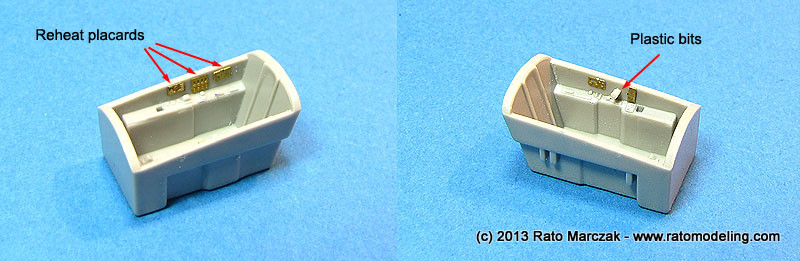
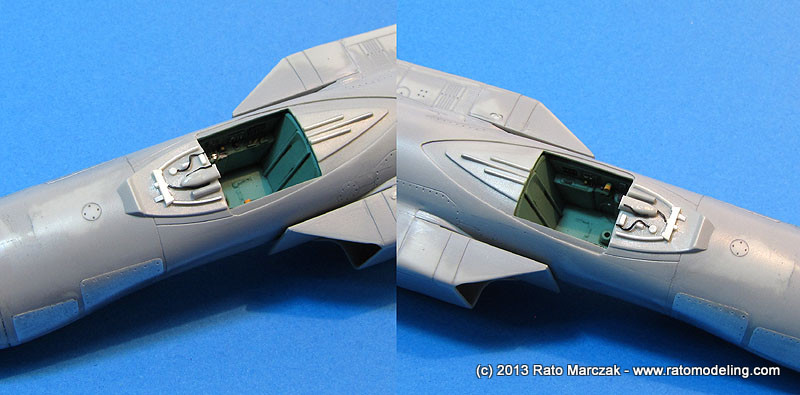
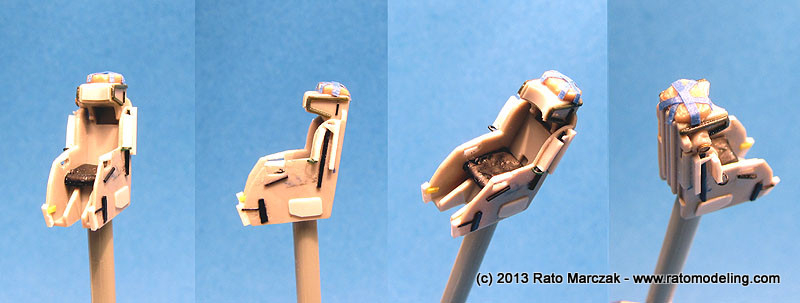
The stock cockpit is very
simple, with a
tub devoid of prototypical details, and a control panel plain flat
(not even a decal is included). So, work stated by adding lateral
consoles from Reheat, a throttle handle and minor details. The pilot's
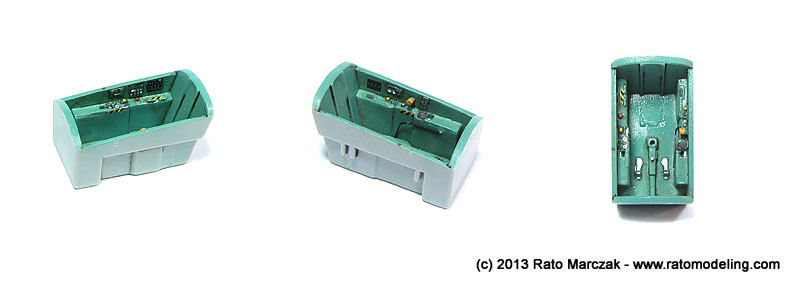
seat was left out to be inserted later on. I painted the cockpit with
Testors Model Master Interior Blue Green
to avoid the mess of mixing the characteristic interior color of Soviet
aircraft. Instruments, consoles and details were painted with black
paint, while handles and buttons highlighted with red, white or
yellow. I also added a Mike Grant's cockpit detail decals here and
there. After a coat of gloss clear, a gentle oils wash was applied and
then sealed with a semi-gloss clear.
The control panel was improved by adding PE instrument dials one by one, following reference photos. It also will be glued in place later, after receiving instrument decals:
The nose wheel well is cleverly molded in three pieces, and a careful painting and drybrushing would probably suffice. I went a bit further by adding the retraction arms (missing in the kit), a bit of gizmology, and solder wire randomly placed to simulate hydraulics and electric cables. I suspect the wheel well is the same for the TM version, which has a different nose undercarriage, because there are a couple of slots not used by the single wheel strut of the Flagon A. Everything was glued so that the landing gear strut could be installed afterwards. The final aspect is the 'busy' look I was after:
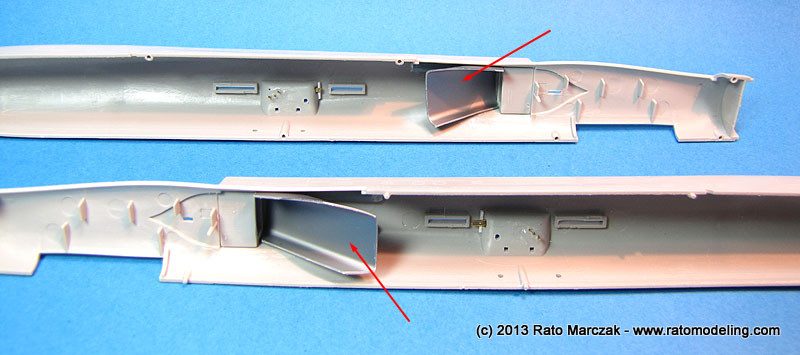
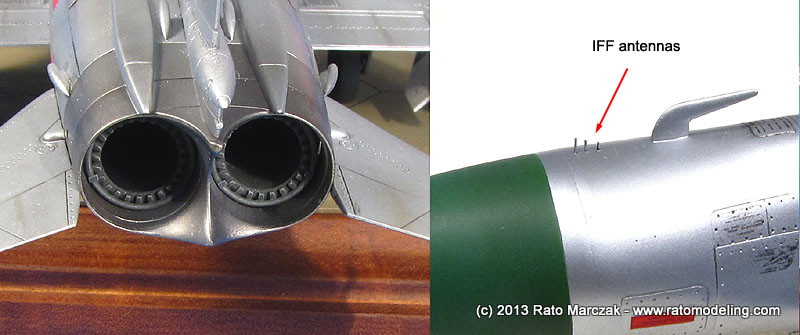
Next, I glued sheets of styrene curved to match the rear of the engine air intakes to the fuselage interior. They were painted with Aluminum and progressively shadowed with flat black towards the rear (not painted yet in the photo below). This way the see-through would be avoided when looking from the front of the aircraft:
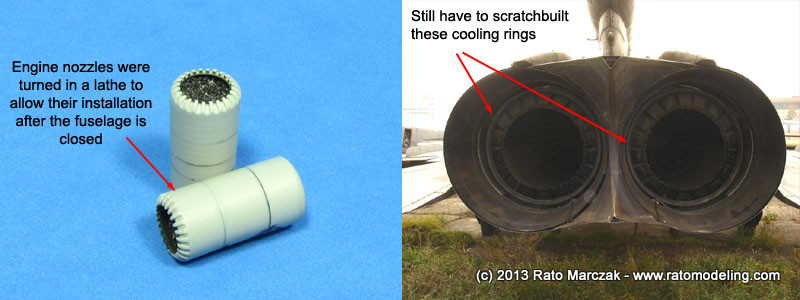
Trumpeter's instructions call for the installation of the engine nozzles before closing the fuselage. I wanted to install them at the end to make the exhaust painting easier and also to have a place to insert a suitable handle during the painting. The kit nozzles, however, wouldn't slide through the exhaust openings. I ended up turning them on a lathe to reduce their diameters, allowing them to be inserted in place later on:
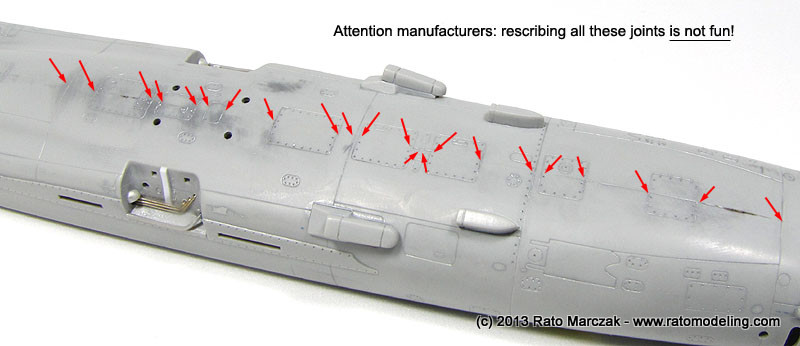
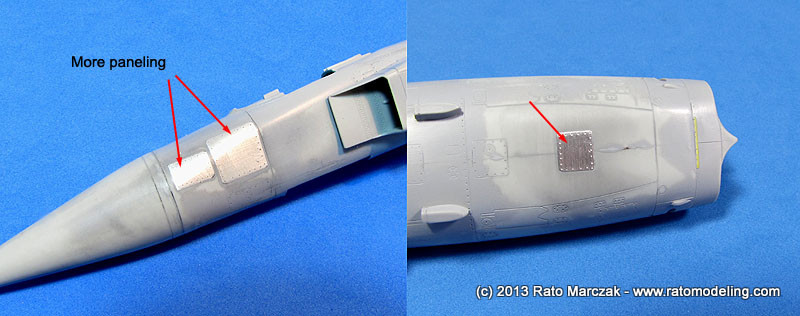
The fuselage halves were glued together, along with the nose, exhaust cover and the engine air intakes. I elected a few panels to be puttied in order to receive a paneling treatment with Aluminum foil afterwards. It was very boring to eliminate several seams without destroying the surrounding details. Fortunately, most access panels on the top and bottom of the fuselage matched well once the fuselage was glued. Even so, the rescribing of that many panels was not the most enjoyable job of the project, mind you. The putty-sand-rescribe phase was carried out between three priming sections - a necessary caution for a model finished in natural metal.
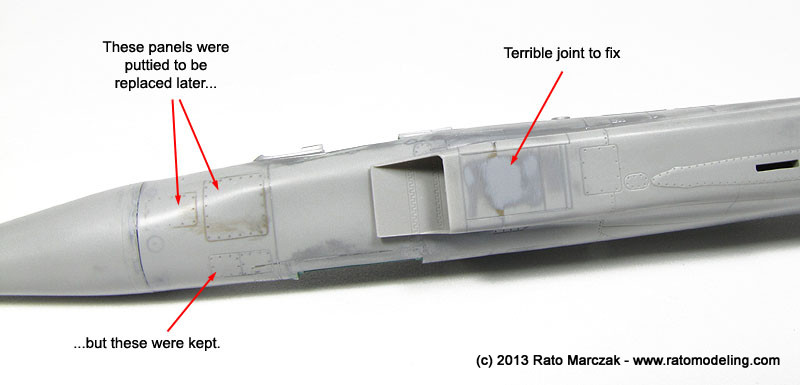
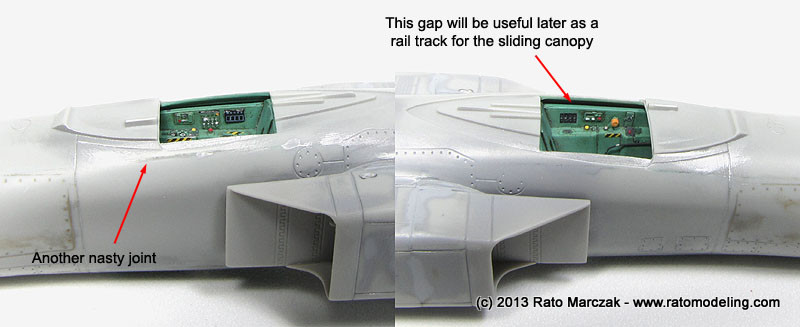
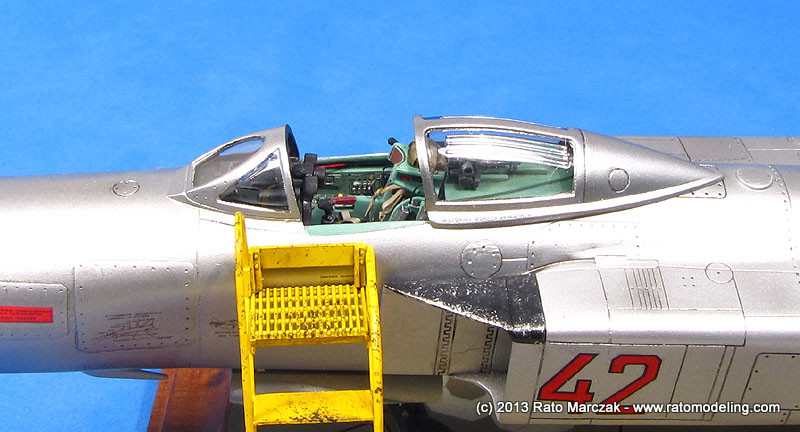
The kit is engineered aiming more than one versions of the Flagon, and therefore it was necessary to work on several joints, including the ones from the cockpit and nose wheel well covers (parts E1 and B4). Part B4 should be installed after the nose landing gear strut. Sure I would break it before too long, but I found out that the nose undercarriage leg could be installed later with some tweaking. The cockpit tube (D35) sides doesn't sit flush with the cockpit cover (E1), leaving a visible slot on both sides. Fortunately, they can be left that way to simulate the rails of the sliding canopy, as per reference photos (more on that later).
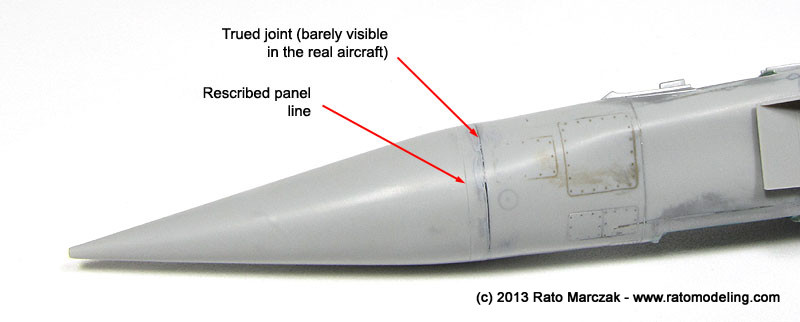
The nose cone housing the radar system (part B2) needed another line to be rescribed, as the joint line is not prototypical.
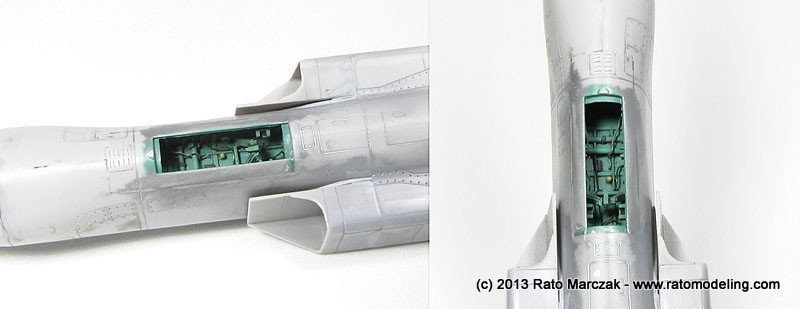
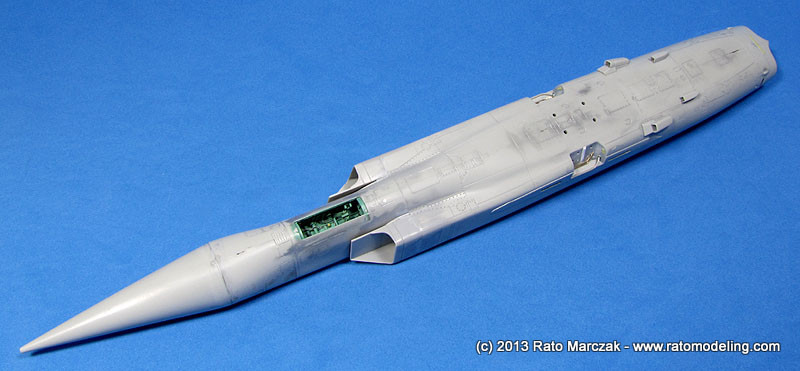
The nose wheel well looked really busy inside the fuselage:
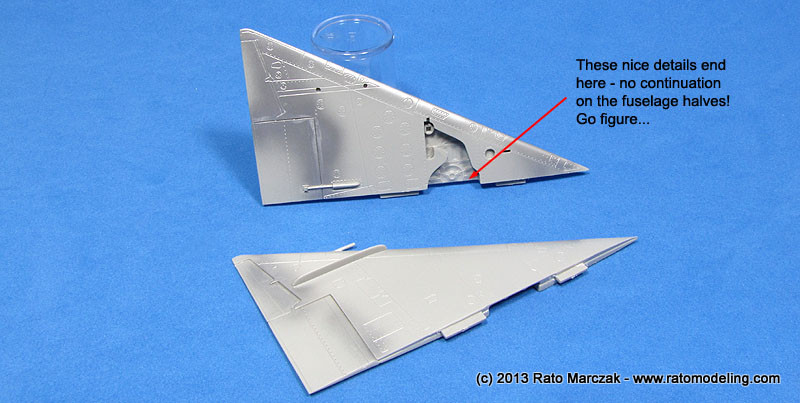
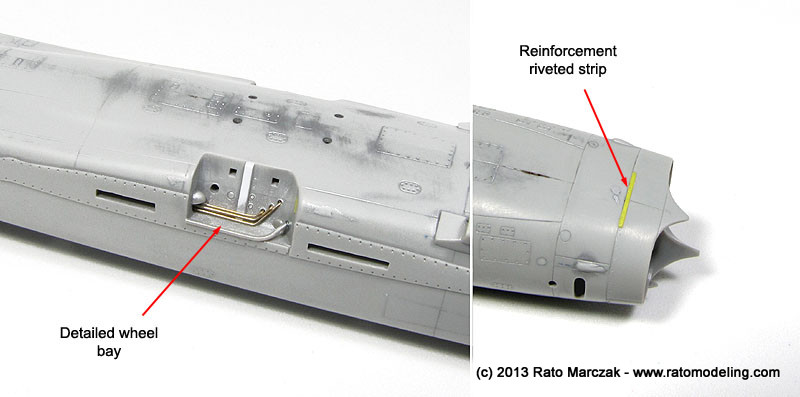
At
this point I added scratchbuilt details to the main wheel wells and
other areas of the fuselage. In particular, the main wheel wells have
nice relief details which - strangely - don't have their counterpart
molded on the fuselage side of the wells. I tried to minimize the issue
by adding hydraulics to the fuselage part of the wells, using photos as
references.
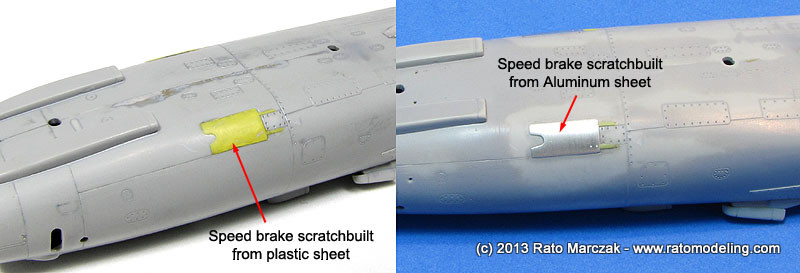
Still in the mood to make surface details less plain, I replaced the recessed speed brakes by raised new ones made from thin plastic. I didn't like the result, as I wasn't able to sand them to a consisent thickness. Therefore, I adopted plan B, and replaced the plastic brakes by thin Aluminum ones. Much better:
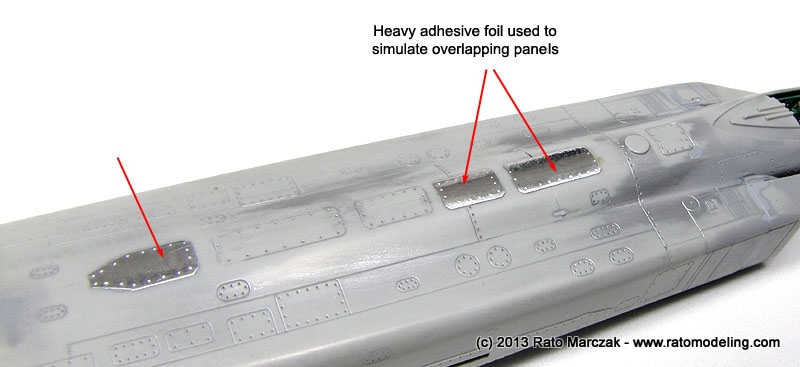
As I mentioned before, some panels were covered by heavy Aluminum foil to give some relief to the external surface of my Flagon. I've been using this technique for a while and I really like the results. It was just a matter of cutting the panels from Aluminum and glueing them over their recessed spots. The rivets were added with a metal pin, and the panels finished with a gentle sanding with 1200 grading sandpaper:
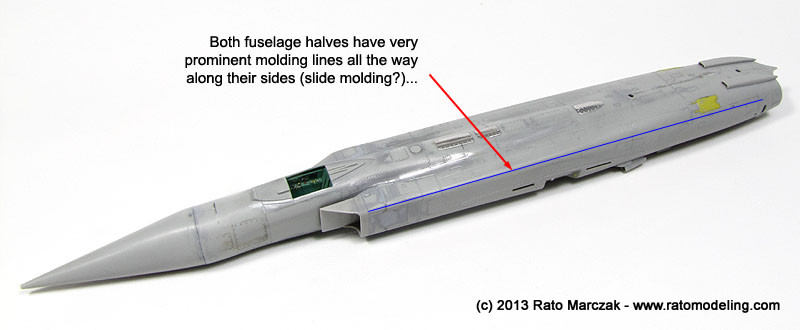
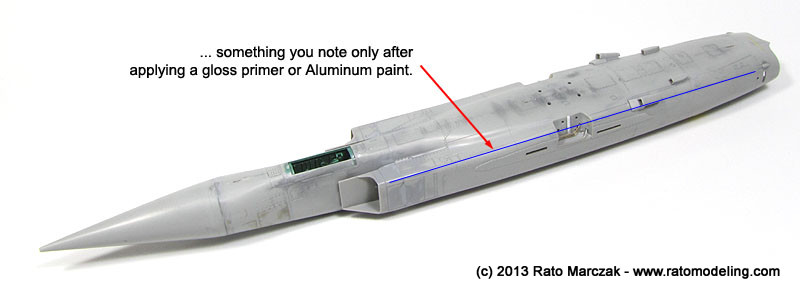
The several priming/sanding passes revealed nasty raised lines running all the way along the fuselage sides, starting on the corners of the air intakes and ending at the exhaust. These are certainly the footprints of a slid mold to allow the injection of such deep fuselage halves. The removal of these marks, however, demanded a lot of sanding which obliterated several surface details, making necessary further rescribing:
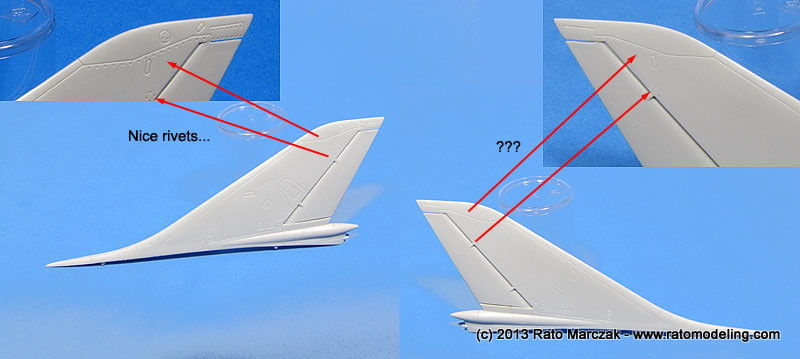
Another
odd thing with this model are the rivets on the vertical and horizontal
stabilizers. They are present on one of the sides of these parts ((D12,
D13, and D20). I used a metal pin to emboss the rivets on the
missing side, using the other one as a template.
Finally, the reworked fuselage was ready to receive the missing paneling treatment and the wings:
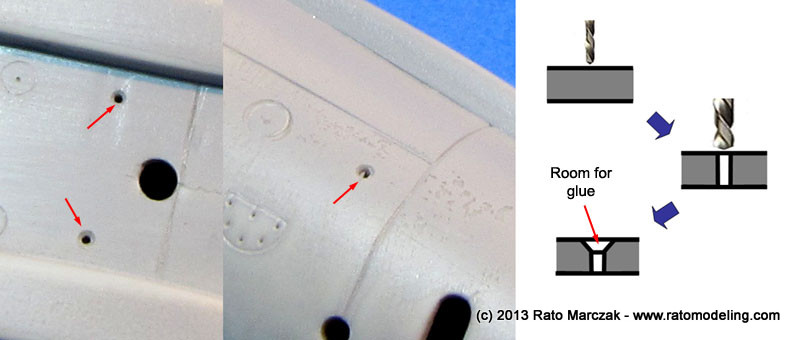
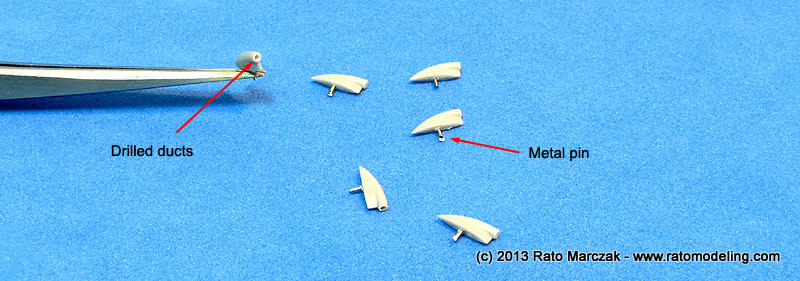
The
several air intakes (parts D14) that had to be glued along the aft
fuselage were another challenge. They didn't have any slots or locating
pins, and the instructions were vague. I had to resort to photos of the
real aircraft to find their correct positions, which were drilled. I
like to use a two steps hole, so that there are two diameters in
there. The intakes received metal pins which fit the smaller hole,
while the larger hole acts as a container for the excess glue.
The I learned that this simple step eliminates any chances of glue
smears, and at the same time provides a strong assembly for the parts:
Before
glueing the windscreen, I scratchbuilt visible details which goes under
it. Besides the radar scope cover, the Flagon had a defogging device
running internally along the lower frame. This was simulated using
pieces of plastic rod, and complemented with other smaller bits:
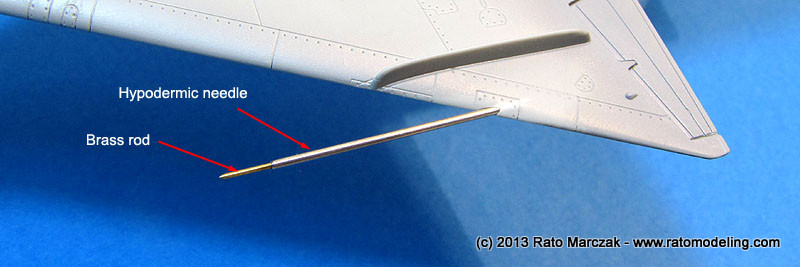
Trumpeter's
instructions kindly ask you to make a butt joint of the pitot tube with
another part of it molded with the wing. This must be some kind of
joke... Anyway, I declined and made a new pitot using needles and brass
rods firmly glued inside the wing leading edge. I guess I won't break
this one:
The
wings were finally glued to the fuselage, as well as the vertical
stabilizer. Although the fit was good, to keep the dihedral slightly
negative was a whole different story which required a lot of tweaking
with rubber bands and wood sticks. Only when I could verify the correct
dihedral I brushed liquid cement along the joints. Any visible seams
were concealed using Mr.Surfacer, the excess being removed with
isopropyl alcohol once dry.
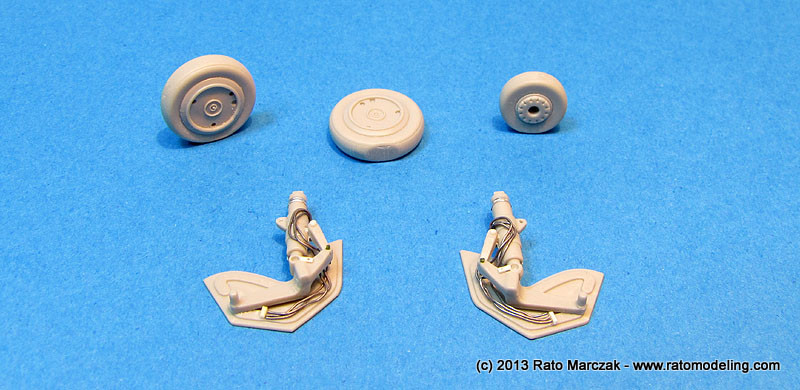
I then could start working on the landing gear. If you compare the undercarriage doors with the real things, you will note that there are some serious errors regarding the internal doors. Trumpeter made them fitting the wheel well openings, but these were wrongly represented. Anyway, I elected not to change them. Instead, a bit of detailing could bring the standards to a better level, or so was the plan.
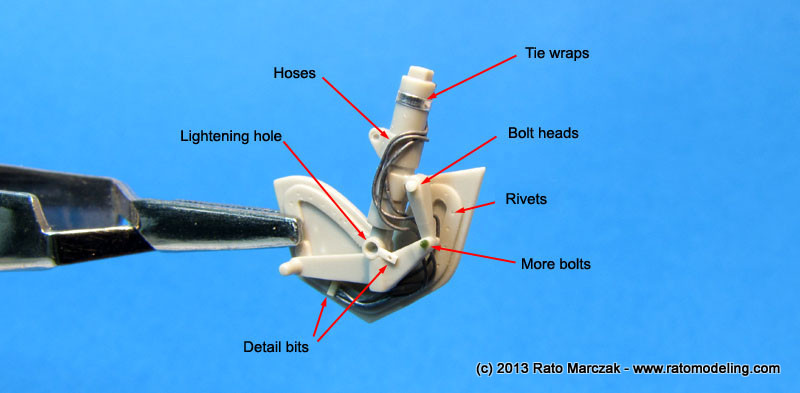
Well, one thing that I like in those Soviet aircraft are those bundle of cables and hoses clustered along the struts. Using photos as references, I added several details to the main landing gear legs using plastic bits and solder wire. They certainly will look nicer after painted and washed:
I then could start working on the landing gear. If you compare the undercarriage doors with the real things, you will note that there are some serious errors regarding the internal doors. Trumpeter made them fitting the wheel well openings, but these were wrongly represented. Anyway, I elected not to change them. Instead, a bit of detailing could bring the standards to a better level, or so was the plan.
Well, one thing that I like in those Soviet aircraft are those bundle of cables and hoses clustered along the struts. Using photos as references, I added several details to the main landing gear legs using plastic bits and solder wire. They certainly will look nicer after painted and washed:
The (wrong) main undercarriage doors were used as a test bed for the MicroMark rivet decals.
I used sheet #84985, which is designed to detail HO scale railroad
stock, but it is still a tad too big to simulate aircraft rivets
in 1/72 scale. Let's see after a paint coat.
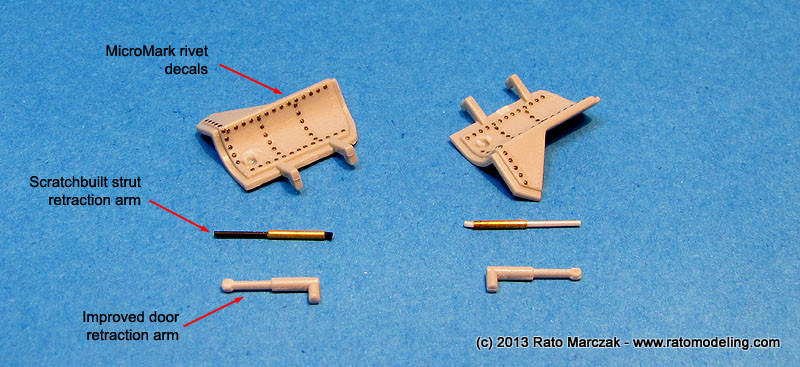
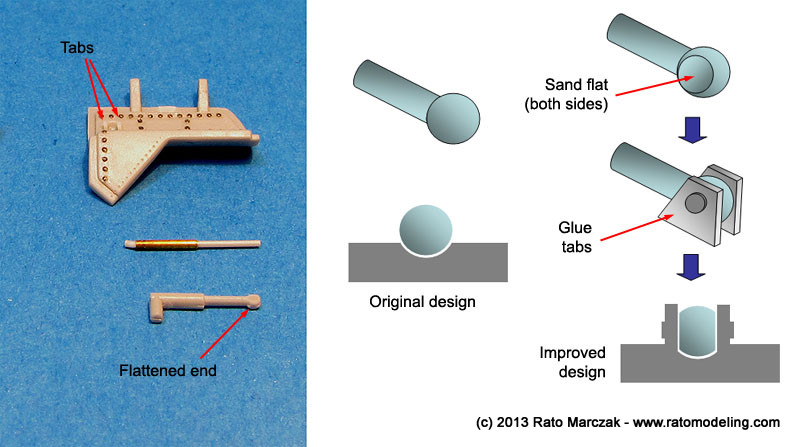
The
doors and undercarriage retraction arms are ridiculously simplified,
and Trumpeter took a shortcut and molded the ends as spheres... C'mon
Trumpeter, do your homework. I had to replace strut arms for
scratchbuilt ones, while the door arms were refined to transform the
original ball joint in something more credible through sanding the
sides flat and adding pivoting tabs to the doors:
And so painting finally started. I've chosen Alclad for this project. I really like the stuff. Not much so for its grain - some other brands around have finer pigments - but for its forgiveness in application and when fixing bad spots. Anyway, I used ALC106 White Aluminum for the whole plane. Many modelers like to mask the model and used various different shades on different panels. I don't like all the extra work, even though sometimes the result pays back. Masking dozens of access panels with rounded corners is not as easy as it seems (one of those cases of 30min masking and 2min airbrushing time), but more importantly, check your references. I don't see the point in making a sparkling multi panel NMF on your model when the photos don't show it. Metals oxidize not only dulling the finish, but also making the aspect of the whole airframe more monotonic, and there are not so many different metal alloys in an aircraft skin as you may be thinking. Of course there are exceptions, so this is not a critique, just a warn: check your references.
As for the Alclad, as much as any other natural metal product, it is always a dilemma: you have a nice, realistic sheen right out of your airbrush, but then you have to apply the decals, making mandatory some sort of clear coat to avoid different shines and conceal the clear film... That's why I like Alclad, it doesn't change that much after a clear coat, and it resists to mineral spirits so that I can apply a wash without any protective coat if I want so.
Back to the Flagon, my plan was tho shoot White Aluminum on the whole model, apply the decals, and coat almost everything with PollyS satin finish. These acrylic flat and semi-gloss products usually render a whitish finish to the NMF, exactly what I saw in the phtos of Flagons in active service. Of course I had to test the plan in a piece of plastic before risking my model:

The order of the battle was the following:
1. Automotive acriylic primer
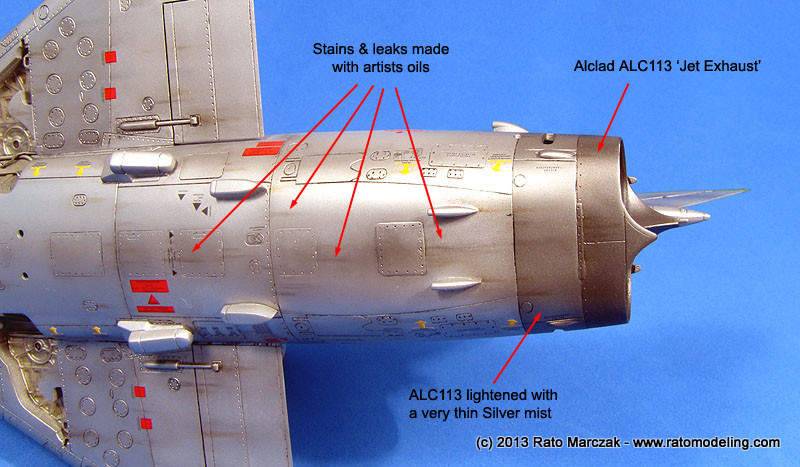
2. Airbrush Alclad ALC113 Jet Exhaust on the tail pipe. Mask the area once finished.
3. Airbrush a very diluted mist of Aluminum on the fore section of the tail pipe to change the color a bit. Mask the area once finished.
4. Airbrush Alclad ALC106 White Aluminum on the whole model.
2. Airbrush Alclad ALC113 Jet Exhaust on the tail pipe. Mask the area once finished.
3. Airbrush a very diluted mist of Aluminum on the fore section of the tail pipe to change the color a bit. Mask the area once finished.
4. Airbrush Alclad ALC106 White Aluminum on the whole model.
After these steps, the very good decals were applied. There are a plethora of stencils on this model. I didn't use them all, though:
Like I said, the bright decals contrasted with the Aluminum color, and they wouldn't stand the abuse of the weathering to come, so I sealed them with a gloss lacquer. In summary, these were the post painting basic steps:
1. Apply decals.
2. Airbrush automotive gloss clear to seal the decals.
3. Pin washes using artists oils and enamels.
4. Mask the central panels of the wings.
5. Airbush satin clear coat.
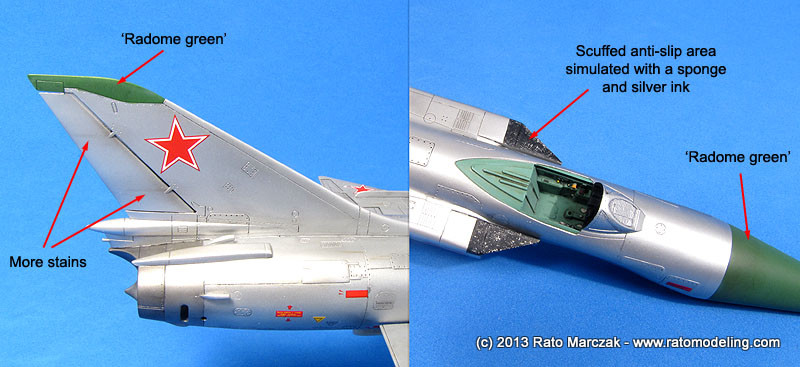
6. Simulate stains and leaks with artists oils.
7. Apply filters on selected panels to avoid monochromatic finish.
8. Paint the radome green on the nose and tail fin.
2. Airbrush automotive gloss clear to seal the decals.
3. Pin washes using artists oils and enamels.
4. Mask the central panels of the wings.
5. Airbush satin clear coat.
6. Simulate stains and leaks with artists oils.
7. Apply filters on selected panels to avoid monochromatic finish.
8. Paint the radome green on the nose and tail fin.
Since
I haven't taken in-progress photos, let me show you and comment some of
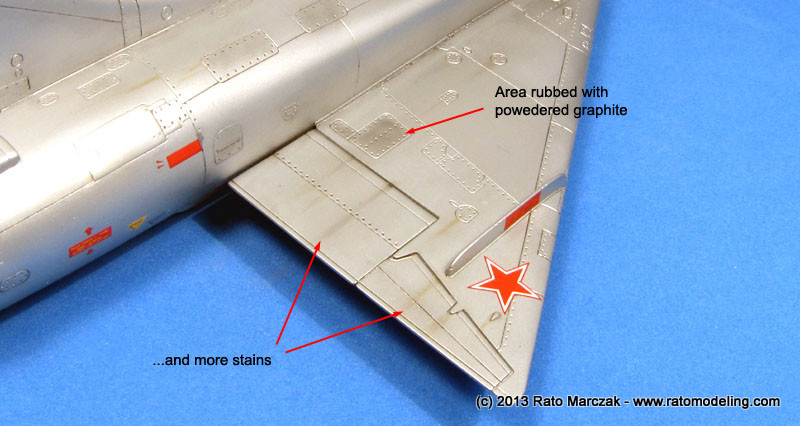
the steps. The leaks and stains were applied with artists oils using
the known brush dragging method:
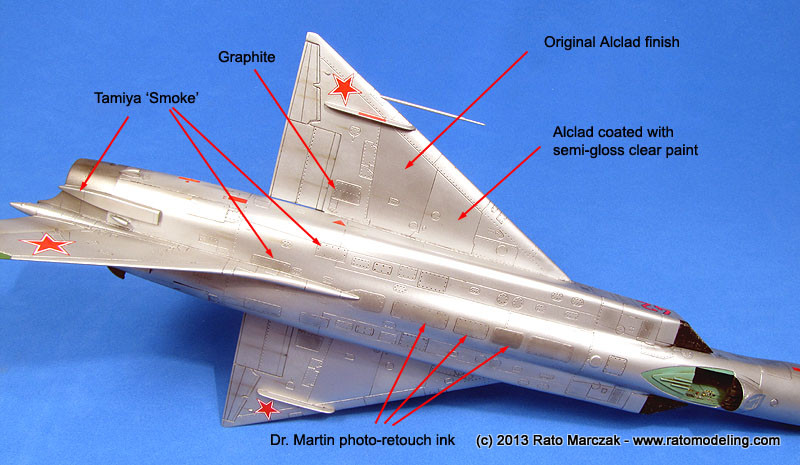
The central panel remained without the satin finish, and the difference in shine can be seen from certain angles, only. I also used powdered graphite, Tamiya Smoke (X-19) and photo-retouch inks as filters to change the color and the shine of selected panels. The graphite was rubbed on with a short bristle brush, Smoke was airbrushed free hand, and the inks were applied by brush:
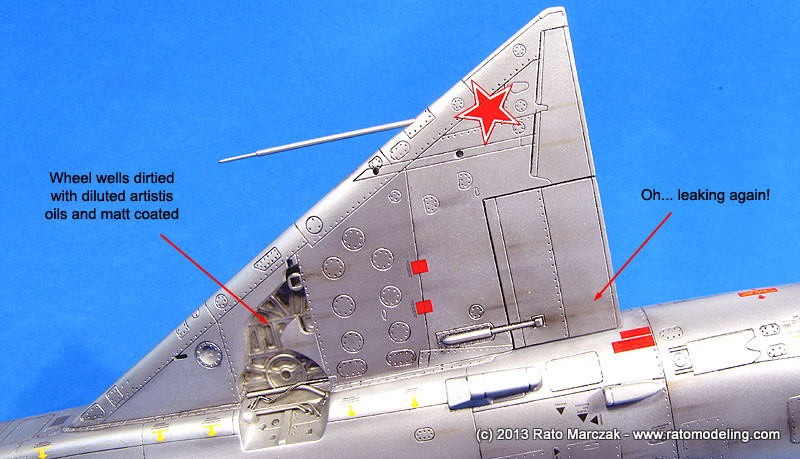
I
applied a heavier light brown artists oils wash on the landing gear
wells and coated the area with flat varnish. That simple recipe made
the wells look more dirty and used than the rest of the airframe:
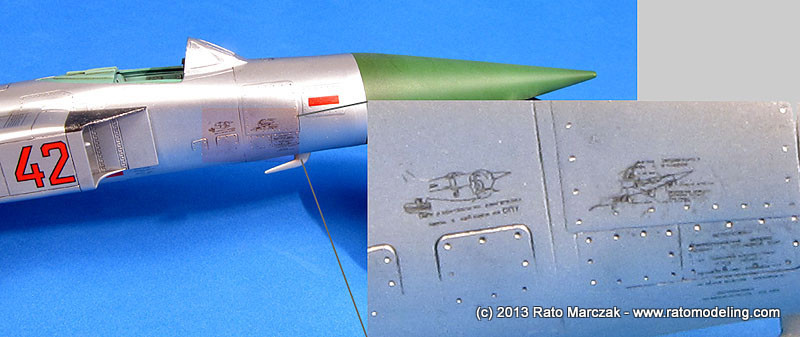
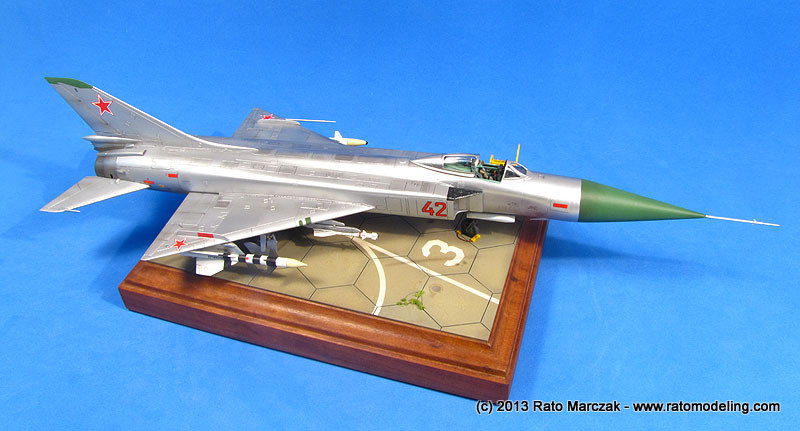
The nose and tip of tail fin were painted with a mix of Tamiya XF-5 and X-28. Since the latter is gloss, I had to apply a flat coat on these areas right after. On the real aircraft, the top of the engine air intakes had a anti-slip area. I painted it with semi-gloss black enamel and dabbed silver paint with a sponge to simulate scratches produced by pilots and groundcrew:
I'm again impressed by the quality of these Trumpeter / Hobby Boss decals. They adhere perfectly to the surface with virtually no silvering, respond to setting solutions, and are very well printed. Some of the stencils bring interesting surprises when viewed with a magnifying glass, and prevented me from applying them up side down:
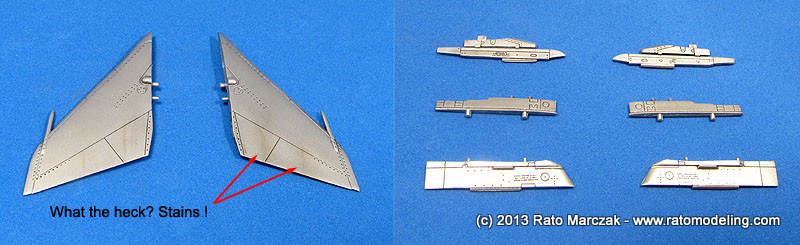
The stabilizers received the same treatment as the rest of the airframe, as well as the pilons:
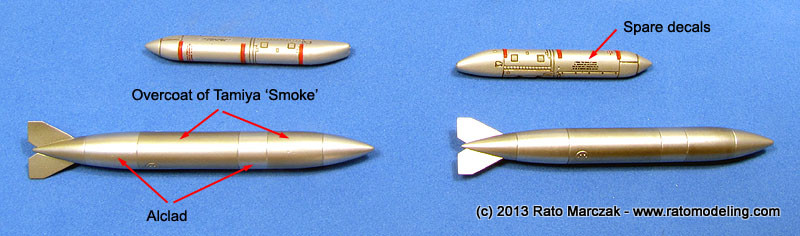
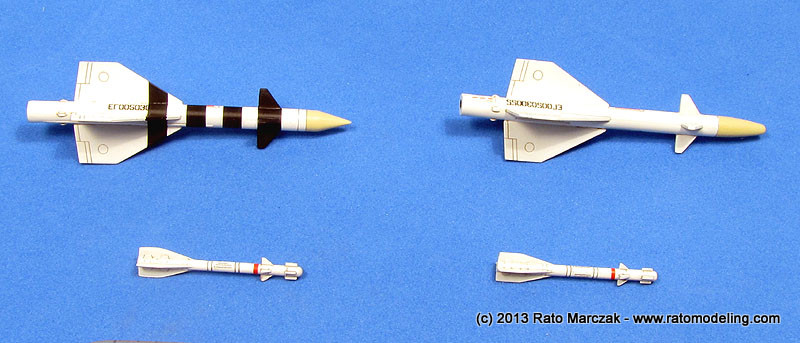
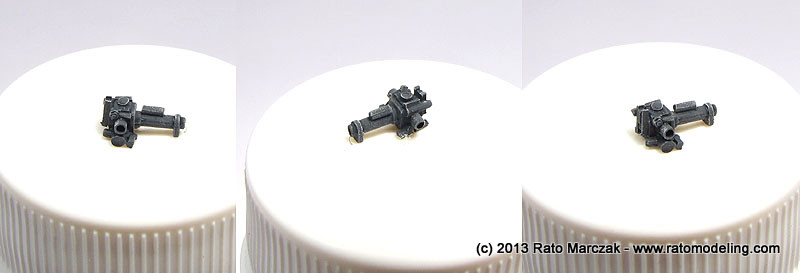
At this point, I had not decided for a short or long range intercepting armament. The difference is the use of fuel tanks or the UPK-23 pods with the twin GSh-23L cannons. So I painted both (the cannon muzzles were not installed in the photo below - I removed them from the kit parts to make new ones later) and decorated with spare decals:
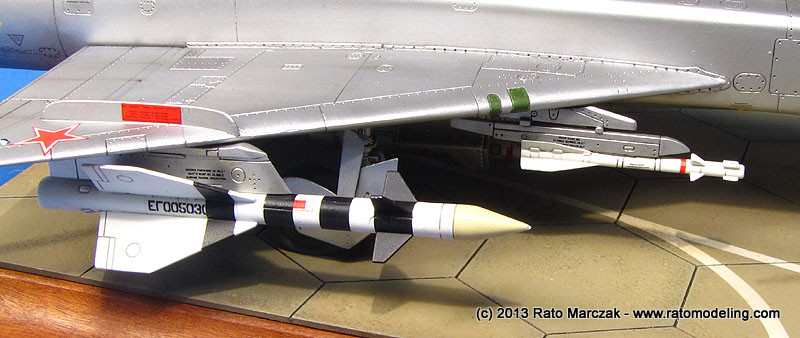
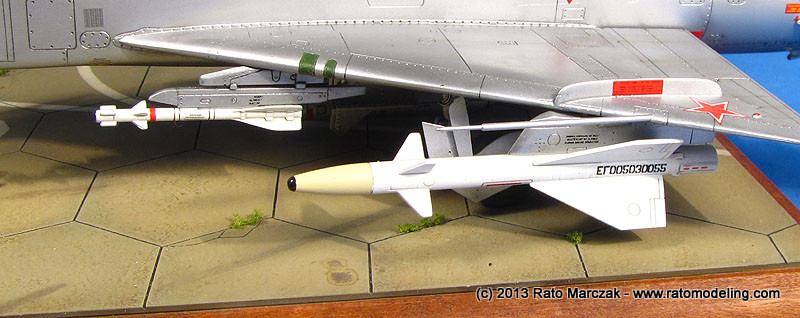
The AA-3 Anab and the AA-8 Aphid AA missiles were painted and decorated with home made decals.
The kit provides one of each type of the AA-3, the infra-red and the
radar guidance types. I found a picture of a radar guided AA-3 painted
with black stripes for some kind of test, and thought that would give a
nice touch to an otherwise boring white finish. All infra-red heads were painted with Tamiya Smoke:
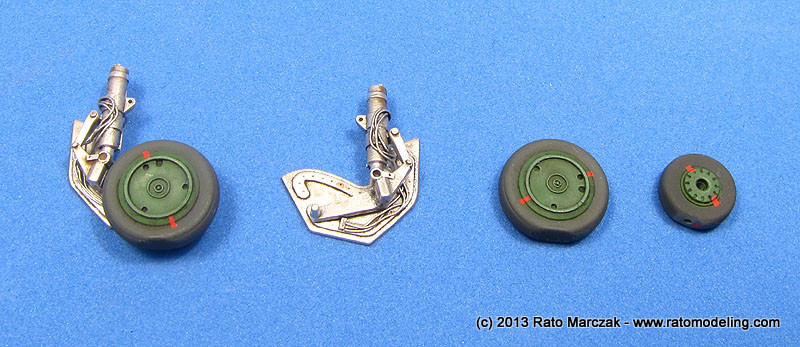
The wheels were painted and drybrushed while the landing gear struts received an Alclad coat. Artists oils provided the shadows and silver paint the shine for selected details. This is a recipe I've been using for a while in silver painted landing gear struts. While the wash makes things darker, you can pick out details using straigh silver paint to highlight raised areas like tie wraps, hydraulics clamps and brackets (besides the oleo cylinders, of course). This adds a lot of three-dimensionality to the final aspect of the part:
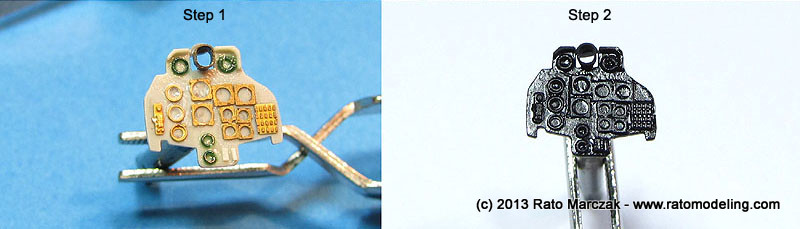
At this point I had to start finishing the cockpit parts. The control panel was painted black early in this project and set aside. In order to make clear how I scratchbuilt it, here are the basic sequence:
Step 1. Install individual bezels, placards, etc.
Step 2. Paint the panel with gloss black color.
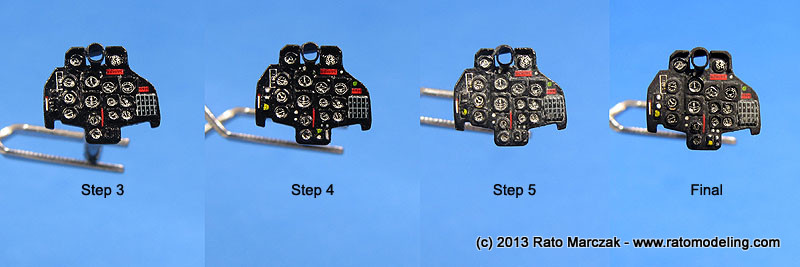
Step 3. Apply the instruments individually. I used Mike Grant instrument decals, ReHeat decals, plus a few silver and red placards cut from leftovers.
Step 4. Paint white, yellow, silver and red details/buttons/switches. I used colored india ink for that. Airbrush a protective coat of gloss varnish.
Step 5. Apply an enamel wash. Clean up the excess wash so that some paint remain around the instruments. This gives a used look to your panel (skip this step if you want a brand new panel).
Final step. Airbrush a flat varnish over the whole panel and apply clear gloss nail enamel on the instrument faces to simulate glass.
Step 2. Paint the panel with gloss black color.
Step 3. Apply the instruments individually. I used Mike Grant instrument decals, ReHeat decals, plus a few silver and red placards cut from leftovers.
Step 4. Paint white, yellow, silver and red details/buttons/switches. I used colored india ink for that. Airbrush a protective coat of gloss varnish.
Step 5. Apply an enamel wash. Clean up the excess wash so that some paint remain around the instruments. This gives a used look to your panel (skip this step if you want a brand new panel).
Final step. Airbrush a flat varnish over the whole panel and apply clear gloss nail enamel on the instrument faces to simulate glass.
The photos below show the result. During step 5, I incidentally removed most of the details painted on step 4, and that's why they appear again in the final pic - I repainted them before the flat coat.
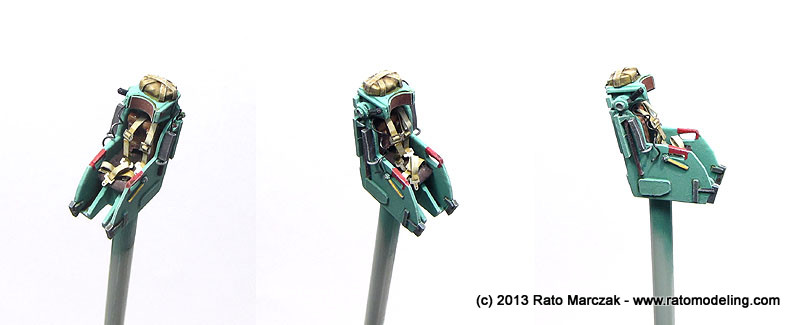
The ejection seat was another challenge. I believe there's is a resin KS-4 ejection seat in 1/72 out there, just couldn't find it. But the basic shape of the kit's seat is not bad, and I opted for improving it. Using photos as a guide, I added the missing details using plastic card and stretched sprue. I couldn't put all details on the lower sides because the seat wouldn't fit its aperture in the cockpit. The ejection chute came from a Preiser's wehrmacht accessory, decorated with tape straps. I also added the ejection triggering handle on the upper right side. The seatbelts are a mix of PE buckles and belts cut from wine bottle seal - they are not exactly prototypical, but that's what I had in hand. The back and seat cushions were made of the same material of the seat belts, but folded several times to give volume and deformed with a burnishing tool to look the part.
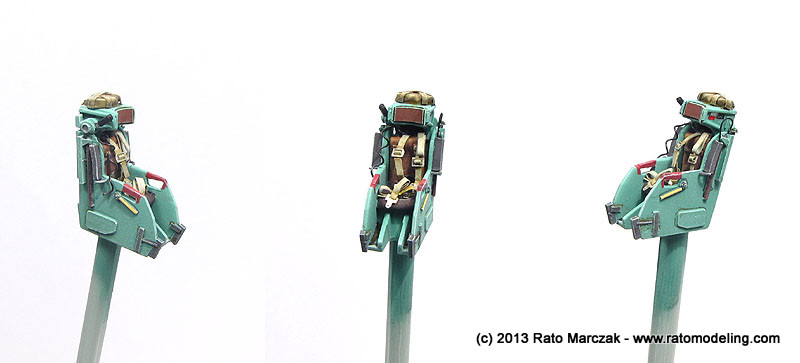
I'm
telling you, a few bits of plastic and a careful painting will save you
several bucks, plus the satisfaction of having made the part yourself.
It is not a Aires item, but much better than the original kit part:
The control column was left stock and painted. One thing missing in Trumpeter's kit is the accessory behind the seat. It was tough to find decent photos of the part. In the end, I left some things out...
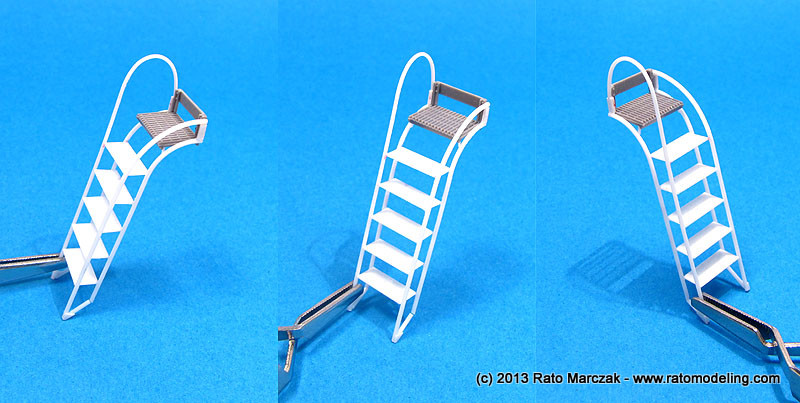
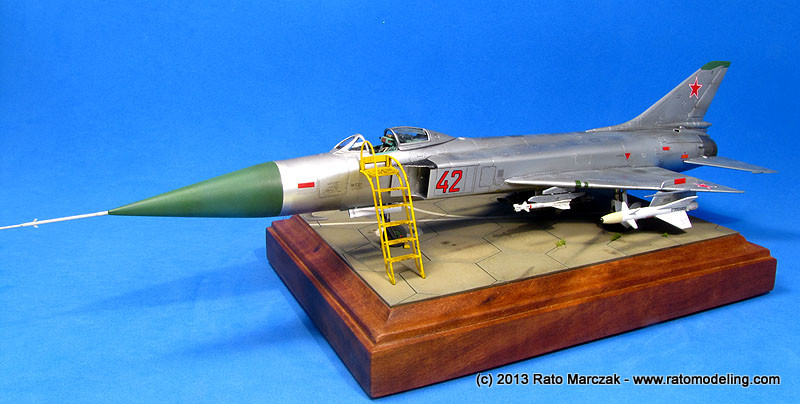
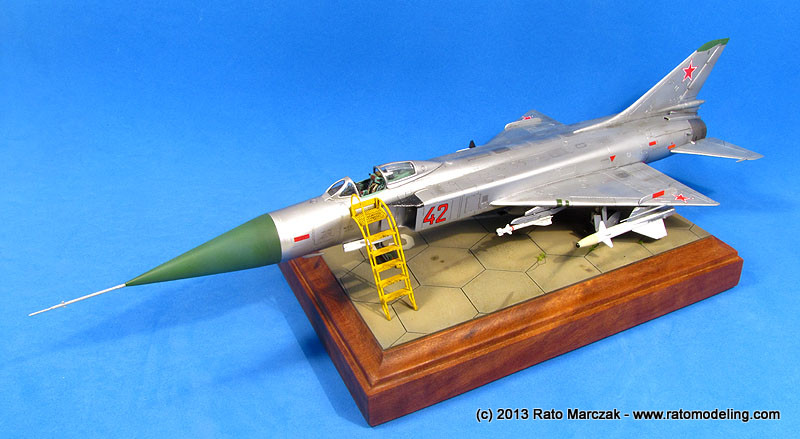
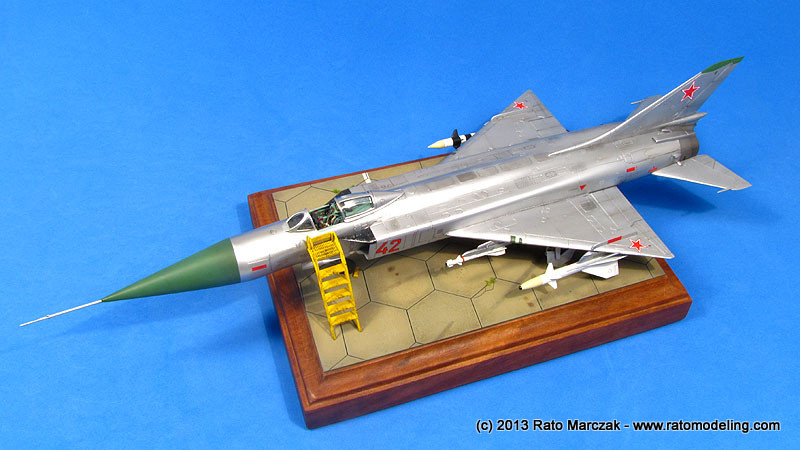
Since I was at it, I decided to scratchbuilt a ladder based on a photo I found. I eyeballed the dimensions, but the geometry was taken from the photo. Plastic rod, sheet, and bits from railroad modeling detail sets were used:
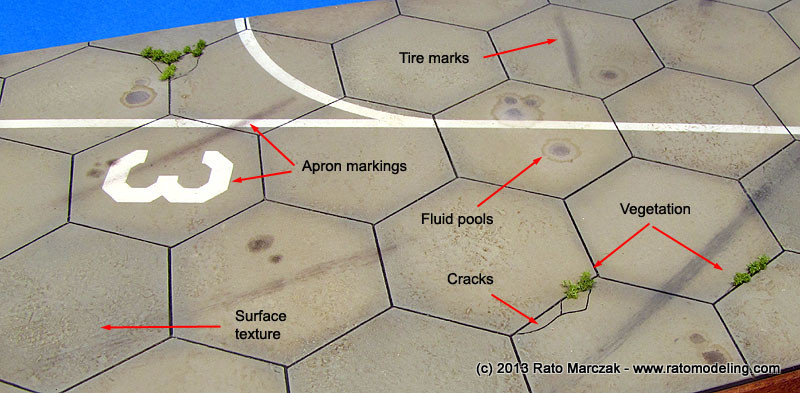
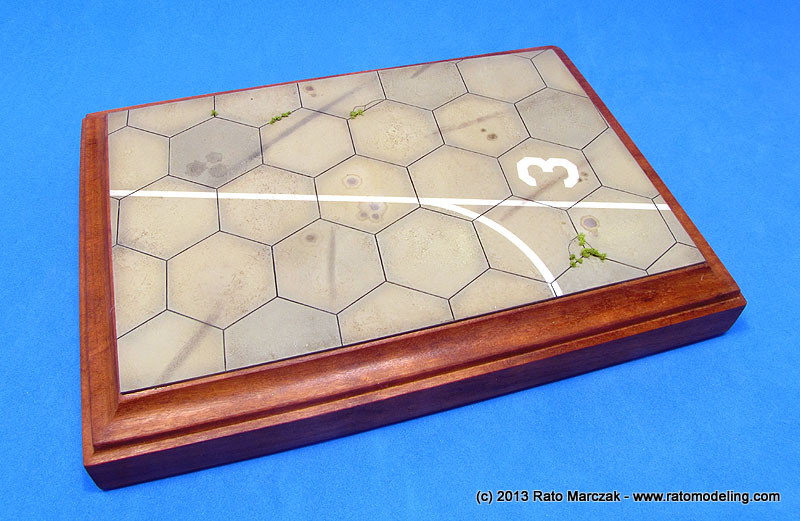
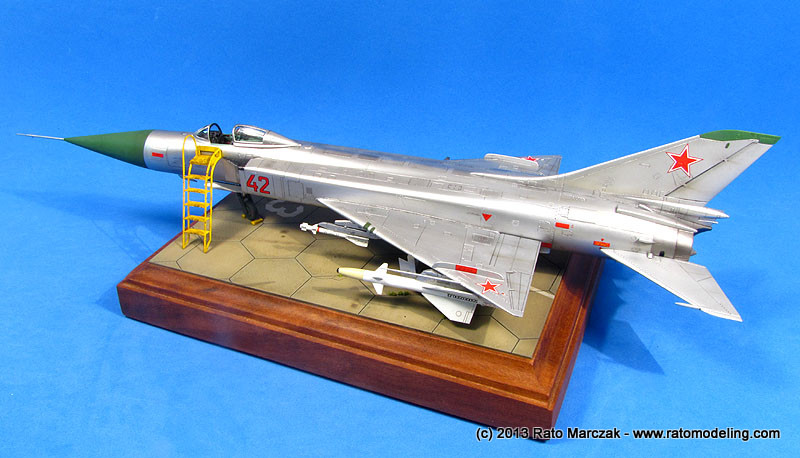
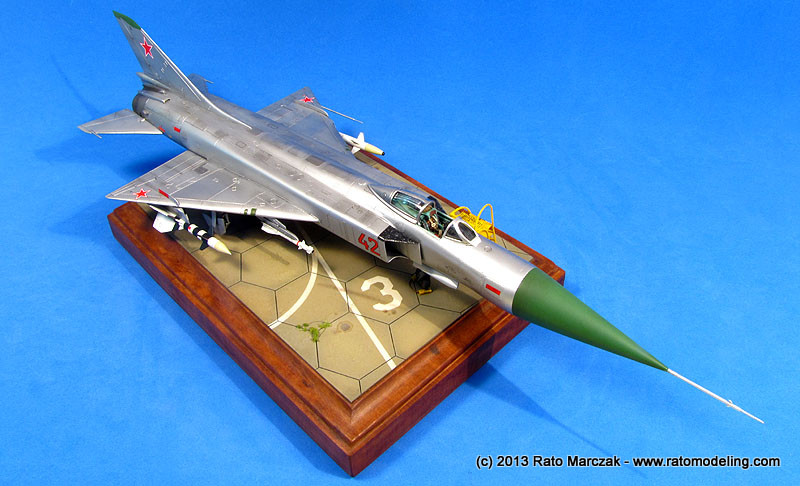
Now I needed a decent base. I used one of my standard wood bases, which I found to be a tad too short for such a long model. Anyway, my idea was to show the Flagon parked on a revetment area in a Soviet airfield. Many comunist military bases have the characteristic hexagonal tarmac, and I wanted to depict that. I started with a plastic sheet cut to fit the wood base and glued. After drawing the pattern over the plastic sheet, the hexagons were scribed. I made very deep lines to simulate the tarmac joints. I also scribed a few cracks in the concrete blocks. Using a stiff bristle brush, I dabbed Mr.Surfacer 500 over the surface to produce a random surface texture, like what one would find in a concrete runway. The base was pre-shaded with Floquil Track Color and afterwards painted with Floquil Concrete, taking care to preserve the pre-shading. A taxiway number and the guidelines were masked and painted white. Once dry, everything was gloss sealed and washed with burnt sienna oils. Another wash, this time using black oils, was then applied on the joint lines to simulate the tarmac joint sealer. A flat clear coat followed with a drybrush with cream-yellow oils finished the job. The final touch was given by some vegetation growing here and there and fluid pools scattered around:
The landing gear was glued next, taking take to assure a symmetrical dihedral. I allowed it to dry well before proceeding with the wheel well doors and the retraction arms.
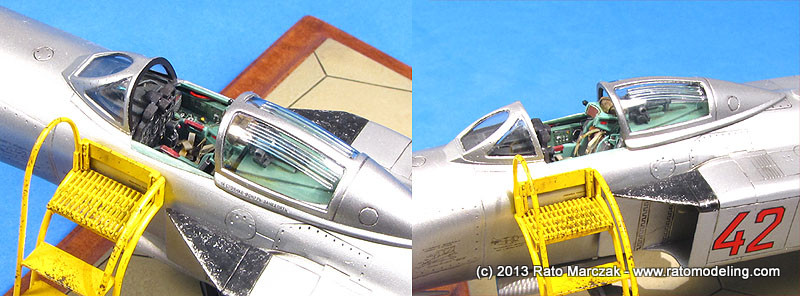
With everything ready, I started gluing the control panel, control column, and the ejection seat in place. The ladder was painted and weathered, and I made a pair of wheel chocks to decorate the display base.

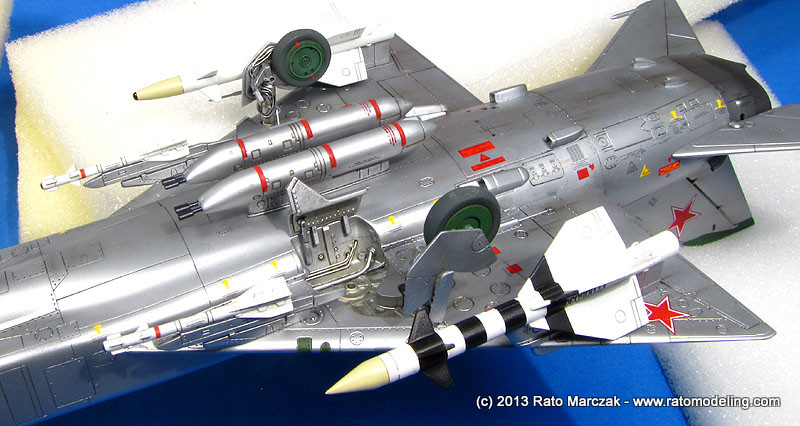
Before gluing the clear covers of the wing lights, I drilled small holes and inserted soldering balls in there to simulate the bulbs. I didn't use the fuel tanks because their fins were interfering to each other, so I was forced to configure my Flagon to short interception role. I installed the missiles, the (improved) sliding canopy, and scratchbuilt new muzzles for the UPK-23-250 gun pods:

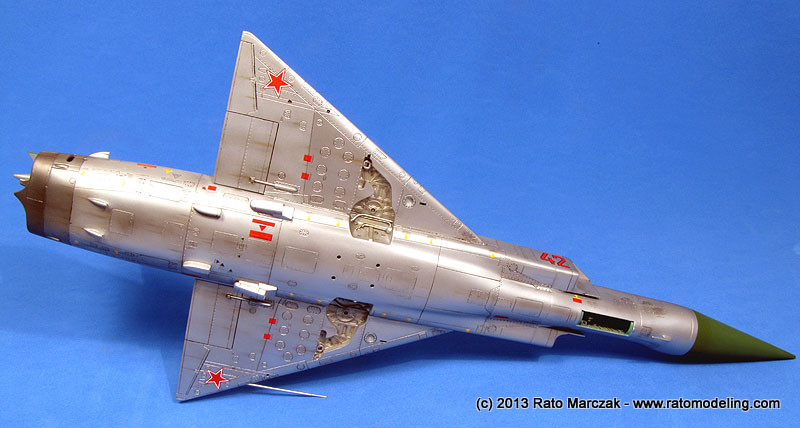
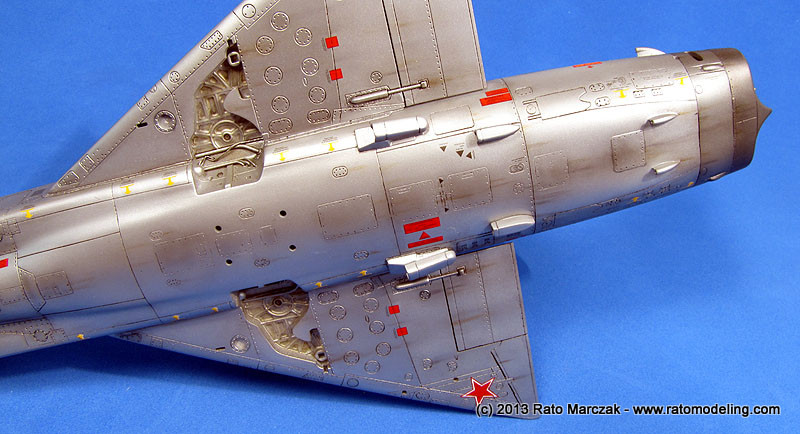
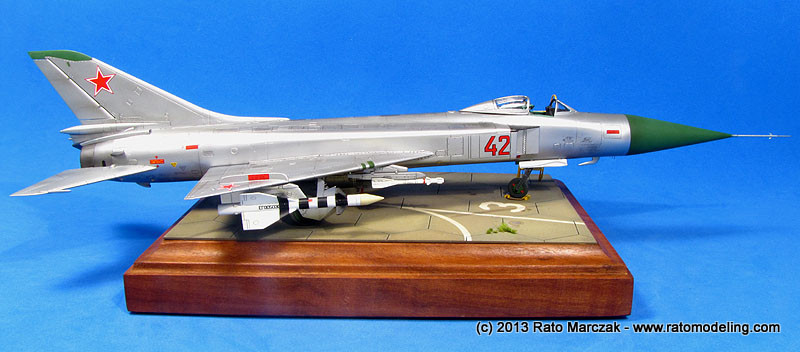
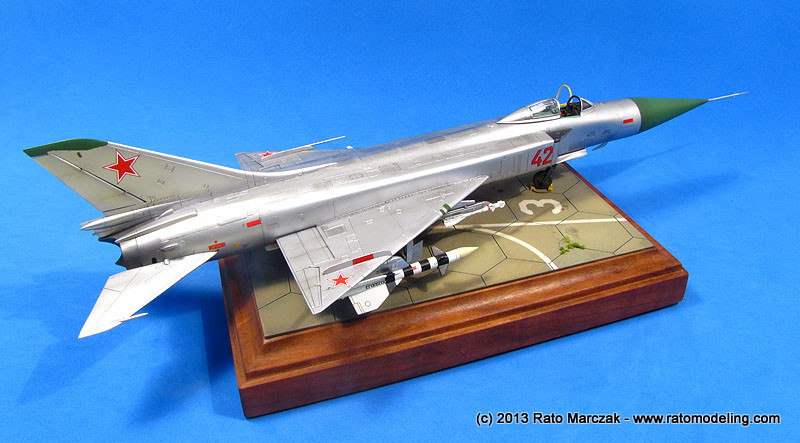
The underside of the model looks pretty busy with all in place, and the black stripes radar guided AA-3 gave a nice touch:
The engine nozzles were inserted through the aft openings, and stretched sprue IFF antennas were glued under the nose in previously drilled holes:
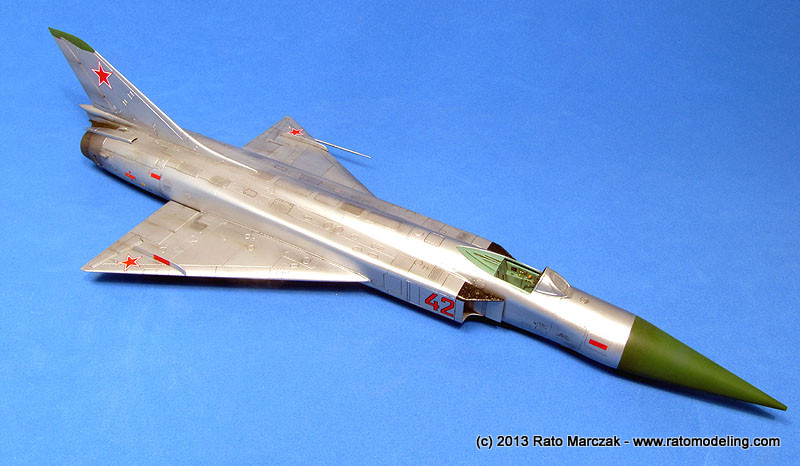
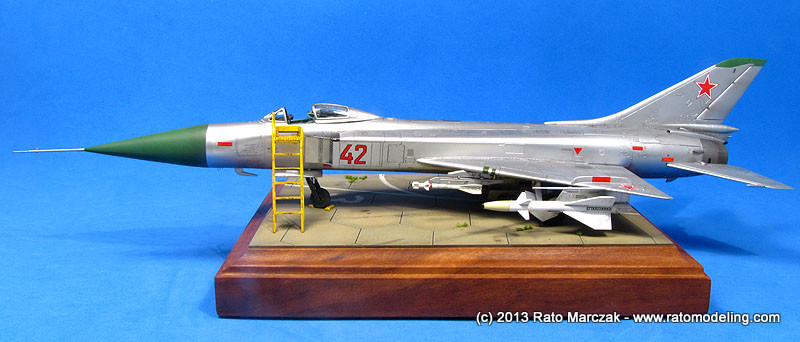
Here are the final images:
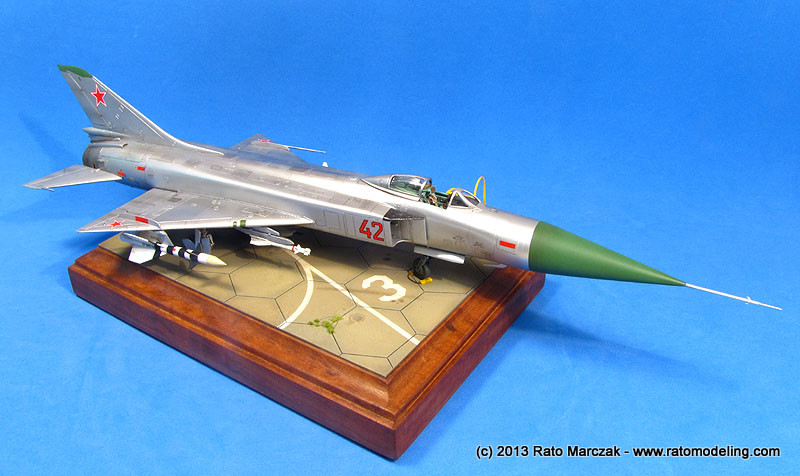
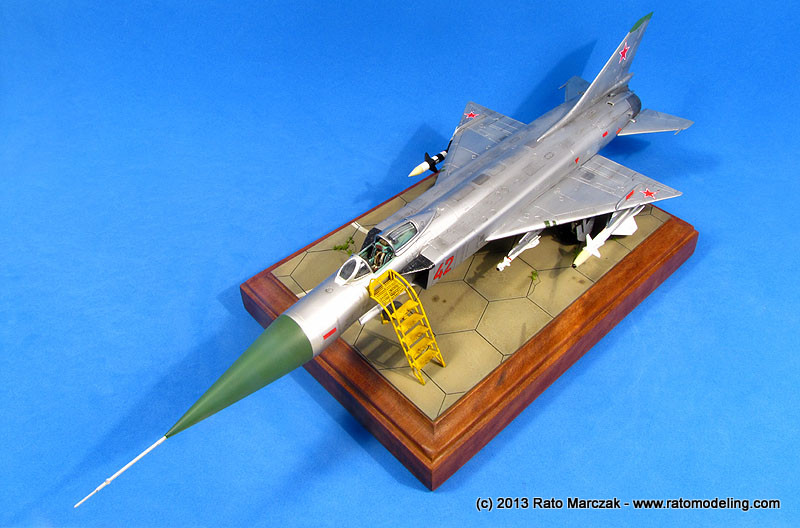
This was a rewarding project, in spite of the lack of accuracy of the Trumpeter Su-15 in a few places. In retrospect, in a next NMF project I may put my laziness aside and actually use one of two more shades of Alclad.
Now I can already see my friends modelers asking me what happened to my old motto: "Jets are for kids". Well...
| Technical file | |
| Kit:
|
-
Trumpeter #01624 |
| Additions:
|
-
Reheat Models 1/72 PE instrumet dials. - Reheat Models 1/72 PE modern consoles. - Mike Grand Cockpit Details decals (CKP072) - Micro Mark Water Slide Surface Details in HO scale (product #84985) |
| Basic
colors: |
-
Primer: Acrylic automotive primer - Interior primer: Testors Model Master Interior Blue Geen (#2135). - Aluminum: Alclad ALC106 White Aluminum - Exhaust: Alclad ALC113 Jet Exhaust - Satin varnish: Testors Polly Scale Satin Finish (#4103) - Flat varnish: Testors Acryl Flat Clear (#2015) |
| Notes: |
-
Several details scratchbuilt (see text). |
Rato Marczak © 2013
