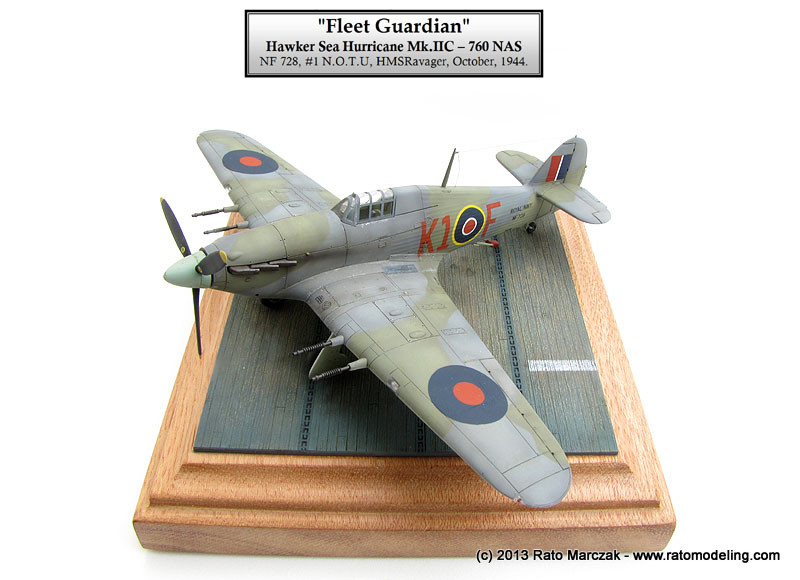
| Revell Sea Hurricane Mk.II C in 1/72 |
|
Started: A long time ago Finished: February 2013 |
This
project is about yet another model saved from my shelf of doom. Until a
few years ago, I used to travel for professional reasons much more than
I do now, and sometimes I had a small model with me. I reasoned that I
could save a lot of time by removing parts from the sprues and making
an initial sanding. Usually better than watching TV in a hotel room...
I ended up with several models of mine almost ready to start painting.
Well, this Revell Sea Hurricane was one of such cases. Not only I
cleaned most of its parts in a single trip, but I also managed to hand
paint the cockpit parts during an ensuing one. And somehow it ended up
in my 'to do one day' stash...

Revell Sea Hurricane is, for the most part, a very good kit. The bad scores go to a wrong cockpit, not very clear clear parts (which seems to be a trademark of Revell-Germany), and the arrestor hook insert under the fuselage.
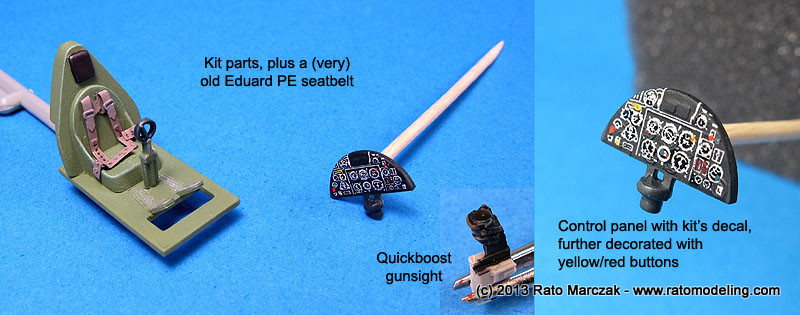
Work started with the cockpit parts. I used exclusively acrylic paints for that: three or four Vallejo bottles and a fine brush did the job. I also used a quickboost gunsight and a very, very old PE British seatbelts fret by Eduard. The control panel used the kit's decal. As you see, I was really trying to make my life simpler then:
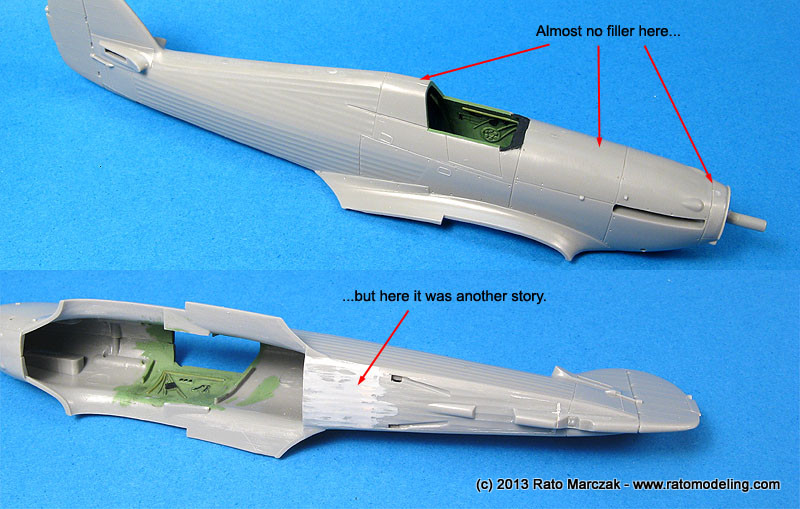
I closed the fuselage and left the cockpit to be installed from the wing opening (more on that later). The fit was very good, except the insert under the fuselage. Revell used this trick to allow both navalized and non-navalized versions be injected with the same mold, but it is almost impossible to sand the area without disturbing the ribs:
Next, the wings were assembled and I refined a few points. New landing and wingtip lights were made using the usual recipe:

The flaps and elevons had their recessed lines further deepened with a judicious scribing job. This not only helps to make them look different than ordinary panel lines (afterall these are control surfaces), but also allows a higher concentration of paint there when the oils wash time comes, making them more conspicuous than skin panel lines. I like to use this method to avoid the panel lines in the model having all the same visibility, something not realistic in my opinion:

After reading magazine reviews comparing Revell, Academy, and Hasegawa Hurricanes, I discovered that the Revell offering is a real contender in 1/72 scale, maybe the best of the trio if you take the price into account (no, I haven't even considereded the RS offerings...). However, the cockpit has a bug which no fan of the aircraft will forgive: the Hurricane had a tapered 'Doghouse' bulkhead behind the pilot's seat, following the shape of the sliding canopy. Here is a picture of a Hurricane under restoration at Alpine Figther Collection in 2000, showing the Doghouse:
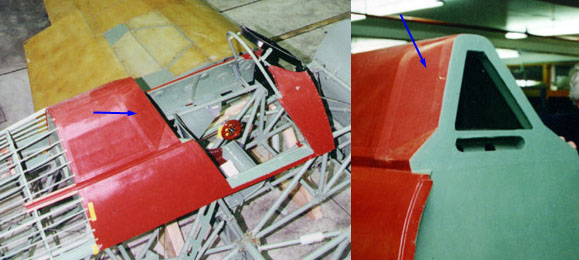
This means that the bulkhead behind the pilot's seat should end roughly in the middle of the last two vertical frames when the canopy is closed, and not aligned with the last frame:

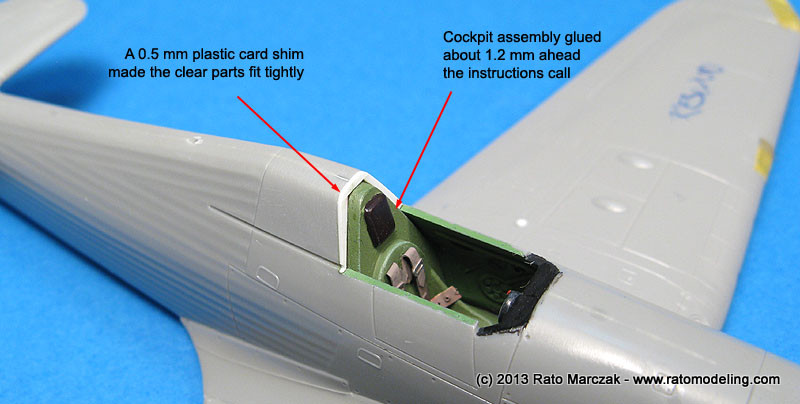
If you assemble the Revell cockpit as per instructions, the bulkhead will end flush with the last canopy frame. I wasn't willing to perform a major surgery to correct the problem. Instead, I installed the canopy about 1 mm or so ahead of its intended position. This way, the pilot's bulkhead sort of simulates the aforementionned doghouse. I couldn't slid the cockpit further ahead because the control stick was already almost touching the control panel. But if I don't tell, nobody will notice...
Another problem that I noted earlier in this project was a significant gap left by the clear parts. They just don't fit where they should, and to pose the canopy open is not an option with the kit parts. I solved the problem by shimming the area behind the doghouse with pieces of 0.5 mm plastic cart sanded flush to the fuselage. This trick made the canopy fit so tightly in place that I opted for gluing the windscreen to the sliding part and work with them as a single clear part.
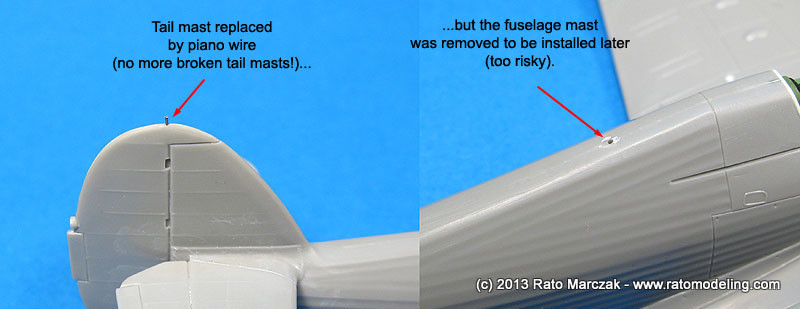
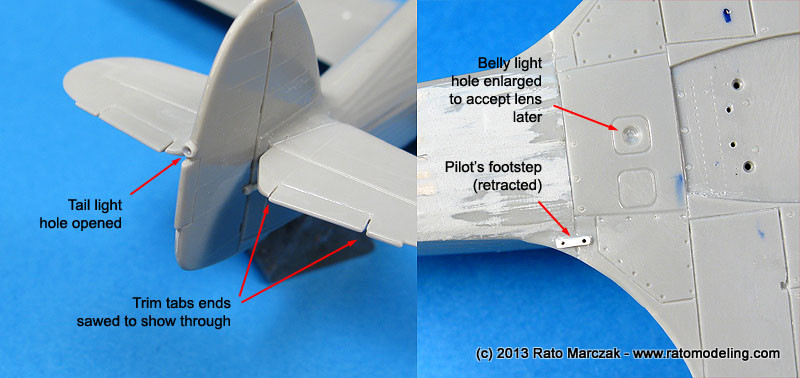
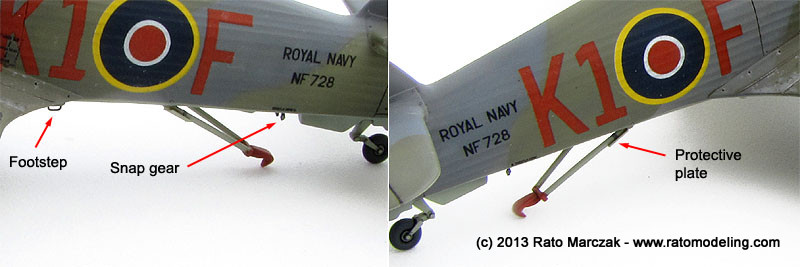
At that point, the wing was attached to the fuselage. I had a very good fit overall, and could start improving some areas right away. The antennas were removed in advance, as I knew I would break them soon. The fuselage mast was removed to be installed later on, while the attachment tip on the fin was replaced by a piece of steel wire. I bored the holes for the tail and belly lights, and also glued a small piece of plastic to simulate the pilot's climbing footstep. These were quick and easy modifications that make a difference in the end.
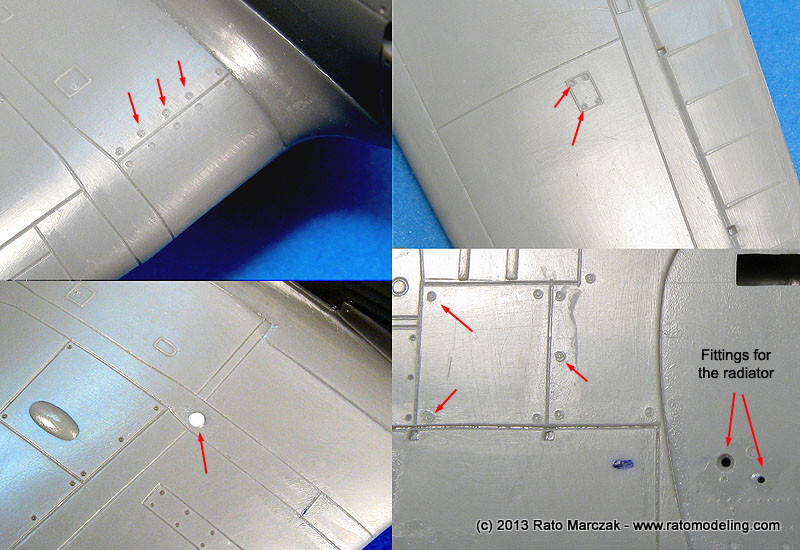
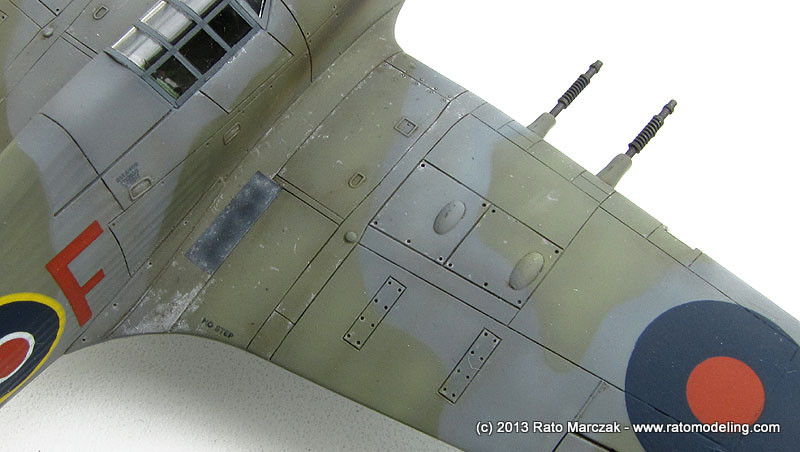
Although the Revell kit is well molded and sports crisp panel lines, it lacks rivets in many areas. Since the Hurricane had lots of non-flushed rivets, I decided to to something about a few panels which were looking too boring without them. The idea is not to rivet the whole model - I don't think this is always worth in 1/72 scale models, let alone camouflaged subjects - but to add interest here and there. I basically embossed fasteners on access panels and rivets along the metal panels under the fuselage, plus a few other places wherever it would be more visible:
At that point, the model was lightly sanded and checked for any flaws:
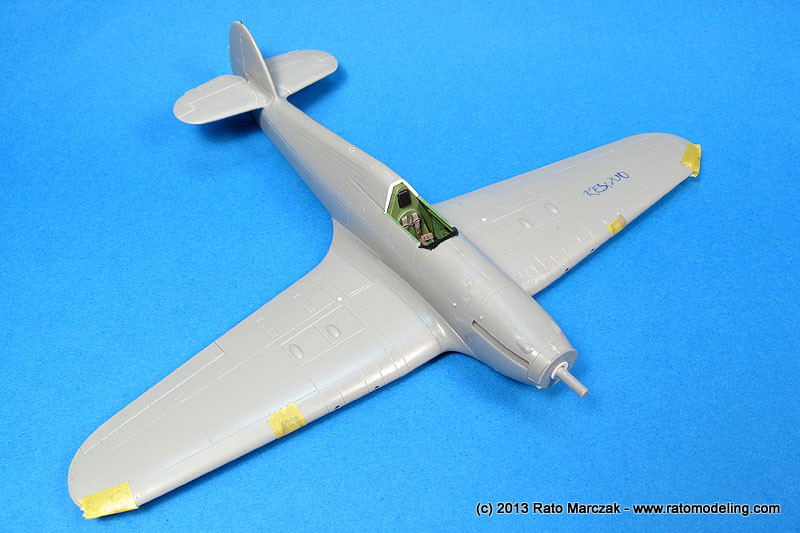
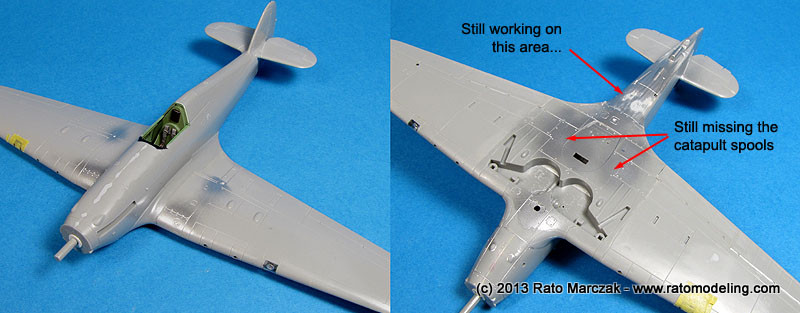
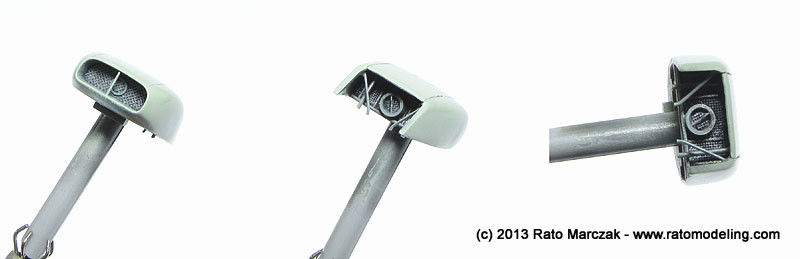
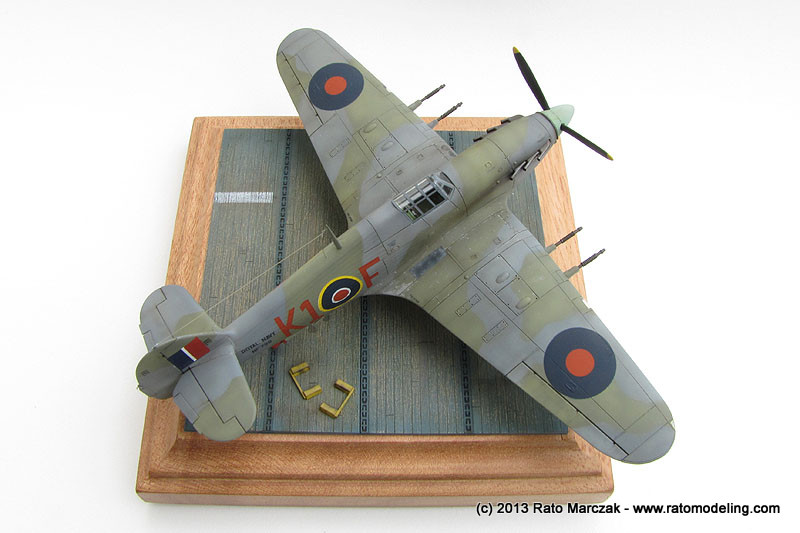
I applied silver paint along the areas more heavily worked to help me to find faults. It worked like a charm, because I discovered that I had forgotten the catapult spools. Revell overlooked completely this important detail of any Sea Hurricane, so I had to make my own pair of spools:

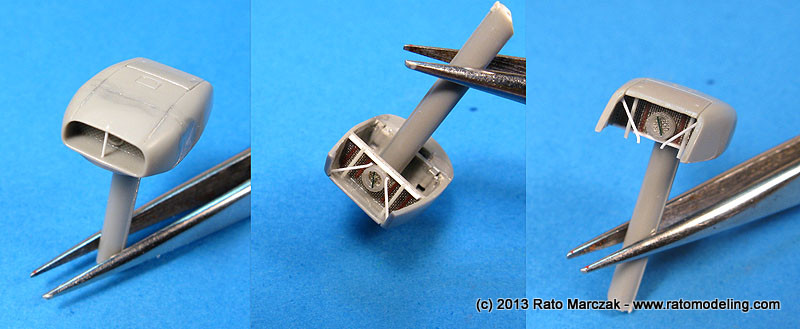
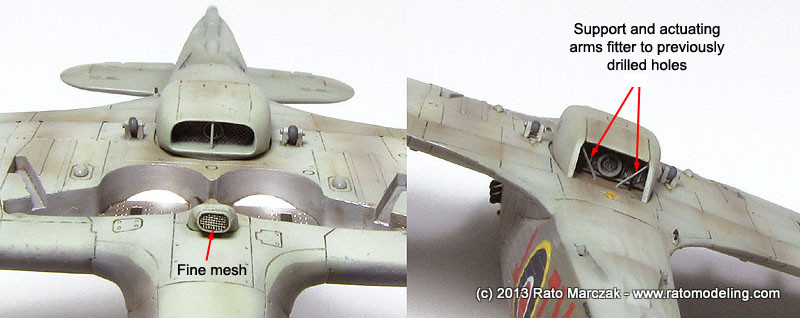
The radiator of the Hurricane was a trademark of it, so I also spent precious time detailing it. I used plastic bits to simulate the structure and the various actuator arms, and pieces of fine mesh to simulate the grilles:
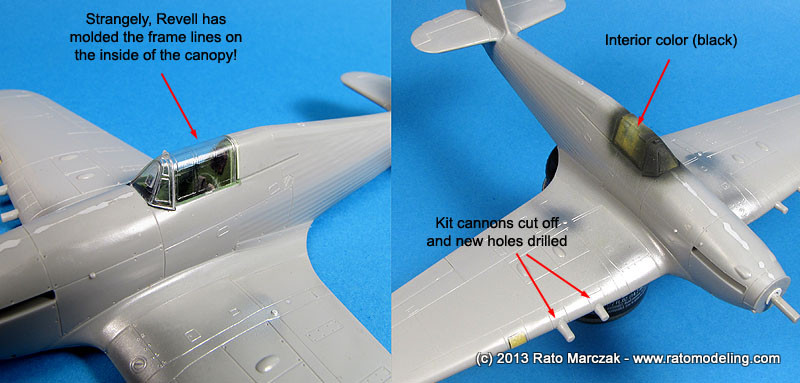
When I started to prepare the model for priming, I noted that the clear parts had their frame lines molded on the inside, messing up with my plans to make my own masks. I elected to forget the frames and add them later with painted decal strips. I also cemented the wing cannons in place, but I removed the muzzles and drilled the holes to accept new ones later:
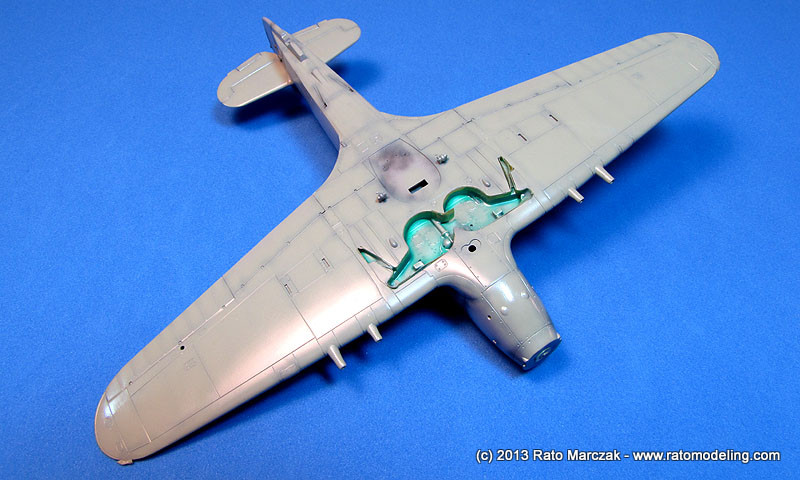
Once satisfied with everything, the model received a coat of automotive acrylic primer, was double-checked, and pre-shaded:

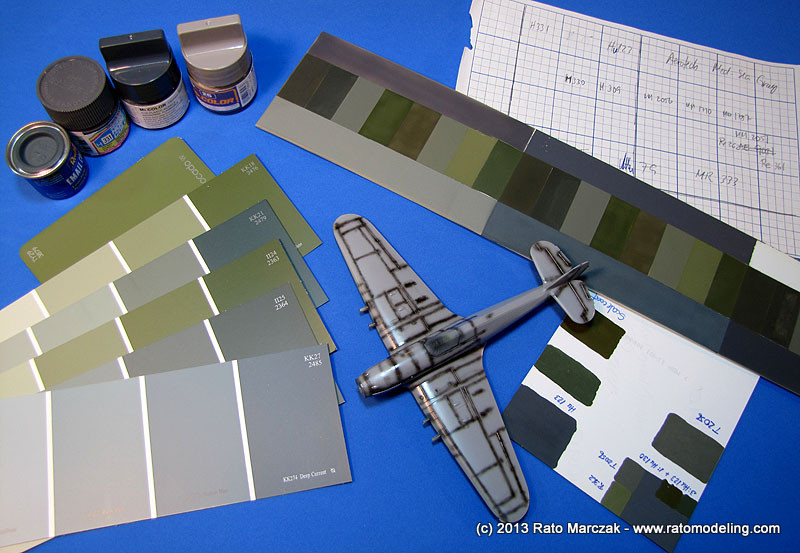
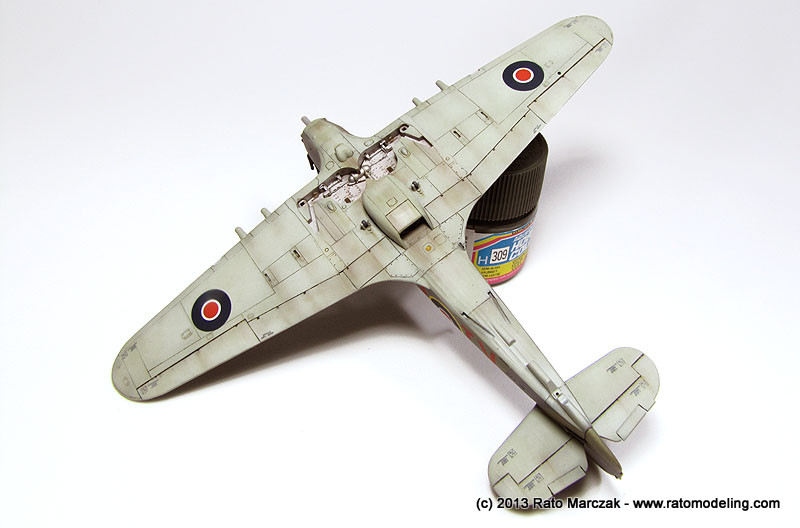
This was probably my first FAA paint job. At least I don't have any recollections of using Extra Dark Sea Grey (EDSG) and Dark Slate Grey (DSG), but I' better know, because I have many more FAA subjects in my stash. Anyway, the EDSG/DSG combination is not a simple one, modeling-wise. It has a very peculiar contrast between the colors. So much so that many times we find modelers using the about right colors, but when put together the effect is wrong. Therefore I spent a good deal of time studying the possible combinations of hobby colors that could make my EDSG/DSG combination look right in 1/72 scale. This is a well spent time, gentleman, do your homework:
Evidently the underside color (Sky Type S) generally is not a major source of discussion, personal tastes aside. I used Aerotech pre-mixed automotive lacquers straight from the bottle.
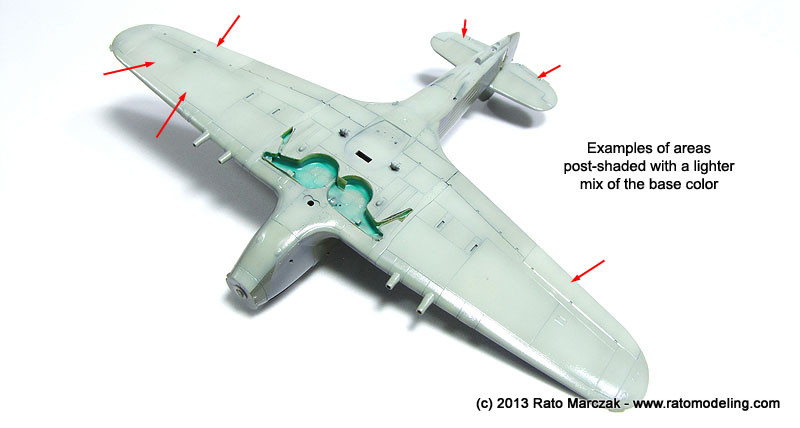
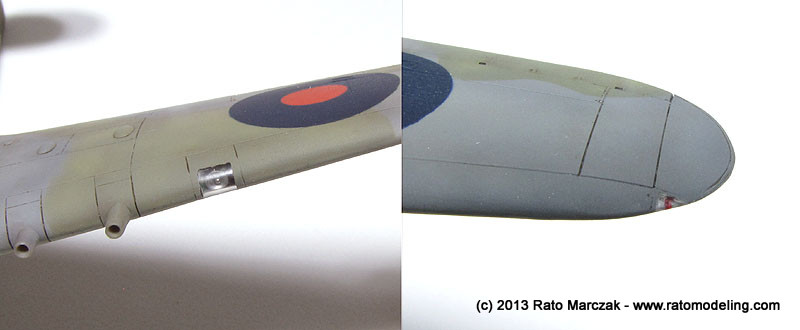
Once dry, I went back with white added to the mixture and post-shaded specific areas to simulate fading. The judicious combination of pre-shading and post-shading can deliver a much more interesting result...
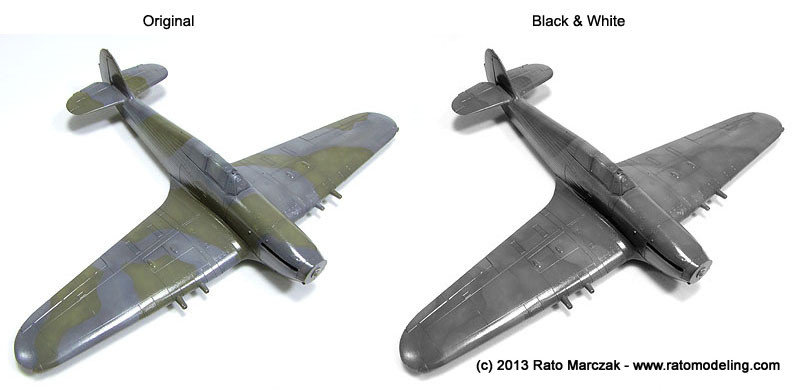
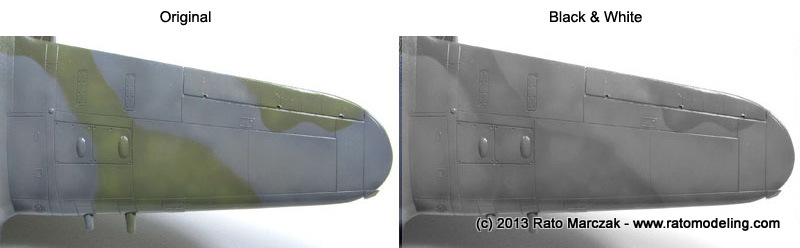
As for the EDSG/DSG, I tested various paint brands from my stash. Since the contrast of both colors wasn't so easy, my weapon of choice was to study which contrast each color combination would result in a B&W photo. After playing with many photos of FAA models from the internet, I found out the best cammos (to my eye, at least) were those whose contrast was not too stark when the photo was converted to B&W mode. The same thing happens to photos of the real thing. Besides the contrast between them, other important things to consider about the top colors were the visible olive hue in the DSG and the characteristic purple tint in the EDSG. Of course there are many other aspects envolved in interpreting the available color photos, not to mention the elements to which these birds were subject at sea.

Well, in the end I settled with the following choices:
The colors still look a tad too dark in the photo above because I had already applied a protective coat of Future clear wax in preparation for the decals (they would enlighten significantly after the final flat coat is applied). If we study the color and B&W photos of the model, this is the result:
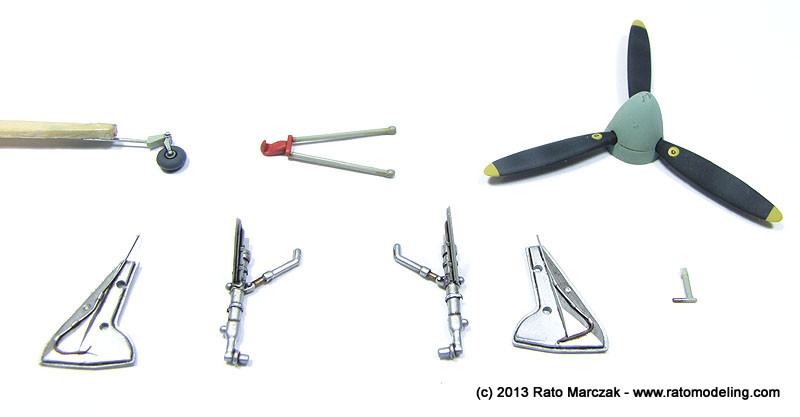
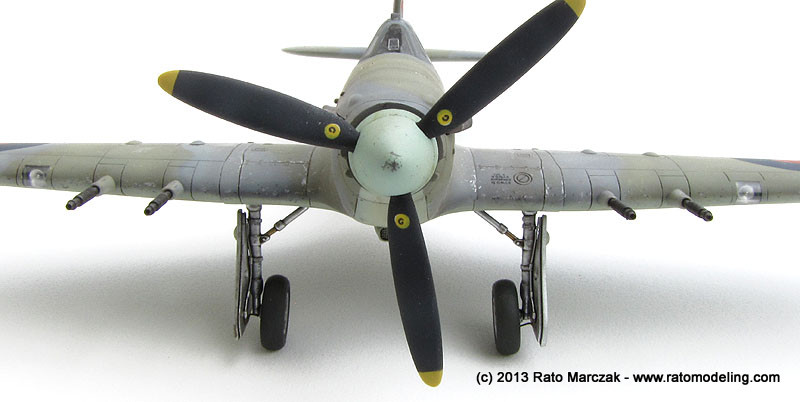
While the paint was drying, I took care of other details spreaded over my workbench. The radiator was painted and received a wash/dry-brushing treatment to make the details stand out. I also worked on the landing gear, propeller and arrestor hook. Note that I painted the spinner with a different color shade than the used on the underside - I found that visible in many wartime photos. I installed the brake lines on the inner side of the landing gear doors, and installed a small grille in front of the carburator air intake, but I forgot to take a picture:
Meanwhile, I had to find a replacement for the gun muzzles. The kit ones are not bad, but the recoil spring is represented as consecutive rings instead of a, well, spring... I decided to make my owns, using syringe needle and cooked stretched sprue:
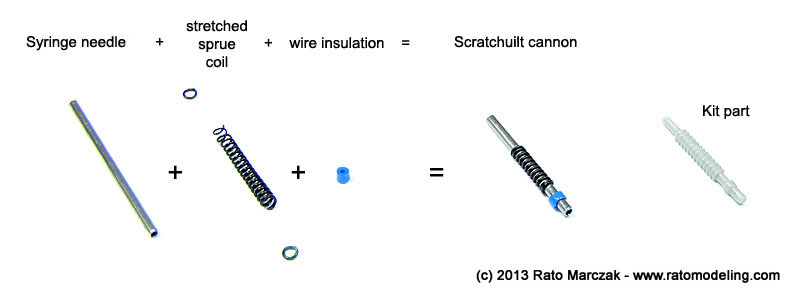
The new cannon was built four times, and I'm already feeling the regret for not making resin copies of them as I have more Hurricanes to build... In the end, I wasn't satisfied with the diameter provided by the insulation part and replaced the insulation by a thinner one.

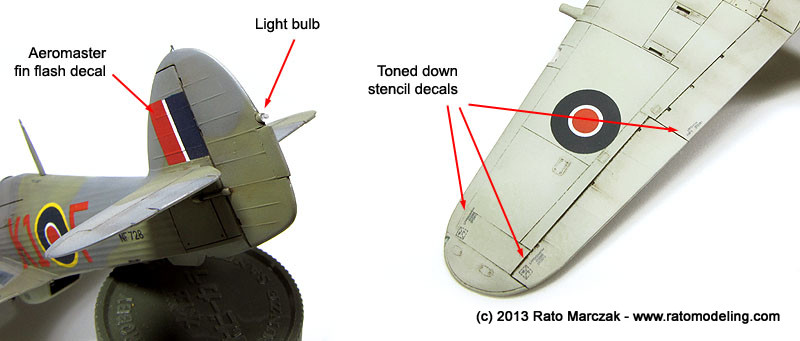
I didn't take many photos of the finishing steps. I basically followed the same steps of my other projects. The kit's decal sheet was used throughout the model, except for the fin flashes which I managed to destroy somehow. I sealed the decals with another coat of Future. Then, wheatering started on the undersides.
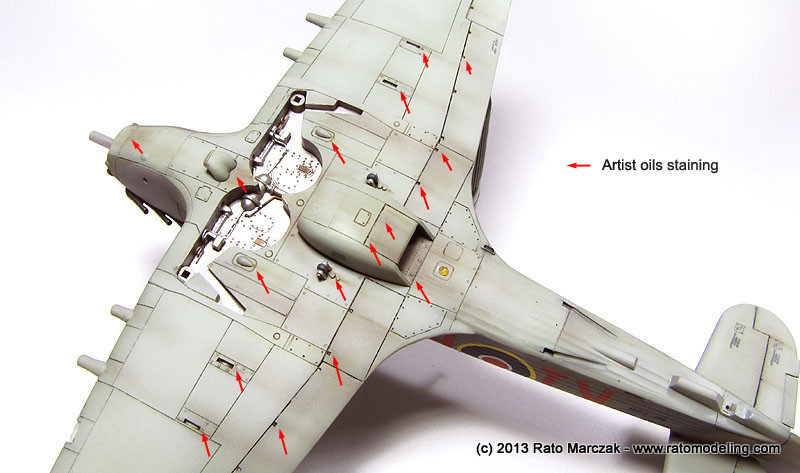
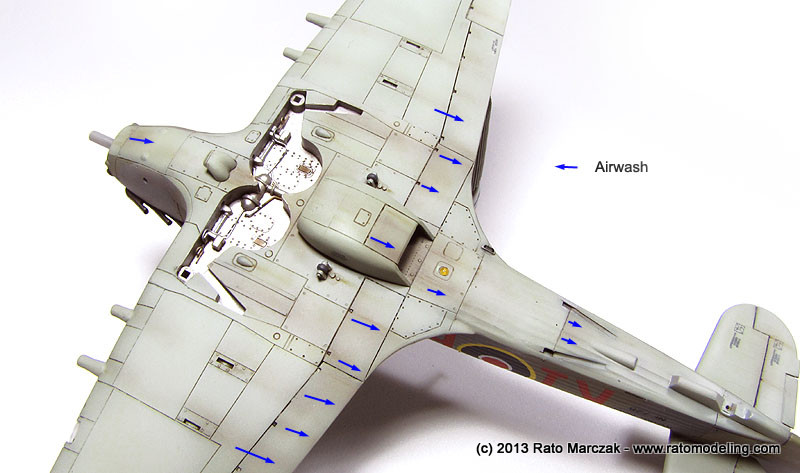
After an artist oils wash, I simulated stains and leaks by applying small amounts of oils over hinges and selected recesses and dragging the paint in the direction of the airflow using a flat brush. This produces crisp, well defined fluid marks. Next, using a fine tipped airbrush I used what I call airwash (see some videos here), a highly thinned dark brown mixture applied wherever I wanted to produce a more diffuse dirt/grime effect. I love to use these two methods together to achieve a realistic staining effect:

The identification light was made using a piece of stretched yellow sprue mushroomed over a candle, cut to size and glued in place. The pilot's footstep had a small handle to lower it, which is visible even with the footstep retracted. I reproduced it with a small piece of u-shaped stretched sprue inserted in the two small holes previously drilled. I painted the catapult spools with dark gray color. I've seen restored Sea Hurricanes with them painted red, but I thought it would be too strong:
 :
:
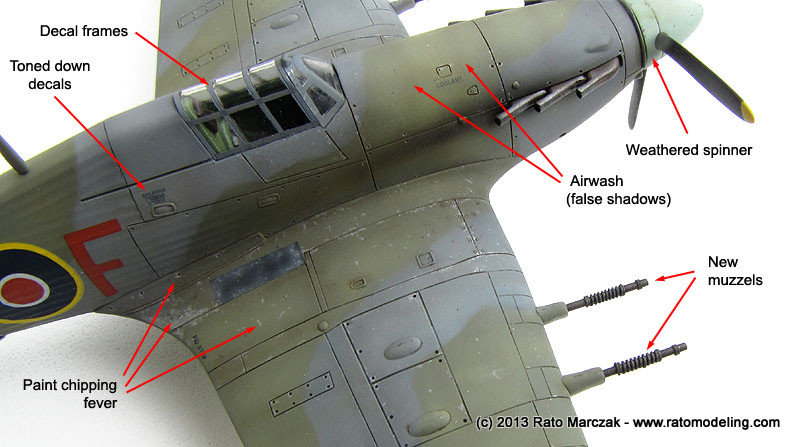
Revell provided most stencils as decals. After applying them, I noted that they were way too stark for the scale. I dug out wartime photos to find out how they should look, and opted for airbrushing a mist of the base color over the stencils to tone them down a little. Worked so well that I repeated the procedure for the stencils on the upper surfaces as well. Having previously drilled a hole in the rudder to accept a new tail light, all I had to do was to glue a small piece of stretched sprue sanded to shape there:
The carburator air intake and the radiator were glued in place. Planning in advance helped to make the radiator arms to fall into their holes perfectly:
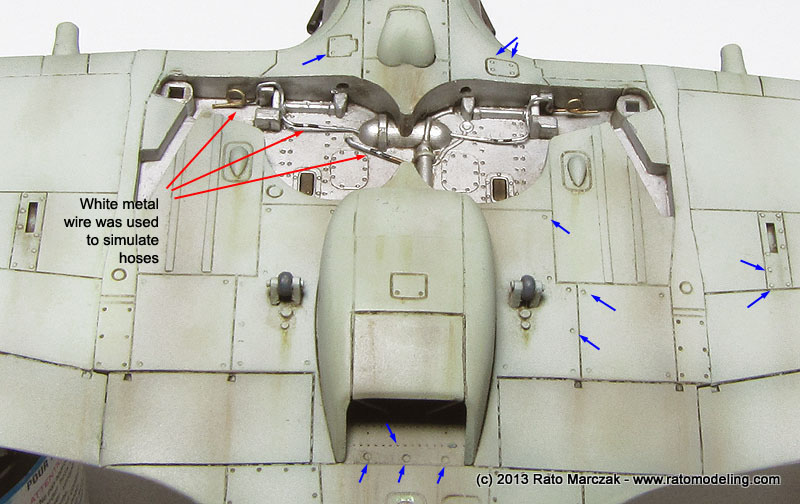
The wheel wells are not faithful to the real thing, as Revell closed the area ahead of the main spar. I decided live with that, but some plumbing and hoses helped to enhance the area. I included only the few more visible in the photos. The two transparent rectangles used by the pilot to assert the landing gear position were painted with Tamiya Smoke (X19). The photo below shows the result, as well as the difference that a few rivets here and there can make on the model (blue arrows):
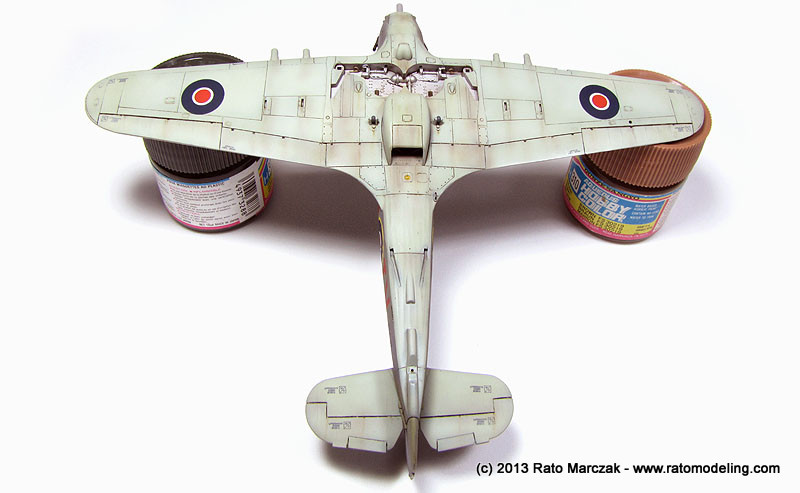
Except for the landing gear, Pitot tube, and the paint chipping, the underside was done:
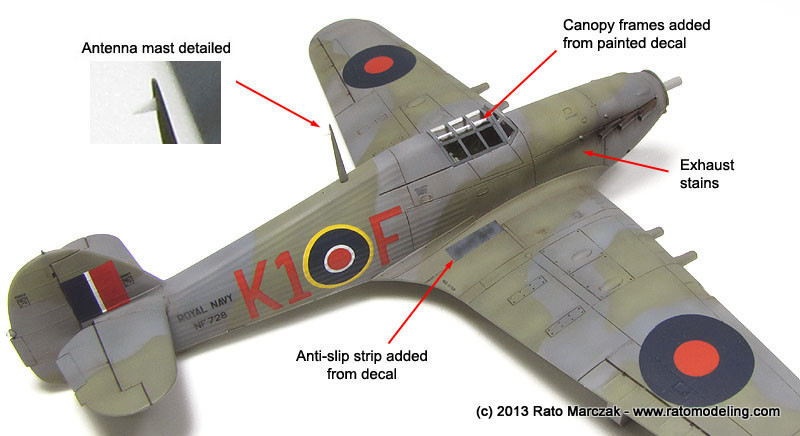
Flipping the model up, I installed the antenna mast and detailed it with a small triangle which would hold the aerial later. I removed the canopy maks and added the missing frames from pre-painted decal strips. The exhaust stacks were painted using a favorite recipe of mine (in sequence): burnt metal, heavily thinned silver (misted), Rustall, black pastel chalk. The exhaust stains were airbrushed using a very thin mix of Gunze Soot (H343), gradually built up, and then retouched with brush strokes of dark brown pastel chalk. The anti-slip strip on the wing roots were from the decal sheet, airbrushed with random highlights in gray to make it looked well worn. Moving to the wings, the landing and navigation lights' masks were removed...
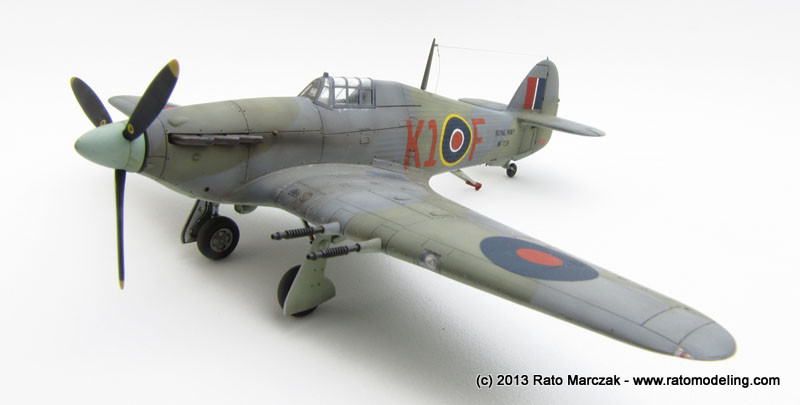
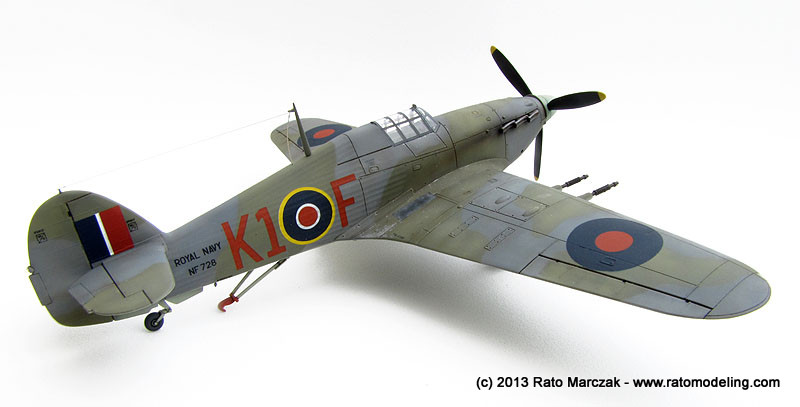
At this point the model was virtually done, except for the paint chipping and final bits. The model was coated with Testors Dullcote to produce a flat finish:
Final weathering touches were applied using my usual recipe: gray and silver pencils. Airwash was also applied over selected panels to produce false shadows:
Once satisfied with the weathering, I glued the missing details and installed the landing gear. The aerial antenna was made of stretched sprue. I opted for cementing the arresting hood down, just to add interest. The real hook had a snap gear, the mechanism responsible for locking the arresting hook in place when retracted. It was too late to scratchbuild a decent one, so I just glued a PE part which would look like the business:
And the models was almost done. I forgot to paint the reflective side of the pilot's rear view mirror, but I now prefer this way. A piece of foil would look like a flashlight.

Then I started to think on a suitable base. NF 728 served during 1944 as part of the #1 Naval Operational Training Unit. It was operated at RNAS Inskip, a land Fleet base, and aboard HMS Ravager (D70). The Ravager was an Ruler class escort carrier built in the USA, initially constructed in the U.S. by Seattle-Tacoma Shipbuilding in Tacoma in 1942. She was purchased by the USN and was converted to an escort carrier at Commercial Iron Works, Portland, Oregon. Upon completion in 1943 she was transferred to the Royal Navy and named HMS Ravager (wikipedia). Her primary role was to operate as a Deck Landing Training carrier, providing a deck for a variety of training squadrons off the Scottish coast. Training included visits from individual aircraft and short detachments for more intensive training periods. Aircraft types operated included Avenger, Barracuda, Corsair, Firefly, Fulmar, Hellcat, Sea Hurricane, Seafire, Spitfire, Swordfish and Wildcat (RN research archive).
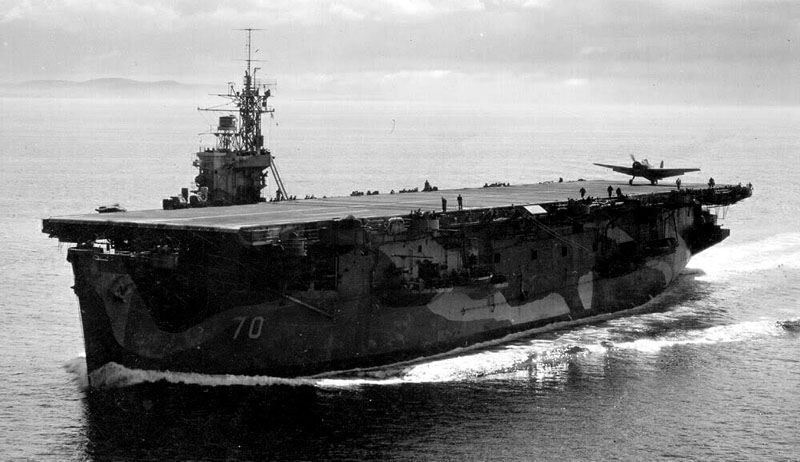
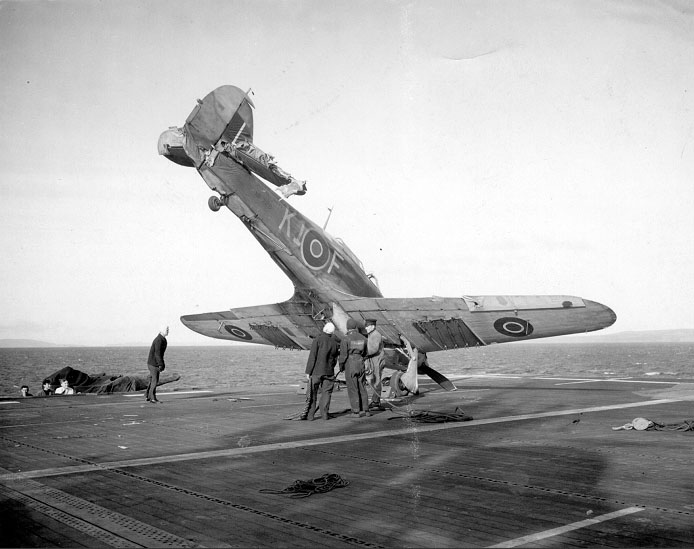
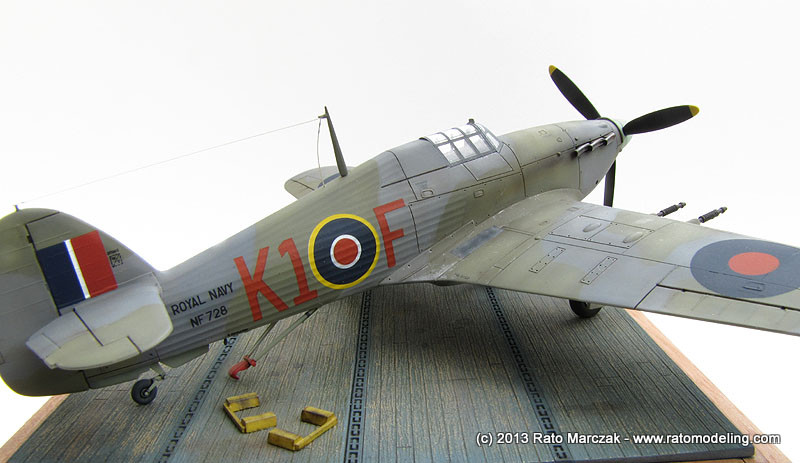
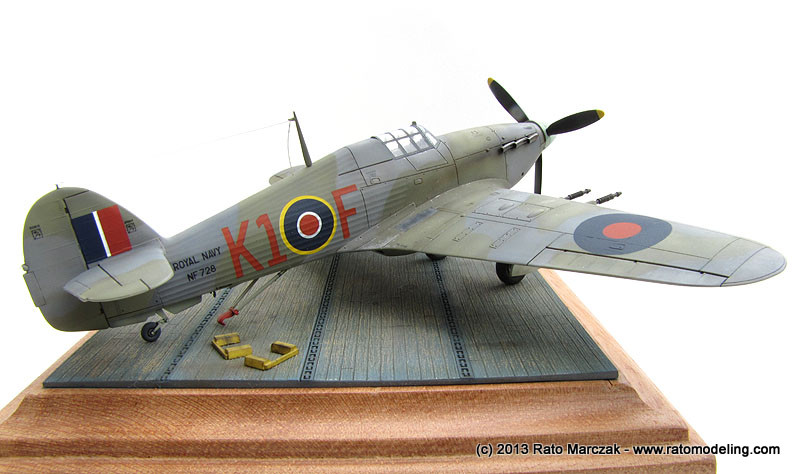
Sea Hurricane NF 728 served during October 1944 within No.760 Naval Air Squadron, replacing No.766 squadron aboard the Ravager. Having found the following pic of the NF 728 aboard HMS Ravage after being struck by NF 722, I opted for a base simulating the aircraft carrier.
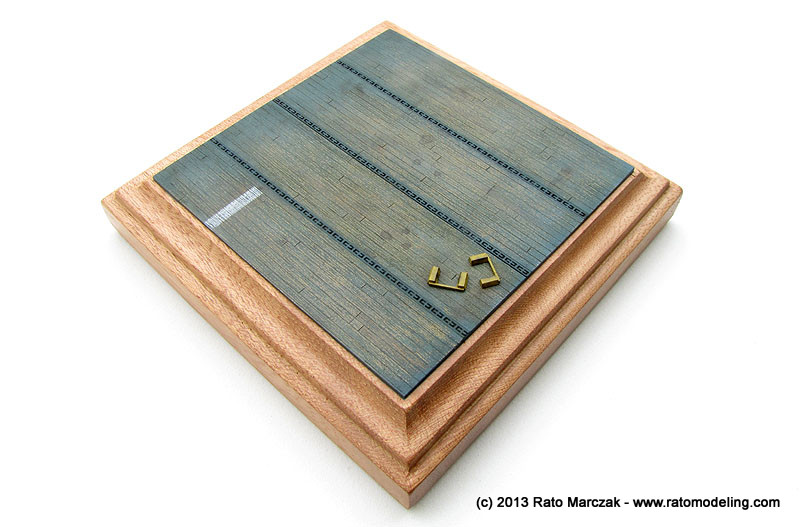
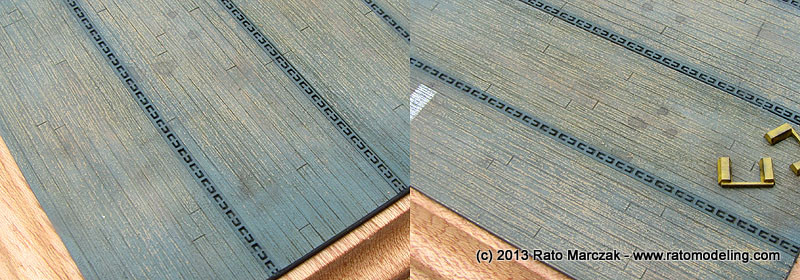
I used my standard wood base for 1/72 scale models, and since the HMS Ravager was produced by an American shipyard, she has the characteristic wood deck planking. This was great, because I could use a left over resin copy of the deck from my very old Hellcat project. I glued the deck over the base, masked the borders, and applied wood color all over the piece. Some planks were retouched with different wood colors and, once everything was dry, I coated the deck with water thinned hairspray. This time, however, I didn't want a chipped - or peeled off - paint layer. It is important to understand that american built carriers didn'td had their decks painted, but stained. With that in mind, I decided to simulate a worn wooden deck, with the stain moderately worn out. This is the reason why I used the hairspray weakened by 50% water: it would make more difficult to remove the second layer of paint. With the hairspray layer completely dry I used a mix of Tamiya grays and blues, hilighted here and there, trying to simulate the color of a British carrier. Once dry, I sprayed water over the deck and started to remove paint from the area I assumed was the central trail of the deck, using a wet flat brush. The dilution of the hairpray made the process much more controllabe. Another drying section and the wood areas were masked to expose the metal channels, which were painted with the deck color without highlighting, but worn out a bit using a sponge and a dark gray color:
Revell Sea Hurricane is, for the most part, a very good kit. The bad scores go to a wrong cockpit, not very clear clear parts (which seems to be a trademark of Revell-Germany), and the arrestor hook insert under the fuselage.
Work started with the cockpit parts. I used exclusively acrylic paints for that: three or four Vallejo bottles and a fine brush did the job. I also used a quickboost gunsight and a very, very old PE British seatbelts fret by Eduard. The control panel used the kit's decal. As you see, I was really trying to make my life simpler then:
I closed the fuselage and left the cockpit to be installed from the wing opening (more on that later). The fit was very good, except the insert under the fuselage. Revell used this trick to allow both navalized and non-navalized versions be injected with the same mold, but it is almost impossible to sand the area without disturbing the ribs:
Next, the wings were assembled and I refined a few points. New landing and wingtip lights were made using the usual recipe:
The flaps and elevons had their recessed lines further deepened with a judicious scribing job. This not only helps to make them look different than ordinary panel lines (afterall these are control surfaces), but also allows a higher concentration of paint there when the oils wash time comes, making them more conspicuous than skin panel lines. I like to use this method to avoid the panel lines in the model having all the same visibility, something not realistic in my opinion:
After reading magazine reviews comparing Revell, Academy, and Hasegawa Hurricanes, I discovered that the Revell offering is a real contender in 1/72 scale, maybe the best of the trio if you take the price into account (no, I haven't even considereded the RS offerings...). However, the cockpit has a bug which no fan of the aircraft will forgive: the Hurricane had a tapered 'Doghouse' bulkhead behind the pilot's seat, following the shape of the sliding canopy. Here is a picture of a Hurricane under restoration at Alpine Figther Collection in 2000, showing the Doghouse:
This means that the bulkhead behind the pilot's seat should end roughly in the middle of the last two vertical frames when the canopy is closed, and not aligned with the last frame:
If you assemble the Revell cockpit as per instructions, the bulkhead will end flush with the last canopy frame. I wasn't willing to perform a major surgery to correct the problem. Instead, I installed the canopy about 1 mm or so ahead of its intended position. This way, the pilot's bulkhead sort of simulates the aforementionned doghouse. I couldn't slid the cockpit further ahead because the control stick was already almost touching the control panel. But if I don't tell, nobody will notice...
Another problem that I noted earlier in this project was a significant gap left by the clear parts. They just don't fit where they should, and to pose the canopy open is not an option with the kit parts. I solved the problem by shimming the area behind the doghouse with pieces of 0.5 mm plastic cart sanded flush to the fuselage. This trick made the canopy fit so tightly in place that I opted for gluing the windscreen to the sliding part and work with them as a single clear part.
At that point, the wing was attached to the fuselage. I had a very good fit overall, and could start improving some areas right away. The antennas were removed in advance, as I knew I would break them soon. The fuselage mast was removed to be installed later on, while the attachment tip on the fin was replaced by a piece of steel wire. I bored the holes for the tail and belly lights, and also glued a small piece of plastic to simulate the pilot's climbing footstep. These were quick and easy modifications that make a difference in the end.
Although the Revell kit is well molded and sports crisp panel lines, it lacks rivets in many areas. Since the Hurricane had lots of non-flushed rivets, I decided to to something about a few panels which were looking too boring without them. The idea is not to rivet the whole model - I don't think this is always worth in 1/72 scale models, let alone camouflaged subjects - but to add interest here and there. I basically embossed fasteners on access panels and rivets along the metal panels under the fuselage, plus a few other places wherever it would be more visible:
At that point, the model was lightly sanded and checked for any flaws:
I applied silver paint along the areas more heavily worked to help me to find faults. It worked like a charm, because I discovered that I had forgotten the catapult spools. Revell overlooked completely this important detail of any Sea Hurricane, so I had to make my own pair of spools:
The radiator of the Hurricane was a trademark of it, so I also spent precious time detailing it. I used plastic bits to simulate the structure and the various actuator arms, and pieces of fine mesh to simulate the grilles:
When I started to prepare the model for priming, I noted that the clear parts had their frame lines molded on the inside, messing up with my plans to make my own masks. I elected to forget the frames and add them later with painted decal strips. I also cemented the wing cannons in place, but I removed the muzzles and drilled the holes to accept new ones later:
Once satisfied with everything, the model received a coat of automotive acrylic primer, was double-checked, and pre-shaded:
This was probably my first FAA paint job. At least I don't have any recollections of using Extra Dark Sea Grey (EDSG) and Dark Slate Grey (DSG), but I' better know, because I have many more FAA subjects in my stash. Anyway, the EDSG/DSG combination is not a simple one, modeling-wise. It has a very peculiar contrast between the colors. So much so that many times we find modelers using the about right colors, but when put together the effect is wrong. Therefore I spent a good deal of time studying the possible combinations of hobby colors that could make my EDSG/DSG combination look right in 1/72 scale. This is a well spent time, gentleman, do your homework:
Evidently the underside color (Sky Type S) generally is not a major source of discussion, personal tastes aside. I used Aerotech pre-mixed automotive lacquers straight from the bottle.
Once dry, I went back with white added to the mixture and post-shaded specific areas to simulate fading. The judicious combination of pre-shading and post-shading can deliver a much more interesting result...
As for the EDSG/DSG, I tested various paint brands from my stash. Since the contrast of both colors wasn't so easy, my weapon of choice was to study which contrast each color combination would result in a B&W photo. After playing with many photos of FAA models from the internet, I found out the best cammos (to my eye, at least) were those whose contrast was not too stark when the photo was converted to B&W mode. The same thing happens to photos of the real thing. Besides the contrast between them, other important things to consider about the top colors were the visible olive hue in the DSG and the characteristic purple tint in the EDSG. Of course there are many other aspects envolved in interpreting the available color photos, not to mention the elements to which these birds were subject at sea.
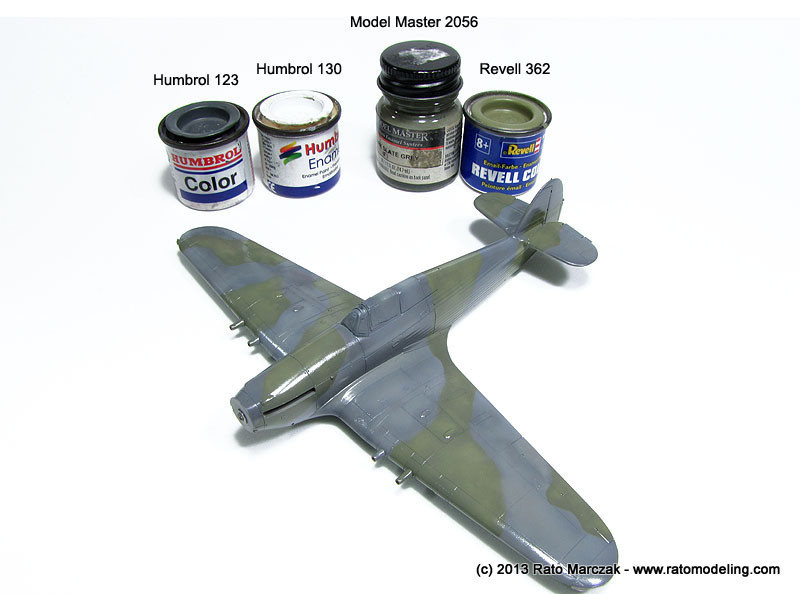
Well, in the end I settled with the following choices:
- Extra Dark Sea Grey:
- Base color: 3:Humbrol #123 + 2:Humbrol #130
- Fading: 1:Humbrol #123 + 1:Humbrol #130
- Dark Slate Grey:
- Base color: Testors Model Master #2056 (Faded Olive Drag #2051 can be used, too).
- Fading: Revell #362
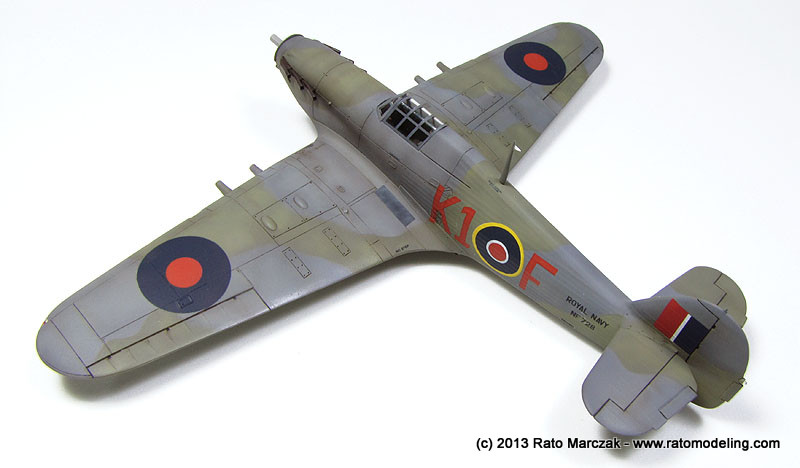
The colors still look a tad too dark in the photo above because I had already applied a protective coat of Future clear wax in preparation for the decals (they would enlighten significantly after the final flat coat is applied). If we study the color and B&W photos of the model, this is the result:
While the paint was drying, I took care of other details spreaded over my workbench. The radiator was painted and received a wash/dry-brushing treatment to make the details stand out. I also worked on the landing gear, propeller and arrestor hook. Note that I painted the spinner with a different color shade than the used on the underside - I found that visible in many wartime photos. I installed the brake lines on the inner side of the landing gear doors, and installed a small grille in front of the carburator air intake, but I forgot to take a picture:
Meanwhile, I had to find a replacement for the gun muzzles. The kit ones are not bad, but the recoil spring is represented as consecutive rings instead of a, well, spring... I decided to make my owns, using syringe needle and cooked stretched sprue:
The new cannon was built four times, and I'm already feeling the regret for not making resin copies of them as I have more Hurricanes to build... In the end, I wasn't satisfied with the diameter provided by the insulation part and replaced the insulation by a thinner one.
I didn't take many photos of the finishing steps. I basically followed the same steps of my other projects. The kit's decal sheet was used throughout the model, except for the fin flashes which I managed to destroy somehow. I sealed the decals with another coat of Future. Then, wheatering started on the undersides.
After an artist oils wash, I simulated stains and leaks by applying small amounts of oils over hinges and selected recesses and dragging the paint in the direction of the airflow using a flat brush. This produces crisp, well defined fluid marks. Next, using a fine tipped airbrush I used what I call airwash (see some videos here), a highly thinned dark brown mixture applied wherever I wanted to produce a more diffuse dirt/grime effect. I love to use these two methods together to achieve a realistic staining effect:
The identification light was made using a piece of stretched yellow sprue mushroomed over a candle, cut to size and glued in place. The pilot's footstep had a small handle to lower it, which is visible even with the footstep retracted. I reproduced it with a small piece of u-shaped stretched sprue inserted in the two small holes previously drilled. I painted the catapult spools with dark gray color. I've seen restored Sea Hurricanes with them painted red, but I thought it would be too strong:
:Revell provided most stencils as decals. After applying them, I noted that they were way too stark for the scale. I dug out wartime photos to find out how they should look, and opted for airbrushing a mist of the base color over the stencils to tone them down a little. Worked so well that I repeated the procedure for the stencils on the upper surfaces as well. Having previously drilled a hole in the rudder to accept a new tail light, all I had to do was to glue a small piece of stretched sprue sanded to shape there:
The carburator air intake and the radiator were glued in place. Planning in advance helped to make the radiator arms to fall into their holes perfectly:
The wheel wells are not faithful to the real thing, as Revell closed the area ahead of the main spar. I decided live with that, but some plumbing and hoses helped to enhance the area. I included only the few more visible in the photos. The two transparent rectangles used by the pilot to assert the landing gear position were painted with Tamiya Smoke (X19). The photo below shows the result, as well as the difference that a few rivets here and there can make on the model (blue arrows):
Except for the landing gear, Pitot tube, and the paint chipping, the underside was done:
Flipping the model up, I installed the antenna mast and detailed it with a small triangle which would hold the aerial later. I removed the canopy maks and added the missing frames from pre-painted decal strips. The exhaust stacks were painted using a favorite recipe of mine (in sequence): burnt metal, heavily thinned silver (misted), Rustall, black pastel chalk. The exhaust stains were airbrushed using a very thin mix of Gunze Soot (H343), gradually built up, and then retouched with brush strokes of dark brown pastel chalk. The anti-slip strip on the wing roots were from the decal sheet, airbrushed with random highlights in gray to make it looked well worn. Moving to the wings, the landing and navigation lights' masks were removed...
At this point the model was virtually done, except for the paint chipping and final bits. The model was coated with Testors Dullcote to produce a flat finish:
Final weathering touches were applied using my usual recipe: gray and silver pencils. Airwash was also applied over selected panels to produce false shadows:
Once satisfied with the weathering, I glued the missing details and installed the landing gear. The aerial antenna was made of stretched sprue. I opted for cementing the arresting hood down, just to add interest. The real hook had a snap gear, the mechanism responsible for locking the arresting hook in place when retracted. It was too late to scratchbuild a decent one, so I just glued a PE part which would look like the business:
And the models was almost done. I forgot to paint the reflective side of the pilot's rear view mirror, but I now prefer this way. A piece of foil would look like a flashlight.
Then I started to think on a suitable base. NF 728 served during 1944 as part of the #1 Naval Operational Training Unit. It was operated at RNAS Inskip, a land Fleet base, and aboard HMS Ravager (D70). The Ravager was an Ruler class escort carrier built in the USA, initially constructed in the U.S. by Seattle-Tacoma Shipbuilding in Tacoma in 1942. She was purchased by the USN and was converted to an escort carrier at Commercial Iron Works, Portland, Oregon. Upon completion in 1943 she was transferred to the Royal Navy and named HMS Ravager (wikipedia). Her primary role was to operate as a Deck Landing Training carrier, providing a deck for a variety of training squadrons off the Scottish coast. Training included visits from individual aircraft and short detachments for more intensive training periods. Aircraft types operated included Avenger, Barracuda, Corsair, Firefly, Fulmar, Hellcat, Sea Hurricane, Seafire, Spitfire, Swordfish and Wildcat (RN research archive).
Sea Hurricane NF 728 served during October 1944 within No.760 Naval Air Squadron, replacing No.766 squadron aboard the Ravager. Having found the following pic of the NF 728 aboard HMS Ravage after being struck by NF 722, I opted for a base simulating the aircraft carrier.
I used my standard wood base for 1/72 scale models, and since the HMS Ravager was produced by an American shipyard, she has the characteristic wood deck planking. This was great, because I could use a left over resin copy of the deck from my very old Hellcat project. I glued the deck over the base, masked the borders, and applied wood color all over the piece. Some planks were retouched with different wood colors and, once everything was dry, I coated the deck with water thinned hairspray. This time, however, I didn't want a chipped - or peeled off - paint layer. It is important to understand that american built carriers didn'td had their decks painted, but stained. With that in mind, I decided to simulate a worn wooden deck, with the stain moderately worn out. This is the reason why I used the hairspray weakened by 50% water: it would make more difficult to remove the second layer of paint. With the hairspray layer completely dry I used a mix of Tamiya grays and blues, hilighted here and there, trying to simulate the color of a British carrier. Once dry, I sprayed water over the deck and started to remove paint from the area I assumed was the central trail of the deck, using a wet flat brush. The dilution of the hairpray made the process much more controllabe. Another drying section and the wood areas were masked to expose the metal channels, which were painted with the deck color without highlighting, but worn out a bit using a sponge and a dark gray color:
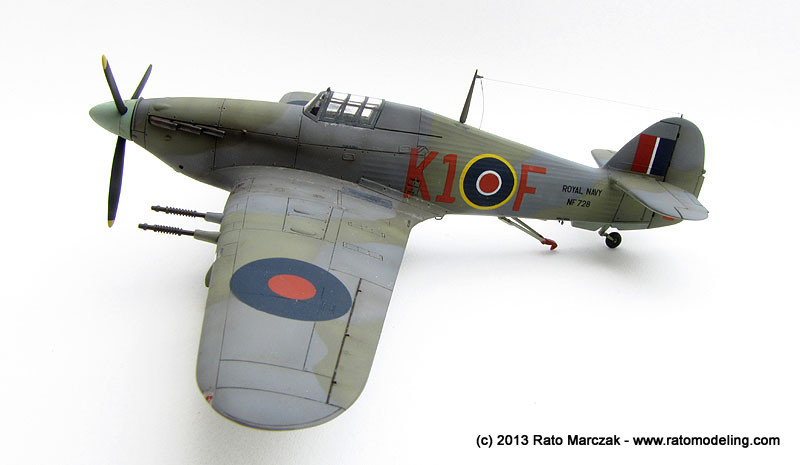
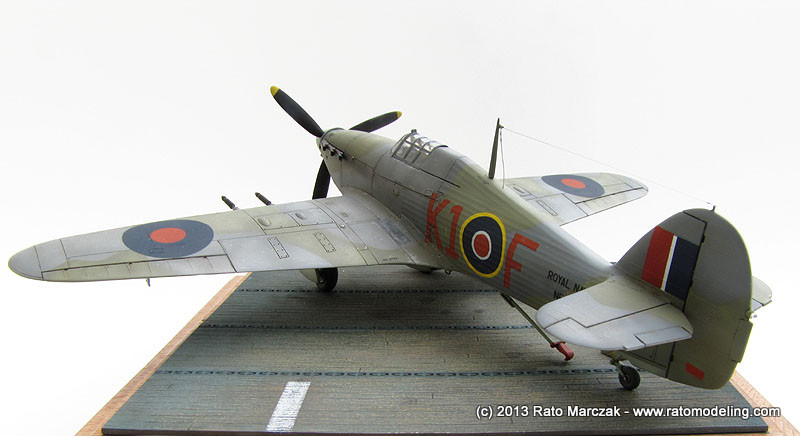
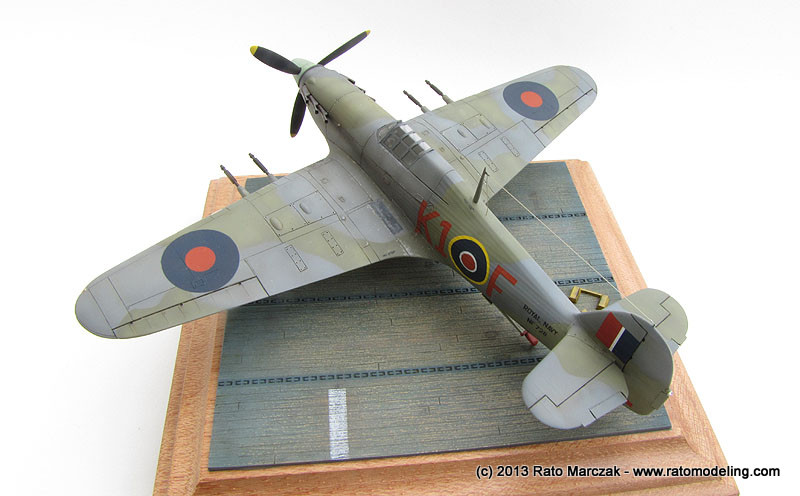
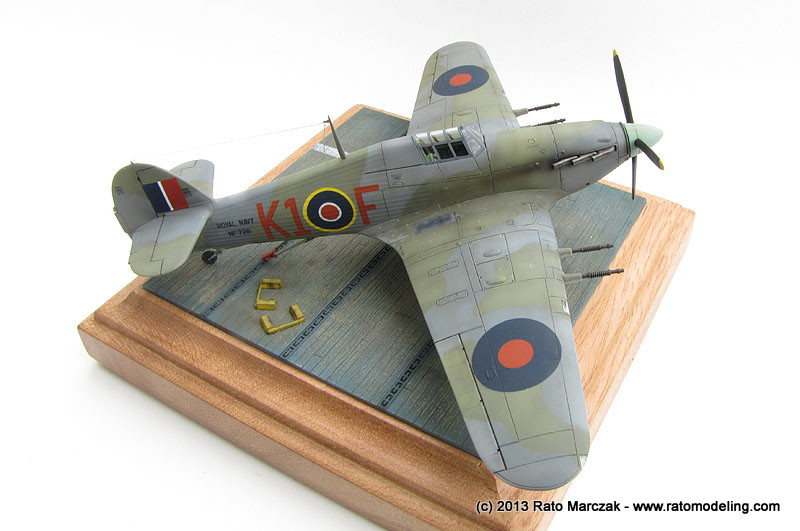
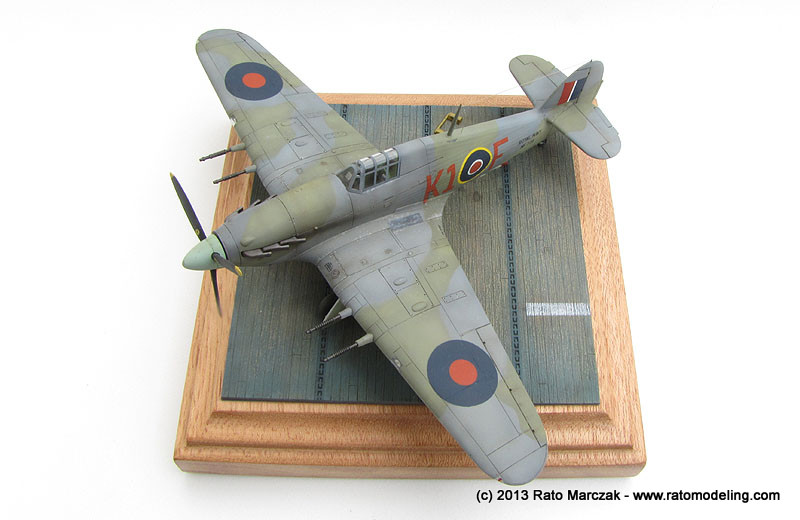
And finally my Sea Hurricane could land on her base (I completely forgot to take a shot of the underside, will do that one day...):
| Technical file | |
| Kit:
|
- Revell #04184 |
| Additions:
|
- Quickboost gunsight - Eduard PE seat belt |
| Basic
colors: |
-
Primer: automotive acrylic gray primer - Silver (interior): GSI Gunze Mr.Color Silver (#008) - Sky Type-S: Aerotech lacquer - Extra Dark Sea Grey: Base color - 3:Humbrol Dark Sea Grey (#123) + 2:Humbrol White (#130); Faded - 1:Humbrol #123 + 1:Humbrol #130. - Dark Slate Grey: Base color - Testors Model Master Dark Slate Grey (#2056); Faded - Revell RAL 6013 (#362) - Gloss coat: Future floor wax - Flat coat: Testors Dullcote |
| Notes: |
-
Several scratchbuilt details (see text). |
Rato Marczak © 2013
