| Hasegawa M5 High Speed Tractor in 1/72 scale |
| Finished: February/2023 |
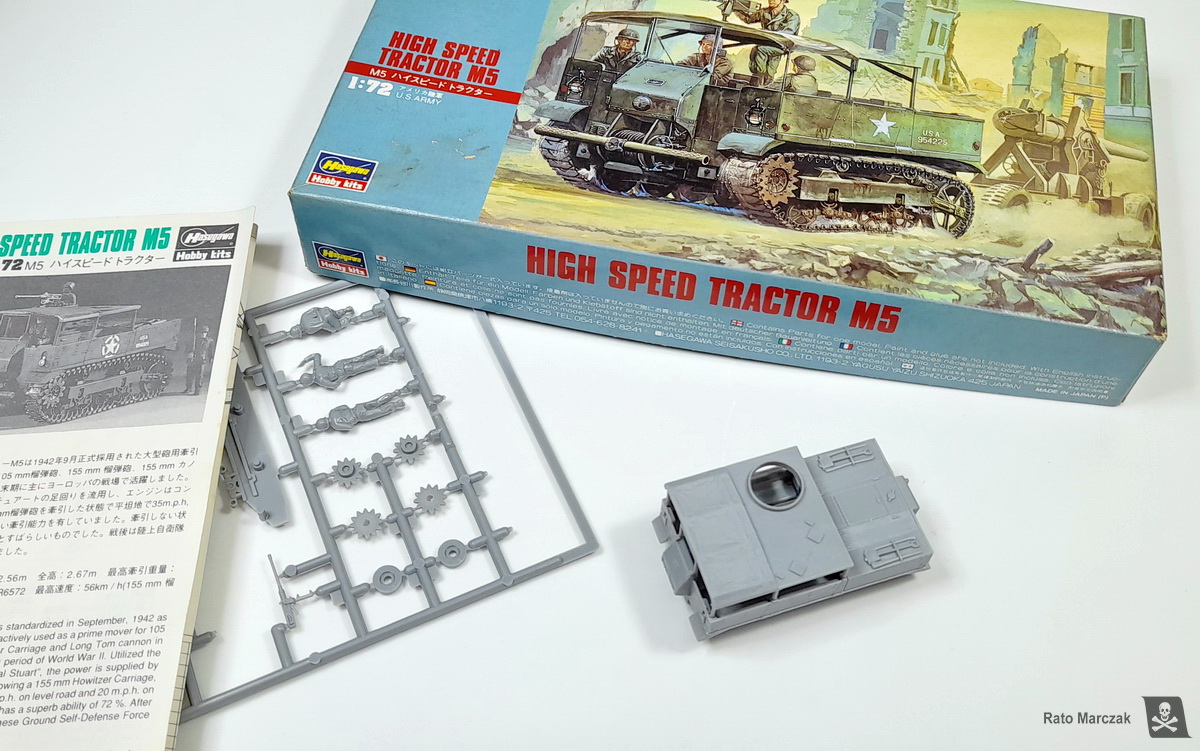
In spite of the countless new releases in the modeling industry these days, some subjects seem doomed to be built from old kits forever. The M5 artillery tractor is an interesting armored vehicle used in all theaters during WWII. Yet, there is no modern injected kit of it in any scale. In 1/72 scale, the only choice is the Hasegawa offering from 1975, but we show how these little models can be much improved with a few modifications.
The M5
tractor was a well-known tracked vehicle used by the US Army to tow artillery guns.
International Harvester produced the original M5 version between 1943 and 1944
and it saw extensive service in all fronts during WWII, as well as during the
Korean conflict.
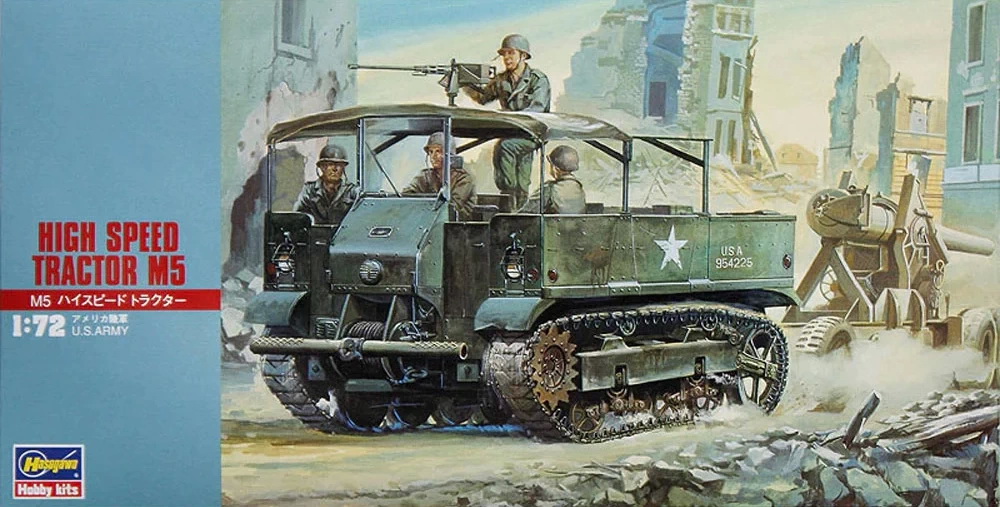
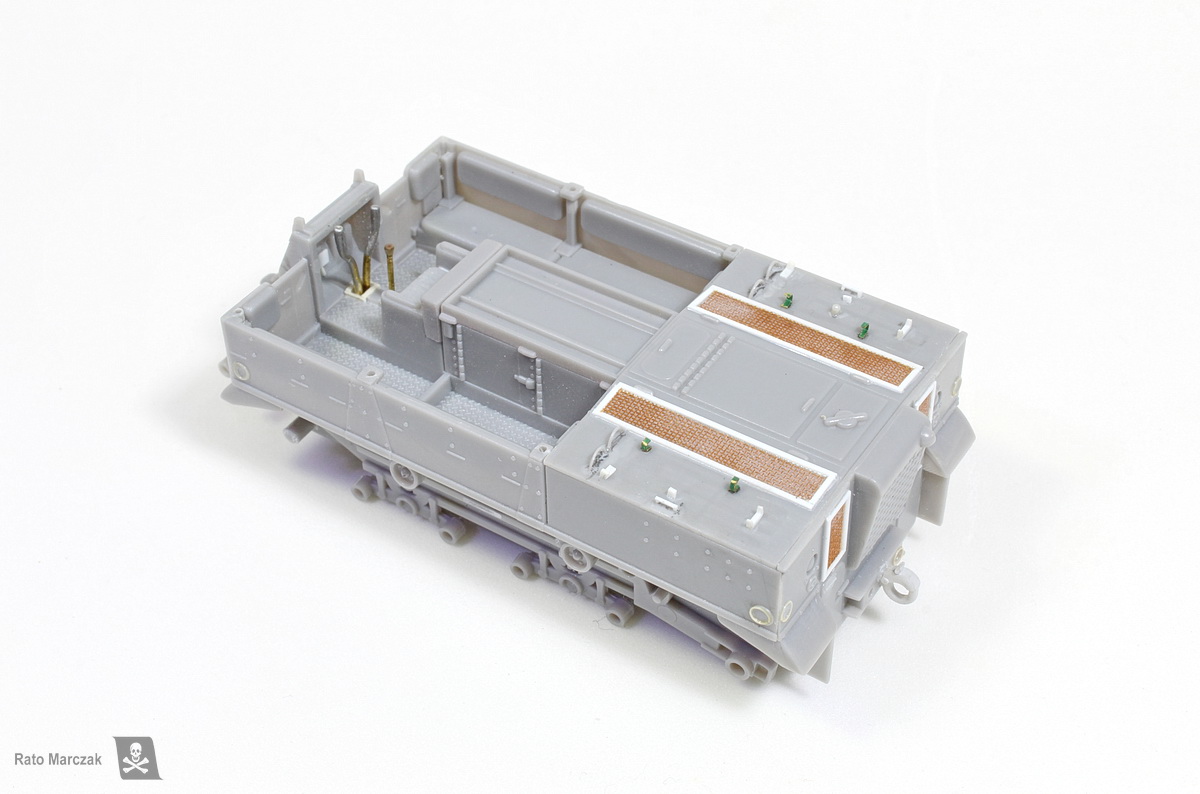
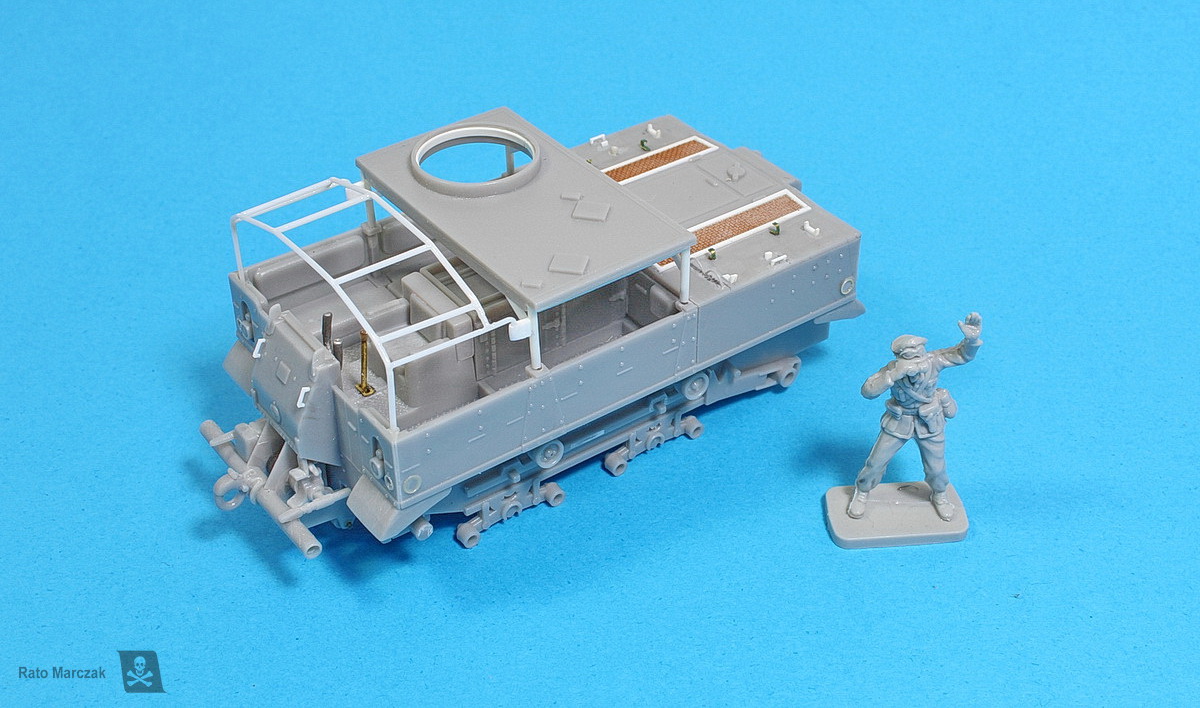
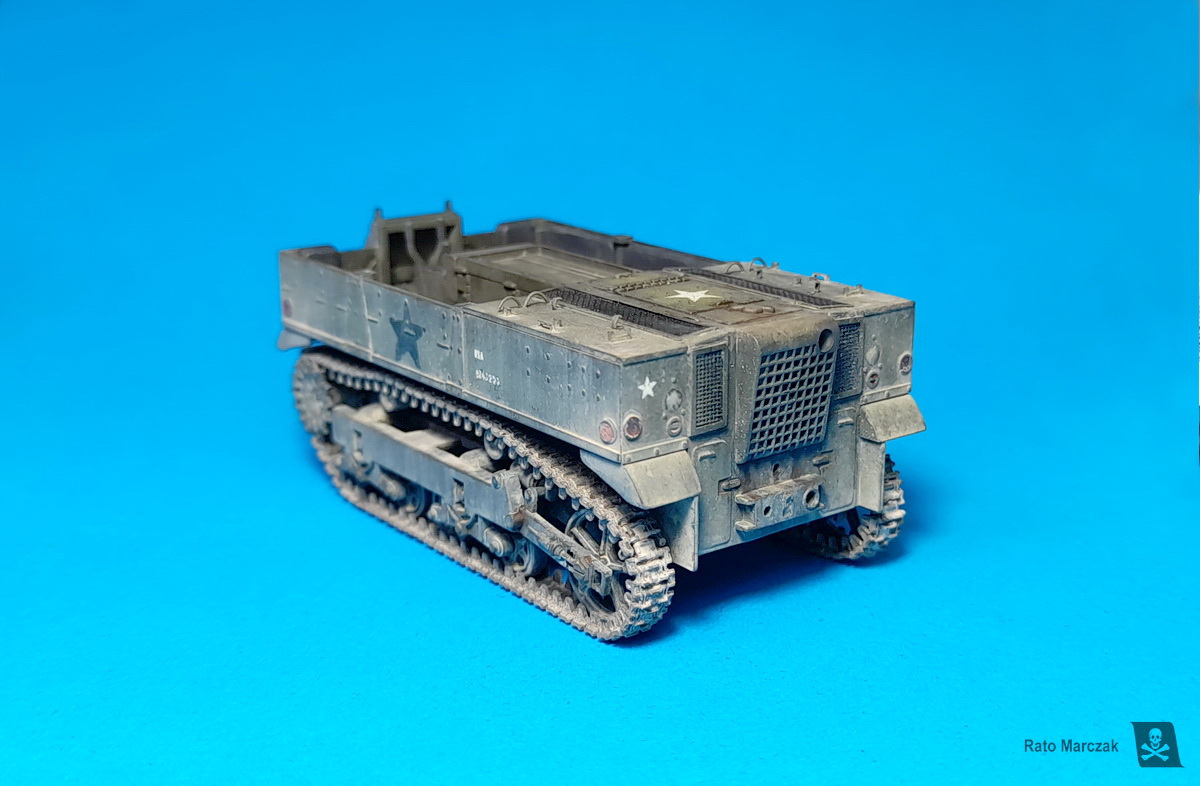
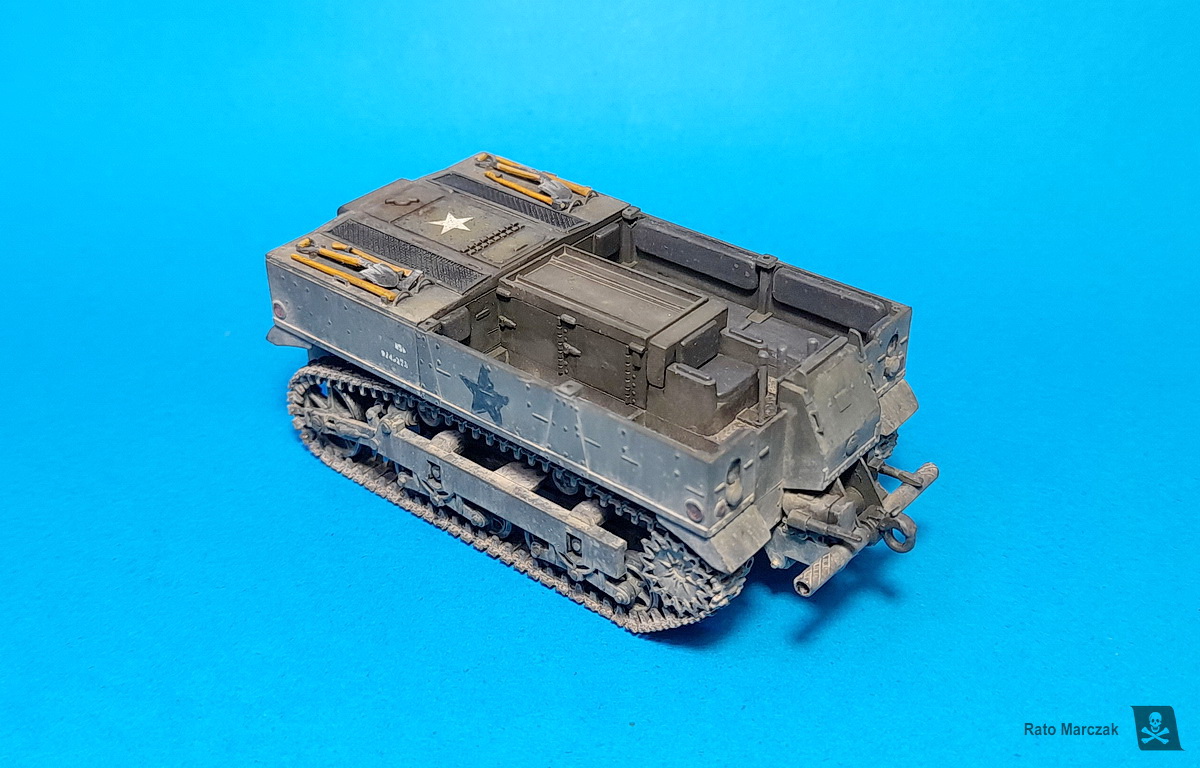
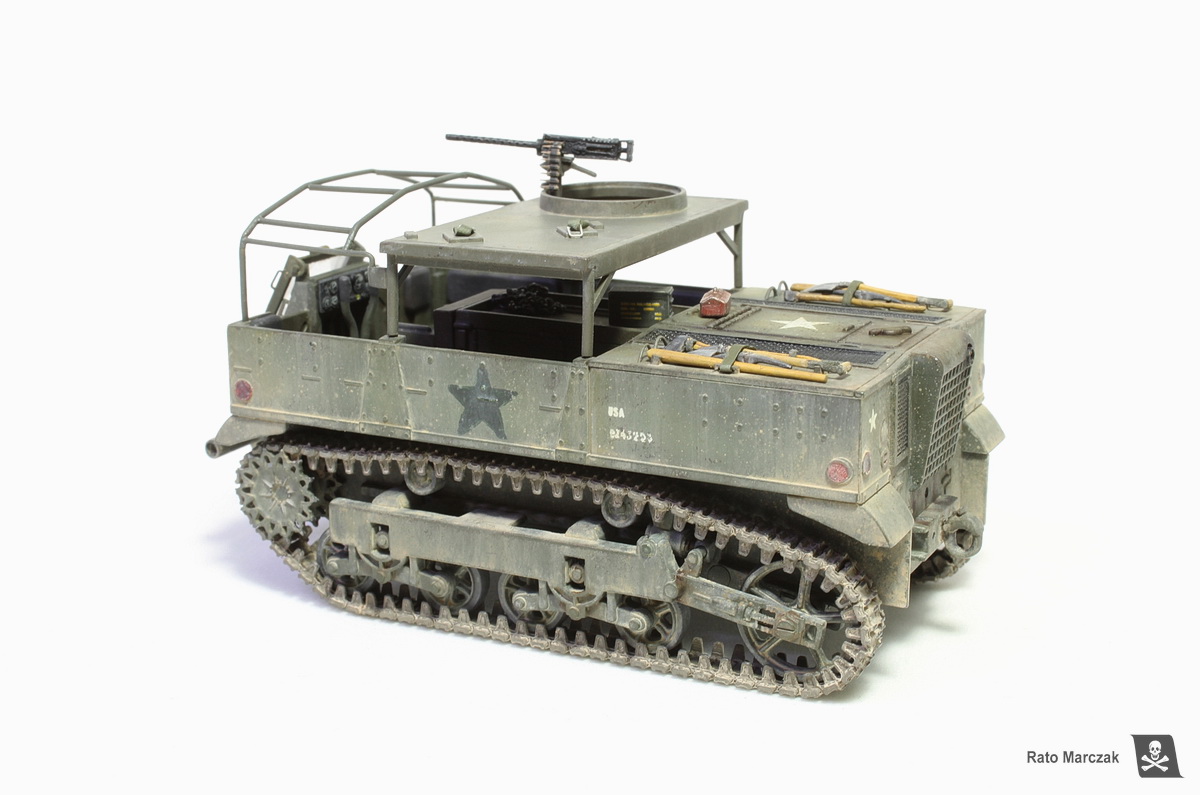
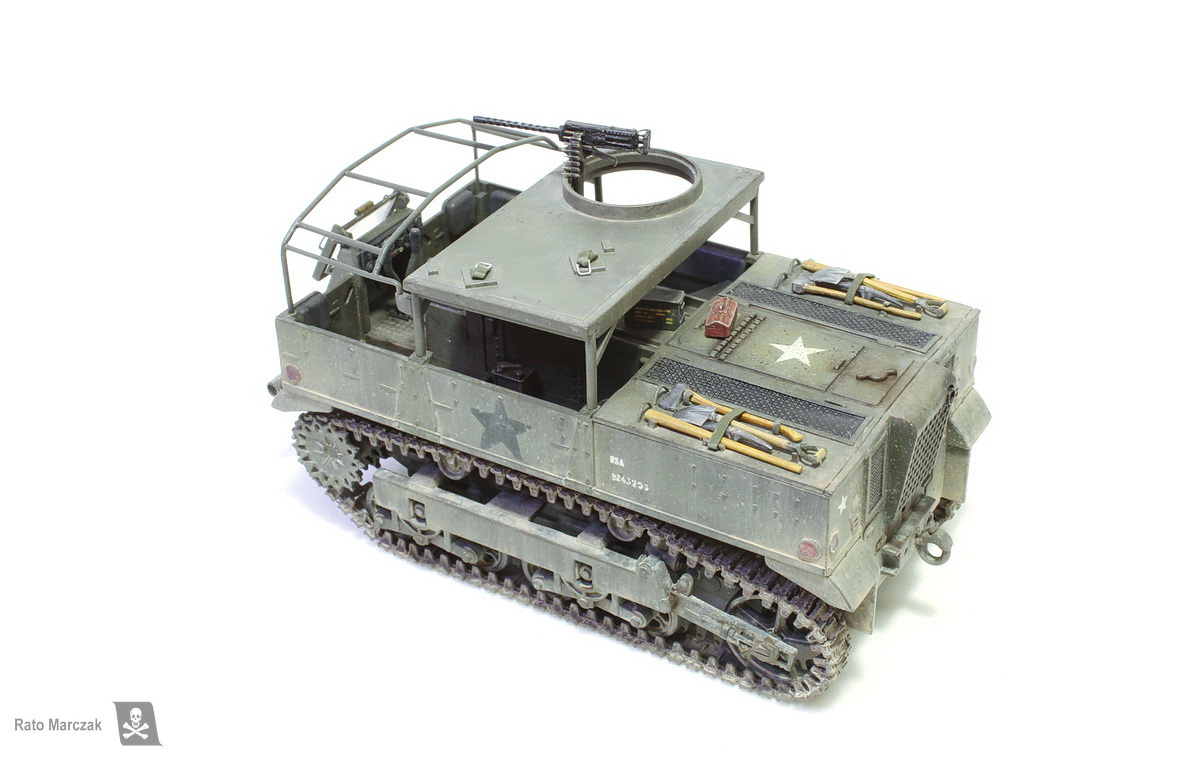
As is my usual practice during diorama construction, I start with the vehicles that will compose the scene. If the diorama does not materialize, at least I have some new models for my display. The Hasegawa kit represents a mid-production M5 with the cage canvas cover for the driver and the open roof for the .50 cal machine gun. It is incredibly well molded for its age and the parts’ fit challenges some modern ones. Of course, the kit shows its age in some details and the terrible (for today’s standards) rubber tracks.
 .
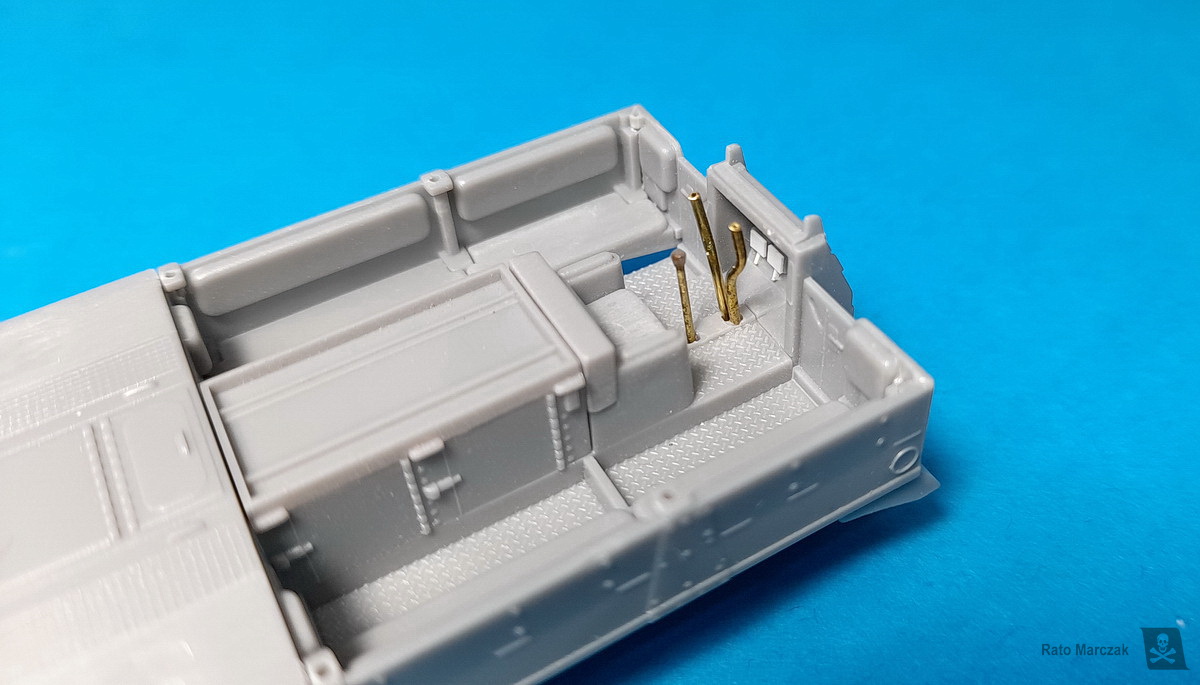
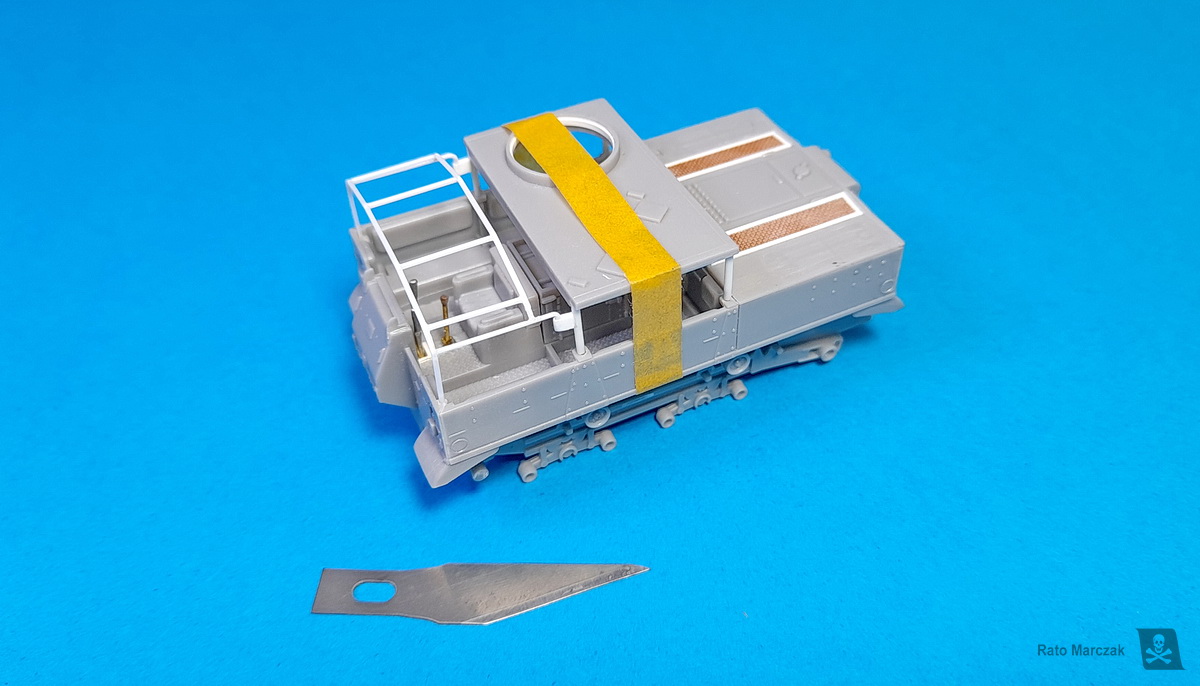
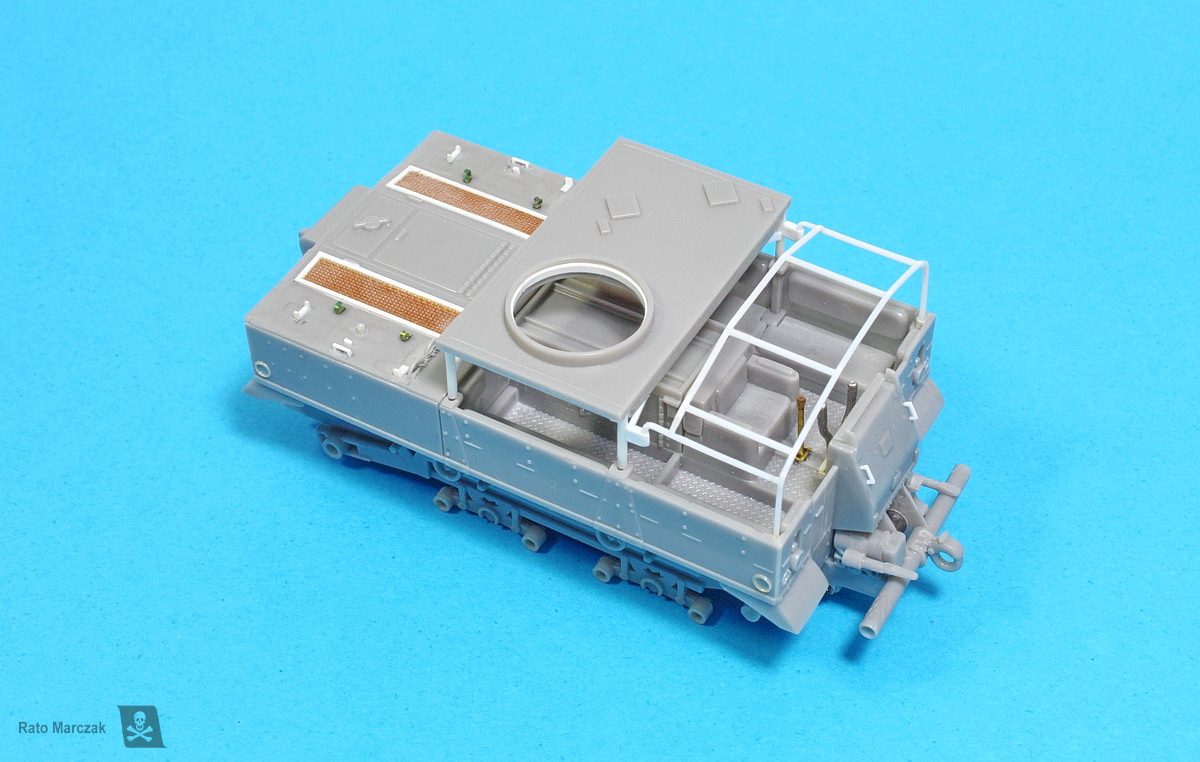
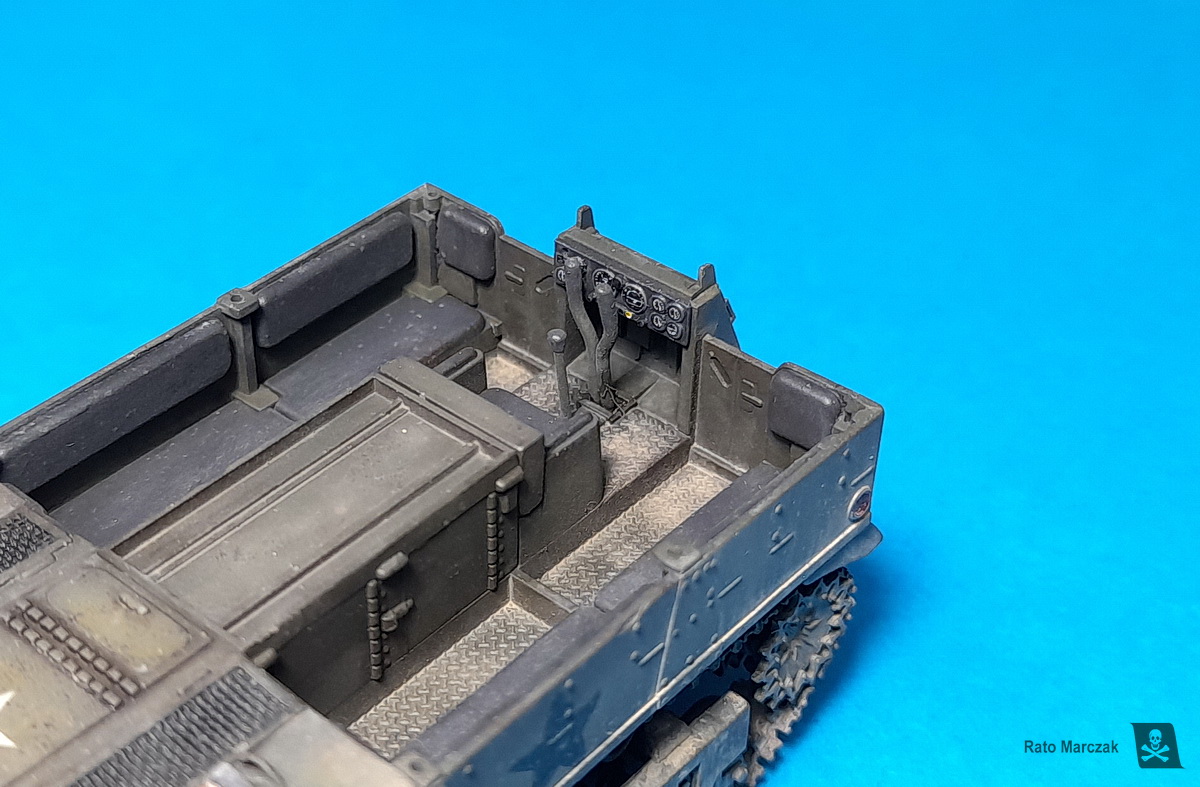
.Overall it is a little gem, cheap, and easily found. I wanted to depict a vehicle in the Pacific, with the canvas cover removed, so my first step was to cut off Hasegawa’s typical canvas-textured area from the roof and detail the remaining part. More in-scale rods replaced the columns that support the rigid roof. Metal pins made the roof removable for easy painting. Hasegawa made the windscreen, which was foldable in the real vehicle, integrated with the front hull (part #3) in the up position. I sawed it off to mount it folded down later on. My German office tested the system.
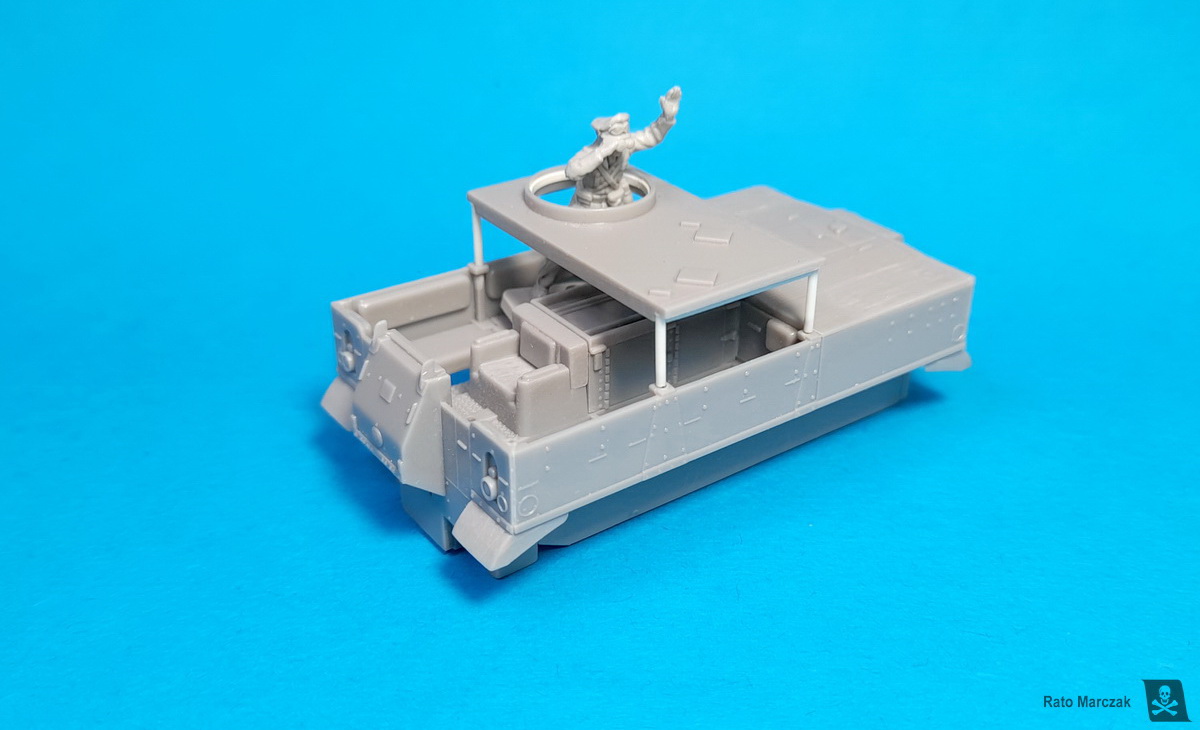
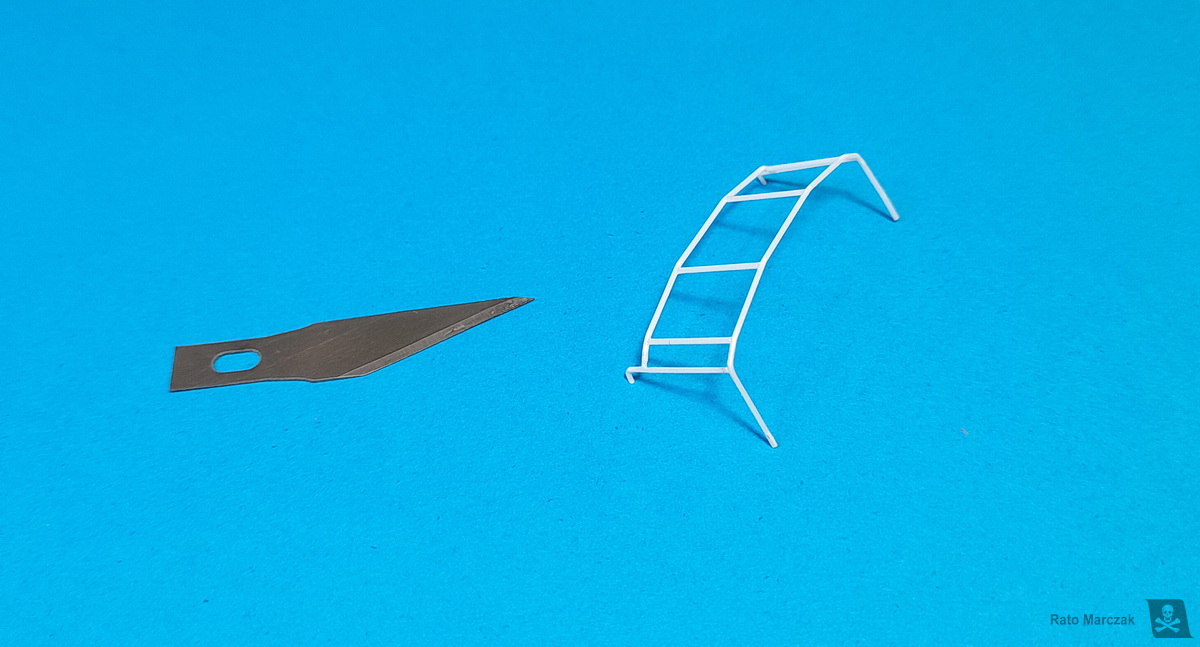
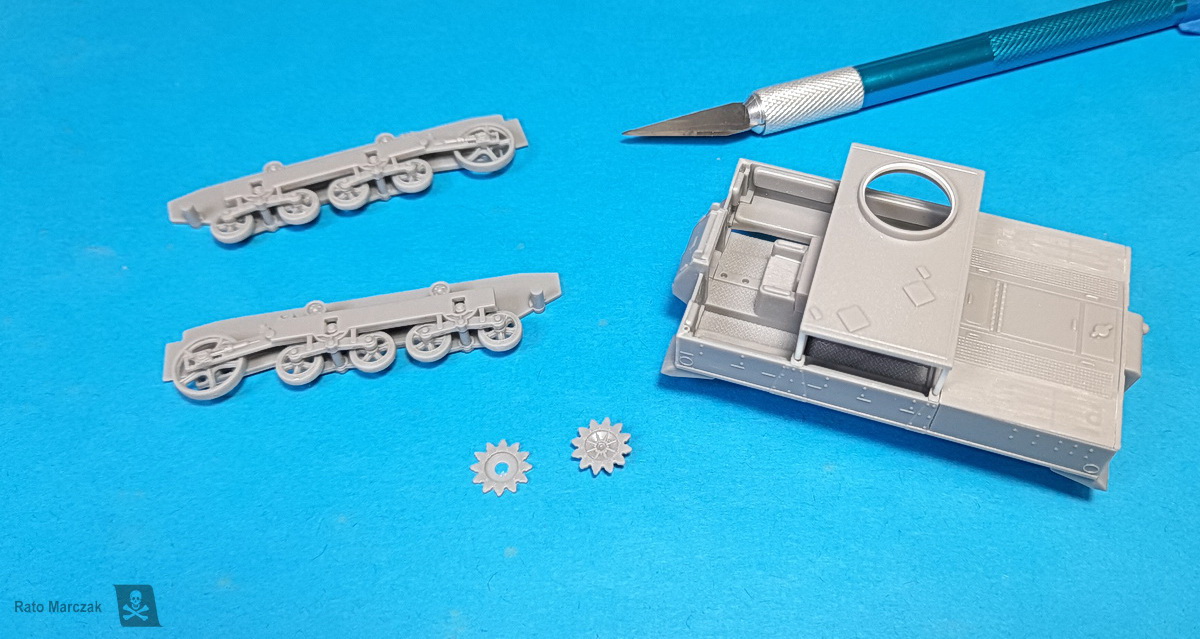
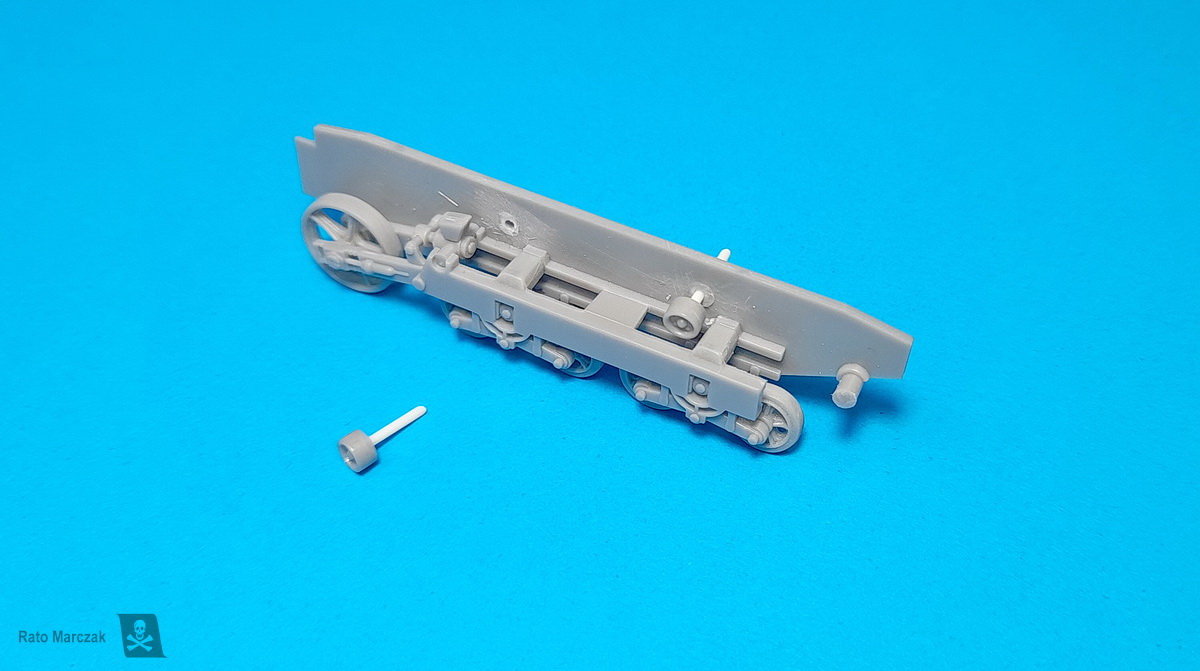
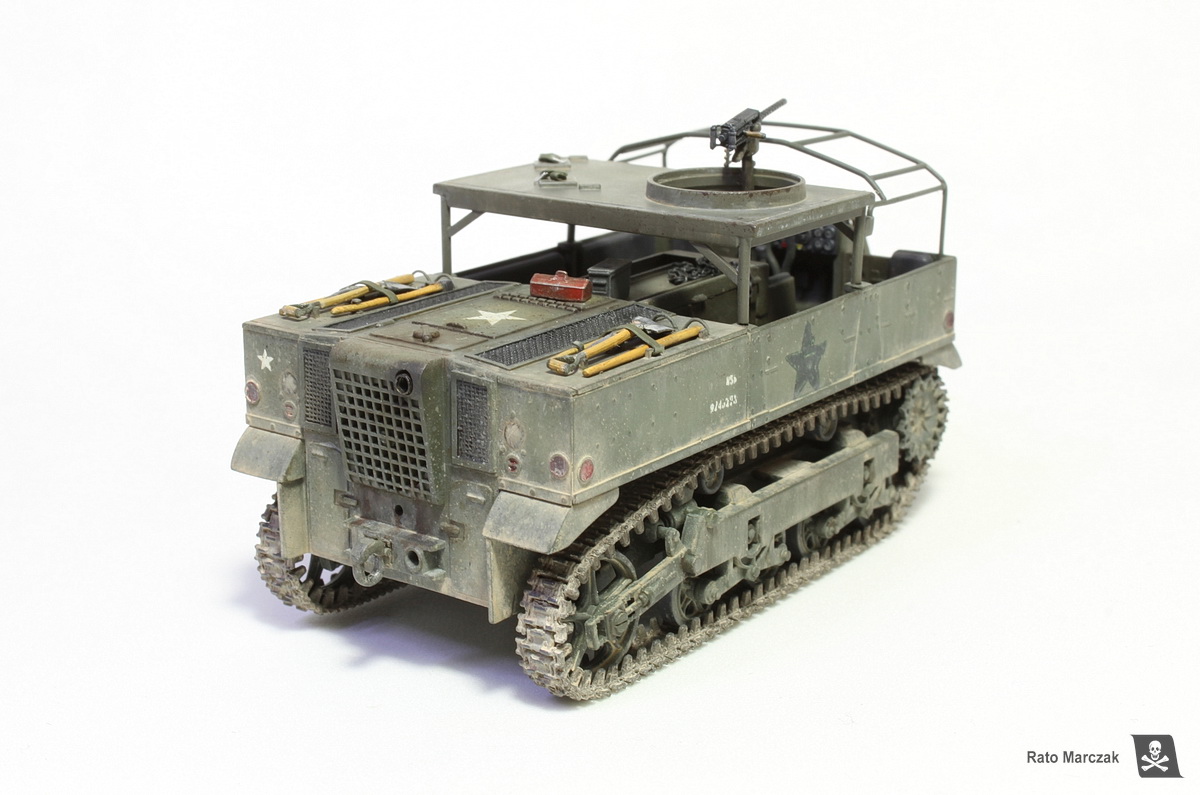
Removing the driver`s cage meant I had to scratchbuild a new one sans the canvas (well, not necessarily since it is a removable structure in the real thing). One of my main reference photos showed the M5 in action with the cage in place, and it adds a lot of character to the vehicle. So I made a cage using 0.5 mm rods by bending the main beams over the heat of an incense stick and gluing the straight ones. And because the driver`s cabin would be more visible, I improved the pedals and replaced the control rods with brass wires. Next, the suspension was assembled and it literally clicked in place, so good is the fit. However, the sprocket wheels were deceptively bad as the tracks… I had to do something.
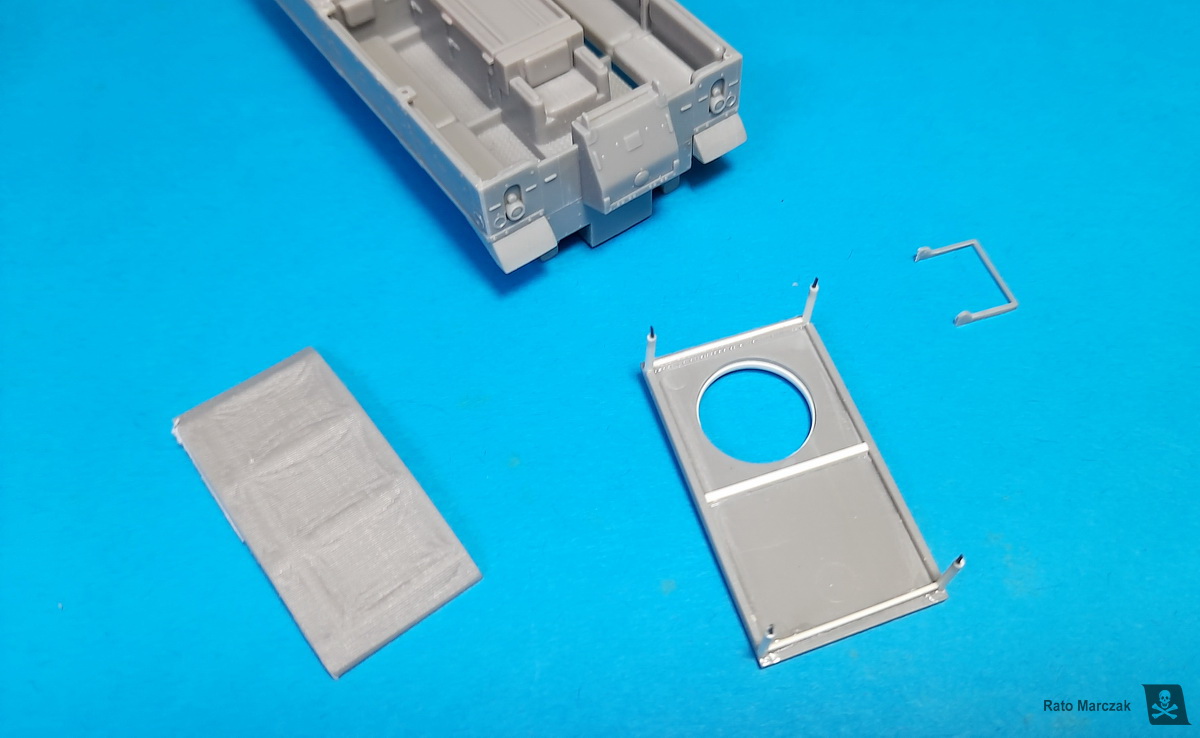
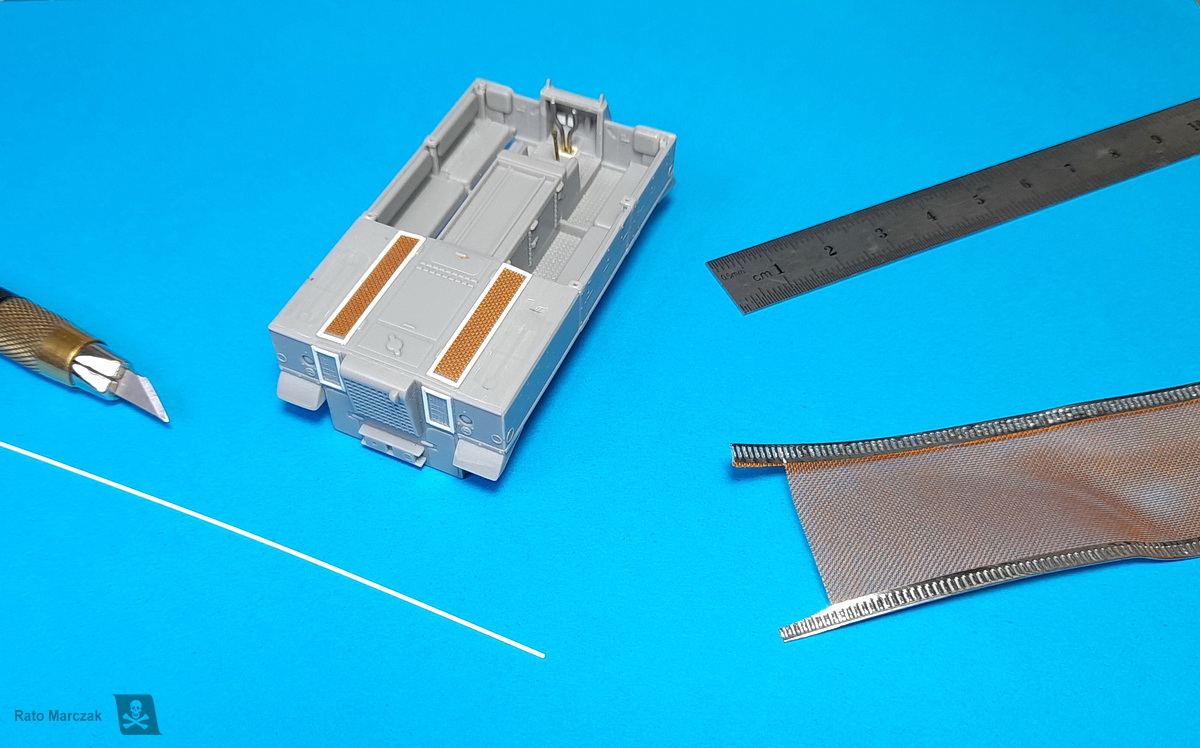
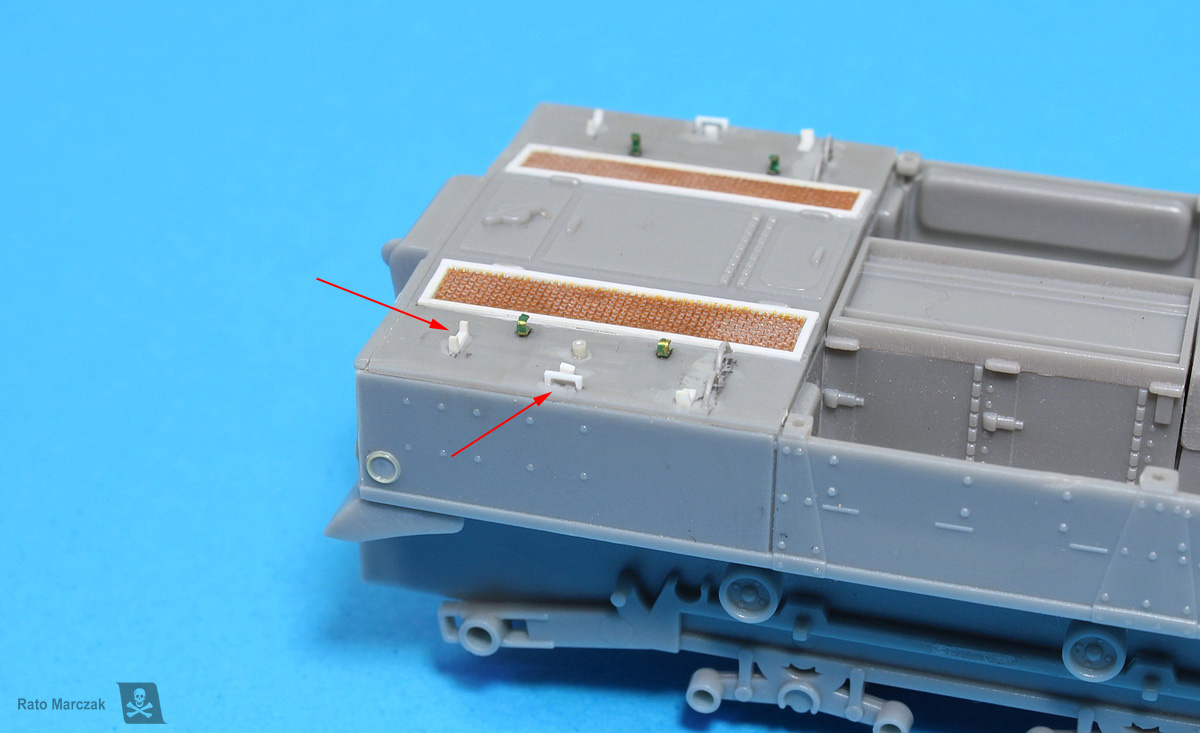
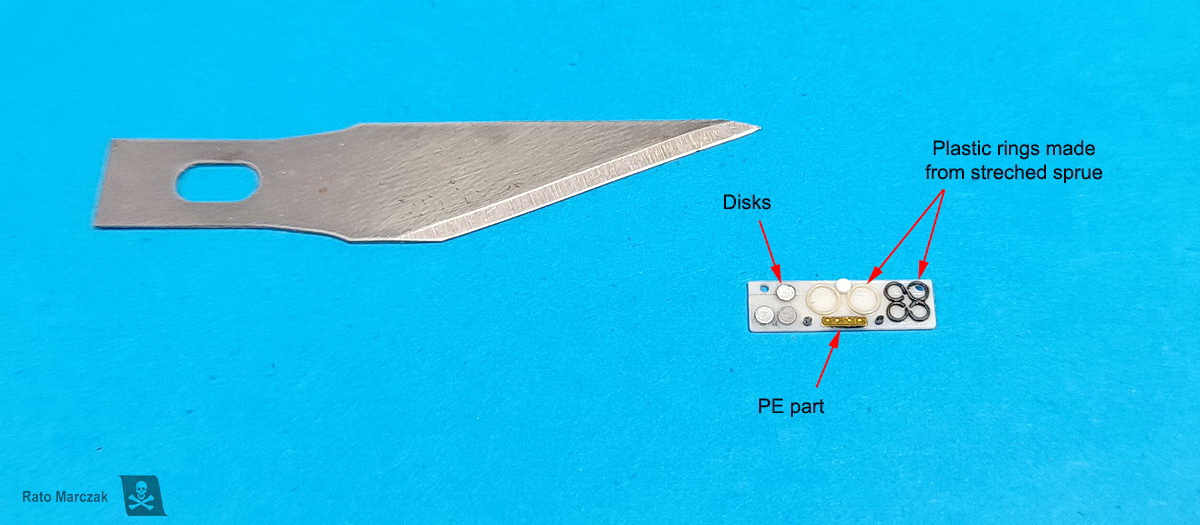
Meanwhile, I had other unconvincing details of the kit to worry about, like the engine grilles. I partially sanded down the texture Hasegawa used to simulate them and glued rectangles cut off a decoration tape I found in my `one day I will use this-box. That tape has a very fine woven screen that no PE detail can. I then boxed the screens with thin plastic stripes. Then everything was dry-fitted in place, and it was time to find a replacement for the tracks. I also improved the driving lights on the side and back of the hull by gluing rings made of stretched sprue over them. After painting the model I would fill them with transparent red and orange paint.
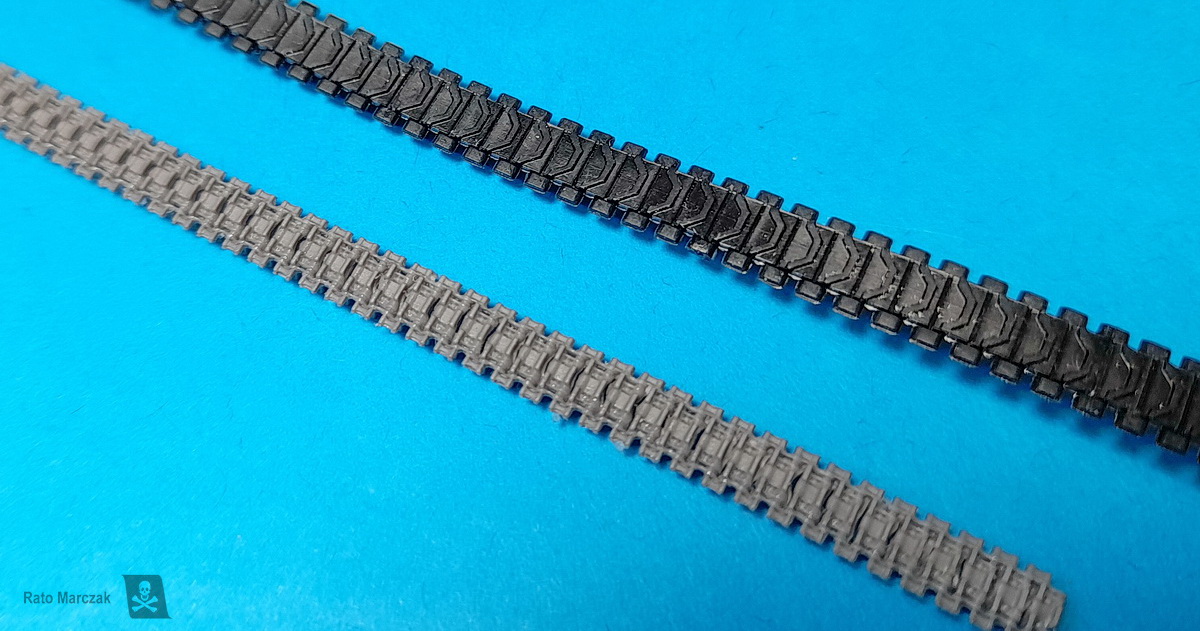
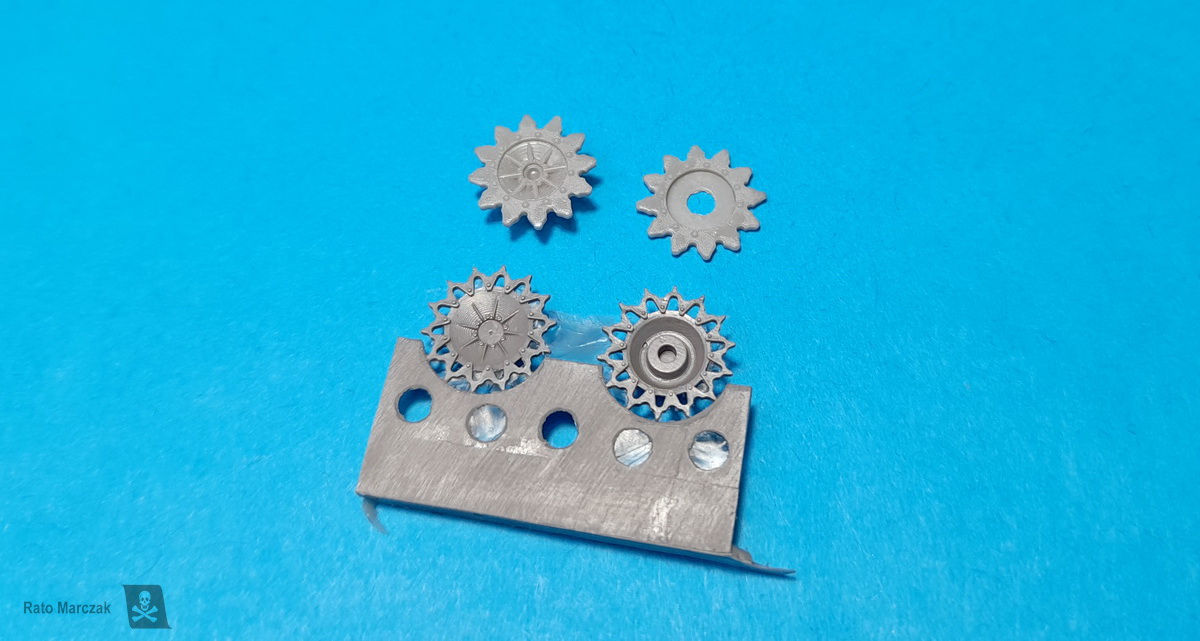
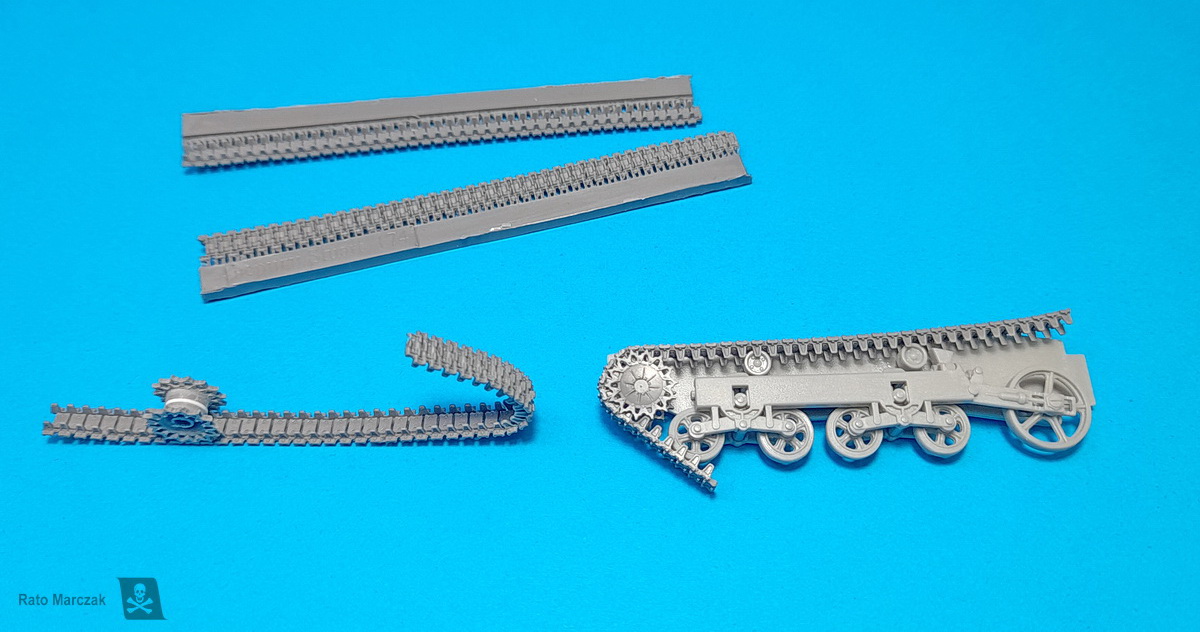
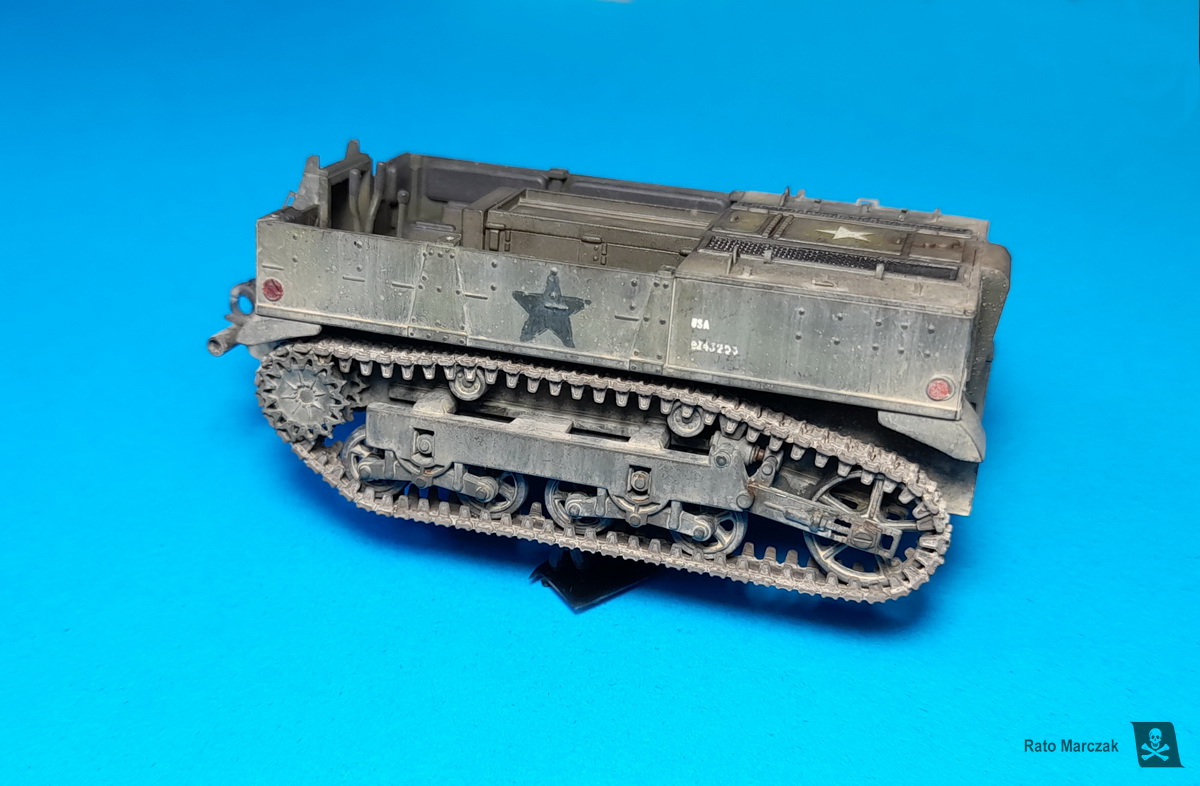
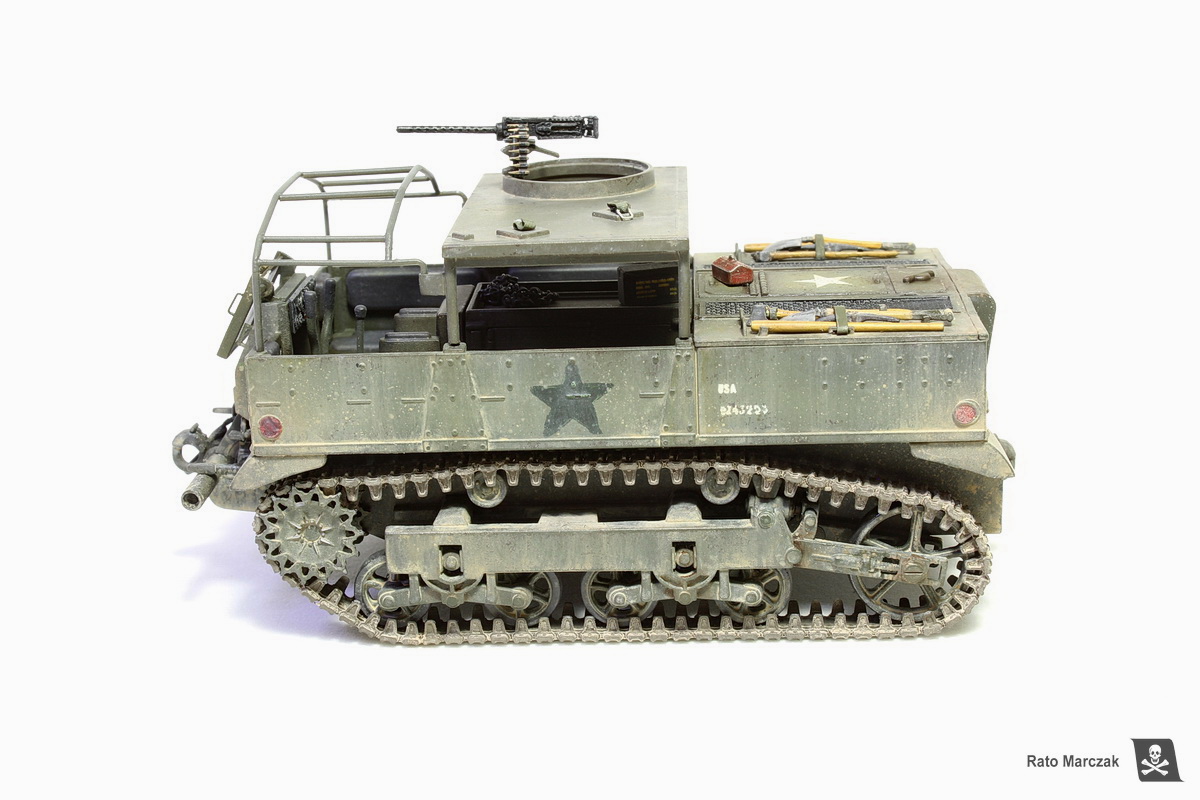
The solution for the tracks’ problem came in the form of resin replacement sets from OKB Grigorov. I used the T36E6 tracks for the M3/M5 family and the sprocket for the M3. I think the T36E6 tracks are a more interesting variation than the T55 and T16 types, and more rare in 1/72 kits as well. Anyway, the level of detail in these sets is unbelievable, and they fitted very well in the kit wheels. They looked more in-scale, too. The sprocket wheel is equally a vast improvement over the kit parts, and before someone asks me, yes, the open-teeth type was used in the M5.
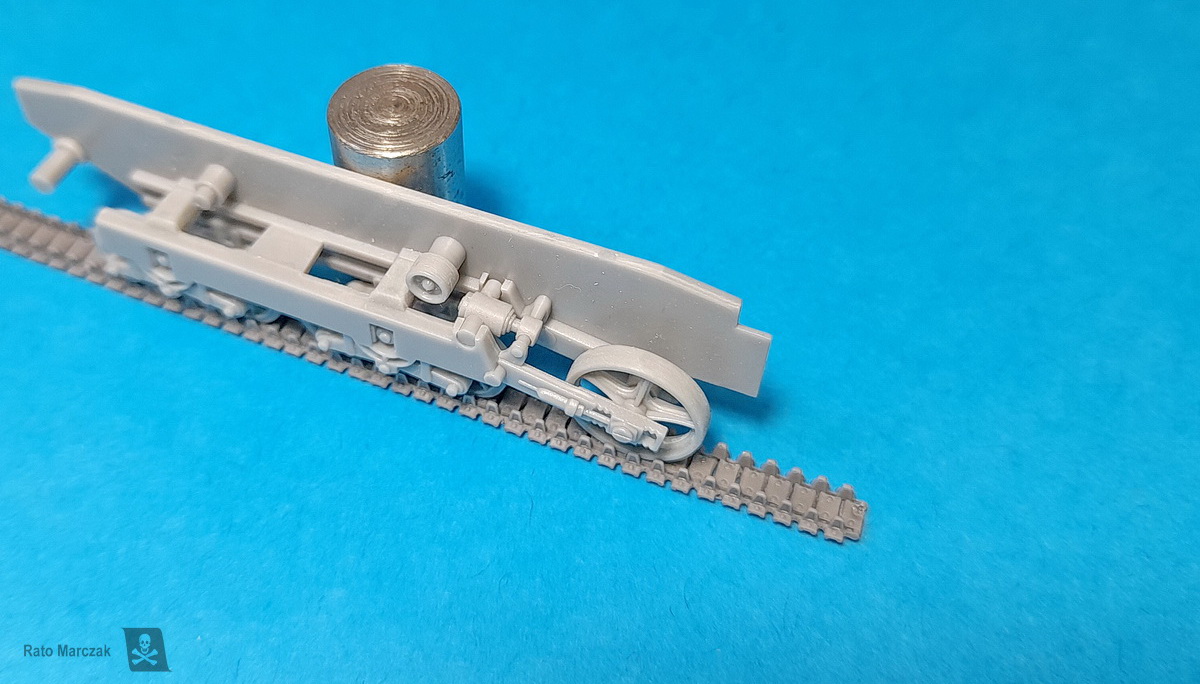
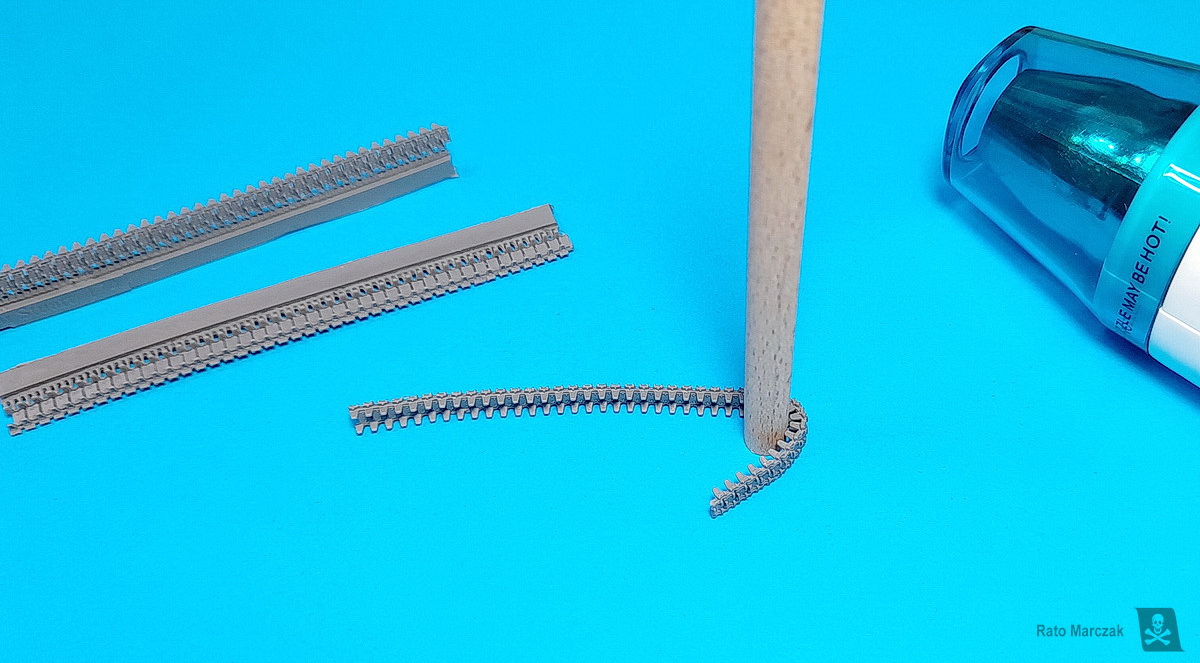
The major difficulty with OKB tracks is that they must be heat formed to conform to the running gear. I used a heat gun and a dowel to make the turn around the sprocket wheel, and gently produced the sags between the return rollers’ positions. The tracks do not need to close perfectly, just enough to be comfortably glued in place later on. One modification was necessary to accept the tracks, however: the axles of the return rollers had to be replaced with thinner ones, as they were interfering with the OKB teeth.
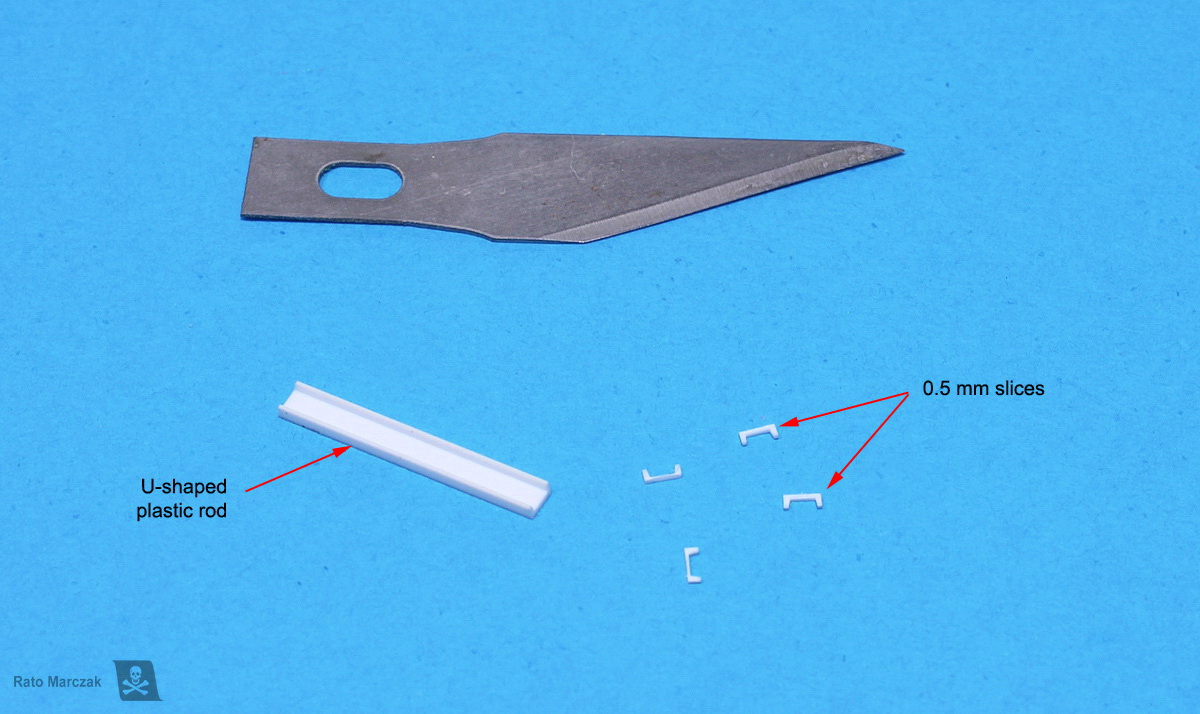
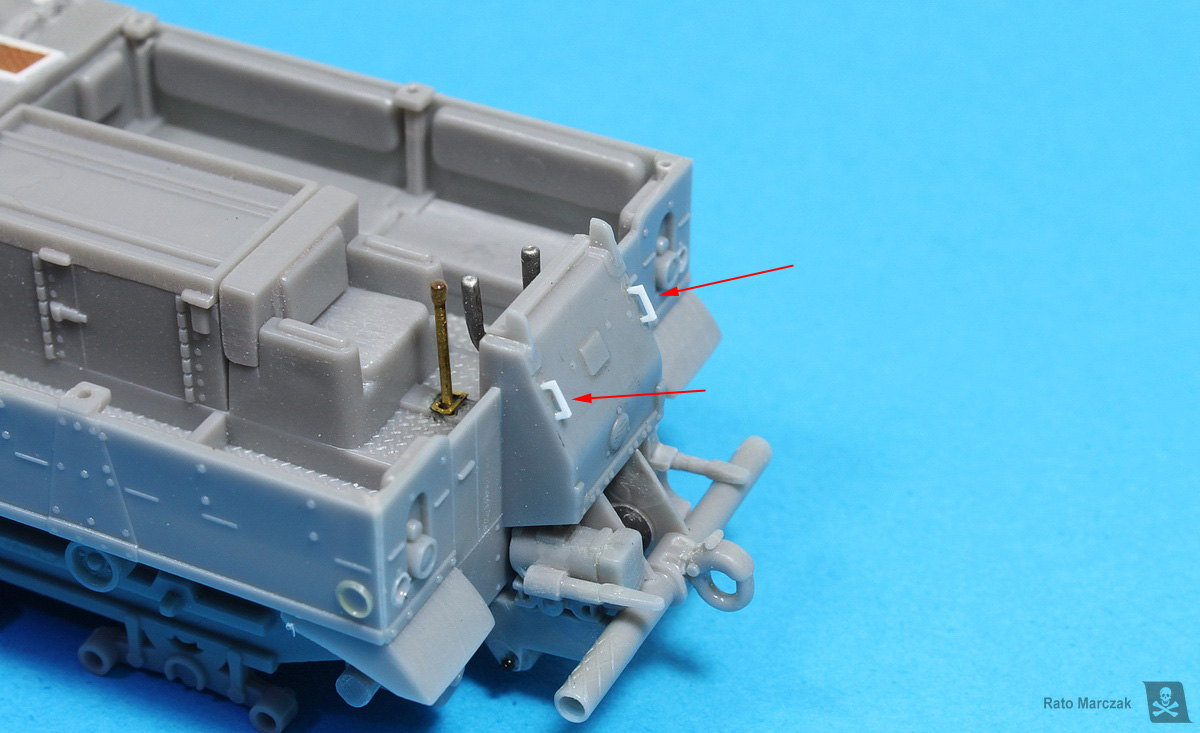
Like many military support vehicles, the M5 family had tie-down loops everywhere. Hasegawa molded them as raised details and they are too small to replace. But the grab handles are too visible to ignore. The usual method of changing them for wire replacements, which requires drilling holes etc., is too painful. I opted to replace them with plastic ones, so I could glue them with regular cement. The idea is to cut thin slices from a U-shaped Evergreen beam and used them as handles. It worked very well, but next time I will round off the beam corners first.
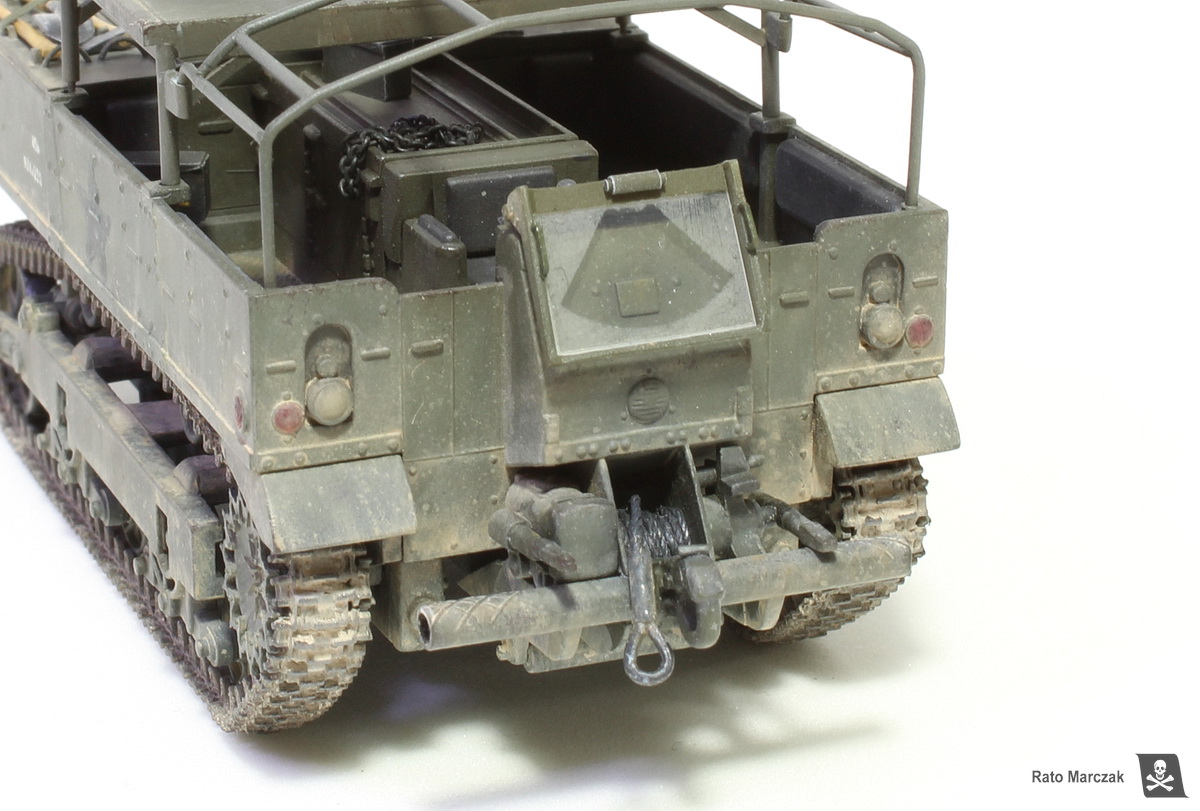
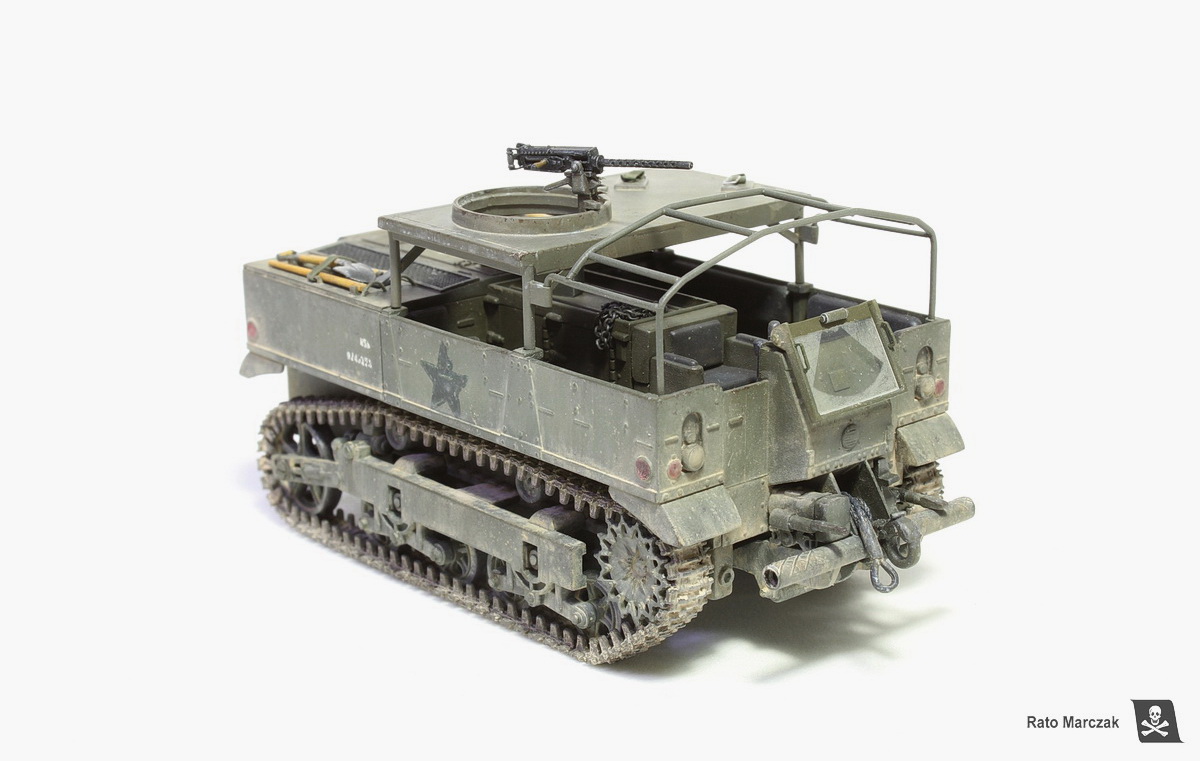
The suspension assembly was glued to the sides of the hull, as well as the huge tubular bumper in the front and the winch accessories. I removed the winch’s cable spool, though, as it had an unconvincing representation of the cable coiled in there. I cemented a piece of plastic tubing in place. Then I had an empty spool to accept a ‘real’ cable later on.
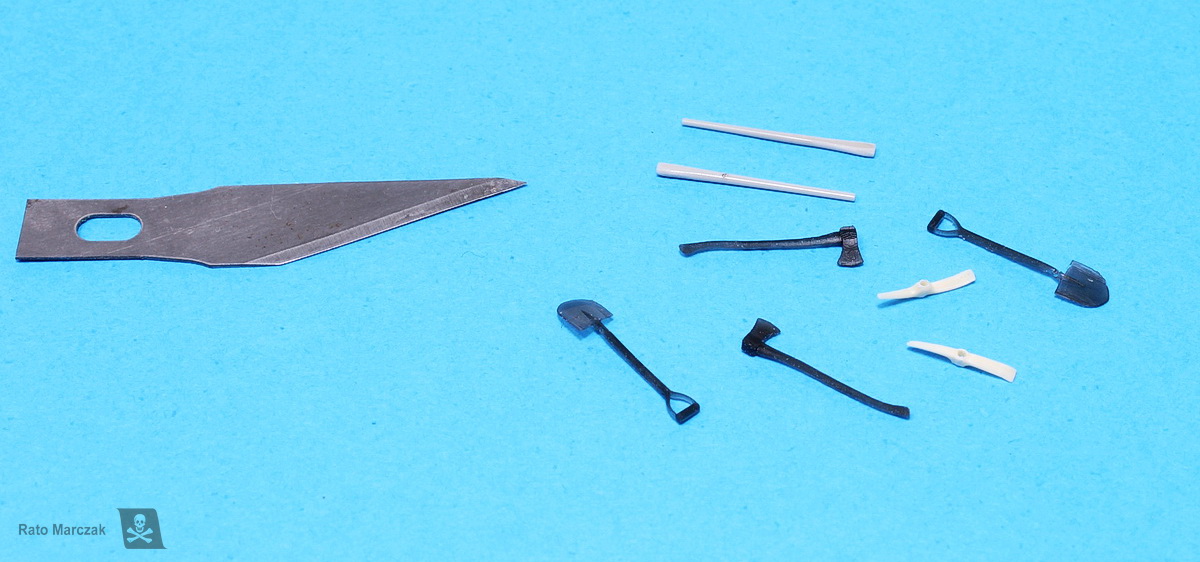
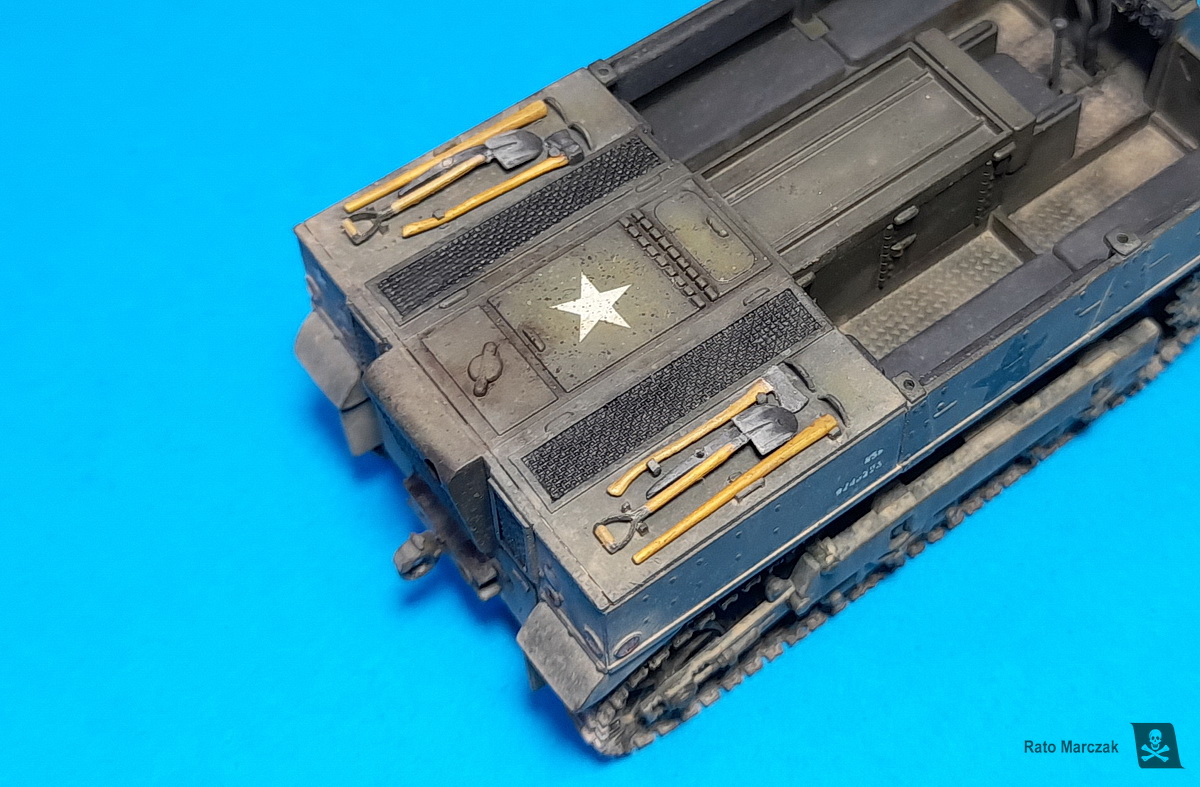
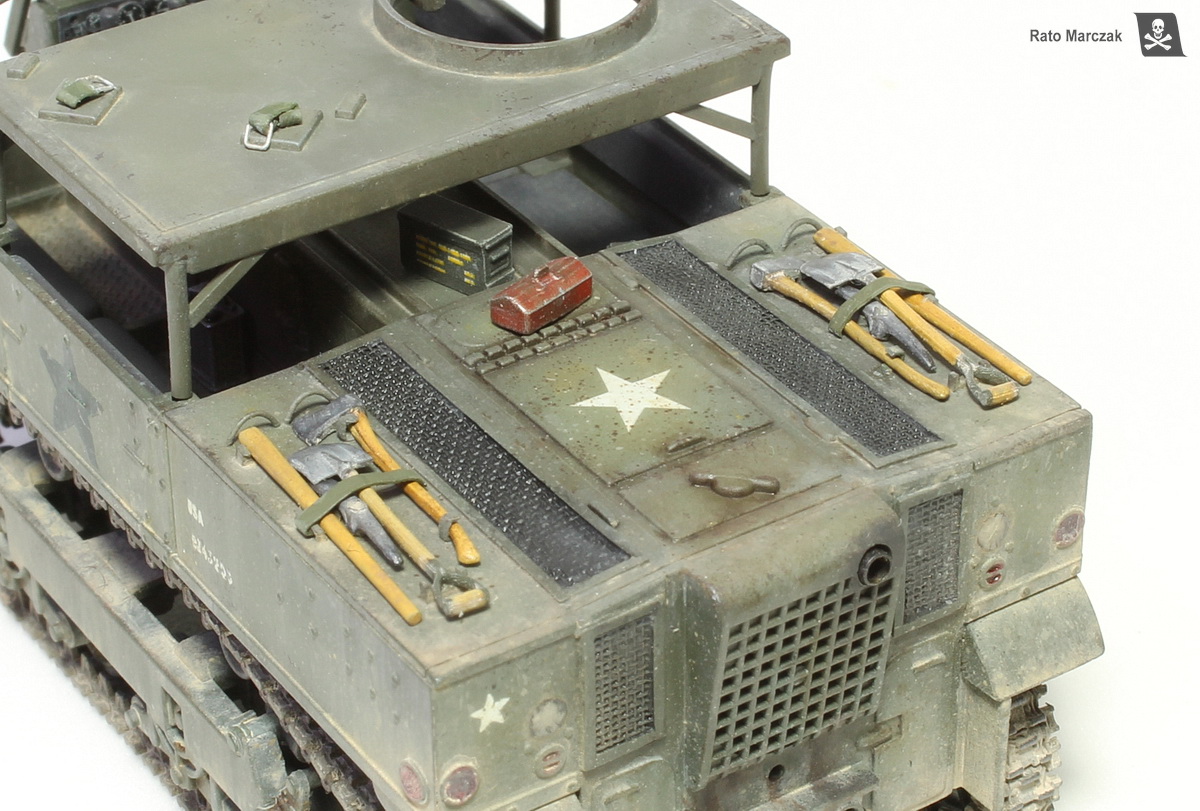
At this point, the model was almost ready for paint, but I still had to address some details. The pioneer tools, which come molded with the hull, were removed earlier to be replaced by individual items, which adds a lot of realism. The new tools were 3D printed or scrounged from my box of spares.
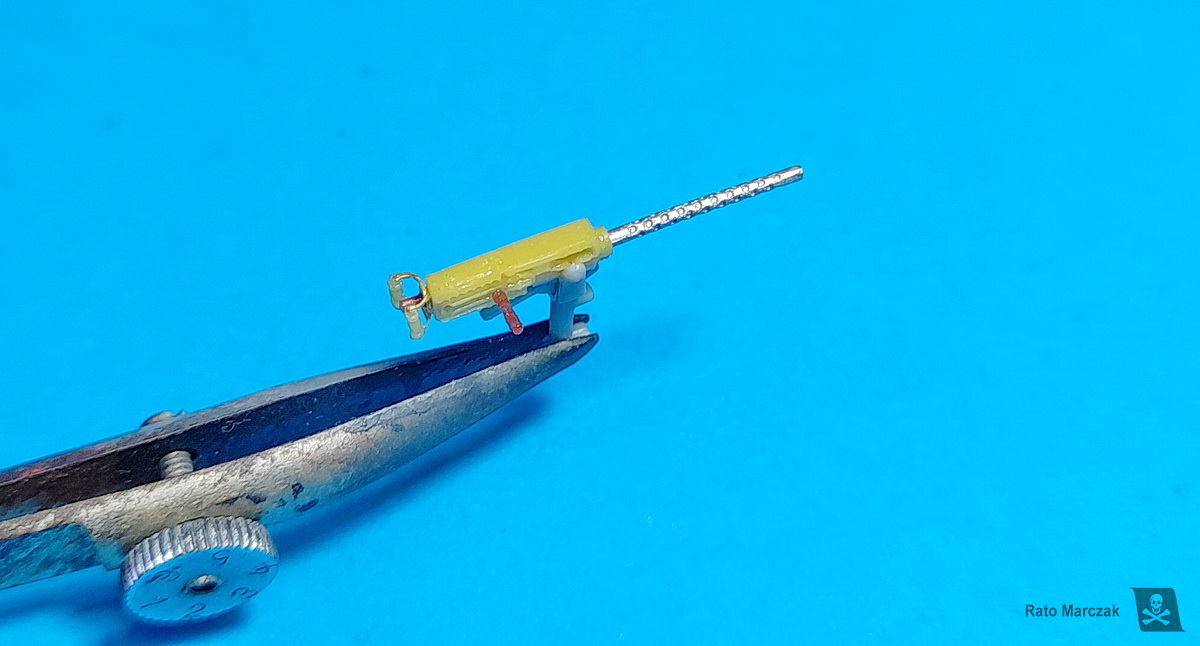
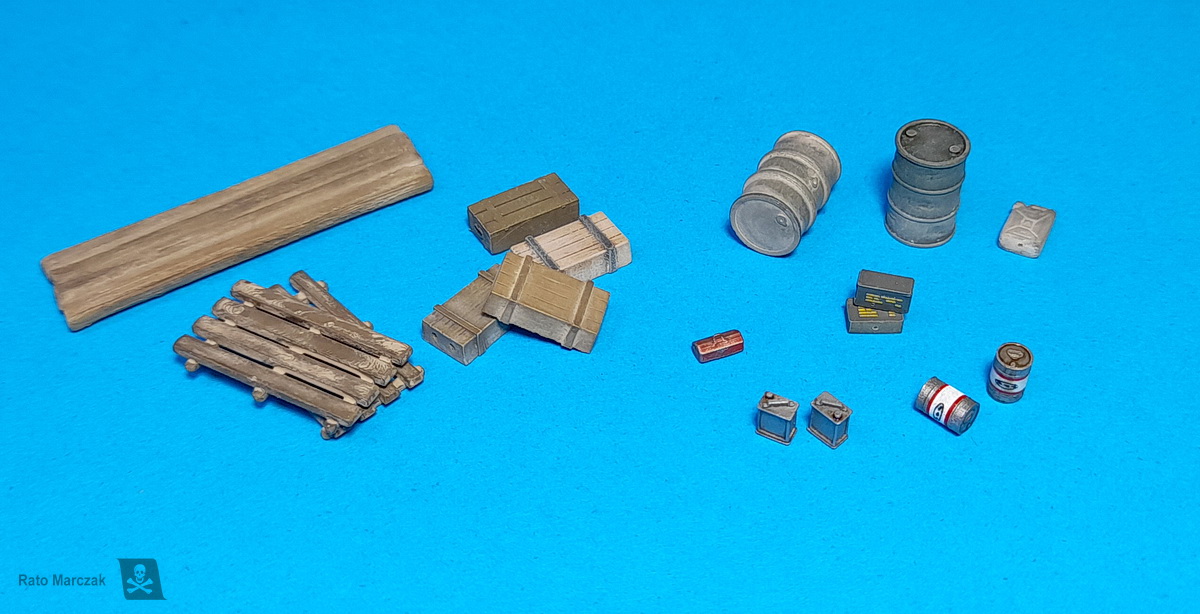
The .50 cal machine gun of the kit was also scrapped, and a new one was assembled from Aires, Reskit, and leftover parts. I also prepared several small items like ammo boxes, oil cans, wooden boxes, fuel drums etc. to be used in a future diorama, but some of them will find their place inside the little tractor later on. These items came from spares' box or were 3D printed.
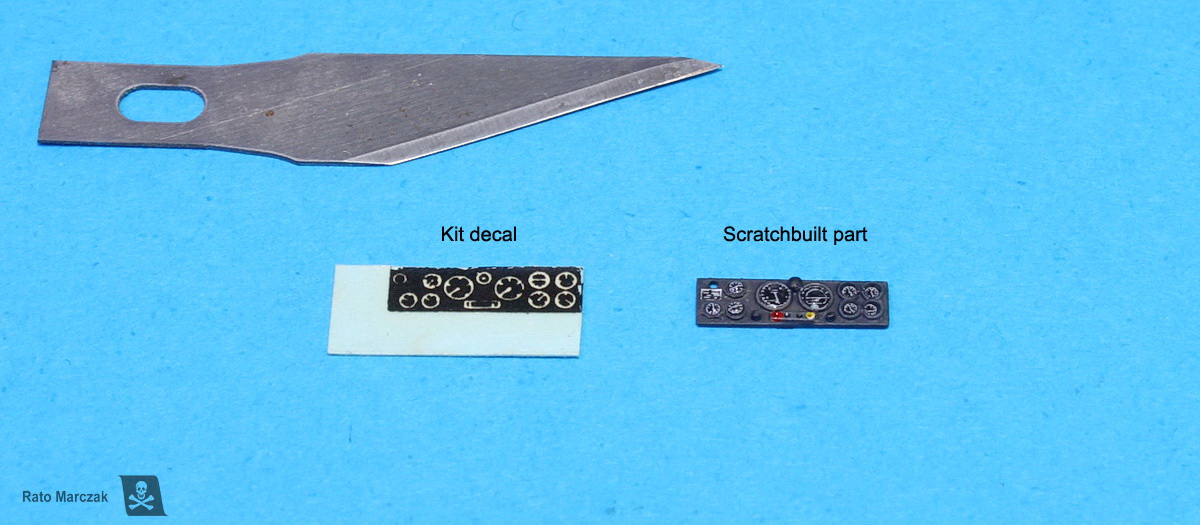
The last item to be done in the cabin was the driver’s control panel. The kit provides it in the form of a decal. It is not bad for the 1970s, but I preferred to scratch built a new one. After painting it I applied individual instrument decals and finished off with a drop of UV resin on top of each instrument to simulate the glasses. The final part is much more interesting.
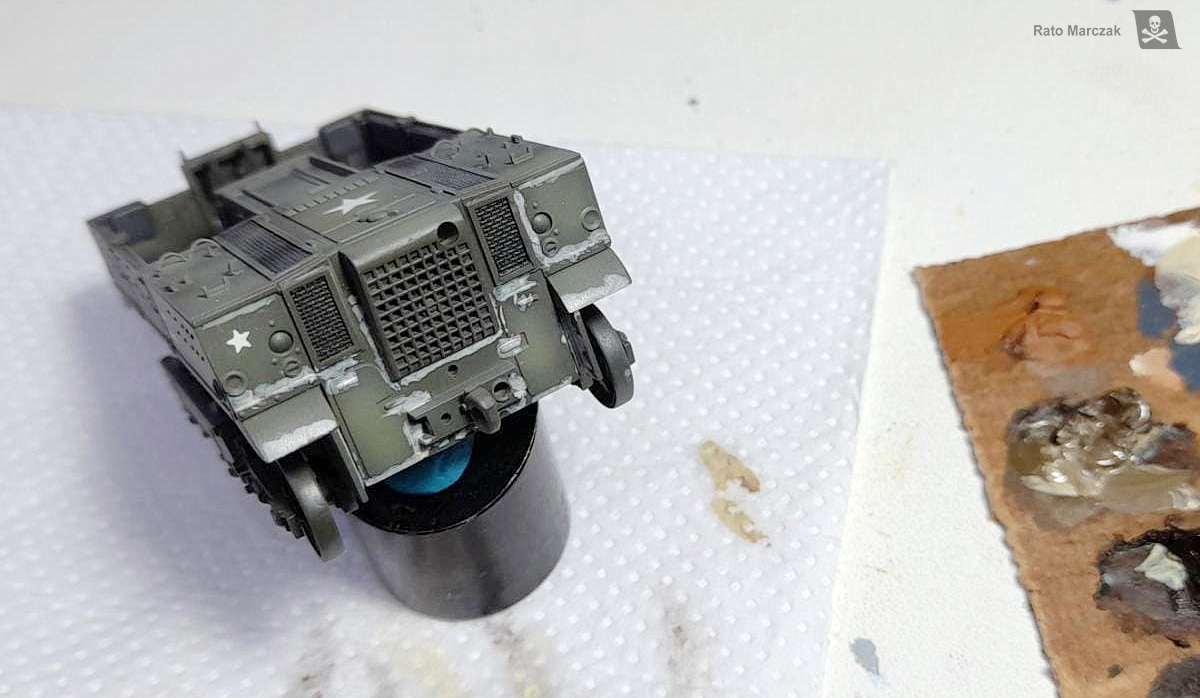
I mixed my own Olive Drab from Gunze acrylics because I wanted a more greenish color than the usual modeling paint brands offer. Ah… the tranquility of a single-color project. The decals came from my spares, and the registration number came from an old dry transfer sheet. Later I reproduced something I saw in period photos: the lateral stars were usually overpainted with a dark color to avoid the enemy using them as aiming points. I also simulated some fading by airbrushing a lighter tone of the base color on the areas of the hull that would be more subjected to the sunlight. These little things that you do before the weathering stage end up counting to the final aspect of the model.

Next came the most enjoyable step of the project (for me at least): weathering. Except for the engine compartment, I have not used paint washes on this model at all. All weathering was done exclusively using oil paints. The idea was to simulate the effects of sand, coral dust, and light earth that these vehicles found in the Pacific. In essence, the technique is based on applying the oils over a flat finish (so the model was airbrushed with a flat varnish before) and spreading/smudging/fading the pigment to accumulate it in corners and recesses and leave the pattern you see in the photos. At the same time progressively add streakings, crew marks, and all sorts of dirt accumulation. I usually start with a lighter color and then I come back with earth color tones in places. Evidently dark brown or black was used near lubricated parts, exhausts, etc.
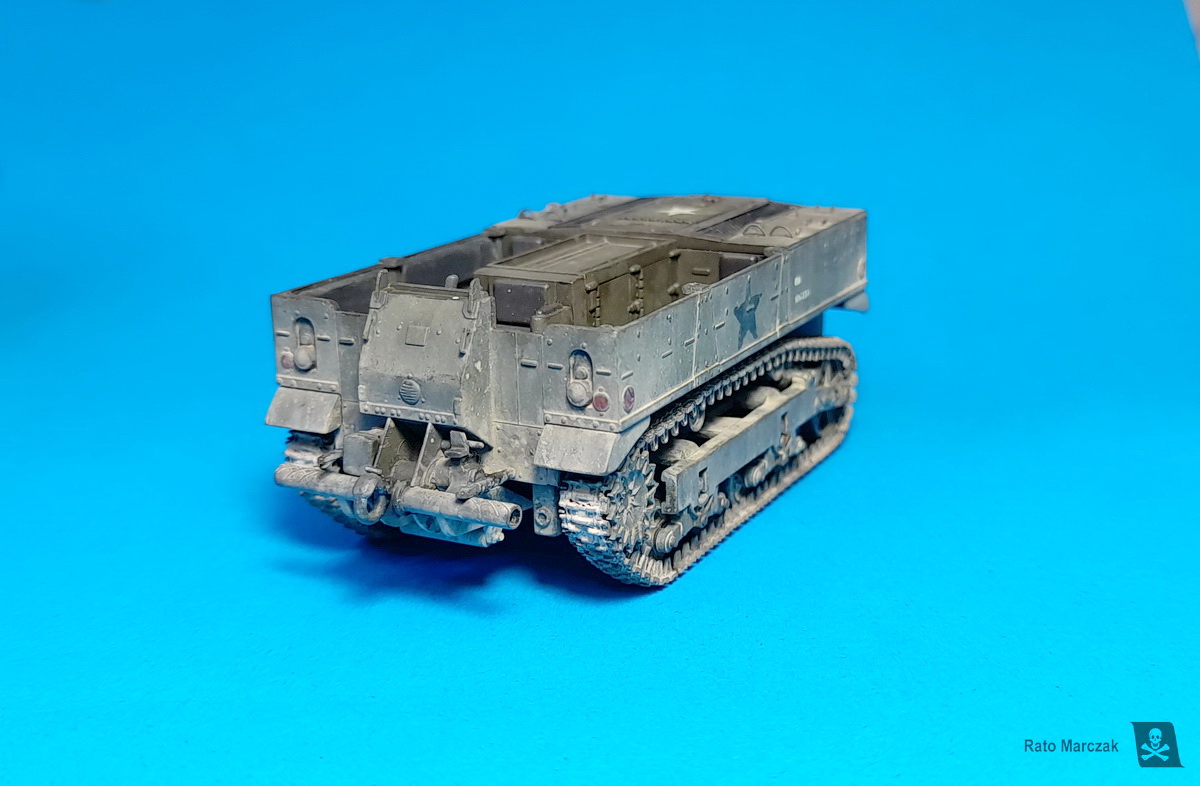
The tracks were actually assembled at this point, after the weathering treatment, as it would be difficult to paint and weather the suspension system with them in place. Glue marks were concealed with more weathering. All the preparation pre-forming and test fitting the tracks before paid-off here. They almost clicked in place. All I had to do was a small adjustment to the curvature of the tracks over the idler wheel. I used CA glue drops to secure the tracks in contact with the wheels:
The leather cover of the crew seats was painted with a very dark gray color and the whole area received the oil treatment as well, particularly the floor. The driver’s console was also glued in place. In the rear area, I dirtied up the engine panels and abused of paint speckling to simulate oil/fuel stains. I reasoned this area should look darker to contrast with the rest of the vehicle, which was substantially lightened with the weathering. The pioneer tools were painted, dirtied to look used, and glued in place. I would add their straps later.
All the
lights were covered with UV resin. Warning lights also received a touch of
Tamiya transparent red color. Now the vehicle was almost done and I could start to add the
final details. I made a glass for the windscreen and airbrushed the wiper marks
on it (on the outer side, of course), but I let the wiper out following several
photos. The winch cable was made from a synthetic sewing thread which was
painted dark grey. Graphite powder was then rubbed over it to look like a metal
cable. The eyelet came from my spares. I literally reeled the cable in the
winch, fixing it in place with PVA glue. And since I was at it, a piece of chain was similarly treated and
thrown over the transmission box.
On the back, I added the tools’ straps made of lead stripes. The roof was fitted in place, and an ammunition box and a small toolbox were also placed laying over the engine hatches. An exhaust pipe was inserted in a hole previously drilled atop the engine grille. Finally, the machine gun was painted and installed on its ring. The ammunition belt came from an old PE set, and I also made the straps that I think are to tie the machine gun tripod on the top of the roof.
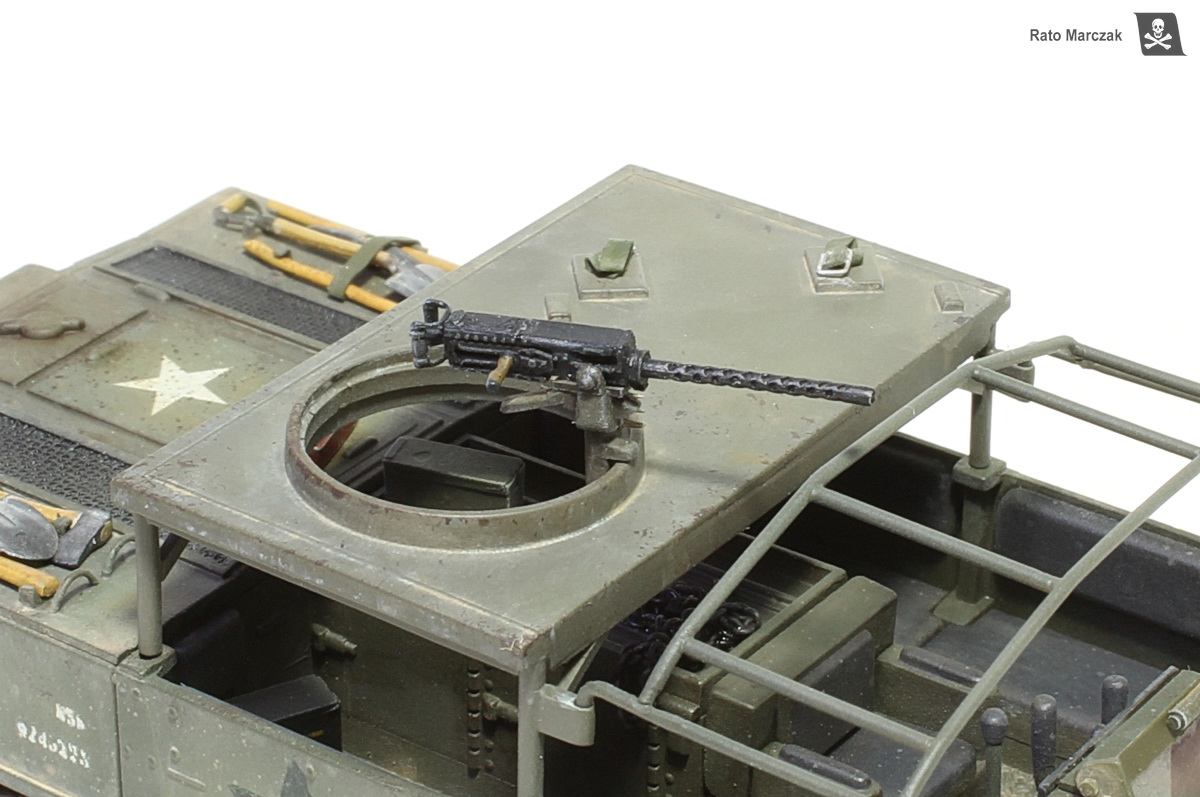
I have not glued the roof and cage structures, as I probably will add a driver one day.
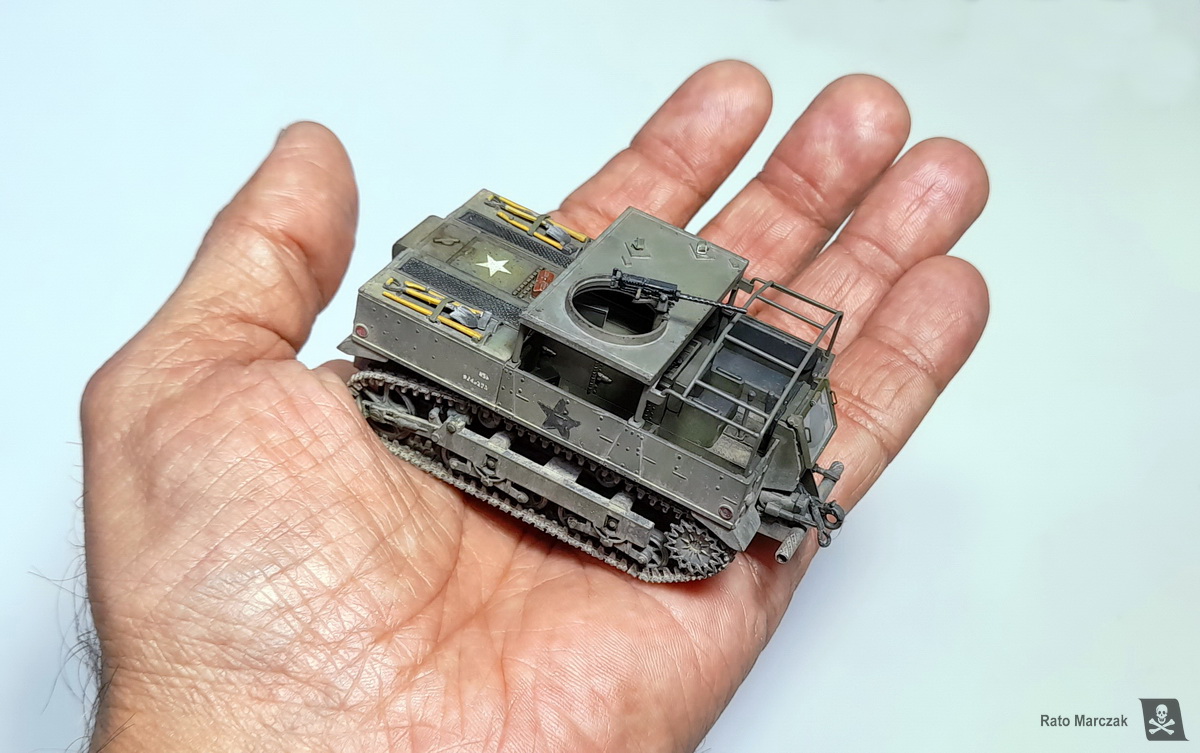
So, here are some photos of the finished model:

This model proved again to me that sometimes it is better to put some basic skills to good use on an old kit than wait for a modern release. After all, it may never quite happen.
I hope you liked this model. See you in the next one.
| Technical file | |
| Kit:
|
- Hasegawa MB023 |
| Additions:
|
- OKB 1/72 Sprockets for M3 / product# S72438 - OKB T36E6 Tracks for M3/5 family / product# S72174 |
| Basic
colors: |
- Primer: GSI Mr. Surfacer. - Olive Drab: mix with base of GSI H-52 and highlighting variations - Clear coat: Testors Model Master Acryl flat. |
| Notes: |
- Several scratchtuilt and 3D-printed items (see text). |
Rato Marczak © 2023
