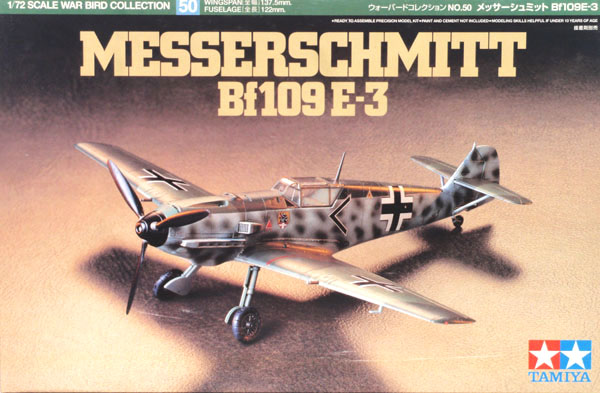
| Tamiya Messerschmitt Bf-109E-3 in 1/72 |
|
Started: A long time ago Finished: March 2013 |
And
again, here is another save from my shelf of doom. It's the delightful
Tamiya Emil in 1/72 scale. Some sources claim that its fuselage is a
bit too short, but that is diluted in the excellent molding, low
parts number and outstanding fit of this kit. I started this model so
long ago that I don't even remember everything, except that I wanted to
depict one of Priller's mount. After fighting with conflicting sources
and decals, it returned to my 'to do' pile in a very advanced stage,
already primed, and with the RLM 65 applied.
In my drive to reduce my shelf of doom as much as possible, I recently rediscovered this model, and I was stunned to find it in such advanced stage. It wouldn't take much to finish it off, but before I needed to chose a version.
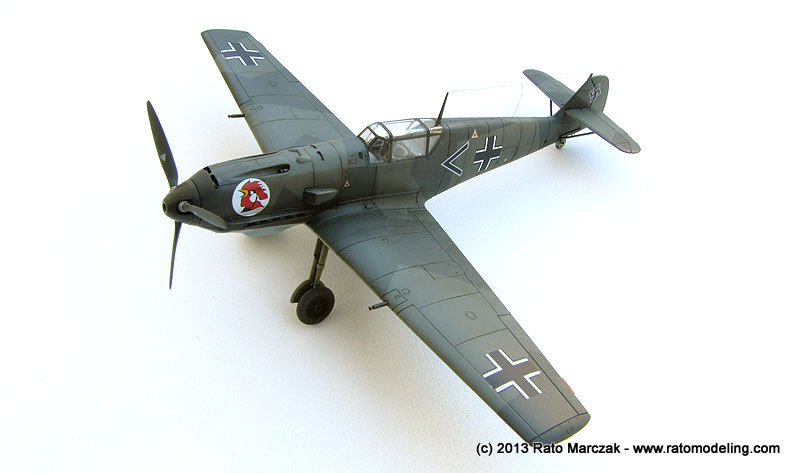
Upon inspecting the model, I noted that I didn't install the pilot armour behind the pilot, and that was the excuse I needed to make a relatively factory fresh E-3 early in the war. I always liked the 70/71/65 scheme with small balkenkreuz. Moreover, it could be a good chance to paint the model using exclusively acrylic paints, something I've never done until then.
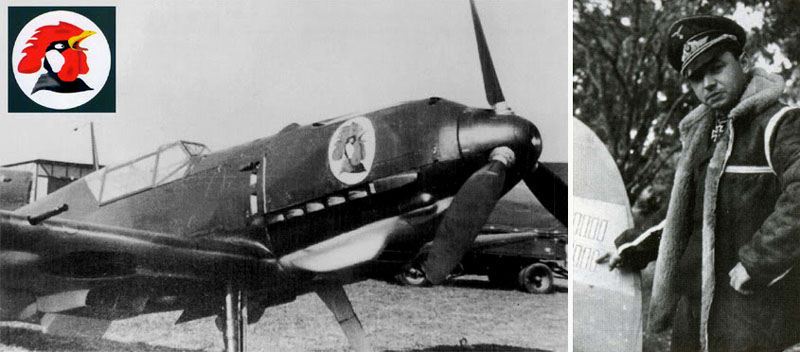
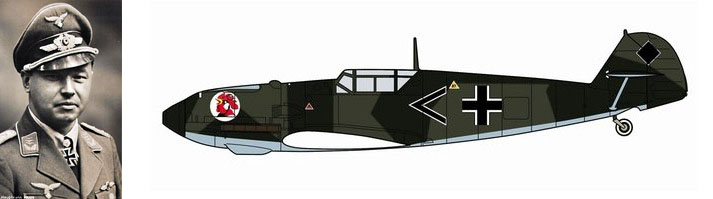
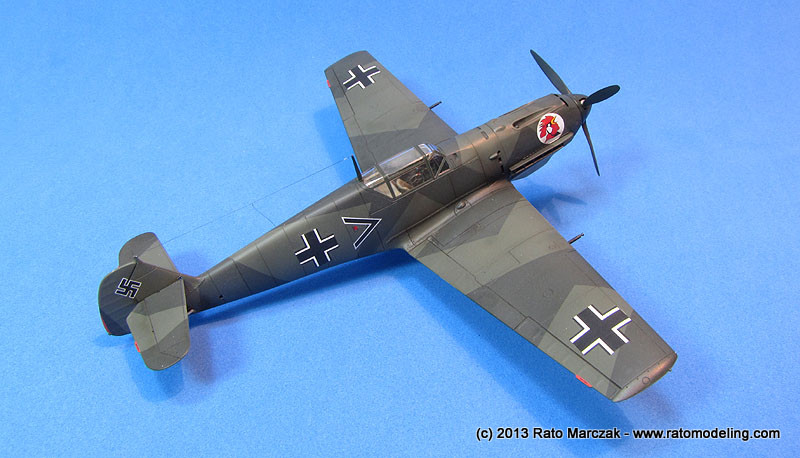
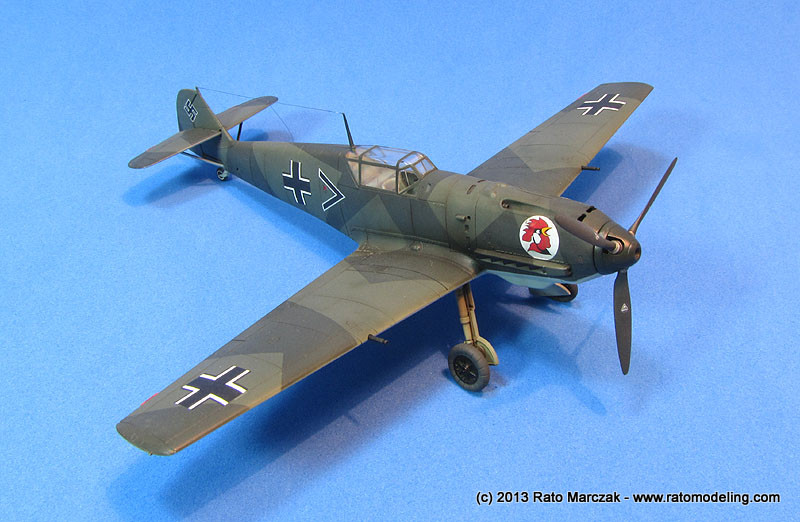
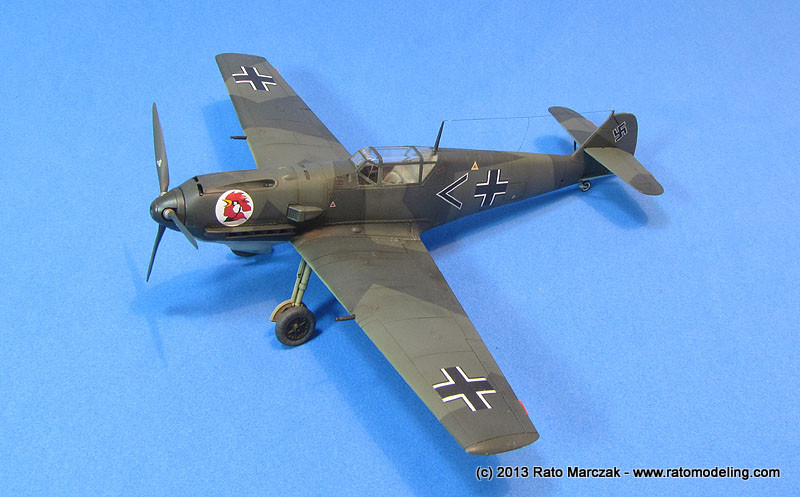
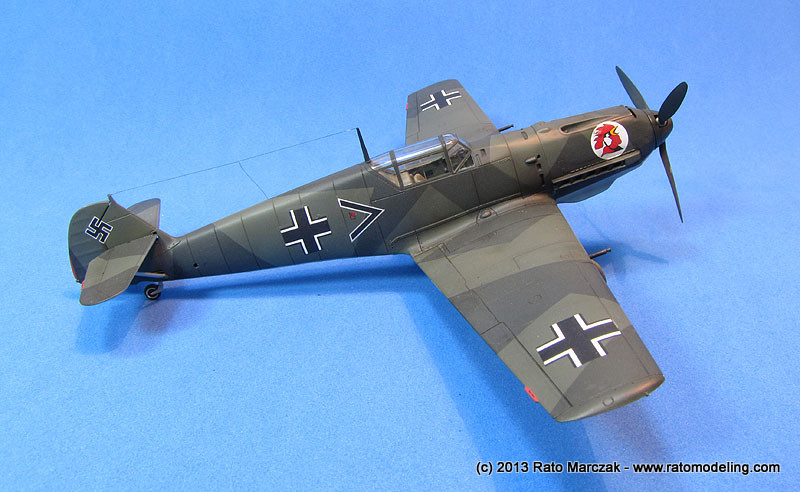
My choice was the mount of Major Hans 'Assi' Hahn, what I believe was his first Emil while serving with 1/JG3 'Udet' at Merseburg, September 1939. There are a number of references showing this bird with the characteristic cock emblem painted on the cowling:
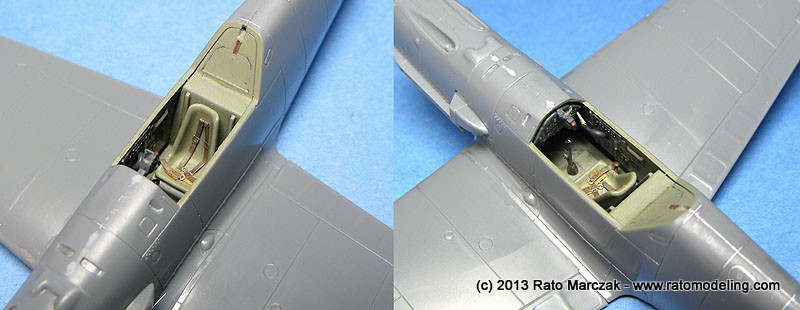
The cockpit was assembled and finished out of the box, except for the oxigen hose and a couple of levers. You will note that I initially used the decal seat belts:
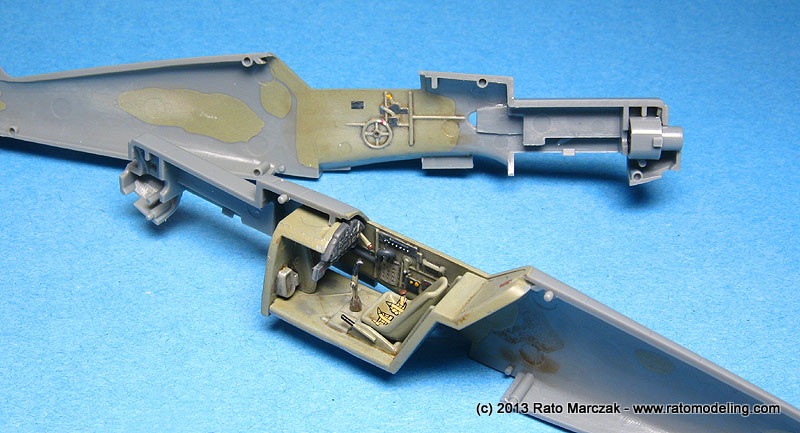
On a second thought, however, I removed the decals and installed a generic photoetched items from Imported Specialties, from Ohio. That simple move helped me to sleep much better afterwards. I also installed a Quickboos Revi gunsight:

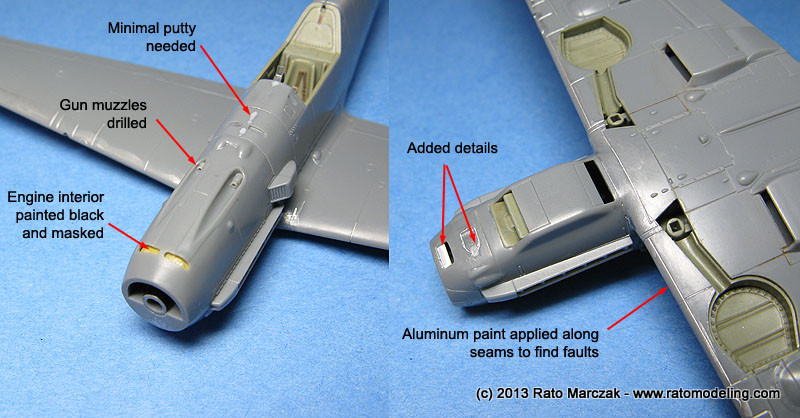
The fit was nothing less then outstanding. I just needd a tad of Mr.Surfacer in a couple of spots. I deliberately made the aft fuselage matting lines visible to simulate the characteristic panel line there. The engine block representation inside the fuselage was painted black and the cooling openings masked from inside. Later on, when finishing the model, I would remove these masks.
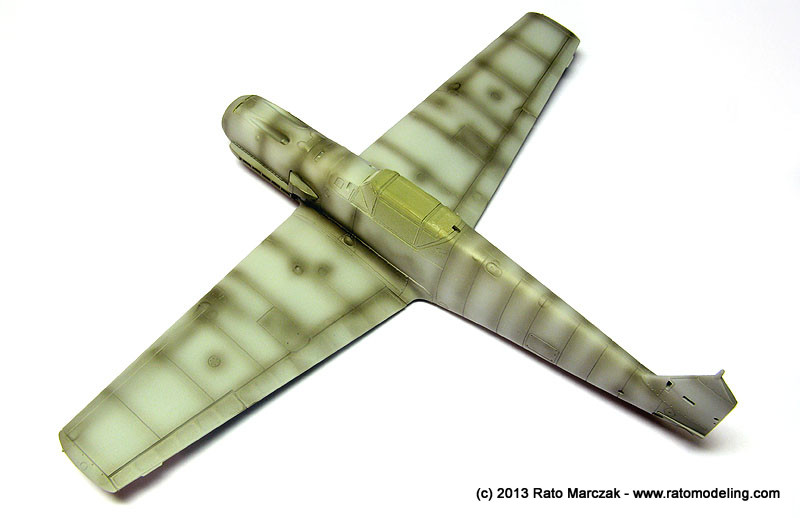
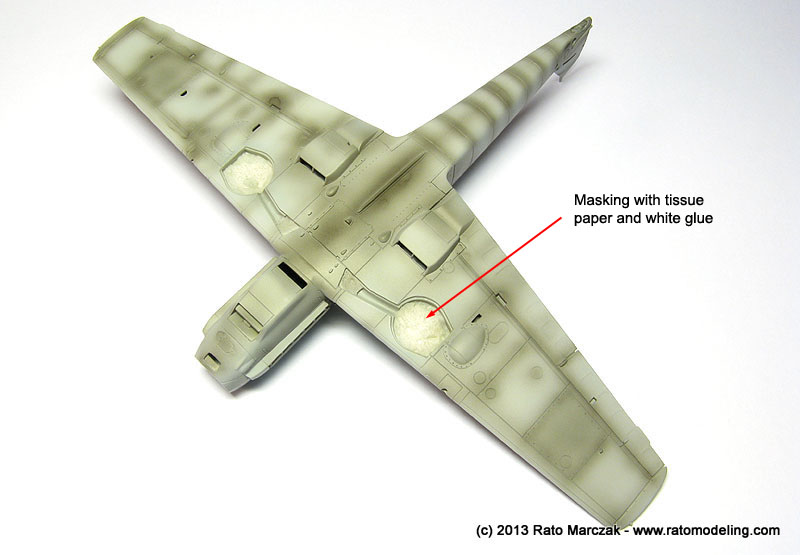
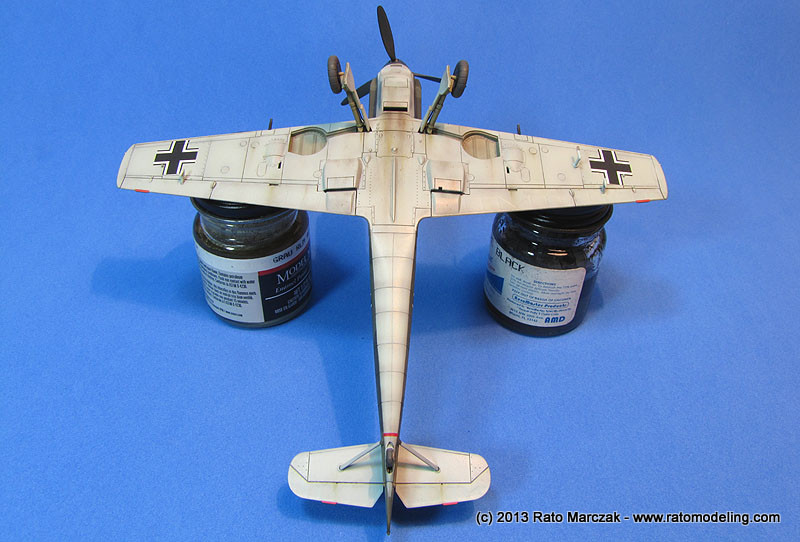
If I recall correctly, Testors Model Master RLM 65 was used to prime the whole model, and a darker, mysterious color was used for pre-shading. The wheel wells were maked using tissue paper and white glue. I was advised to use this method because it's easy and the mask just pops out when the time to remove it comes. Not so (more on that later).
This is how the model was when I put it aside. When I resumed the project, I restricted myself to acrylic paints, just for a change. I didn't take photos of it during the painting. The only steps which gave me some additional work were adding the brake lines to the landing gear struts and painting the tail wheel. While waiting for the main camouflage to dry, I tackled these smaller items:
As for the main colors, as I said, the RLM 65 came from the Testors Model Masters range. The RLM 70 and 71 is a different story. Gunze produtcs are funny sometimes. Their RLM 70 are about the same color in both lines, acrylic and lacquer, although I prefer the acrylic hue. The RLM 71 is not so, with the lacquer being more correct in my opinion. Since I wanted to use acrylics exclusively, I mixed RLM 71 (H-64) and IJA Green (H-60) acrylics to produce a greener color (I thought the original was too grayish).
Gunze's clear gloss acrylic (H-30) was applied over the model in preparation for the decals. The decals are a mixed bag, mostly coming from Techmod sheet 72049. I had some trouble with Techmod decals, as they would stick to the model surface and nothing on Earth would move them (I lost a couple of markings because of that). Upon studying the issue and making a few tests, it was clear that the problem was not the Techmod decals, it was my technique of applying decals. A long time ago, I learned from master modeler Rodney Williams to slide the decals over a pool of 50/50% of Micro-Set and Micro-Sol. It happens that Micro-Sol softens Gunze's clear gloss (to the point of leaving white stains - don't panic, they disappear after drying again). As I found out, Techmod decals stick to the softened gloss coat like if it was glue - well, I guess any good decal would. Therefore I applied the remaining decals over pure water and it performed much better, allowing me to position them correctly.
Still, Techmod decals are note the easiest ones, be aware. On the other hand, the stencils offered in the sheet are very comprehensive. My Emil looked like a Phantom if you start counting how many decals you have to put on it. Since most of them are very small, I left a few out.
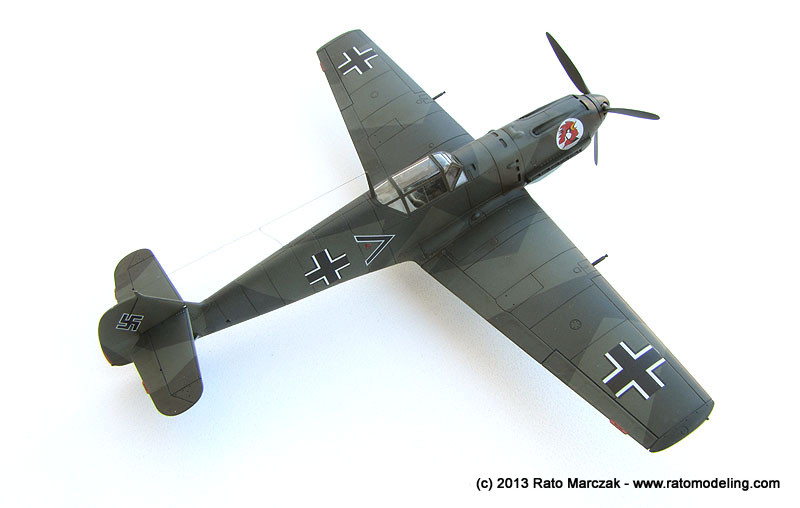
If you look carefully at wartime photos, you will note that the nose gun slots were factory painted in RLM 02. I didn't do it on my model because the cock emblem the Techmod sheet is slightly oversized. Had I painted the slots accordingly, the RLM 02 would cover the top of the emblem, evidencing the problem. Since many Emils had these slots overpainted in the field, I chose not to paint them.
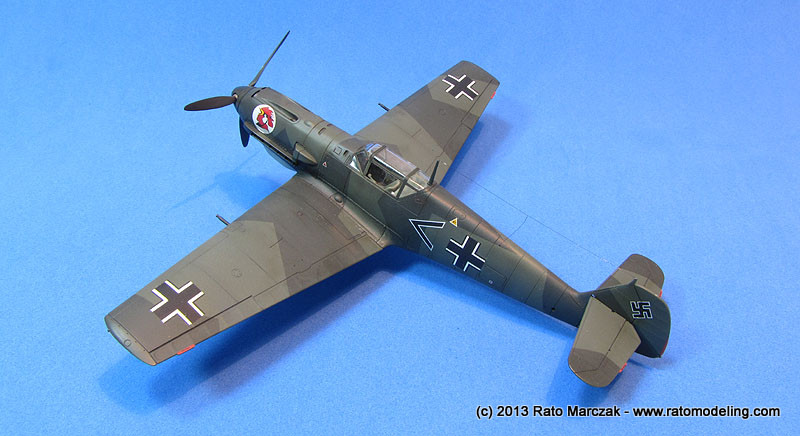
Another gloss coat sealed the decals and I proceeded with artists oil washes to enhance the panel lines. I made the effect heavier on the undersides, and also used dot filtering and airwash there.
The model was coated with a 50/50% mix of Gunze's clear gloss (H-30) and flat (H-20) to produce a semi-gloss finish. I could make it more gloss, but I don't think it would look realistic in 1/72 scale. The final weathering consisted of minimal paint chipping on the wing roots and exhaust stains airbrushed using Gunze's Soot H-343 (a wonderful color for this kind of effect, by the way, and unfortunately discontinued), again from their acrylic range.
I had to refrain from overdoing the weathering, since this was a relatively new machine. I'm not 100% sure, but I think the 1/JG3 received their E-3s on May, 1939. Therefore, by October these birds were not really new regarding their age, but they would see actual combat only months later on. In retrospect, the weathering on the undersides may have resulted a tad too heavy on my model...
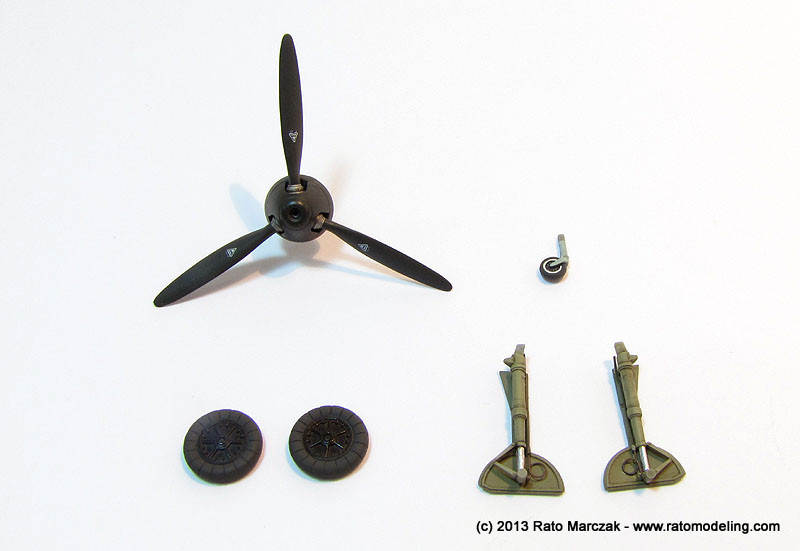
The propeller, landing gear, mass balances, and gun muzzles were then glued in place. An aerial antenae made of stretched sprue was installed and I considered this one done.

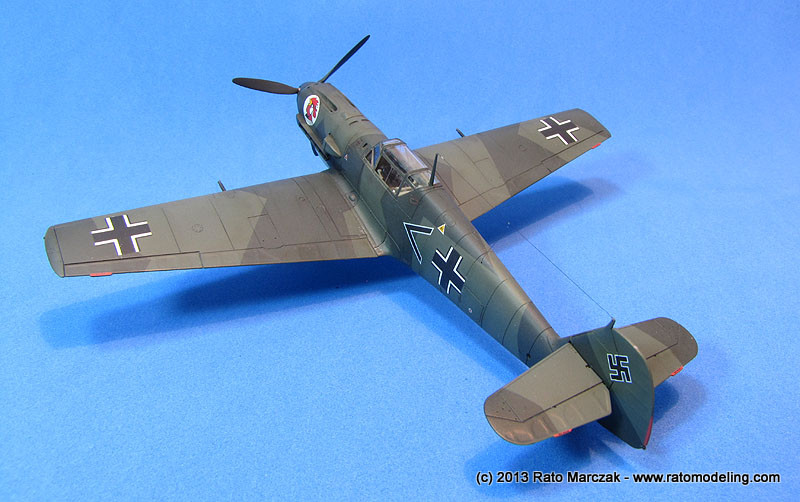
I really enjoyed this project because of two main reasons: 1) I recoverd yet another model from my shelf of doom, and 2) I've been wanting a green/green early war Emil in my collection for a long time. I guess I'm a bit tired of those rainbow-type camouflages which requires 17 colors to paint the model...
I ran out of the wood bases I use to display my models. I'll be adding more photos, once I finish its display base.
And no, I'm not switching to acrylics. At least not for now...
In my drive to reduce my shelf of doom as much as possible, I recently rediscovered this model, and I was stunned to find it in such advanced stage. It wouldn't take much to finish it off, but before I needed to chose a version.
Upon inspecting the model, I noted that I didn't install the pilot armour behind the pilot, and that was the excuse I needed to make a relatively factory fresh E-3 early in the war. I always liked the 70/71/65 scheme with small balkenkreuz. Moreover, it could be a good chance to paint the model using exclusively acrylic paints, something I've never done until then.
My choice was the mount of Major Hans 'Assi' Hahn, what I believe was his first Emil while serving with 1/JG3 'Udet' at Merseburg, September 1939. There are a number of references showing this bird with the characteristic cock emblem painted on the cowling:
The cockpit was assembled and finished out of the box, except for the oxigen hose and a couple of levers. You will note that I initially used the decal seat belts:
On a second thought, however, I removed the decals and installed a generic photoetched items from Imported Specialties, from Ohio. That simple move helped me to sleep much better afterwards. I also installed a Quickboos Revi gunsight:
The fit was nothing less then outstanding. I just needd a tad of Mr.Surfacer in a couple of spots. I deliberately made the aft fuselage matting lines visible to simulate the characteristic panel line there. The engine block representation inside the fuselage was painted black and the cooling openings masked from inside. Later on, when finishing the model, I would remove these masks.
If I recall correctly, Testors Model Master RLM 65 was used to prime the whole model, and a darker, mysterious color was used for pre-shading. The wheel wells were maked using tissue paper and white glue. I was advised to use this method because it's easy and the mask just pops out when the time to remove it comes. Not so (more on that later).
This is how the model was when I put it aside. When I resumed the project, I restricted myself to acrylic paints, just for a change. I didn't take photos of it during the painting. The only steps which gave me some additional work were adding the brake lines to the landing gear struts and painting the tail wheel. While waiting for the main camouflage to dry, I tackled these smaller items:
As for the main colors, as I said, the RLM 65 came from the Testors Model Masters range. The RLM 70 and 71 is a different story. Gunze produtcs are funny sometimes. Their RLM 70 are about the same color in both lines, acrylic and lacquer, although I prefer the acrylic hue. The RLM 71 is not so, with the lacquer being more correct in my opinion. Since I wanted to use acrylics exclusively, I mixed RLM 71 (H-64) and IJA Green (H-60) acrylics to produce a greener color (I thought the original was too grayish).
Gunze's clear gloss acrylic (H-30) was applied over the model in preparation for the decals. The decals are a mixed bag, mostly coming from Techmod sheet 72049. I had some trouble with Techmod decals, as they would stick to the model surface and nothing on Earth would move them (I lost a couple of markings because of that). Upon studying the issue and making a few tests, it was clear that the problem was not the Techmod decals, it was my technique of applying decals. A long time ago, I learned from master modeler Rodney Williams to slide the decals over a pool of 50/50% of Micro-Set and Micro-Sol. It happens that Micro-Sol softens Gunze's clear gloss (to the point of leaving white stains - don't panic, they disappear after drying again). As I found out, Techmod decals stick to the softened gloss coat like if it was glue - well, I guess any good decal would. Therefore I applied the remaining decals over pure water and it performed much better, allowing me to position them correctly.
Still, Techmod decals are note the easiest ones, be aware. On the other hand, the stencils offered in the sheet are very comprehensive. My Emil looked like a Phantom if you start counting how many decals you have to put on it. Since most of them are very small, I left a few out.
If you look carefully at wartime photos, you will note that the nose gun slots were factory painted in RLM 02. I didn't do it on my model because the cock emblem the Techmod sheet is slightly oversized. Had I painted the slots accordingly, the RLM 02 would cover the top of the emblem, evidencing the problem. Since many Emils had these slots overpainted in the field, I chose not to paint them.
Another gloss coat sealed the decals and I proceeded with artists oil washes to enhance the panel lines. I made the effect heavier on the undersides, and also used dot filtering and airwash there.
The model was coated with a 50/50% mix of Gunze's clear gloss (H-30) and flat (H-20) to produce a semi-gloss finish. I could make it more gloss, but I don't think it would look realistic in 1/72 scale. The final weathering consisted of minimal paint chipping on the wing roots and exhaust stains airbrushed using Gunze's Soot H-343 (a wonderful color for this kind of effect, by the way, and unfortunately discontinued), again from their acrylic range.
I had to refrain from overdoing the weathering, since this was a relatively new machine. I'm not 100% sure, but I think the 1/JG3 received their E-3s on May, 1939. Therefore, by October these birds were not really new regarding their age, but they would see actual combat only months later on. In retrospect, the weathering on the undersides may have resulted a tad too heavy on my model...
The propeller, landing gear, mass balances, and gun muzzles were then glued in place. An aerial antenae made of stretched sprue was installed and I considered this one done.
I really enjoyed this project because of two main reasons: 1) I recoverd yet another model from my shelf of doom, and 2) I've been wanting a green/green early war Emil in my collection for a long time. I guess I'm a bit tired of those rainbow-type camouflages which requires 17 colors to paint the model...
I ran out of the wood bases I use to display my models. I'll be adding more photos, once I finish its display base.
And no, I'm not switching to acrylics. At least not for now...
| Technical file | |
| Kit:
|
- Tamiya #60750 |
| Additions:
|
- Quickboost Revi gunsight - Imported Specialties PE seat belts - Techmod decals 72049 - Messerschmitt Bf-109E-3 |
| Basic
colors: |
- RLM 02 (interior): Testors Model Master RLM 02 (#2071) - RLM 65: Testors Model Master RLM 65 (#2078) - RLM 70: Gunze RLM 65 Black Green (H-65) - RLM 71: 50/50% mix of Gunze RLM 71 Dark Green (H-65) and IJA Green (H-60) - Gloss coat: Gunze clear gloss (H-30) - Semi-gloss coat: 50/50% mix of Gunze clear gloss (H-30) and flat (H-20) |
| Notes: |
|
Rato Marczak © 2013
