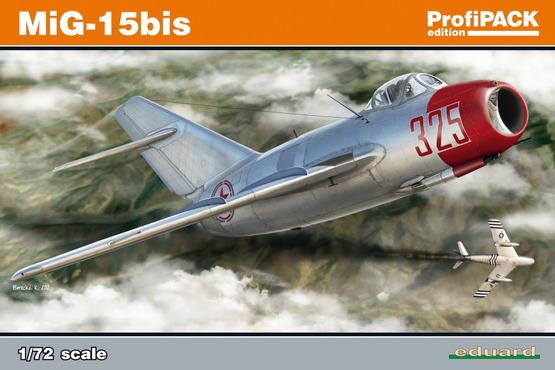
| Eduard MiG-15 in 1/72 |
|
Started: April/2014 Finished: Jun/2014 |
I
always wanted a MiG-15 in my 1/72 scale classic jets
collection. When my friend Cristian Zarichta gave me this kit as a
birthday gift a couple of months ago (thanks mate!), it seemed so
good on the sprues that I decided to start it immediately. And so I
did. This is my sample, kit #7056:
Eduard has packed everything you need for a quick build in this box. Several optional parts, a PE fret and even masks to make painting easier.
Work started with the cockpit. One of the very few things that I didn't like in this kit was the color of the PE parts. Eduard has painted them with the typical interior blue-green seen on Soviet aircraft after 1966-67. The MiG-15s were all painted gray in the cockpit and wheel bays - although the exact shade varied a lot. Even though mine would be a Czech bird, they were acquired from the Russians in the 50s, so grey was on order. I used a mix of Tamiya acrylics for all cockpit parts, but repainting the PE parts was obviously out of question. All I did was to airbrush an almost transparent coat of medium grey over them and glue the PE parts without further changes. Blame Eduard, not me. Surprinsingly, the color shift was not big and if you are not a Soviet aircraft expert, probably will not note it.
I also added cables on the sidewalls coming from and to switch boxes, and detailed the control column with the gun trigger
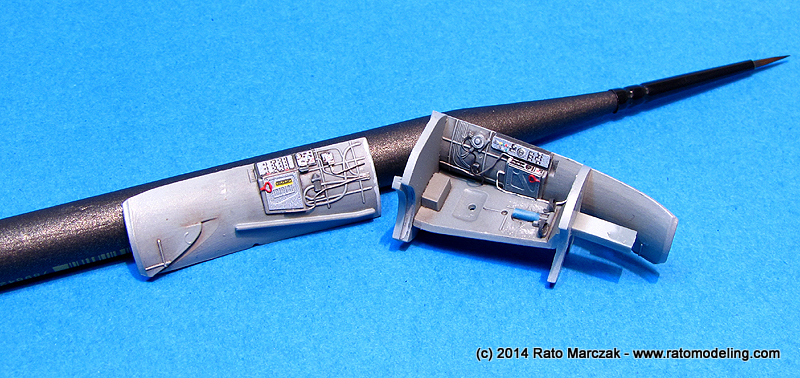
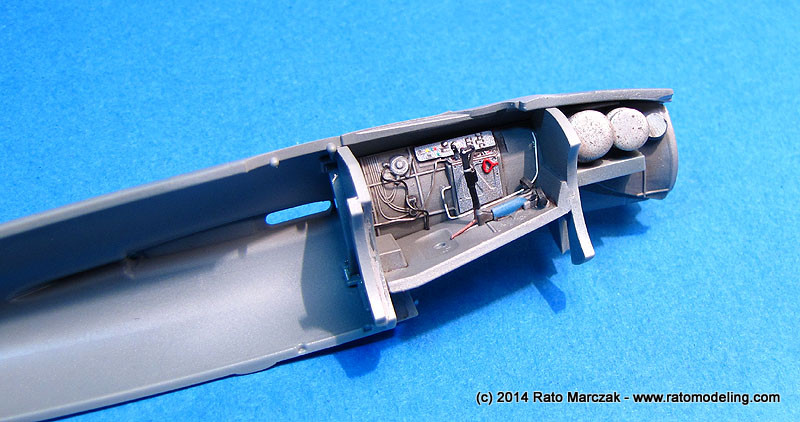
I left the pilot's seat out. It can be inserted through the cockpit opening after finishing the assembly. I added white metal bits to the front cockpit area to avoid tail-sitting. Eduard's instructions don't tell you how much weight must go there, and I'm not telling neither. Just added enough to balance the model with wings and fuselage dry fitted with tape.
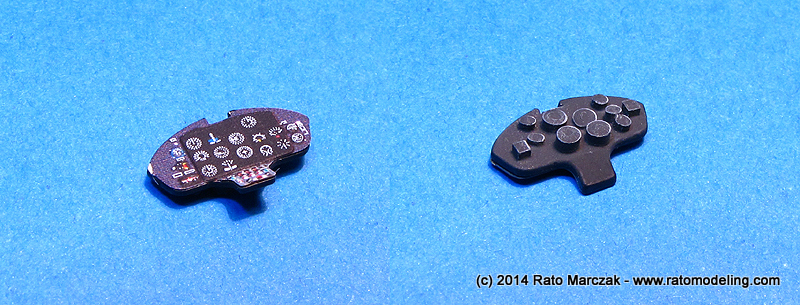
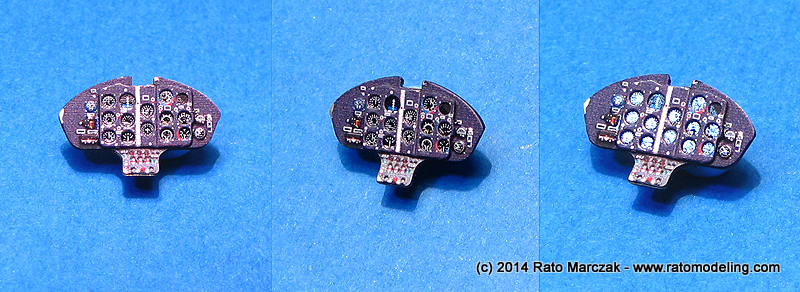
For some strange reason, I added the back of the instrument faces on part C8. Forget it, as nothing of it can be seen once glued in place. After sandwiching the control panel PE parts, I used a needle to pour some Future floor wax inside each dial opening. This sealed the assembly, and worked as glasses for the instruments, which is discernible when seen from certain angles:
Eduard opted for a strange parts breakdown in the cockpit area. The nose wheel bay is part of the assembly (see steps D and F of the instructions booklet), but it is split through a diagonal line. If not properly aligned, or the dividing wall in the middle of the air intake will be off center, or you will have a hard time closing the fuselage around the nose wheel - or both. In order to alleviate the problem, I installed everything as per instructions on one side of the fuselage, except the oposite sidewall. I left it unglued while I closed the fuselage. This allowed some room for tweaking the front fuselage joint while the glue was setting. I also deviated from the instructions and glued part C1 at this stage to complete the nose assembly and make the area stronger. Worked ok, without gaps or loose parts, but I used almost all rubber bands on my bench to ensure a good joint all over.
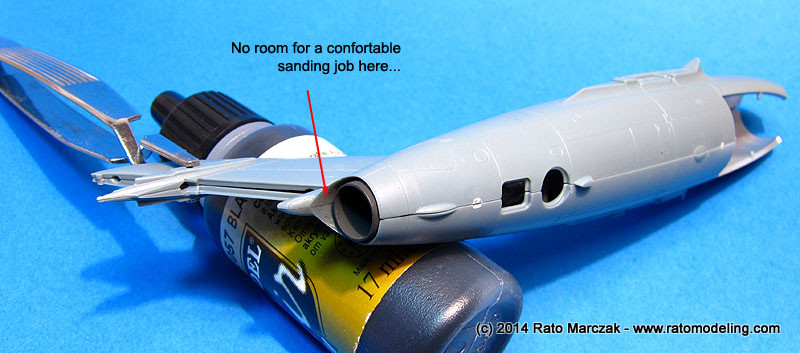
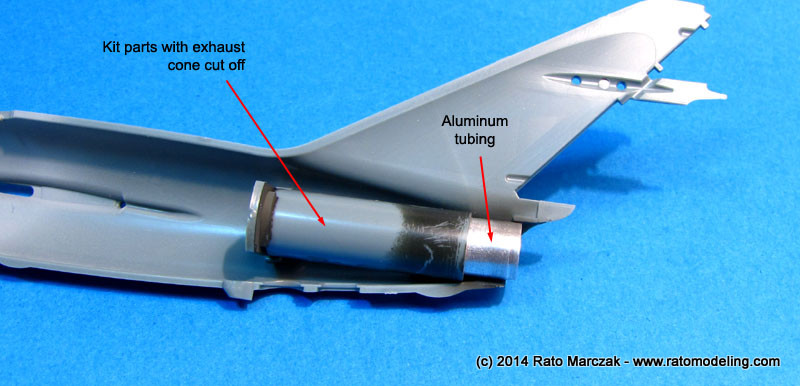
Another small operational problem was found with the jet exhaust (parts D8, step E). If assembled in between the fuselage halves, I wouldn't leave room for my fat fingers to do a decent sanding job on the seam of the tail inner lip. You know, I'm getting older and lazy, and I need space to use a piece of sandpaper...
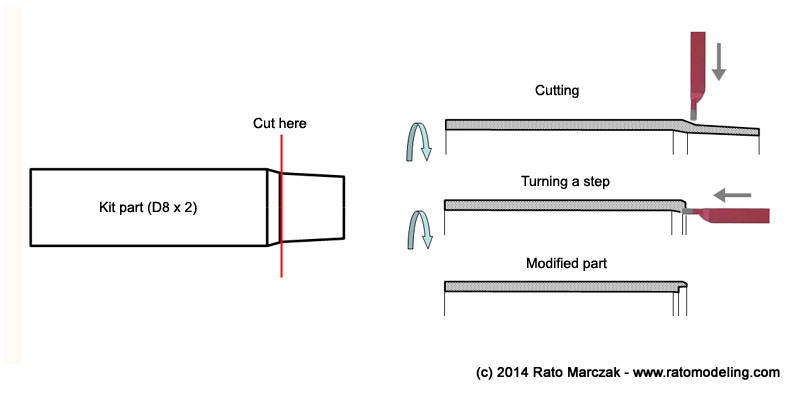
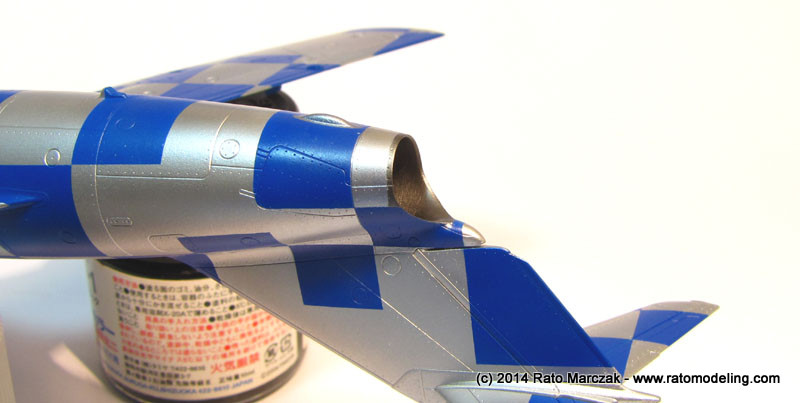
In a matter of minutes, I cut off the tapered end of the exhaust, mounted the remaining part on my lathe and milled an internal step to accept a piece of Aluminum tubing of the right diameter/thickness. This is the idea:
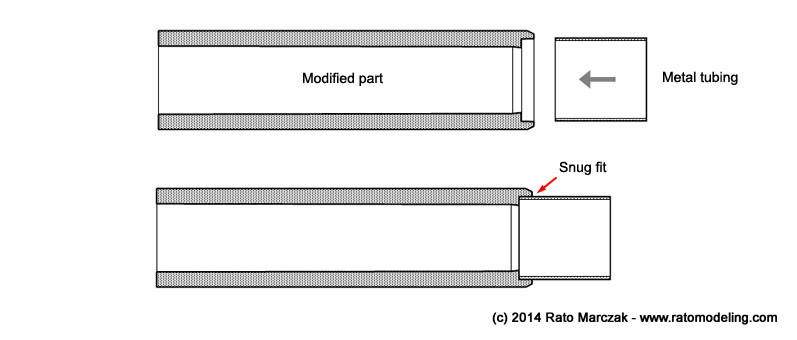
The step was done so that the Aluminum tubing fits snugly to the plastic part:
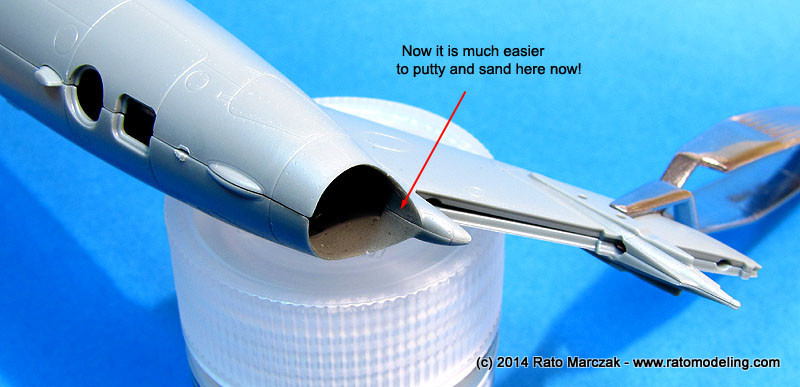
This means that I could close the fuselage, work on the offending seam much more easily, paint it...
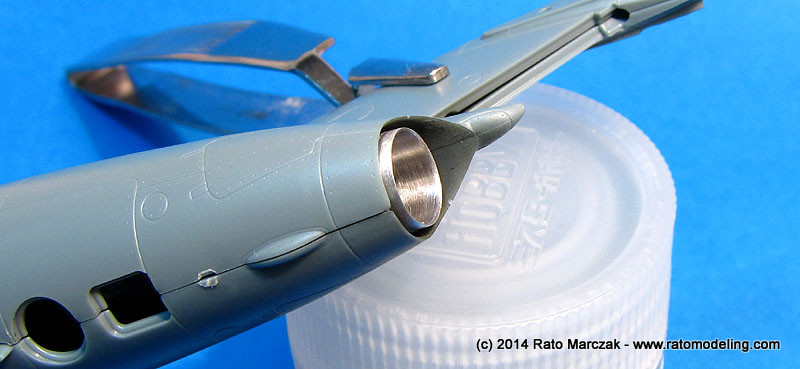
...and mount the metal part simply by pressing it in place after finishing the model:
With the fuselage closed, assembling the wings went without hurdles, but I would warn you to clean the butt joint faces of the wing roots carefully for a good fit, and watch that dihedral (or lack of...). Still, the seam left was a bit too large for what you would expect from a modern kit. A brush load of Mr.Surfacer cleaned with isopropyl alcohol took care of any potential problem there. At that point, the model was lightly sanded and checked for any flaws. Afterall, this would be a natural metal project.
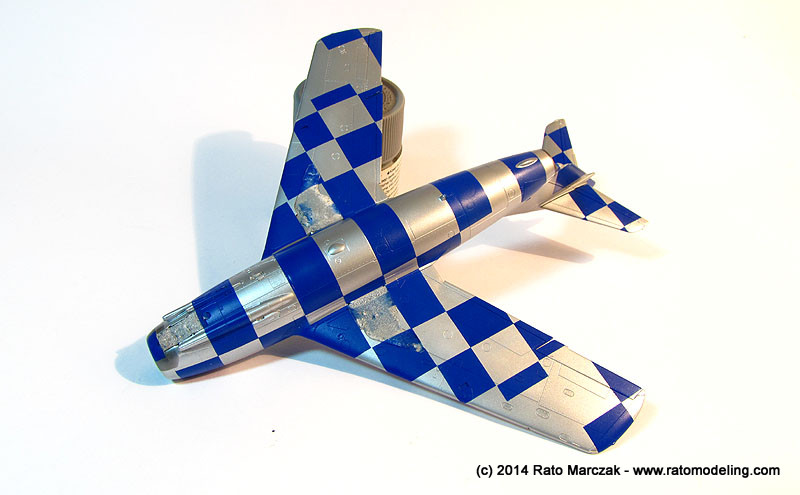
Wait a minute... not so. I've seen some well executed checkered camouflages on jet models for a while, and always found it very inspiring. I had several other NMF projects ahead in the pipeline, so why not try something different with this one, I thought? I then stumbled with this Czechoslovak Air Force profile of the dual combo boxing of this very same kit:
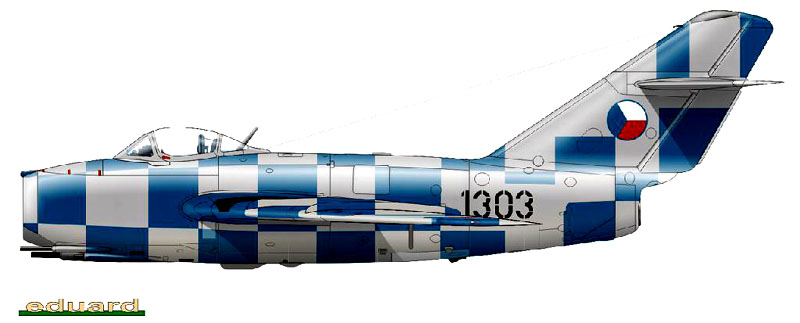
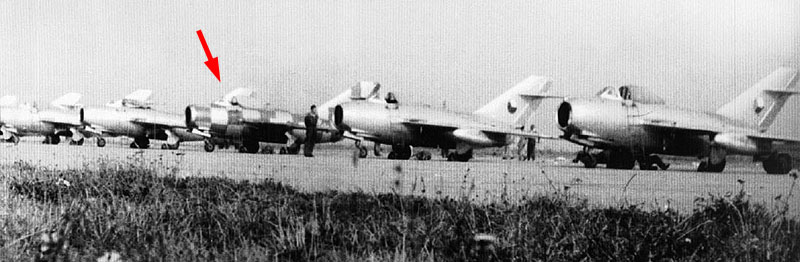
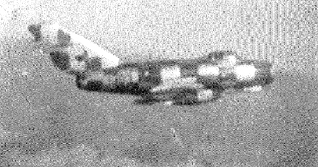
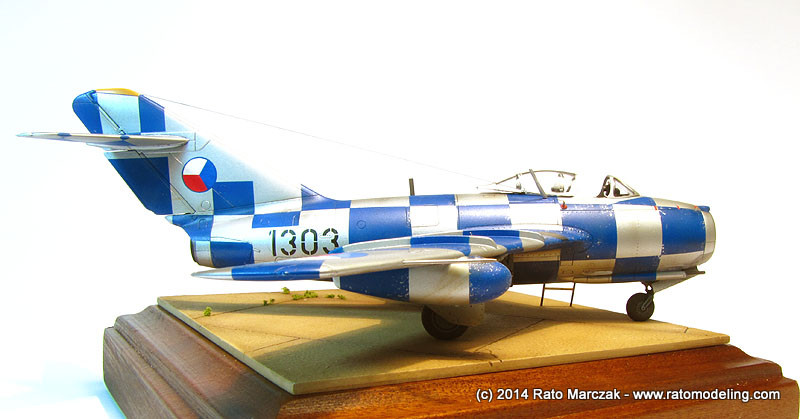
I was hooked, and since Cristian had the dual combo kit and agreed to lend me the decals of that version, I made my mind. A quick research showed that this particular aircraft served with the Czechs from 1954 until 1964, when it was lost. Sometime during 1957-58 it was coded 1303 (s/n 141303) and received the large checkers while serving with the 18th Fighter-Bomber Regiment as a target aircraft for AA gunners at Pardubice. Some sources state that this should be a MiG-15 Fagot A, some others claim it was a MiG-15bis. Whatever is the case, by the end of its career it was upgraded to the SB standard, although probably before receiving the checkered camouflage. The most visible difference being the shape of the air brakes. Stangely, I don't recall the fuselage of the dual combo boxing coming with the small air brake (edit: it does!), although the Eduard profile shows so (see profile above). Well, I could have rescribed a new shape for the air brake, but the truth is that there is no photographic proof of that (maybe through the serial number, anyone?). There was also a discussion about the checkers being blue or red on some internet forums. An examination of the only two (B&W) photos I found of 1303 shows that the color of the checkers are much closer to the blue than the red of the Czech AF insigina. Blue it should be, then.
After priming the model and shooting a coat of Gunze's H-8, I started painting the squares using H-110. I will spare you the photos of the long painting job on this kit. My only observation are: (a) I left the horizontal stabilizers off to make the making easier; (b) I painted the scheme by parts - many parts. I started by carefully masking and painting the upper and lower fuselage squares, as they would set the pattern for the remaining areas. Then I proceeded to the tail and fuselage side squares, and finally painted the wings starting at the wing root and progressing towards the wing tips in three painting sections. In case you are wondering, I think this method is less stressful than masking all the model, as you can take a break between painting sections and, besides, it is a formidable task to apply accurately aligned masks all over the tiny model. This way I could make small adjustments in the go, yet they won't be discernible, and the overall effect of a checkered finish will trick your eyes anyway. (c) triple check your masking along the upper wing fences to avoid paint bleeding in the tight corners.
In the end, I had to do very few touch ups. Eduard combo boxing instructions (available in pdf in their web page) are almost in 1/72 scale (a tad undersized), and can be your best help to position the masks, as many panel lines and hatches can be used as a visual references.
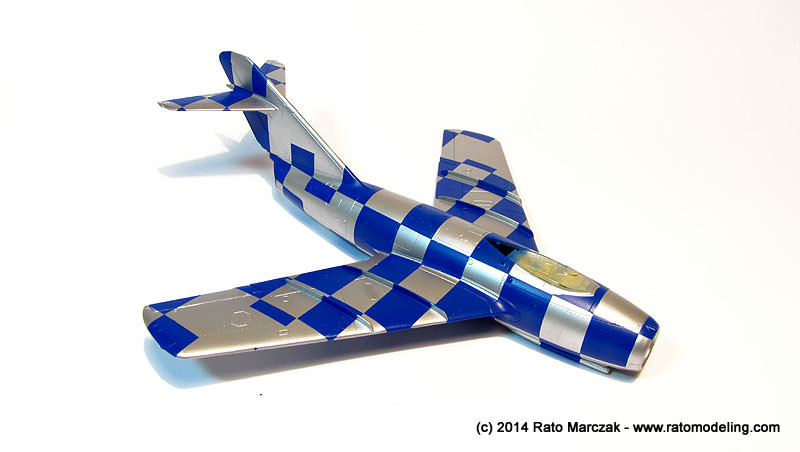

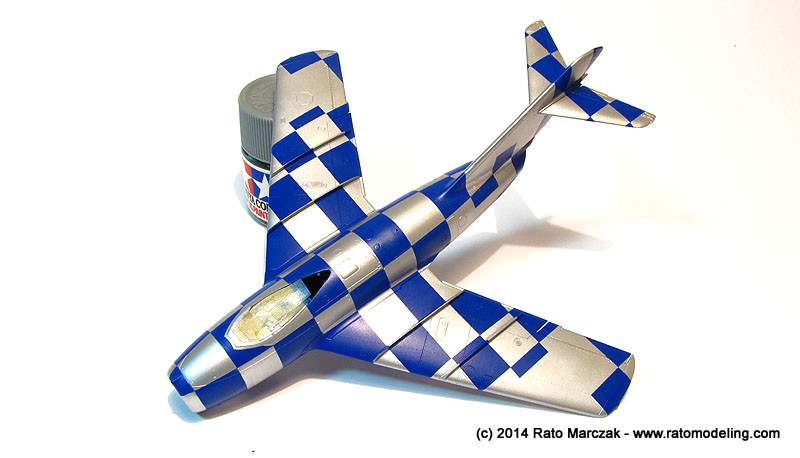
As for the blue used, maybe it was not the best choice. I just took the shortest path and used something ready in my bench. It is, however, a good match to the blue used in the insignias - a tad darker. I could formulate a whole theory asserting that the blue of the insignias were older than the checkers, and therefore more faded, and blah, blah, blah... Well, I just love Gunze lacquers as much as I hate mixing strange shades!
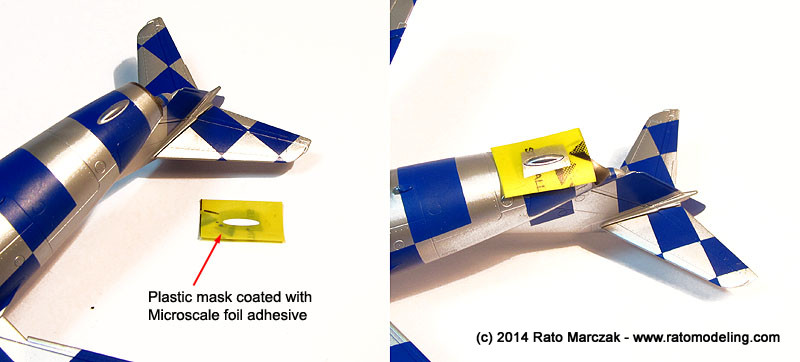
Anyway, there would be some blue paint chipping later on. Meanwhile, the small tail bump was masked with a template cut from 0.2mm plastic card and carefully sanded to the oval shape I was after. It was bent to match the fuselage curve and coated on one side with Microscale Foil Adhesive. Once dry, it was pressed against the bump, protected around with post-it notes and shot in H-8. It made a perfect mask which would be impossible to be cut on ordinary tape (at least for me).
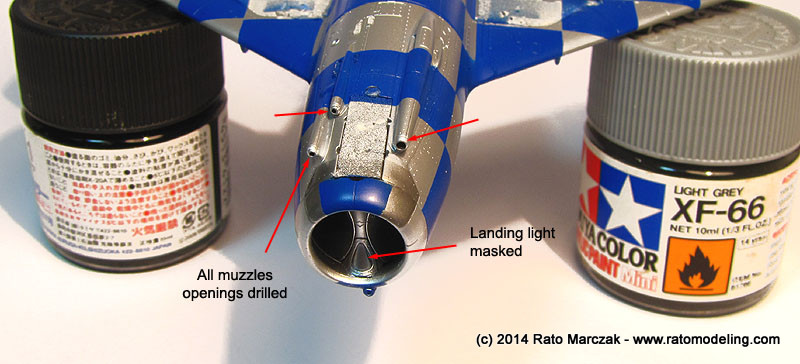
I forgot to mention that all three gun muzzles were removed and had holes drilled to accept metal tubings afterwards. I also airbrushed Tamiya Smoke (X-19) on a couple of panels. I should have done more of this before painting the checkers, as it adds a lot of realism to the model. Too late now.
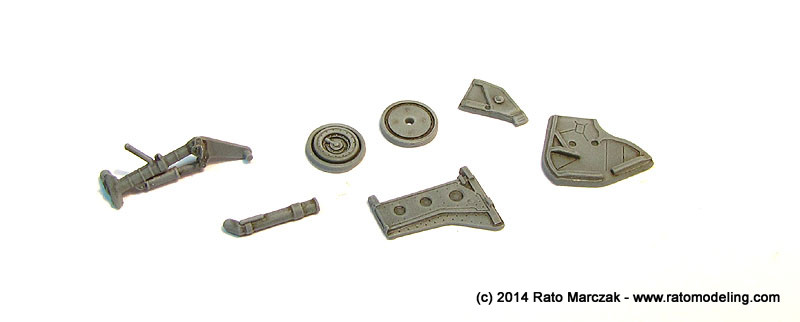
The landing gear parts were painted with the same Tamiya mix used in the cockpit. Once dry, they were glossy-ed, oil washed, and dry-brushed. The gear leg retraction arms (parts C22 & C23) had their oleos cut to be replaced later by pieces of hypodermic needles. I still have to paint the oleos and add the brake lines to the gear legs:
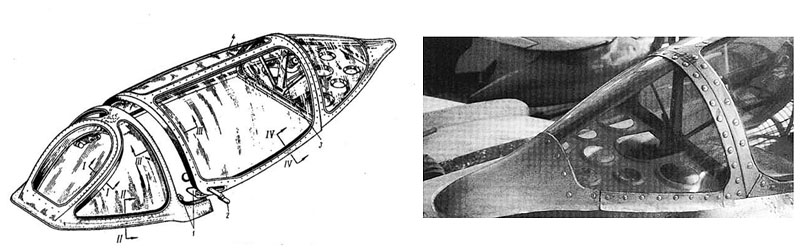
The kit provided canopy masks were used and worked flawlessly on the clear parts. Better than I would ever expect, and I still don't understand why this has not became the norm with new kits. The rear deck of the sliding canopy is made of two solid parts, a clear one (part A5) and a gray one (parts B8 or B12, for closed and open canopy, respectively). The clear one must be painted to simulate the truss supporting the canopy, while the other one should be perforated, as per prototype:
Eduard even markets a separate PE detail fret with these features. I cheated and discarded part A5, replacing the truss for plastic strips, while the solid deck was perforated. The result is way better than the original kit parts:
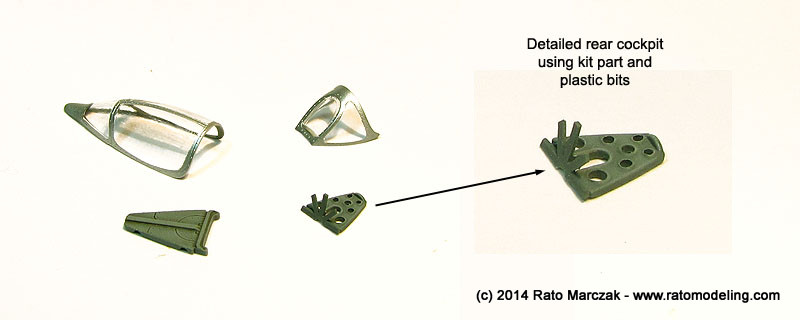
The rear cockpit deck was glued to the sliding canopy and the painted areas of the clear parts received a light wash of Payne's grey oils to enhance the rivets and lines:

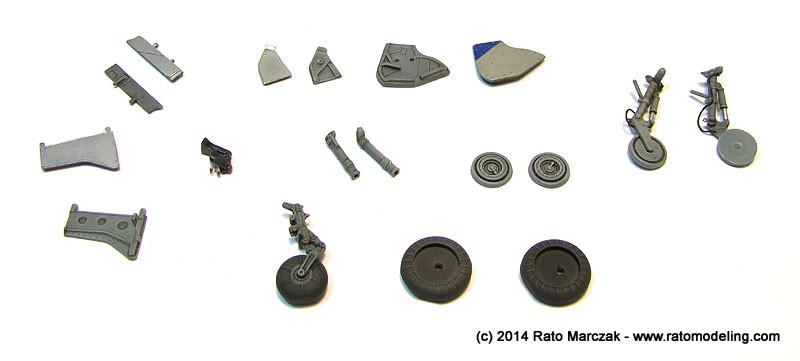
At that point, I tried to finish as many small parts as I could. The gunsight was painted, as well as the oleos of the landing gear legs. They also received break lines, oils wash and a gentle drybrushing to highlight the nice details. Eduard scored twice by adding texture to the tires, making it stand after the drybrushing, and for making the wheel hubs separe from the tires. I deviated from the instructions and glued parts C26 to the main wheel legs before gluing them to the wings, instead of putting them on the wheels. That saved me the trouble of aligning the wheels, as the pins in parts C30 and C31 are too small and do not make a tight fit.
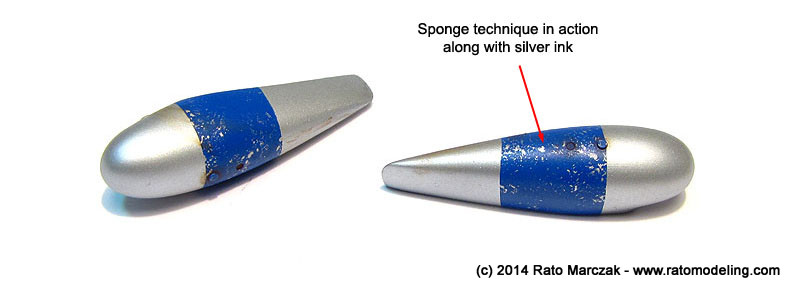
Another item I took care at this point were the external fuel tanks. I wanted to calibrate my hand with the sponge method to simulate paint chipping, so I abused the tanks. Interestingly - I like to use silver ink for that - even when incidentally hitting the silver areas, you can't see the difference to the base silver, only on the blue areas:
In order to finish off the camouflage, if that can be so called, I applied the decals. Only eight decals... no stencils, no fancy stripes... life is good. I sealed the decals with gloss lacquer and proceeded with a Payne's grey oil wash. I like to use Payne's grey to enhance panel lines of NMF models because of its blue tint. I made the oil wash heavier around surface controls:
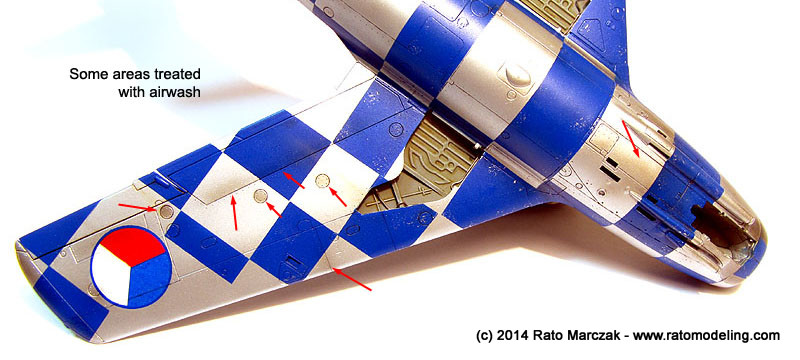
Small access and maintenance hatches were further treated with an airwash of Tamiya Smoke (X-19):
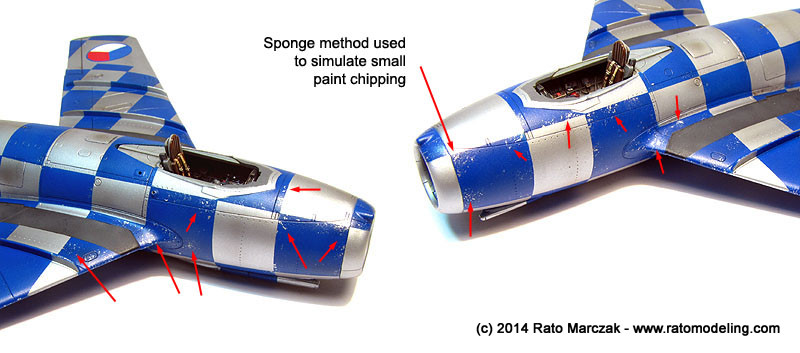
Next in the process was the paint chipping, again using the sponge method. Later I would make a few bigger paint chips using a fine pointed brush and silver pencil:
Once satisfied with the weathering, the whole model received a coat semi-gloss automotive clear lacquer. MiG-15s were either painted with 9-32 transparent varnish or 9-32Al silver dope, so operational aircraft never looked really natural metal.
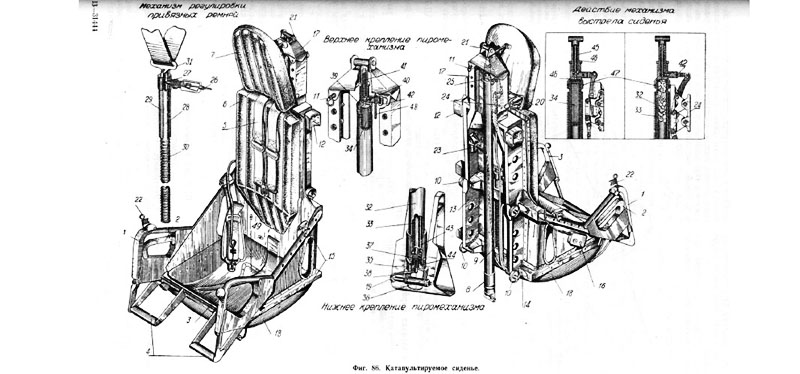
The pilot's seat was decorated with the kit provided PE set, and it looks great, except for my brown leather upholstery - most photos I found later showed black leather... Ah, those Czeck upholsterers. This picture from the aircraft manual helped to detail the seat and install the PE parts:
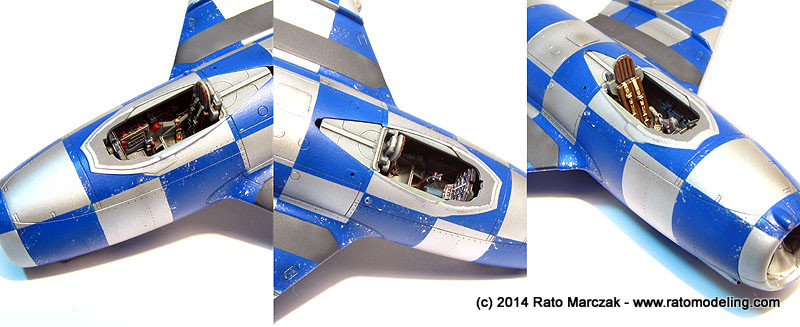
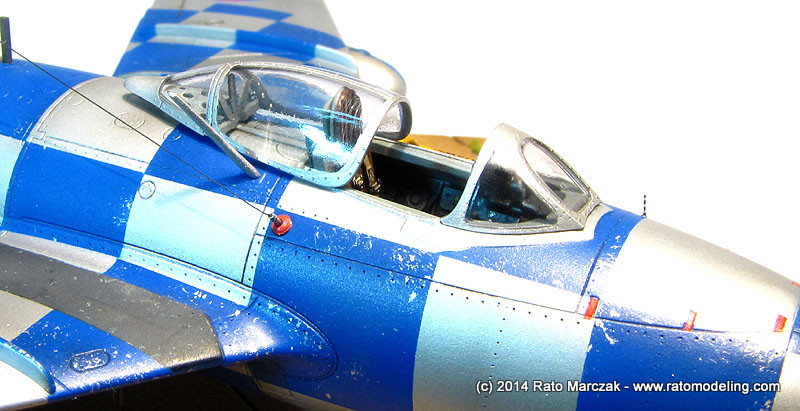
Anyway, the seat was inserted throught the cockpit opening and pressed in place with a drop of glue. The 'office' looks busy enough to leave the canopy open. I wanted to scratchbuilt the unfogging hose which runs internally around the windscreen, but gave up after a quick glance to my stash of kits:
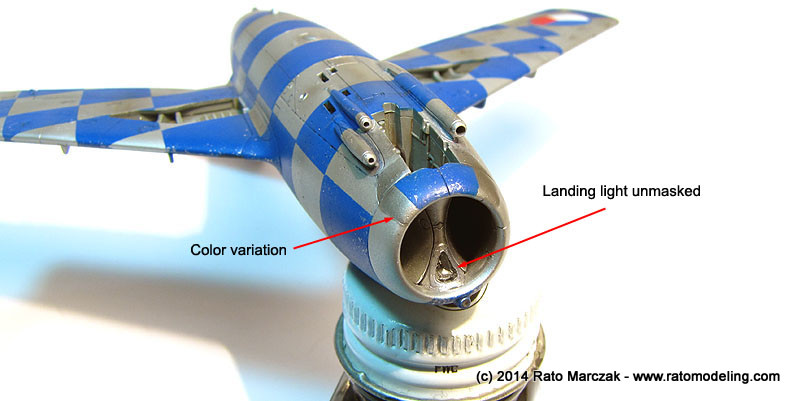
I made a bit more post-shading here and there, and removed the landing light mask. Time to start gluing the small bits:
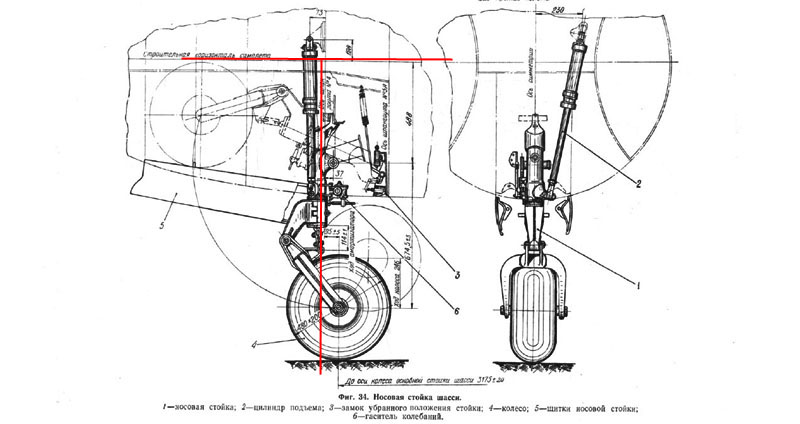
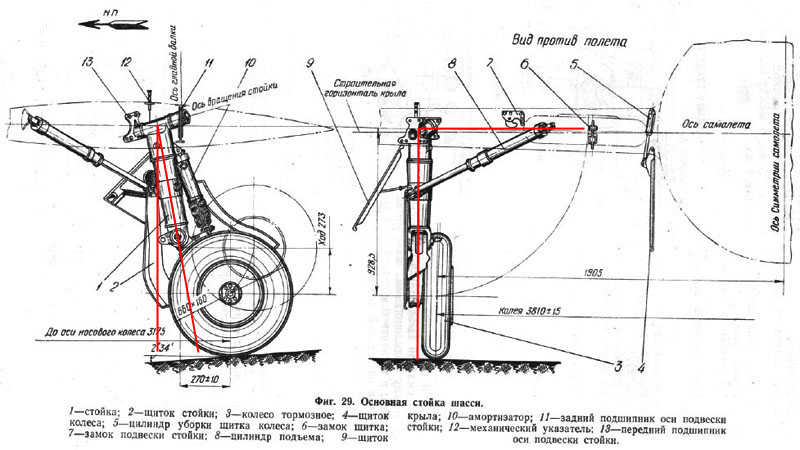
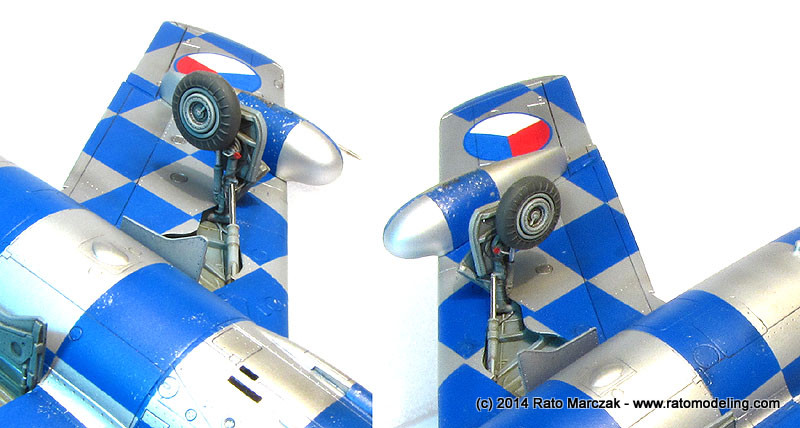
The assembly of the small remaining items started with the landing gear. I had to flat the bottom side of them but wasn't sure if the flat spot under the front wheel should be perpendicular to the gear leg. Images from the aircraft manual helped immensely here, showing it was. A small catch I found with the main gear legs was also found in the MiG-15 manual. They are not perpendicular to the wings' chord line, but slightly canted backwards. The kit's instructions are not clear about that, be warned when installing parts C30 and C31.
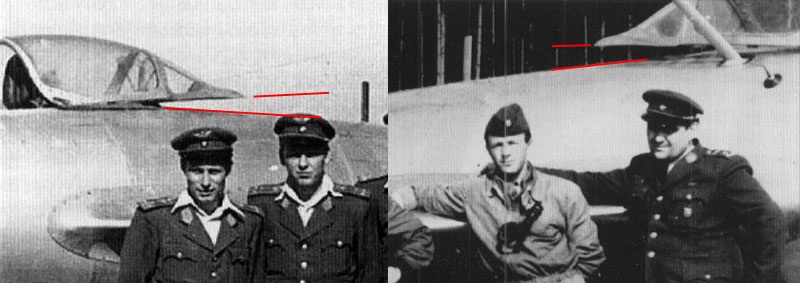
When I glued the sliding canopy in place, touching its rails, I noted that it rested with a visible inclination on the back side. After looking for my mistake for a while, photos showed that there was no error. It really opened that inclined.
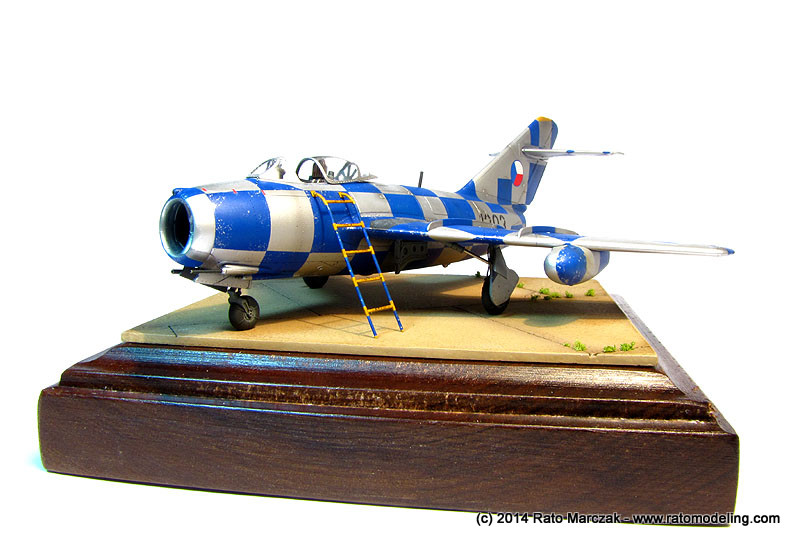
The MiG-15 had a protuding insulator on the starboard side of the canopy. I painted it red and inserted a small length of syringe needle in it to accept a radio antenna made of stretched sprue connected to the top of the fin.
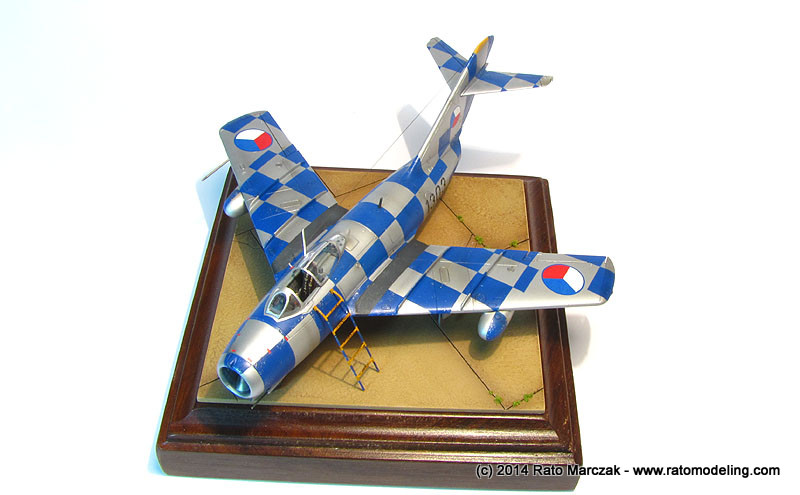
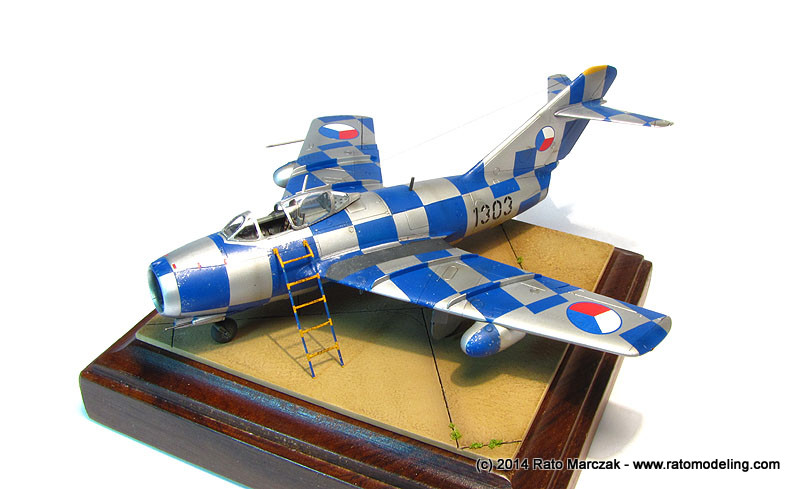
At this point I made a display base, a very simple one. Just a few concret blocks painted and weathered to look dirty. I think this was the most convincing concrete texture I've ever made on a base. And since I was at it, a pilot's ladder was scratchbuilt using 0.5 mm plastic rod, painted and weathered.
Another small detail - rarely seen in the photos because of its minute size, are the landing gear indicators. There are one on each wing, close to the outer fence, and one on the nose, right in front of the windscreen, on the port side. I made them with stretched white spure and painted the black stripes:
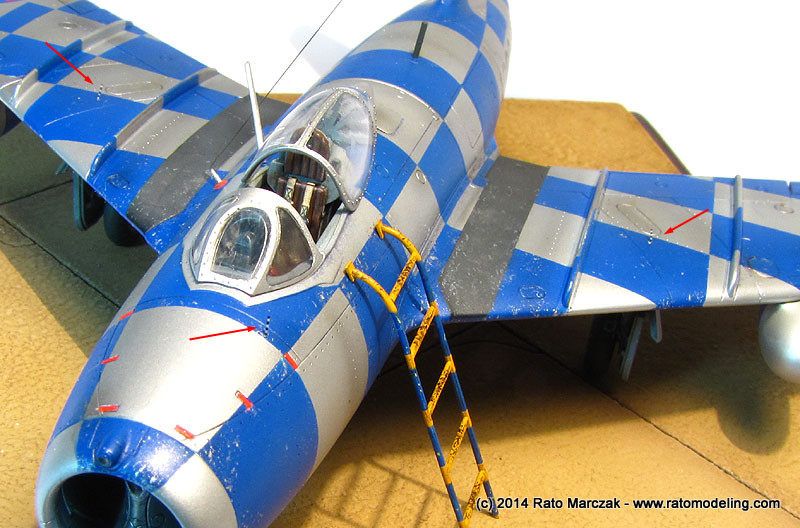
You can't see them? A little closer, then...

A careful reader will note that the 260 liters wing tanks in the last photos do not match the ones I showed before. That's because I initially test-fitted them in the wrong position under the wings (they would prevend the flaps from dropping - duh!). So I had to repaint them to match the checkers of their correct positions, and weather accordingly.
The wingtip light bulbs are nicely molded to the wings. In order to emulate their clear caps, I used an old recipe of mine. First, paint a small dot of grey. Once dry, the colored clear covers are simulated by putting a small drop of transparent paint on top of it (red on the port wing, blue on the left). Let the paint overlap the grey dot just a tad and it will look like a clear cover with a bulb inside:
A new pitot tube was made from a metal pint and installed on the wing. The remaining antenna masts were glued in place, and a small drop of Future was put in the gun camera opening on the top of the nose. It's finished:
I'm not sure, but I guess this was my first Eduard kit ever. I enjoyed every (well, almost every) minute building it, but it is not an idiot proof kit. There are a few catchs throughout the assembly, so read the instructions and study the subject before you start gluing parts. That's the theory... as you all know, instructions are for sissies.
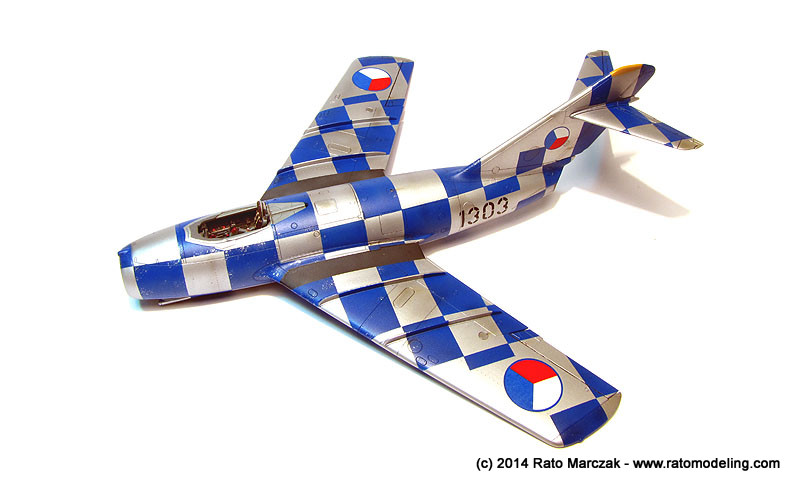
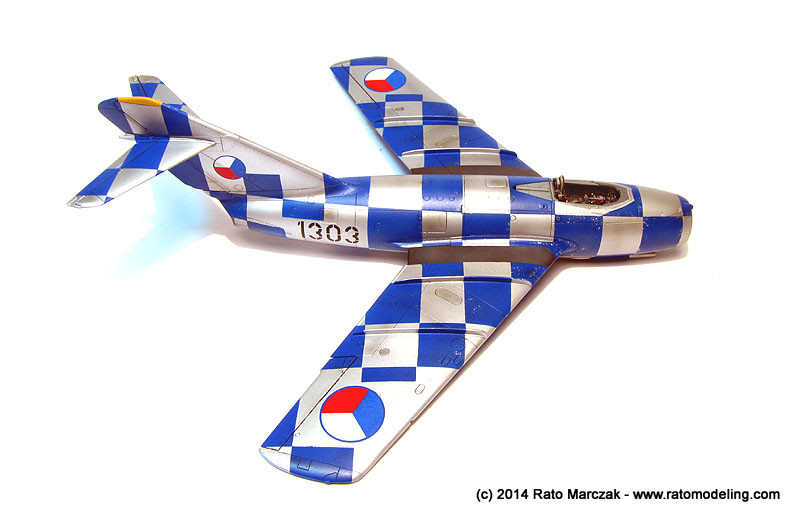
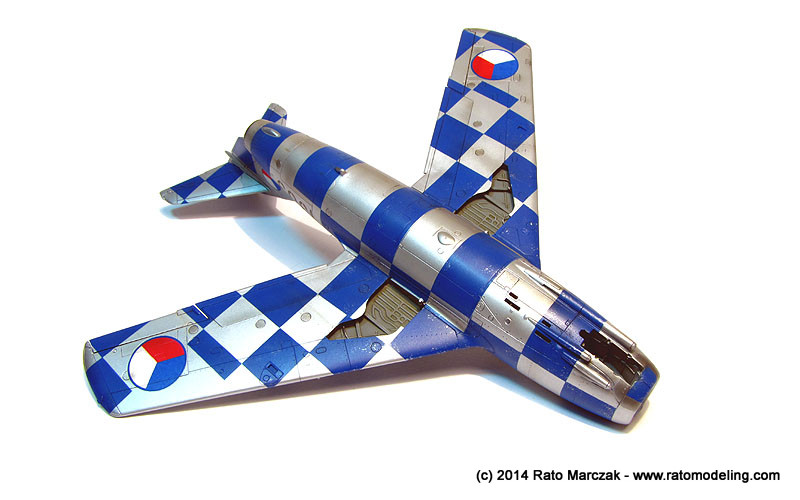
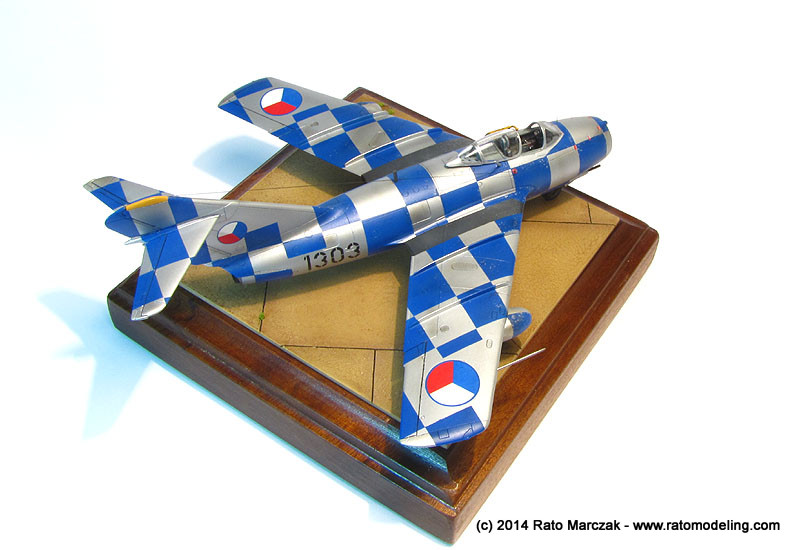
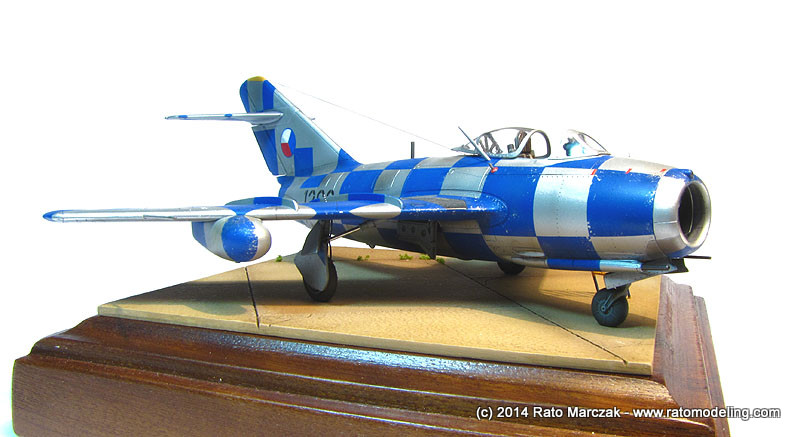
My old little warrior is ready for another gun training day...
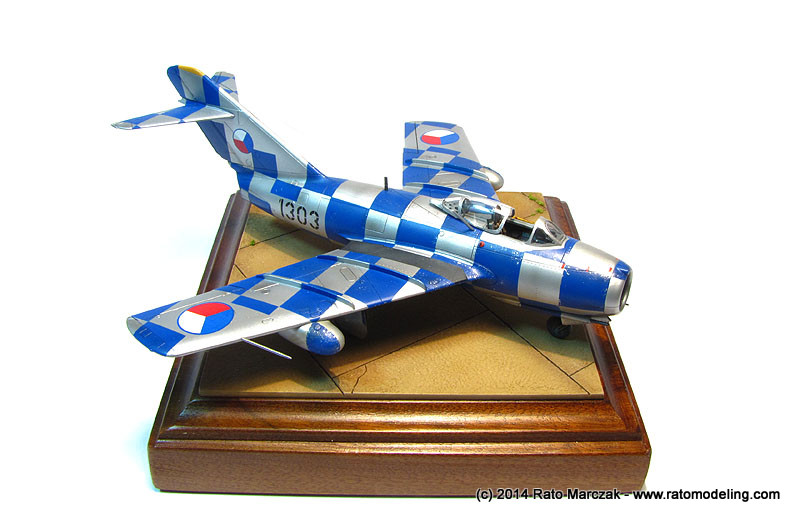
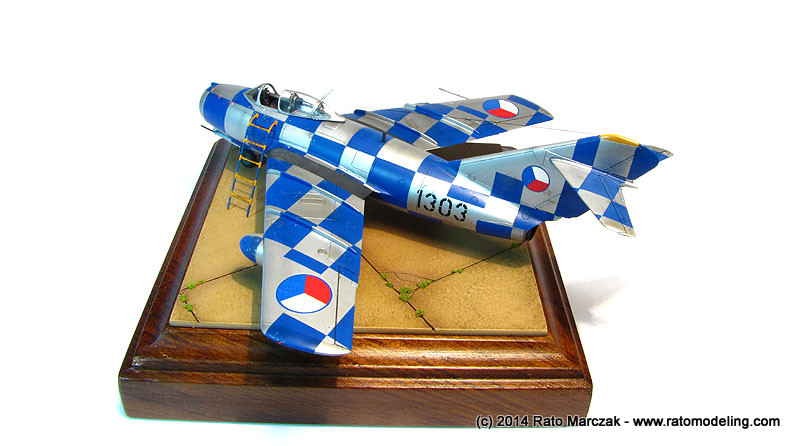
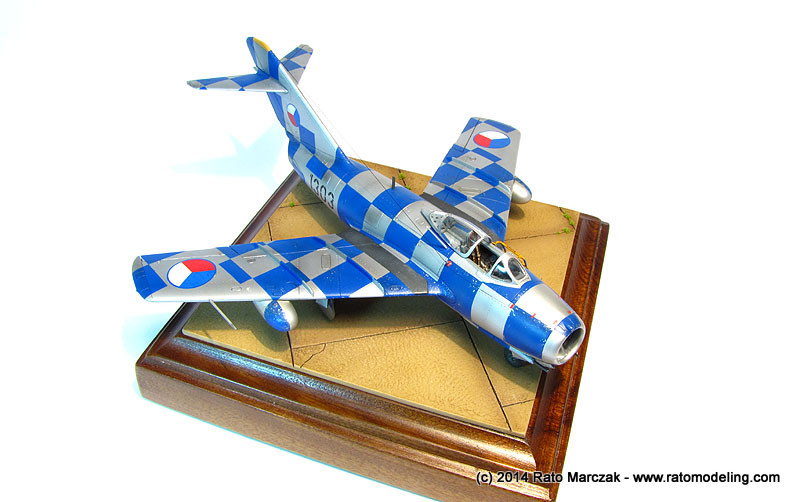
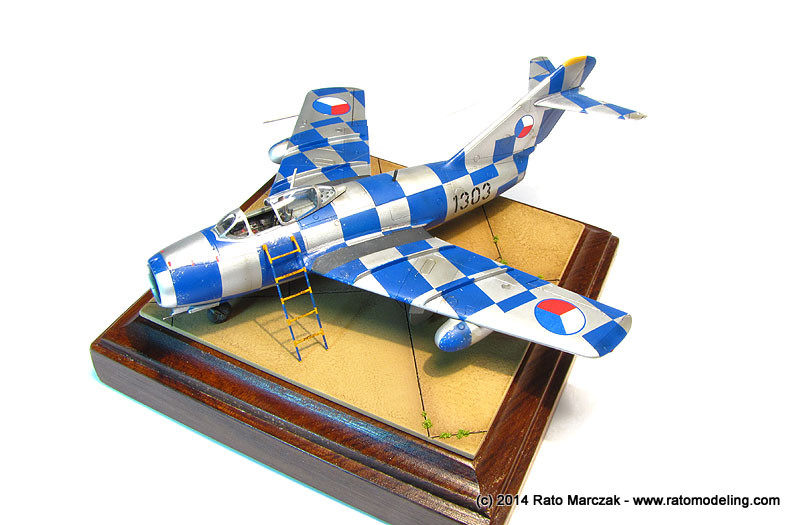
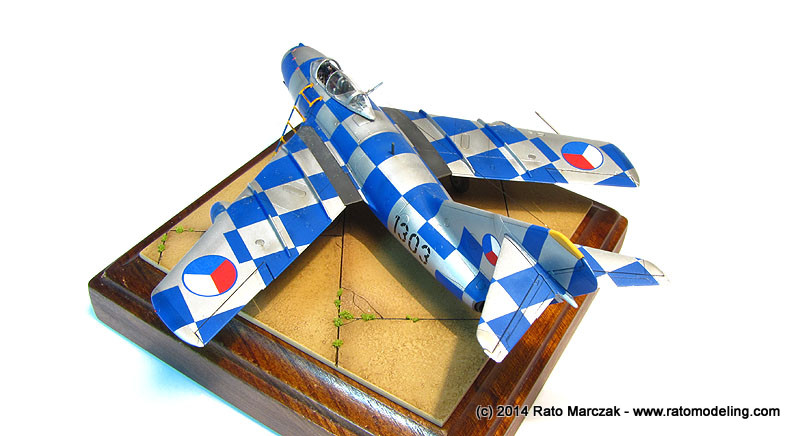
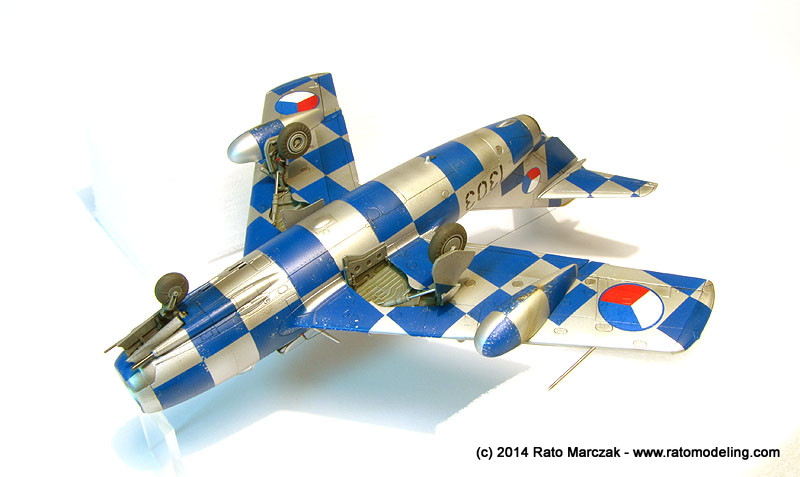
A few more photos from different angles:


Thank you Cristian! I hope my model makes justice to the gift.
Eduard has packed everything you need for a quick build in this box. Several optional parts, a PE fret and even masks to make painting easier.
Work started with the cockpit. One of the very few things that I didn't like in this kit was the color of the PE parts. Eduard has painted them with the typical interior blue-green seen on Soviet aircraft after 1966-67. The MiG-15s were all painted gray in the cockpit and wheel bays - although the exact shade varied a lot. Even though mine would be a Czech bird, they were acquired from the Russians in the 50s, so grey was on order. I used a mix of Tamiya acrylics for all cockpit parts, but repainting the PE parts was obviously out of question. All I did was to airbrush an almost transparent coat of medium grey over them and glue the PE parts without further changes. Blame Eduard, not me. Surprinsingly, the color shift was not big and if you are not a Soviet aircraft expert, probably will not note it.
I also added cables on the sidewalls coming from and to switch boxes, and detailed the control column with the gun trigger
I left the pilot's seat out. It can be inserted through the cockpit opening after finishing the assembly. I added white metal bits to the front cockpit area to avoid tail-sitting. Eduard's instructions don't tell you how much weight must go there, and I'm not telling neither. Just added enough to balance the model with wings and fuselage dry fitted with tape.
For some strange reason, I added the back of the instrument faces on part C8. Forget it, as nothing of it can be seen once glued in place. After sandwiching the control panel PE parts, I used a needle to pour some Future floor wax inside each dial opening. This sealed the assembly, and worked as glasses for the instruments, which is discernible when seen from certain angles:
Eduard opted for a strange parts breakdown in the cockpit area. The nose wheel bay is part of the assembly (see steps D and F of the instructions booklet), but it is split through a diagonal line. If not properly aligned, or the dividing wall in the middle of the air intake will be off center, or you will have a hard time closing the fuselage around the nose wheel - or both. In order to alleviate the problem, I installed everything as per instructions on one side of the fuselage, except the oposite sidewall. I left it unglued while I closed the fuselage. This allowed some room for tweaking the front fuselage joint while the glue was setting. I also deviated from the instructions and glued part C1 at this stage to complete the nose assembly and make the area stronger. Worked ok, without gaps or loose parts, but I used almost all rubber bands on my bench to ensure a good joint all over.
Another small operational problem was found with the jet exhaust (parts D8, step E). If assembled in between the fuselage halves, I wouldn't leave room for my fat fingers to do a decent sanding job on the seam of the tail inner lip. You know, I'm getting older and lazy, and I need space to use a piece of sandpaper...
In a matter of minutes, I cut off the tapered end of the exhaust, mounted the remaining part on my lathe and milled an internal step to accept a piece of Aluminum tubing of the right diameter/thickness. This is the idea:
The step was done so that the Aluminum tubing fits snugly to the plastic part:
This means that I could close the fuselage, work on the offending seam much more easily, paint it...
...and mount the metal part simply by pressing it in place after finishing the model:
With the fuselage closed, assembling the wings went without hurdles, but I would warn you to clean the butt joint faces of the wing roots carefully for a good fit, and watch that dihedral (or lack of...). Still, the seam left was a bit too large for what you would expect from a modern kit. A brush load of Mr.Surfacer cleaned with isopropyl alcohol took care of any potential problem there. At that point, the model was lightly sanded and checked for any flaws. Afterall, this would be a natural metal project.
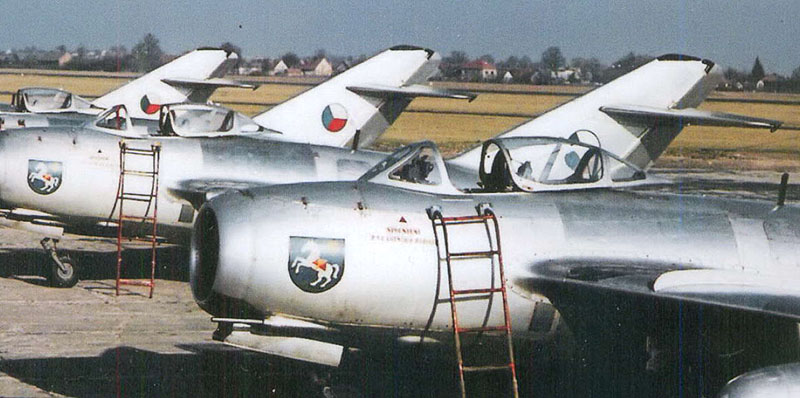
Wait a minute... not so. I've seen some well executed checkered camouflages on jet models for a while, and always found it very inspiring. I had several other NMF projects ahead in the pipeline, so why not try something different with this one, I thought? I then stumbled with this Czechoslovak Air Force profile of the dual combo boxing of this very same kit:
I was hooked, and since Cristian had the dual combo kit and agreed to lend me the decals of that version, I made my mind. A quick research showed that this particular aircraft served with the Czechs from 1954 until 1964, when it was lost. Sometime during 1957-58 it was coded 1303 (s/n 141303) and received the large checkers while serving with the 18th Fighter-Bomber Regiment as a target aircraft for AA gunners at Pardubice. Some sources state that this should be a MiG-15 Fagot A, some others claim it was a MiG-15bis. Whatever is the case, by the end of its career it was upgraded to the SB standard, although probably before receiving the checkered camouflage. The most visible difference being the shape of the air brakes. Stangely, I don't recall the fuselage of the dual combo boxing coming with the small air brake (edit: it does!), although the Eduard profile shows so (see profile above). Well, I could have rescribed a new shape for the air brake, but the truth is that there is no photographic proof of that (maybe through the serial number, anyone?). There was also a discussion about the checkers being blue or red on some internet forums. An examination of the only two (B&W) photos I found of 1303 shows that the color of the checkers are much closer to the blue than the red of the Czech AF insigina. Blue it should be, then.
After priming the model and shooting a coat of Gunze's H-8, I started painting the squares using H-110. I will spare you the photos of the long painting job on this kit. My only observation are: (a) I left the horizontal stabilizers off to make the making easier; (b) I painted the scheme by parts - many parts. I started by carefully masking and painting the upper and lower fuselage squares, as they would set the pattern for the remaining areas. Then I proceeded to the tail and fuselage side squares, and finally painted the wings starting at the wing root and progressing towards the wing tips in three painting sections. In case you are wondering, I think this method is less stressful than masking all the model, as you can take a break between painting sections and, besides, it is a formidable task to apply accurately aligned masks all over the tiny model. This way I could make small adjustments in the go, yet they won't be discernible, and the overall effect of a checkered finish will trick your eyes anyway. (c) triple check your masking along the upper wing fences to avoid paint bleeding in the tight corners.
In the end, I had to do very few touch ups. Eduard combo boxing instructions (available in pdf in their web page) are almost in 1/72 scale (a tad undersized), and can be your best help to position the masks, as many panel lines and hatches can be used as a visual references.
As for the blue used, maybe it was not the best choice. I just took the shortest path and used something ready in my bench. It is, however, a good match to the blue used in the insignias - a tad darker. I could formulate a whole theory asserting that the blue of the insignias were older than the checkers, and therefore more faded, and blah, blah, blah... Well, I just love Gunze lacquers as much as I hate mixing strange shades!
Anyway, there would be some blue paint chipping later on. Meanwhile, the small tail bump was masked with a template cut from 0.2mm plastic card and carefully sanded to the oval shape I was after. It was bent to match the fuselage curve and coated on one side with Microscale Foil Adhesive. Once dry, it was pressed against the bump, protected around with post-it notes and shot in H-8. It made a perfect mask which would be impossible to be cut on ordinary tape (at least for me).
I forgot to mention that all three gun muzzles were removed and had holes drilled to accept metal tubings afterwards. I also airbrushed Tamiya Smoke (X-19) on a couple of panels. I should have done more of this before painting the checkers, as it adds a lot of realism to the model. Too late now.
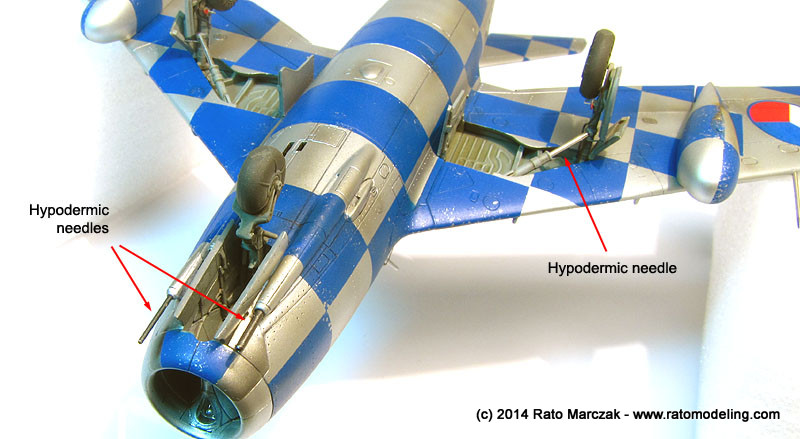
The landing gear parts were painted with the same Tamiya mix used in the cockpit. Once dry, they were glossy-ed, oil washed, and dry-brushed. The gear leg retraction arms (parts C22 & C23) had their oleos cut to be replaced later by pieces of hypodermic needles. I still have to paint the oleos and add the brake lines to the gear legs:
The kit provided canopy masks were used and worked flawlessly on the clear parts. Better than I would ever expect, and I still don't understand why this has not became the norm with new kits. The rear deck of the sliding canopy is made of two solid parts, a clear one (part A5) and a gray one (parts B8 or B12, for closed and open canopy, respectively). The clear one must be painted to simulate the truss supporting the canopy, while the other one should be perforated, as per prototype:
Eduard even markets a separate PE detail fret with these features. I cheated and discarded part A5, replacing the truss for plastic strips, while the solid deck was perforated. The result is way better than the original kit parts:
The rear cockpit deck was glued to the sliding canopy and the painted areas of the clear parts received a light wash of Payne's grey oils to enhance the rivets and lines:
At that point, I tried to finish as many small parts as I could. The gunsight was painted, as well as the oleos of the landing gear legs. They also received break lines, oils wash and a gentle drybrushing to highlight the nice details. Eduard scored twice by adding texture to the tires, making it stand after the drybrushing, and for making the wheel hubs separe from the tires. I deviated from the instructions and glued parts C26 to the main wheel legs before gluing them to the wings, instead of putting them on the wheels. That saved me the trouble of aligning the wheels, as the pins in parts C30 and C31 are too small and do not make a tight fit.
Another item I took care at this point were the external fuel tanks. I wanted to calibrate my hand with the sponge method to simulate paint chipping, so I abused the tanks. Interestingly - I like to use silver ink for that - even when incidentally hitting the silver areas, you can't see the difference to the base silver, only on the blue areas:
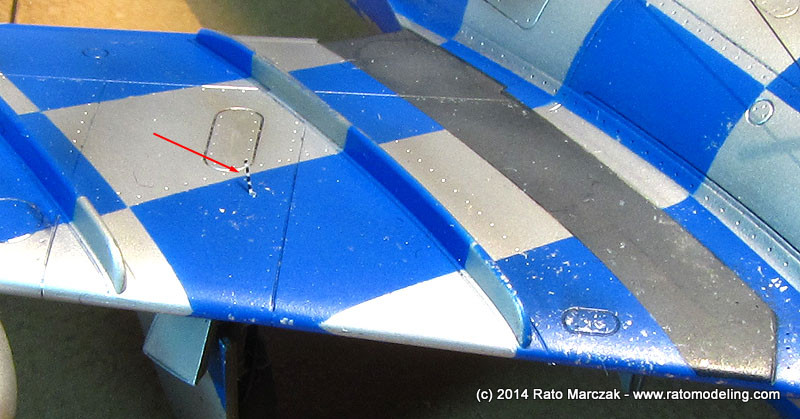
In order to finish off the camouflage, if that can be so called, I applied the decals. Only eight decals... no stencils, no fancy stripes... life is good. I sealed the decals with gloss lacquer and proceeded with a Payne's grey oil wash. I like to use Payne's grey to enhance panel lines of NMF models because of its blue tint. I made the oil wash heavier around surface controls:
Small access and maintenance hatches were further treated with an airwash of Tamiya Smoke (X-19):
Next in the process was the paint chipping, again using the sponge method. Later I would make a few bigger paint chips using a fine pointed brush and silver pencil:
Once satisfied with the weathering, the whole model received a coat semi-gloss automotive clear lacquer. MiG-15s were either painted with 9-32 transparent varnish or 9-32Al silver dope, so operational aircraft never looked really natural metal.
The pilot's seat was decorated with the kit provided PE set, and it looks great, except for my brown leather upholstery - most photos I found later showed black leather... Ah, those Czeck upholsterers. This picture from the aircraft manual helped to detail the seat and install the PE parts:
Anyway, the seat was inserted throught the cockpit opening and pressed in place with a drop of glue. The 'office' looks busy enough to leave the canopy open. I wanted to scratchbuilt the unfogging hose which runs internally around the windscreen, but gave up after a quick glance to my stash of kits:
I made a bit more post-shading here and there, and removed the landing light mask. Time to start gluing the small bits:
The assembly of the small remaining items started with the landing gear. I had to flat the bottom side of them but wasn't sure if the flat spot under the front wheel should be perpendicular to the gear leg. Images from the aircraft manual helped immensely here, showing it was. A small catch I found with the main gear legs was also found in the MiG-15 manual. They are not perpendicular to the wings' chord line, but slightly canted backwards. The kit's instructions are not clear about that, be warned when installing parts C30 and C31.
I
have been making extensive use of hypodermic needles to simulate
actuating hydraulic cylinders. I also used hypodermic needles of
various diameters to simulate the guns. They were painted with gunmetal
color and inserted in the previously drilled holes. It is useful to
keep the original plastic muzzles to find a suitable needle later
- and of course, drill holes of the correct diameter, if not slightly
larger.
When I glued the sliding canopy in place, touching its rails, I noted that it rested with a visible inclination on the back side. After looking for my mistake for a while, photos showed that there was no error. It really opened that inclined.
The MiG-15 had a protuding insulator on the starboard side of the canopy. I painted it red and inserted a small length of syringe needle in it to accept a radio antenna made of stretched sprue connected to the top of the fin.
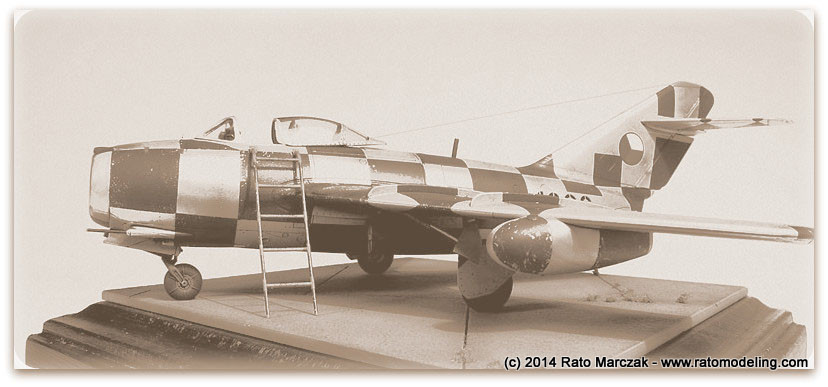
At this point I made a display base, a very simple one. Just a few concret blocks painted and weathered to look dirty. I think this was the most convincing concrete texture I've ever made on a base. And since I was at it, a pilot's ladder was scratchbuilt using 0.5 mm plastic rod, painted and weathered.
Another small detail - rarely seen in the photos because of its minute size, are the landing gear indicators. There are one on each wing, close to the outer fence, and one on the nose, right in front of the windscreen, on the port side. I made them with stretched white spure and painted the black stripes:
You can't see them? A little closer, then...
A careful reader will note that the 260 liters wing tanks in the last photos do not match the ones I showed before. That's because I initially test-fitted them in the wrong position under the wings (they would prevend the flaps from dropping - duh!). So I had to repaint them to match the checkers of their correct positions, and weather accordingly.
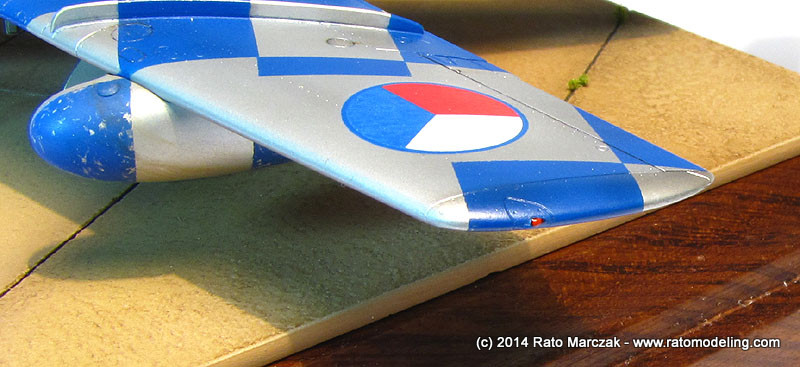
The wingtip light bulbs are nicely molded to the wings. In order to emulate their clear caps, I used an old recipe of mine. First, paint a small dot of grey. Once dry, the colored clear covers are simulated by putting a small drop of transparent paint on top of it (red on the port wing, blue on the left). Let the paint overlap the grey dot just a tad and it will look like a clear cover with a bulb inside:
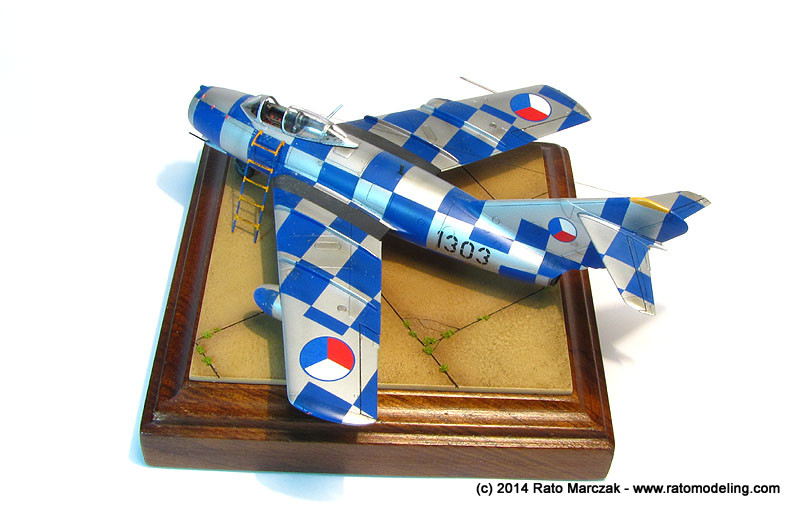
A new pitot tube was made from a metal pint and installed on the wing. The remaining antenna masts were glued in place, and a small drop of Future was put in the gun camera opening on the top of the nose. It's finished:
I'm not sure, but I guess this was my first Eduard kit ever. I enjoyed every (well, almost every) minute building it, but it is not an idiot proof kit. There are a few catchs throughout the assembly, so read the instructions and study the subject before you start gluing parts. That's the theory... as you all know, instructions are for sissies.
My old little warrior is ready for another gun training day...
A few more photos from different angles:
Thank you Cristian! I hope my model makes justice to the gift.
| Technical file | |
| Kit:
|
- Eduard #7056 |
| Additions:
|
- |
| Basic
colors: |
-
Primer: automotive acrylic gray primer - Silver (interior): GSI Gunze Mr.Color Silver (#008) - Blue (checkers): GSI Gunze Mr.Color Character Blue (#110) - Automotive semi-gloss clear. |
| Notes: |
-
A few scratchbuilt details added to the cockpit and landing gear (see text). - New exhaust made of Aluminum tubing |
Rato Marczak © 2014
