| Letzte Lefechte Dragon 88 mm Raketenwerfer Püppchen vignette in 1/35 |
| Started: May/2005 Finished: August/2005 |
I started this model right after acquiring the Dragon 1/35
Sd.Kfz. 2 to pull my Me-262. The Kettenkrad kit came with this little
anti-tank weapon, and I decided to give it a go as an excuse to
practice different techniques on making trees. So, I thought,
let´s do a vignette...

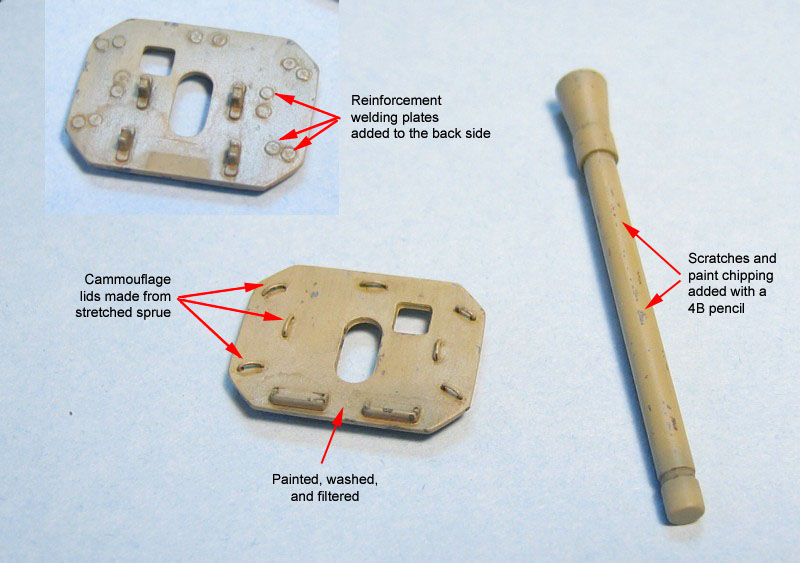
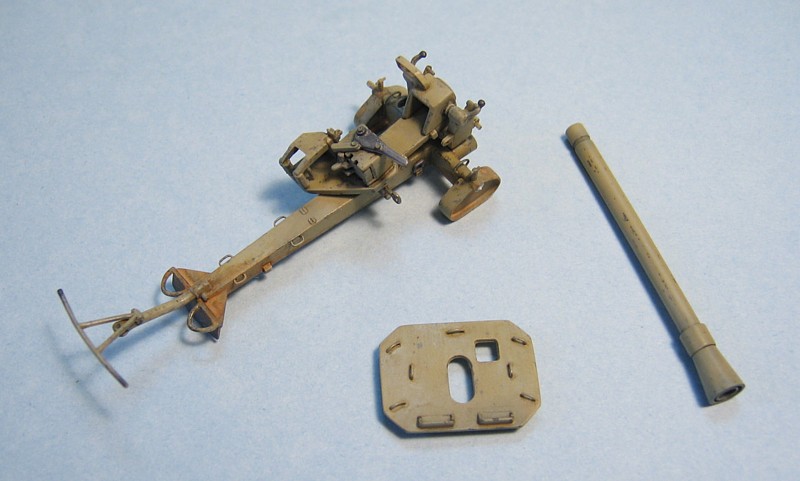
The first thing I assembled was the cannon barrel. I also replaced the relief molded cammoflage eye lids on the armor shield 'with more realistic ones made of stretched sprue. The corresponding weld backplates were glued on the opposite side. These partes were painted with Tamiya XF-60 Dark Yellow and sealed with Future. Once dry, I used washes and filters, and only then the flat coat was applied. I used a 4B pencil directly over the flat coat to simulate paint chipping and scratches.
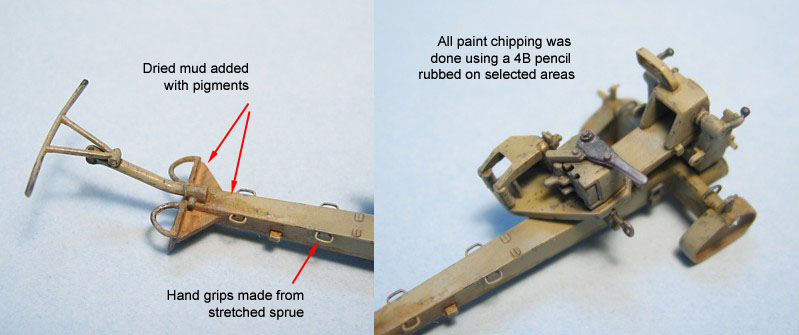
I used the same recipe to paint the chassis. Some parts were painted with Humbrol Metal Cote Polished Steel, though, specially those subjected to heavy use, like handles, levers, movable components and of course the breech area. I also exaggerated a bit more in the paint chipping department, as these areas used to have a more intense contact with the soldiers, tools, ammo etc.
I used a mix of grounded pastel chalk of various tones applied isopropyl alcohol around corners, recesses and low areas to simulate dried mud and dust. Be aware, though, that with isopropyl alcohol the pastel chalk becomes very stubborn if you want to remove some (I guess it reacted with the Future sealing coat). Next time I´m going to use regular rubbing alcohol.
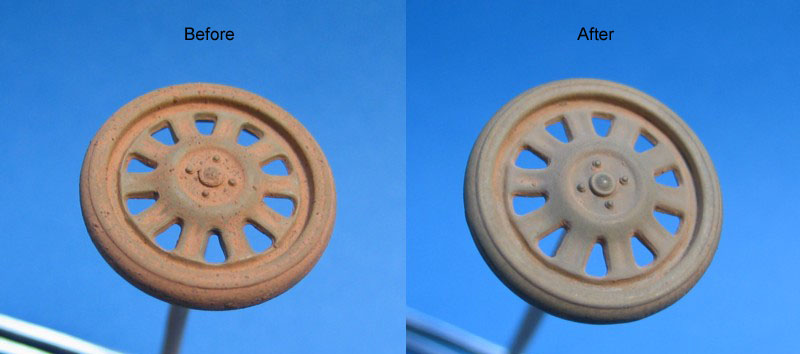
After a quick research, I found that Püppchen could be equipped with two types of wheels. The one depicted in the Dragon kit is the most common type. Contrary to popular belief, these wheels didn´t have a rubber band - they were made entirely of welded steel. I used a variation of the salt technique: after painting the rolling area with a dark steel color, I applied some hair lacquer over which fine sand was sprinkled. The Dark Yellow was then airbrused. Once dry, the sand was scrubbed with a toothbrush in the direction of rolling, revealing the steel color. Evidently, the wheels should receive a heavier coat of pastel, this time diluted with water. Once dry, I rubbed off the excess using a stiff bristle flat brush:

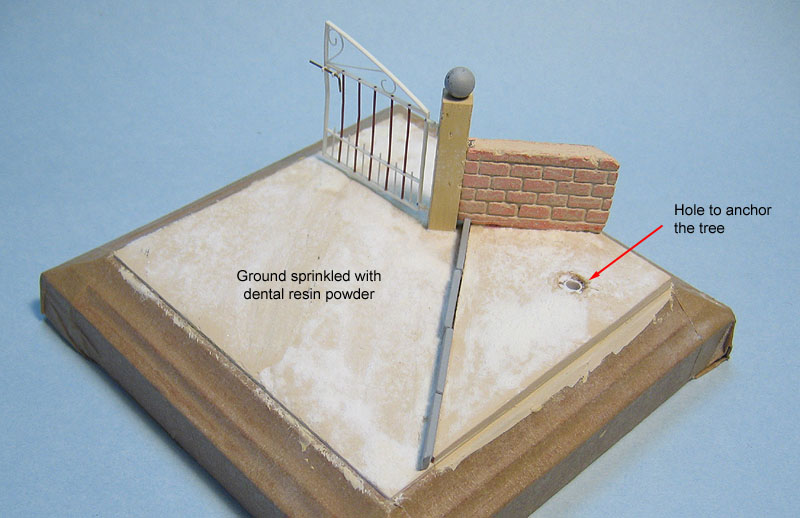
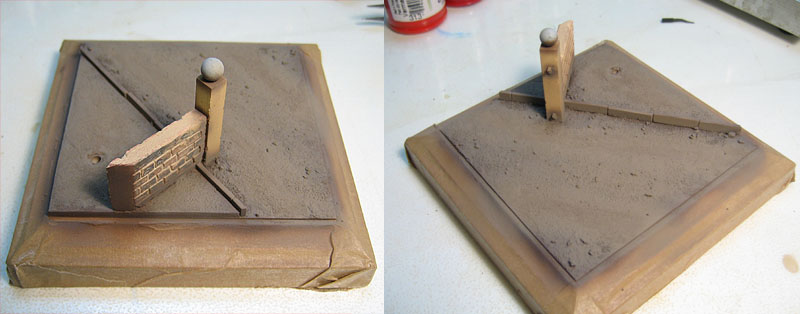
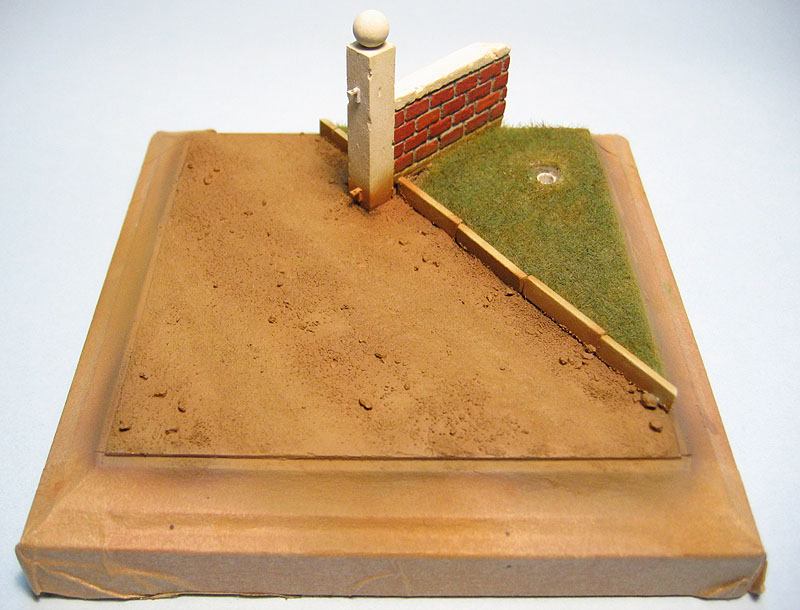
The Püppchen subassemblies were then cemented together and I started to work on the vignette base. The scene should depict a countryside street somewhere in a rural area around Berlin. I glued plastic cards of different thickness to provide some relief, and coated everything with a heavy layer of wood putty which was sanded once dry. The Püppchen was to be placed in a farm gate of sorts, so I made a small section of a brick fence in plaster, and glued a piece of balsa wood to anchor the gate.

The bricks of the wall were carved directly on the plaster using a small nail. The stones laid along the road sides were simulated with small sections of plastic, glued intentionally misaligned. Some decorative details were also added using what I had in hand, while the gate itself was scratchbuilt from plastic rods and strips.

The first thing I assembled was the cannon barrel. I also replaced the relief molded cammoflage eye lids on the armor shield 'with more realistic ones made of stretched sprue. The corresponding weld backplates were glued on the opposite side. These partes were painted with Tamiya XF-60 Dark Yellow and sealed with Future. Once dry, I used washes and filters, and only then the flat coat was applied. I used a 4B pencil directly over the flat coat to simulate paint chipping and scratches.
I used the same recipe to paint the chassis. Some parts were painted with Humbrol Metal Cote Polished Steel, though, specially those subjected to heavy use, like handles, levers, movable components and of course the breech area. I also exaggerated a bit more in the paint chipping department, as these areas used to have a more intense contact with the soldiers, tools, ammo etc.
I used a mix of grounded pastel chalk of various tones applied isopropyl alcohol around corners, recesses and low areas to simulate dried mud and dust. Be aware, though, that with isopropyl alcohol the pastel chalk becomes very stubborn if you want to remove some (I guess it reacted with the Future sealing coat). Next time I´m going to use regular rubbing alcohol.
After a quick research, I found that Püppchen could be equipped with two types of wheels. The one depicted in the Dragon kit is the most common type. Contrary to popular belief, these wheels didn´t have a rubber band - they were made entirely of welded steel. I used a variation of the salt technique: after painting the rolling area with a dark steel color, I applied some hair lacquer over which fine sand was sprinkled. The Dark Yellow was then airbrused. Once dry, the sand was scrubbed with a toothbrush in the direction of rolling, revealing the steel color. Evidently, the wheels should receive a heavier coat of pastel, this time diluted with water. Once dry, I rubbed off the excess using a stiff bristle flat brush:
The Püppchen subassemblies were then cemented together and I started to work on the vignette base. The scene should depict a countryside street somewhere in a rural area around Berlin. I glued plastic cards of different thickness to provide some relief, and coated everything with a heavy layer of wood putty which was sanded once dry. The Püppchen was to be placed in a farm gate of sorts, so I made a small section of a brick fence in plaster, and glued a piece of balsa wood to anchor the gate.
The bricks of the wall were carved directly on the plaster using a small nail. The stones laid along the road sides were simulated with small sections of plastic, glued intentionally misaligned. Some decorative details were also added using what I had in hand, while the gate itself was scratchbuilt from plastic rods and strips.
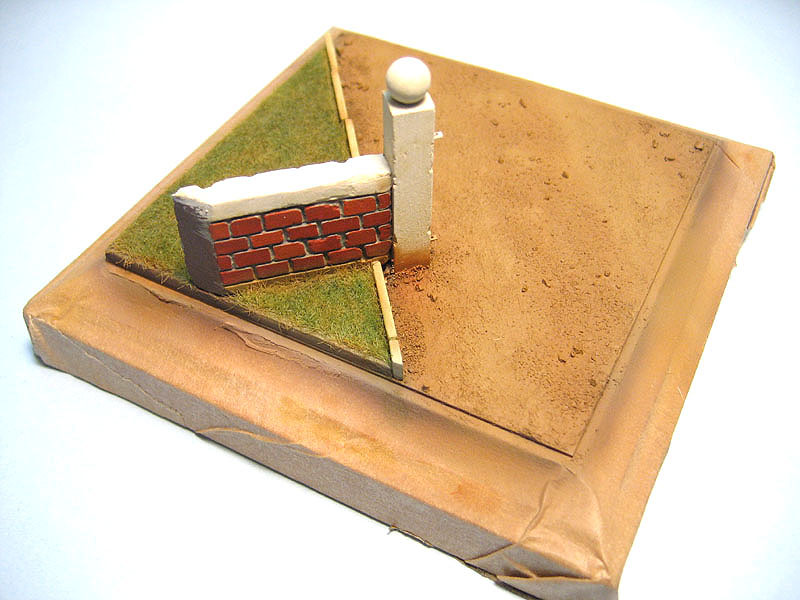
Finally, I applied a
generous coat of white glue diluted with water and sprinkled dental
resin powder over it to give the terrain some texture.
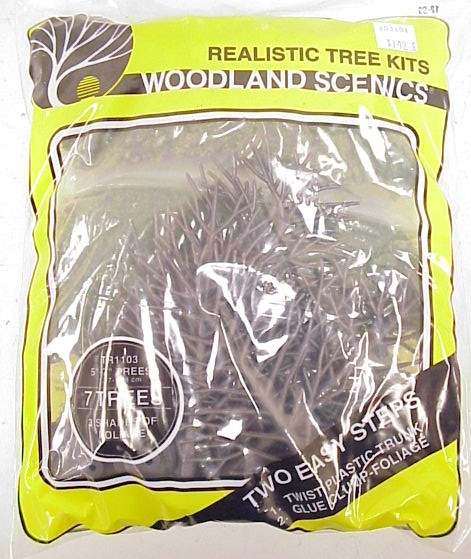
While the glue was still wet, I added some gravel and stones here and there. I then moved to the main excuse for this project: the tree. I had some Woodland Scenics stuffs around my bench for a while, and decided to give it a go. The particular item I used here is the product #TR1103, Woodland Scenics Tree Kit 5"-7" Large Green Tree, containing enough material to model seven trees. Three bags of green foliage accompany the set.
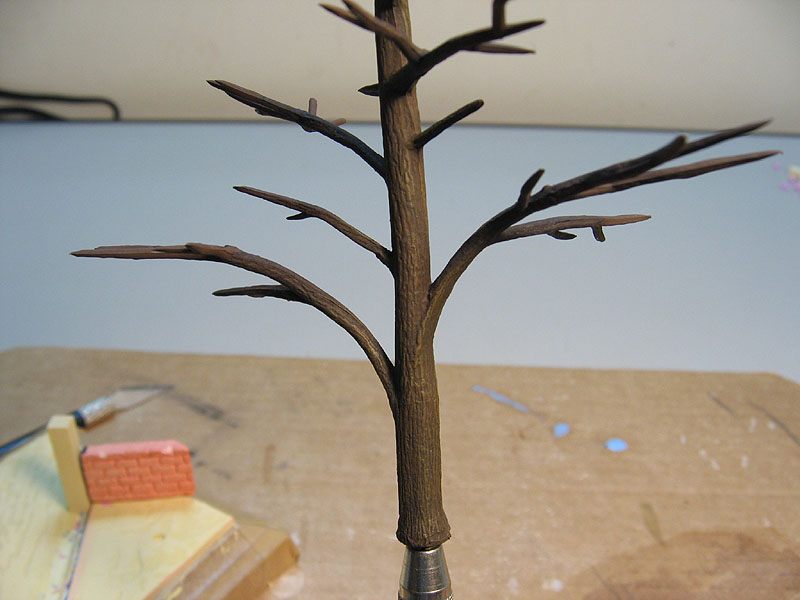
The tree armatures (trunks and branches) are injected flat. Since they are made of a pliable type of plastic, you have to bend the branches in a natural look. I airbrused a coat of dark brown over the trunk, washed with an almost black dirty thinner, and finally drybrushed everything with ochre oils. This showed the texture of the bark effectivelly,
Next, I had to provide some support to the foliage. I used pieces of Scotch Brite scrubbing pads randomly stretched, which were glued to the ends of the branches.
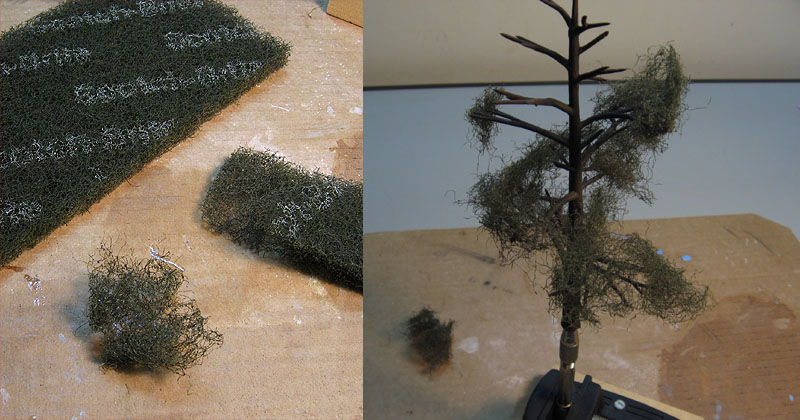
I then started to glue the foliage. This is a very tedious process. Our friend military modeler Jerônimo Teixeira told me once to use diluted gel medium as the glueing agent. I made a few tests and found it tooke too long to dry (would need a day to dry each layer of foliage). Therefore, I started to look for alternatives. In the end I decided to use banana extract. No, it won't attract flyes... This stuff is actually a nitrocellulose resin, which remains tacky several hours after the application. Furthermore, it is very thin and can be applied through an airbrush or refillable spray bottles straightforwardly. I used a small, plastic refillable spray bottle to apply it. In the first pass, I turned the tree up side down, sprayed a pass, and sprinkled the dark green foliage. I then turned the tree up and repeated the process, using the same dark green foliage. These two steps pretty much form an initial dark green foliage shell around the stretched pad volumes. With the tree up, I repeated the application using medium green and light green, reducing the amount of glue as I advanced. Since the foliage is a kind of sponge, you can control the build up as the tree canopy takes shape. Very easy, in fact. A couple of warnings, though: Mr. Jerônimo's method of using gel medium has the advantage of drying flat. My choice left a very bright finish on several spots along the trunk, making touch ups with flat varnish mandatory. And secondly, don't use brushes to apply the glueing agent. Sprays have a random character that will help to give a more natural aspect to the finished tree.
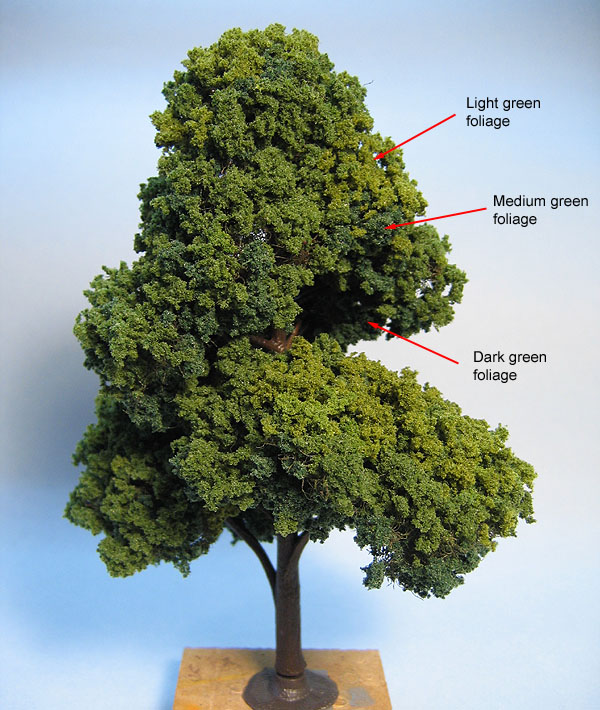
The Woodland Scenics set comes with a base, but I used it only to let the tree to dry. At this point, I couldn't resist to dry fit the tree on the base. Of course, this is a small decidious tree for the 1/35 scale:
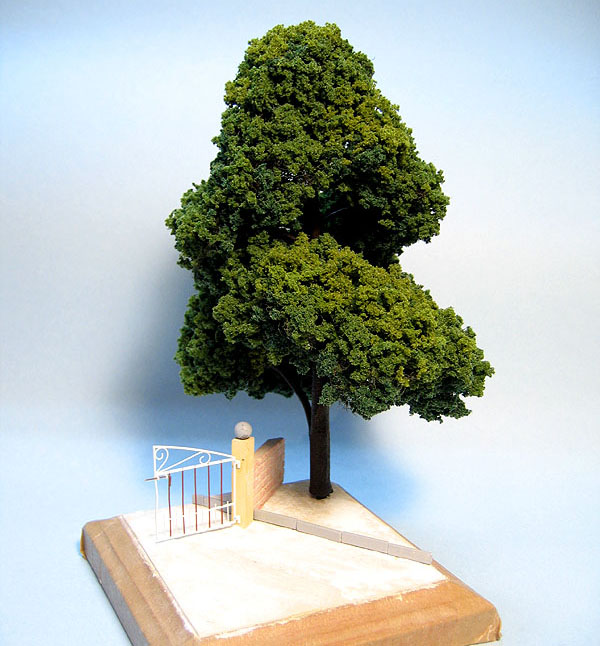
Now I could finish the base. Time to put the colors... I started airbrushing a dark earth color all over the ground, and adding false shadows with a darker tone of the original color. I used mostly some leftovers of the old Pactra acrylics that are still around my bench.
The street then received a hand of medium brown in light coats, in order to show some of the dark earth through. Using the excellent Vallejo acrylics line, I could hand painted the smaller details. Some areas were painted in white, including the sidewalk border. The brick wall received cement color first. I could then paint the bricks individually. I used some tonal variations on a couple of bricks, to add some interest. I also used my trusty Badger 150 to simulate the mud spills here and there. I liked the effect.

Now that everything was basically done, I could add some green. I used simply diluted white glue and Woodland Scenics static grass. I didn't care about the color, as I always paint it anyway... In this case, I just airbrushed some medium green, followed by some highlights in yellow, and finally some dust in the areas adjacent to the wall.
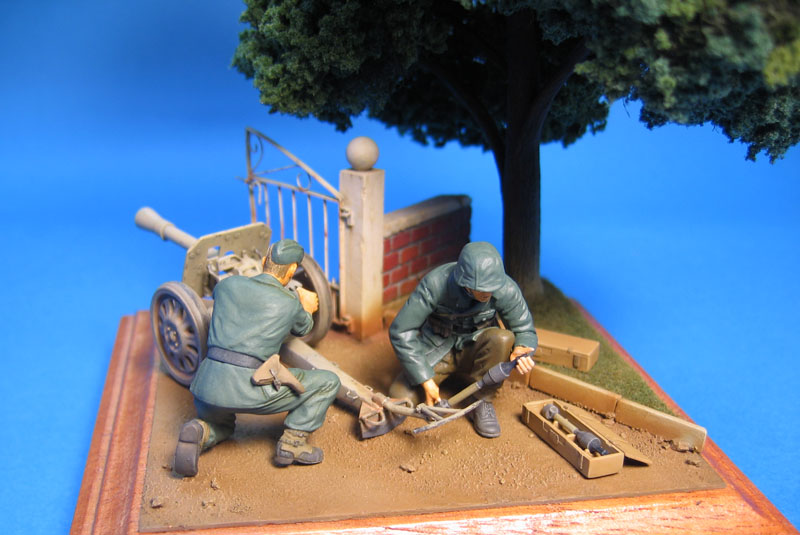
I also painted the gate in off white, and simulated several spots of chipped paint and rust. Chipped paint effect was achieved using the traditional pencil technique, while rust was depicted using oil paints and some pastel chalk. I carefully painted the ammo boxed which come with the kit, but I failed to find a definitive answer about the ammunition colors, in this particular case. I had a pretty bad time trying to paint a Tamiya mechanic with the same level of Fabricio Fay or the folks from Caxias... Fortunately, Vallejo paints are very forgiving, but they can't make a Leonardo da Vinci out of a Rat. I'm pretty satisfied, though, as I can't remember the last time I painted a large scale figure. Well, the tree was fixed in place (some more grass was sprinkled around the trunk base to conceal the joint), and the Püppchen with its Jerry were glued in place (don't stop reading here... this is not finished):

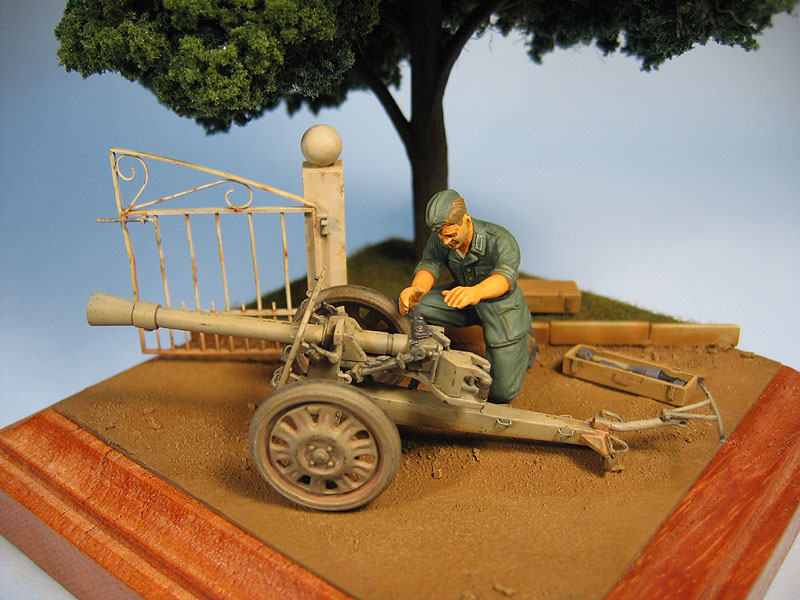
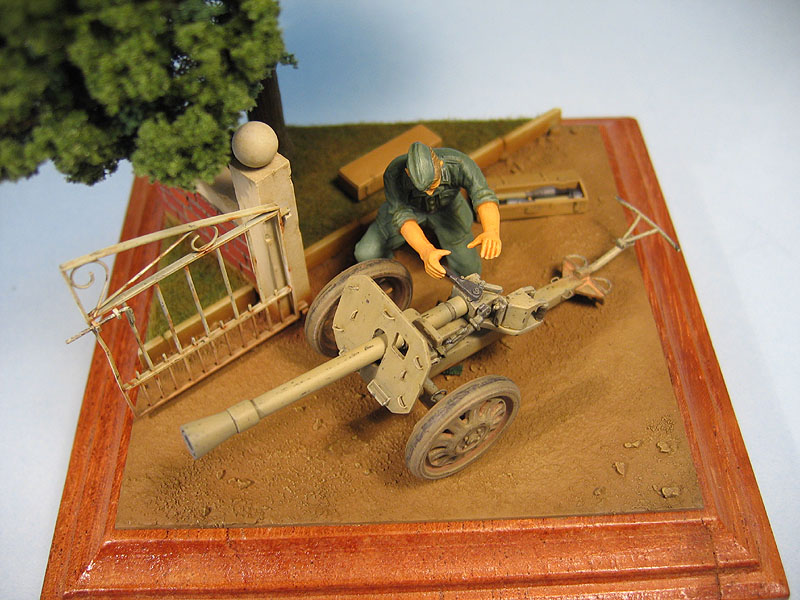
At this point I was admiring my work, but not fully satisfied... something was missing. Thanks to my lack of expertise in military subjects, I couldn't say what (I still can't today), but I wondered one more figure would at least render a more realistic aspect for such a piece of artillery under use. Another fellow modeler, Mr. Fabrício Fay (an excellent figure painter himself) gently donated a resin figure of a Jerry posed just like I figured in my mind - thanks dude! I assembled and painted the item with slight modifications in order to make him handling a round. I varied a bit the uniforms colors. You know, the war is almost over...
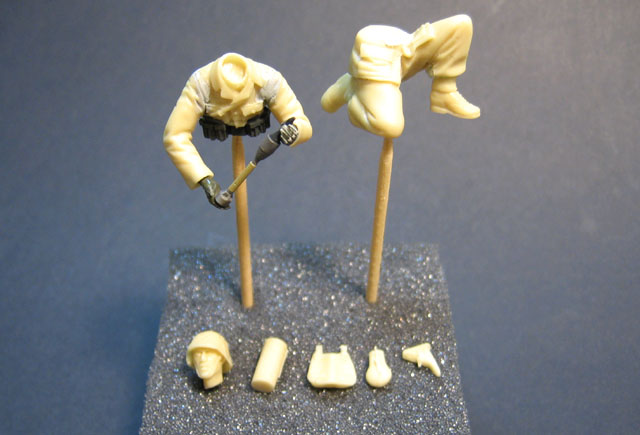
Folks, I'm telling you, these stuffs about highlights, lowlights, midtones, blending etc. are hard as hell. Hats off to those of you who enjoy figures. Anyway, I had opportunity to play a lot with these techniques (most of them new for an aviation modeler). In the end I think that with some practice even me can produce an acceptable figure, with luck. Well, at least my trees are acceptable.
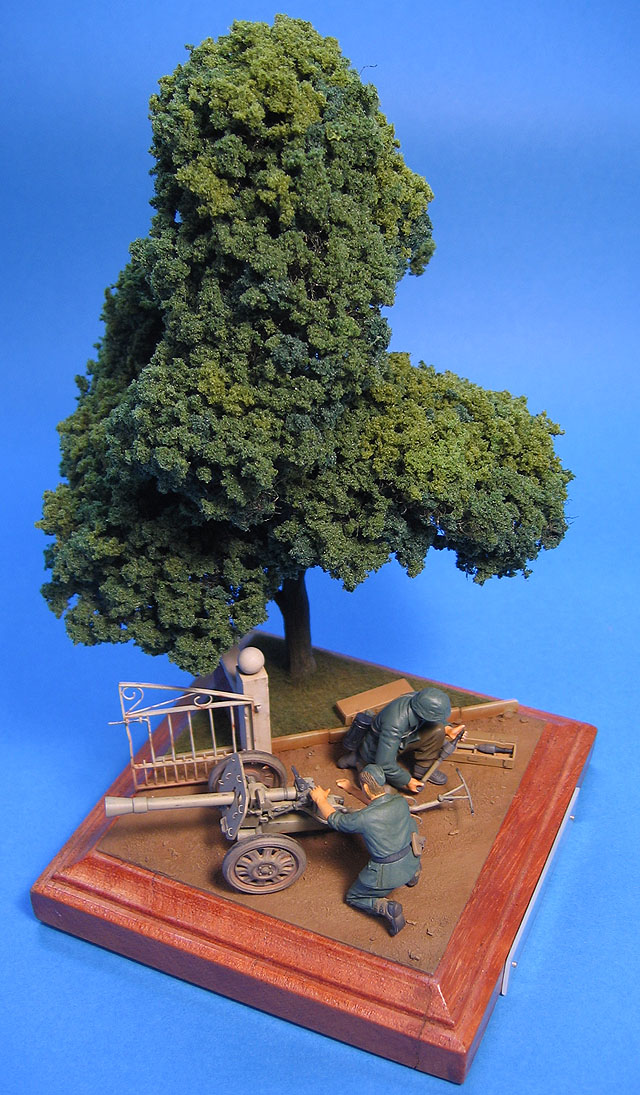
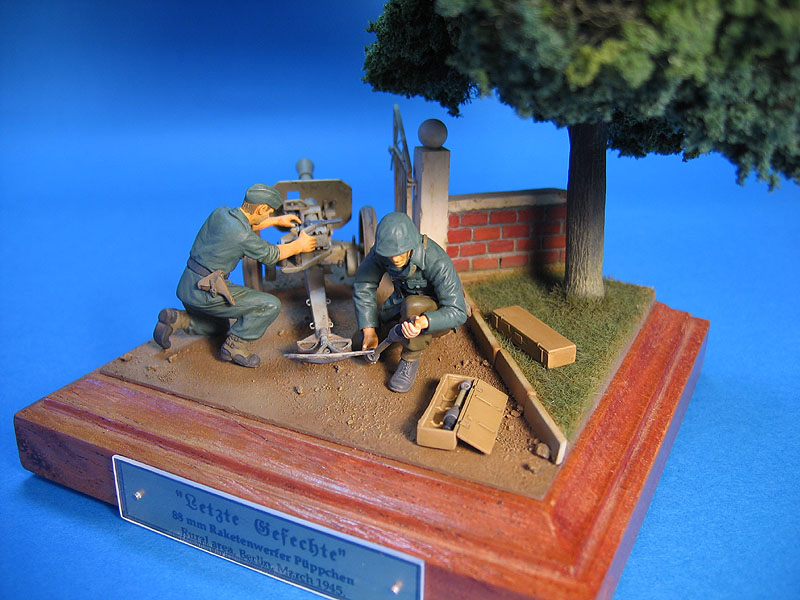
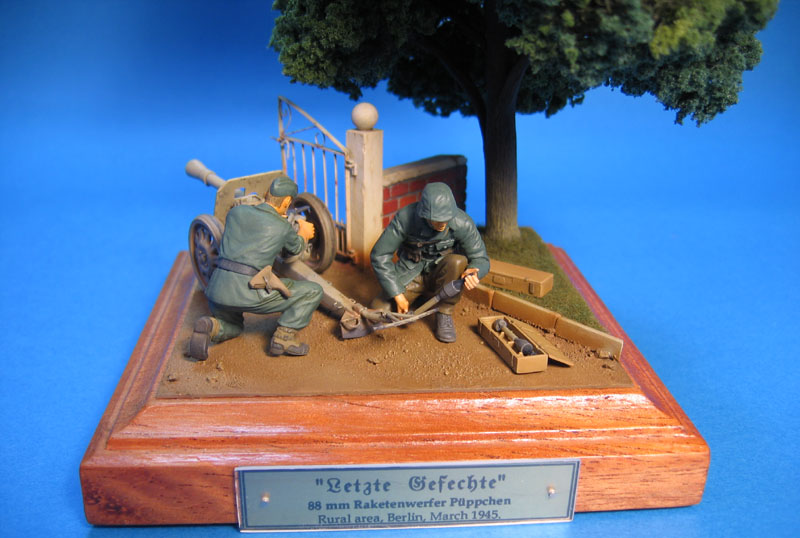
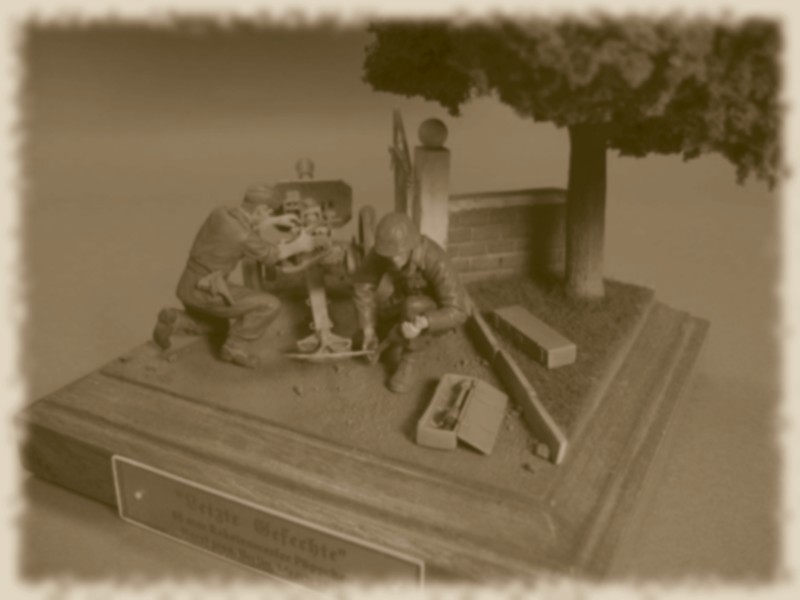
And that's it, two Jerrys desperately trying to defend their sector. And in case you're wondering, letzte lefechte is the german translation for last rounds. Here are some pics of the vignette finished:

Of course, I couldn't resist to play a bit with Photoshop:
While the glue was still wet, I added some gravel and stones here and there. I then moved to the main excuse for this project: the tree. I had some Woodland Scenics stuffs around my bench for a while, and decided to give it a go. The particular item I used here is the product #TR1103, Woodland Scenics Tree Kit 5"-7" Large Green Tree, containing enough material to model seven trees. Three bags of green foliage accompany the set.
The tree armatures (trunks and branches) are injected flat. Since they are made of a pliable type of plastic, you have to bend the branches in a natural look. I airbrused a coat of dark brown over the trunk, washed with an almost black dirty thinner, and finally drybrushed everything with ochre oils. This showed the texture of the bark effectivelly,
Next, I had to provide some support to the foliage. I used pieces of Scotch Brite scrubbing pads randomly stretched, which were glued to the ends of the branches.
I then started to glue the foliage. This is a very tedious process. Our friend military modeler Jerônimo Teixeira told me once to use diluted gel medium as the glueing agent. I made a few tests and found it tooke too long to dry (would need a day to dry each layer of foliage). Therefore, I started to look for alternatives. In the end I decided to use banana extract. No, it won't attract flyes... This stuff is actually a nitrocellulose resin, which remains tacky several hours after the application. Furthermore, it is very thin and can be applied through an airbrush or refillable spray bottles straightforwardly. I used a small, plastic refillable spray bottle to apply it. In the first pass, I turned the tree up side down, sprayed a pass, and sprinkled the dark green foliage. I then turned the tree up and repeated the process, using the same dark green foliage. These two steps pretty much form an initial dark green foliage shell around the stretched pad volumes. With the tree up, I repeated the application using medium green and light green, reducing the amount of glue as I advanced. Since the foliage is a kind of sponge, you can control the build up as the tree canopy takes shape. Very easy, in fact. A couple of warnings, though: Mr. Jerônimo's method of using gel medium has the advantage of drying flat. My choice left a very bright finish on several spots along the trunk, making touch ups with flat varnish mandatory. And secondly, don't use brushes to apply the glueing agent. Sprays have a random character that will help to give a more natural aspect to the finished tree.
The Woodland Scenics set comes with a base, but I used it only to let the tree to dry. At this point, I couldn't resist to dry fit the tree on the base. Of course, this is a small decidious tree for the 1/35 scale:
Now I could finish the base. Time to put the colors... I started airbrushing a dark earth color all over the ground, and adding false shadows with a darker tone of the original color. I used mostly some leftovers of the old Pactra acrylics that are still around my bench.
The street then received a hand of medium brown in light coats, in order to show some of the dark earth through. Using the excellent Vallejo acrylics line, I could hand painted the smaller details. Some areas were painted in white, including the sidewalk border. The brick wall received cement color first. I could then paint the bricks individually. I used some tonal variations on a couple of bricks, to add some interest. I also used my trusty Badger 150 to simulate the mud spills here and there. I liked the effect.
Now that everything was basically done, I could add some green. I used simply diluted white glue and Woodland Scenics static grass. I didn't care about the color, as I always paint it anyway... In this case, I just airbrushed some medium green, followed by some highlights in yellow, and finally some dust in the areas adjacent to the wall.
I also painted the gate in off white, and simulated several spots of chipped paint and rust. Chipped paint effect was achieved using the traditional pencil technique, while rust was depicted using oil paints and some pastel chalk. I carefully painted the ammo boxed which come with the kit, but I failed to find a definitive answer about the ammunition colors, in this particular case. I had a pretty bad time trying to paint a Tamiya mechanic with the same level of Fabricio Fay or the folks from Caxias... Fortunately, Vallejo paints are very forgiving, but they can't make a Leonardo da Vinci out of a Rat. I'm pretty satisfied, though, as I can't remember the last time I painted a large scale figure. Well, the tree was fixed in place (some more grass was sprinkled around the trunk base to conceal the joint), and the Püppchen with its Jerry were glued in place (don't stop reading here... this is not finished):
At this point I was admiring my work, but not fully satisfied... something was missing. Thanks to my lack of expertise in military subjects, I couldn't say what (I still can't today), but I wondered one more figure would at least render a more realistic aspect for such a piece of artillery under use. Another fellow modeler, Mr. Fabrício Fay (an excellent figure painter himself) gently donated a resin figure of a Jerry posed just like I figured in my mind - thanks dude! I assembled and painted the item with slight modifications in order to make him handling a round. I varied a bit the uniforms colors. You know, the war is almost over...
Folks, I'm telling you, these stuffs about highlights, lowlights, midtones, blending etc. are hard as hell. Hats off to those of you who enjoy figures. Anyway, I had opportunity to play a lot with these techniques (most of them new for an aviation modeler). In the end I think that with some practice even me can produce an acceptable figure, with luck. Well, at least my trees are acceptable.
And that's it, two Jerrys desperately trying to defend their sector. And in case you're wondering, letzte lefechte is the german translation for last rounds. Here are some pics of the vignette finished:
Of course, I couldn't resist to play a bit with Photoshop:
| Technical file | |
| Kit:
|
-
Dragon item #6114 |
| Acessories:
|
-
Woodland Scenics 5"-7" tree set - Woodland Scenics static grass |
| Stolen
parts: |
- A german mechanic from Tamiya
Kubelwagen engine maintenance set. - A resin soldier from somewhere. |
| Basic
colors: |
-
Primer: Gunze Mr. Surfacer 500 (only
for the figures) - Dark Yellow: Tamiya XF-60 acrylic - Steel: Humbrol Metal Cote #27003 Polished Steel enamel - Soldiers' uniforms: Vallejo #085 and #141 - Diorama base colors: custom mix of Pactra and Vallejo acrylics |
| Notes: |
|
Rato Marczak © 2007
