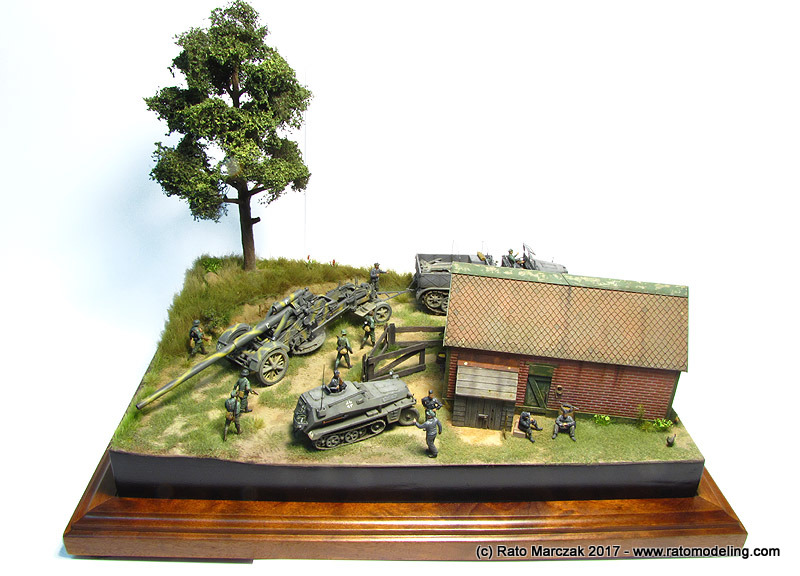
| Retreat diorama in 1/72 with Trumpeter Sd.Kfz.9 Famo, Revell Kanone 18 and Italeri Sd.Kfz.253 |
|
Started: December / 2014 Finished: May/2017 |
Retreat is a 1/72 scale diorama which I've been planning for a while, and helps to explain the Revell Kanone, the Famo, and the Sd.Kfz.253.
The latter shouldn't be in the diorama, but I gave up using it in
another one, what makes this one my first diorama with more than two
models since my teen years. Anyway, the idea is to depict a scene in
late summer,
circa 1943, somewhere in the Eastern front. After successive defeats to
the Red Army, the
Germans are retreating to reorganize. I haven't thought about any
particular place, just tried to imagine a glimpse of troops retreating,
not so far from the frontline, trying to gather what was
left of vehicles, soldiers, and morale. Think about a confluence
of troops, artillery, mechanics... but the enemy is no longer on their
heels.
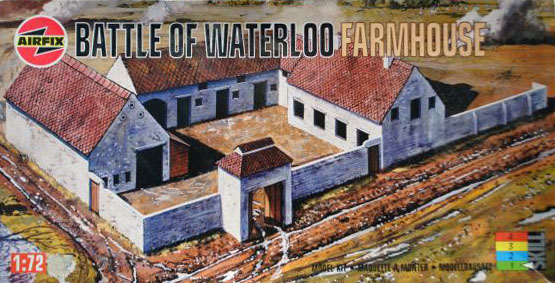
The diorama base was sketched several times, until I settled on something that looked nice and balanced. I wanted to include a building of some sort, so I resourced to Airfix Battle of Waterloo Farmhouse kit. This is a vintage kit, but thankfully manufacturers are starting to release similar kits more recently. They are very, very useful for anyone interested in dioramas.
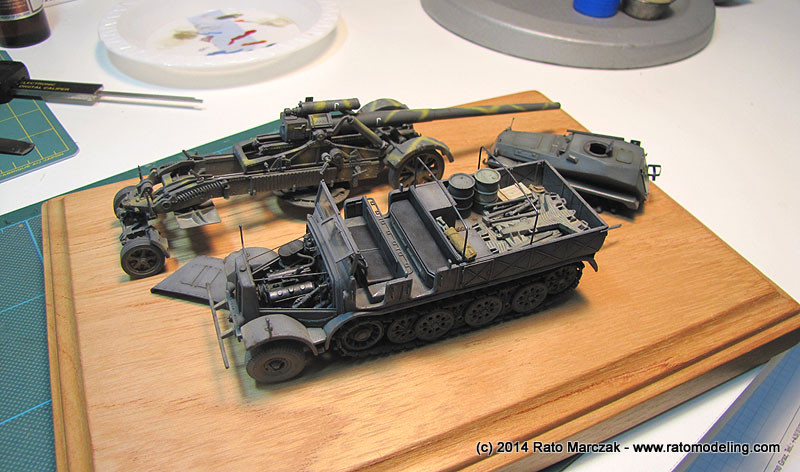
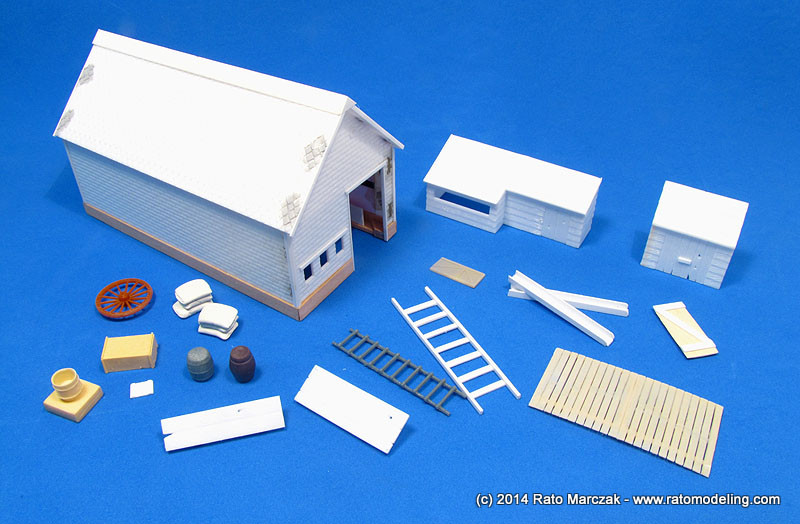
Of course the first moves envolved some measurements. The essential part of the scene would be the Famo towing the Kanone and negotiating a tight curve, with the Sd.Kfz.253 parked in the entrance of a farmhouse or barn... So these are the actors:
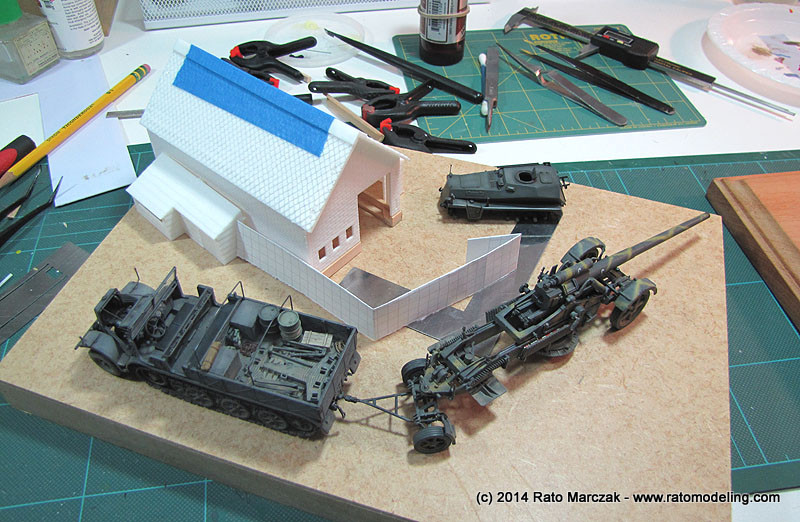
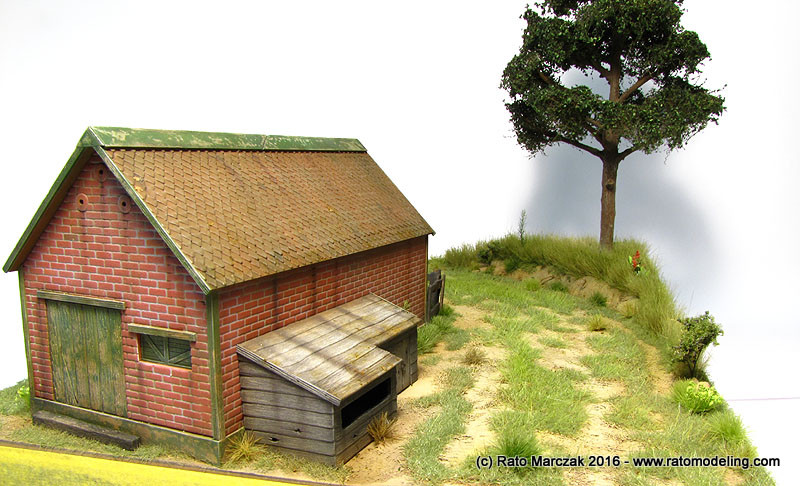
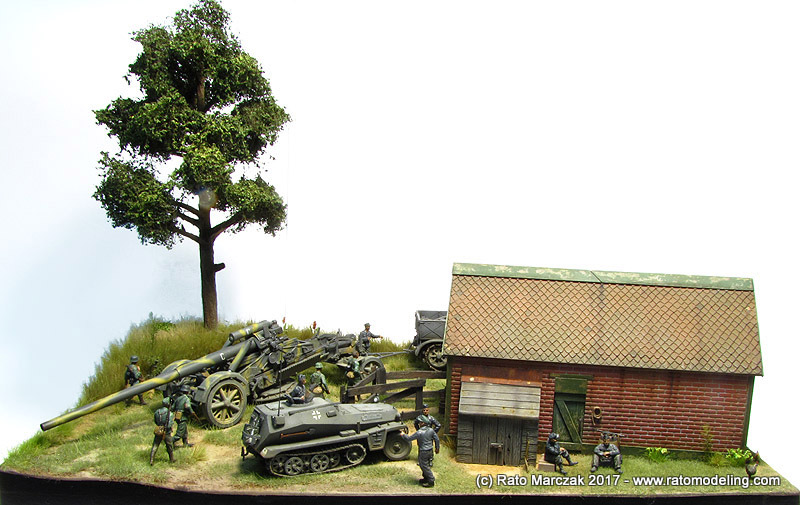
The picture below gives you an idea of the basic setting. At that point I didn't have all details in mind, but I believe one of the nice things about building dioramas is exactly small changes that you do as you go, afterall the diorama in your mind seldom is exactly replicated in the real one. The opposite corner of the house will have a higher ground displaying a tree to balance things.
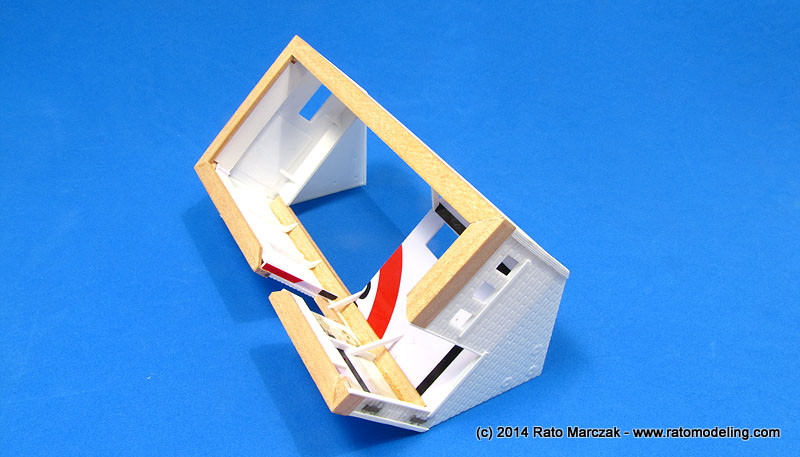
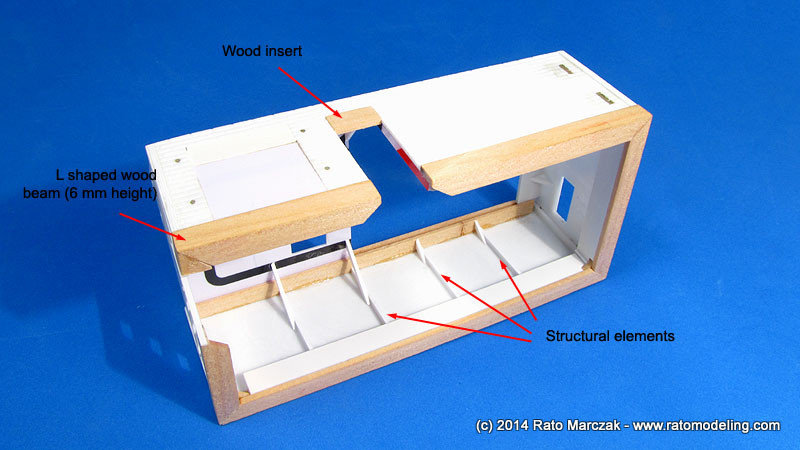
As you see in the photo above, I used only part of the Airfix farmhouse kit. Because of this, I had to make changes and corrections to use it as a kind of barn or farm storehouse. It was originally boxed as 1/76 scale, and later advertised as 1/72. A comparison with 1/72 figures showed that I had to make it a little taller to look right. So the the storehouse was lifted 6 mm by gluing wood shoes along the walls' base. I used architectural L shaped wood beam for that. Other internal structural elements were also used, crudely cut from plastic card, as not much of the inner wall would be visible:
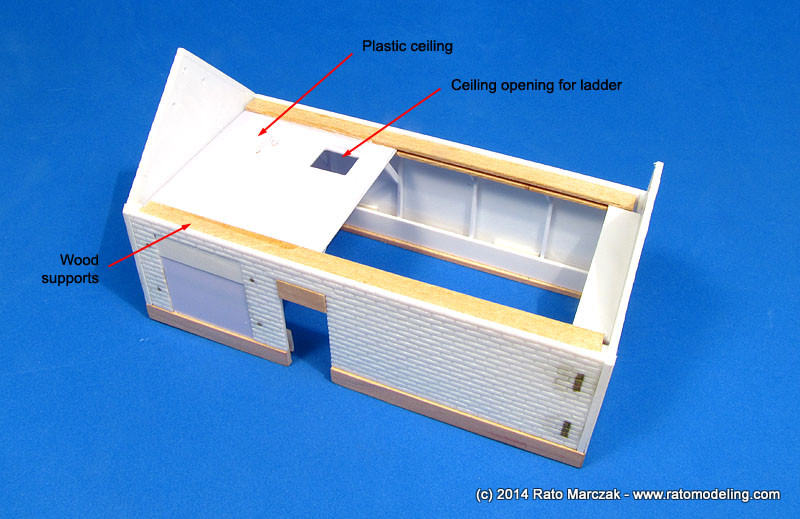
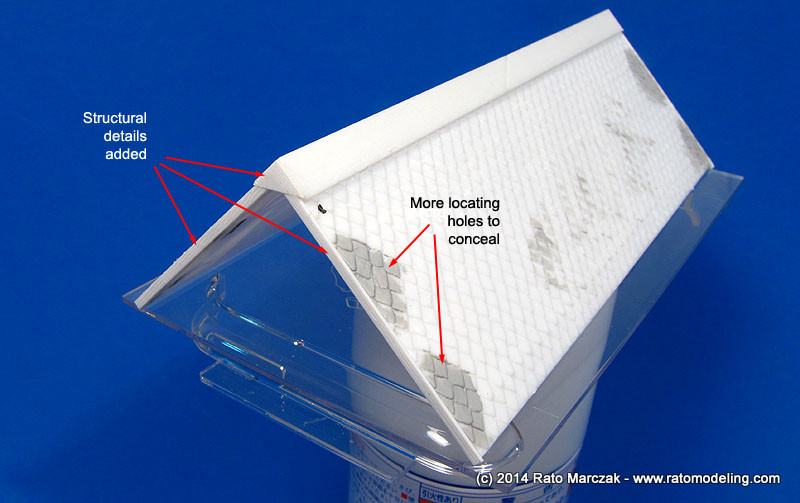
Another modification was the addition of an attic, typical in this kind of construction - more on that latter:
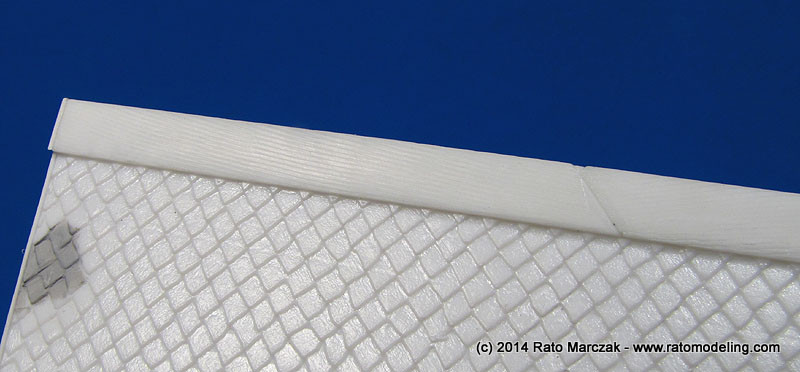
An annoying thing with the Airfix kit is the need to conceal all joints after the glue was set, and this means filling and rescribing the area to look like a continuation of the brick pattern:
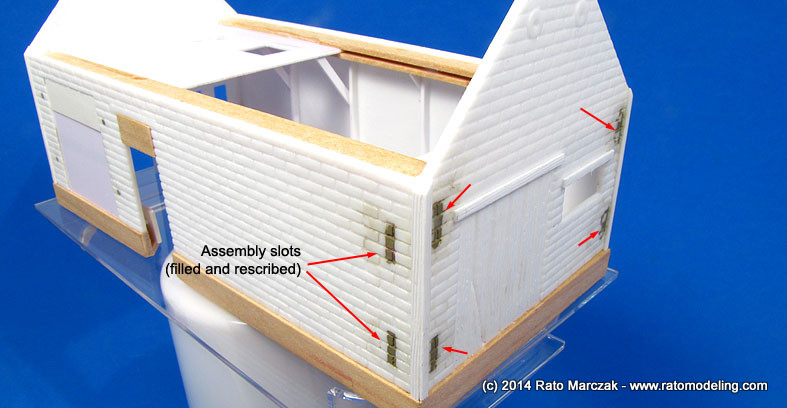
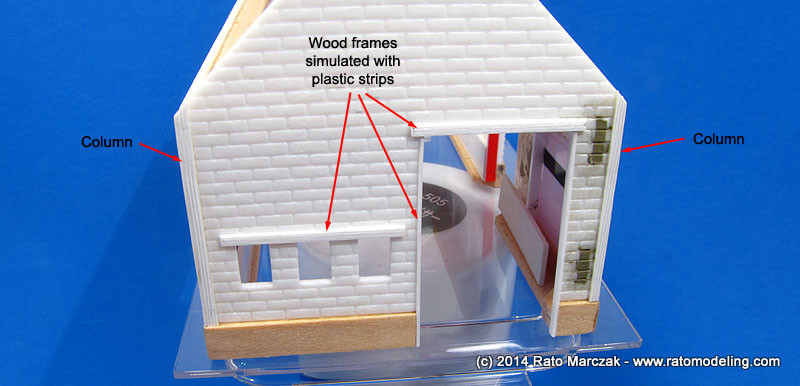
I also added plastic strips on the corners to simulate columns and drip stoppers atop walls and windows. I think this was a good idea, as the old Airfix kit is very simple and would not look realistic without a twist:
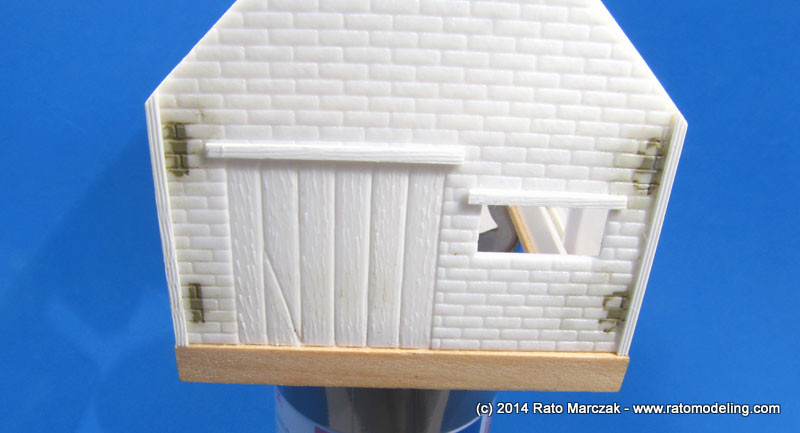
After gluing these planks, I used a needle to make a small punctures along them. Later, painting and oil washing these parts would make the small holes look like nails.

The roof parts were assembled as per instructions, and I went over the same steps there:
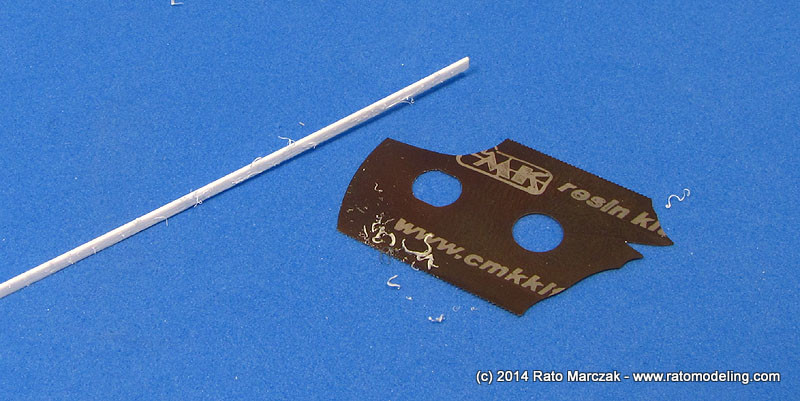
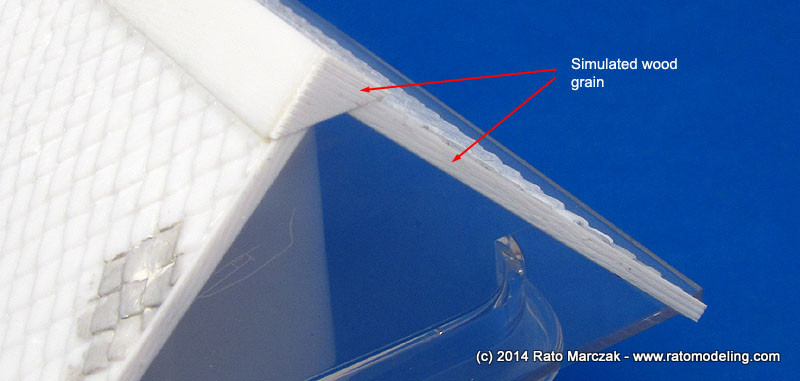
The wood planks simulated in the previous steps were made with plastic strips. Antecipating the need of a good amount of them, I simulated wood grain on a big piece of plastic strip by running a metal saw randomly along its length. After scrubbing with a Scotch Brite pad, I had enough to go on:
It is not the best way to simulate wood grain, mind you. You have to take care to avoid too parallel grains along the strips. At times I also used a pass with a metal brush to increase the randomness of the grains:
Besides the barn, I added two annexes to it, both also from the Airfix farmhouse kit.
The larger one was a..., uh..., well, I don't know what it was, but think about a chickenhouse of some sort. Maybe a storage space. It would go attached to West wall of the barn (heck, I know the geo-orientation of my dioramas!). A fun step during the preparation of these things is to rescribe wood planks, and simulate knots and holes in the wood. It is not like rescribing and aircraft model. Here you can go wrong without much of a problem, no need of rulers or tapes to guide the scriber. Of course this will be a battered house, made with old dry wood planks from another, even older, demolished building. Well you got the idea:
The second addition is where the farm owner used to stock cryogenically his best genetically modified eggs... Ok, in case you haven't noted, this was a joke. Again, I don't know what this little house was, except that it goes glued to the East wall of the barn. It also came from the Airfix farmhouse, and had some detail added mostly using a sharp hobby knife. I wasn't totally satisfied with the wood grain molded raised on these parts, so I sanded them slightly to mitigate the effect a tad and, if I were in the mood, I could add a few passes with a metal brush:
At that point, the main items were ready for priming. Besides the barn and the two houses, I scrounged or scratchbuilt the following items to decorate the scene:
- Wagon wheel
- Grain drum
- Grain sacks
- Wood barrels
- Stairs
- Channels
- Windows & doors
plus a few other things, not really sure what would be actually used in the diorama. Here is the family portrait:
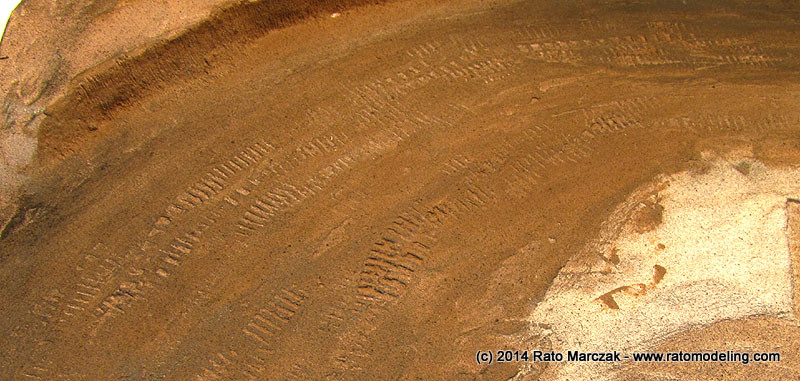
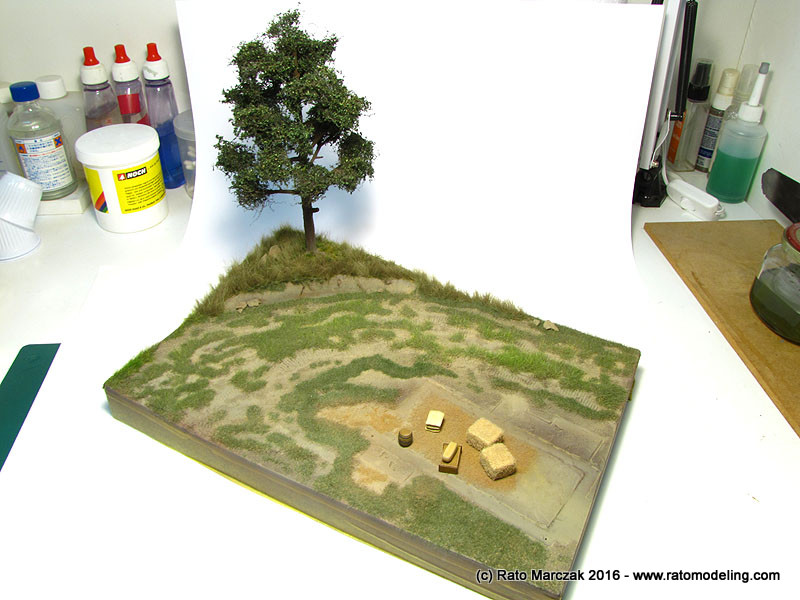
So it was time to start working on the base itself. I used a small poster frame (20cm x 30 cm) over which a piece of expanded styrene was glued and carved to make the higher ground on the corner of the road. Then, a layer of acrylic putty was spread over the whole base and worked out before setting. The barn and the little houses were pressed against the putty to mark their final positions, a tree trunk was pressed on its place, and road marks of several types of tires/tracks were impressed along the road using parts from other kits.
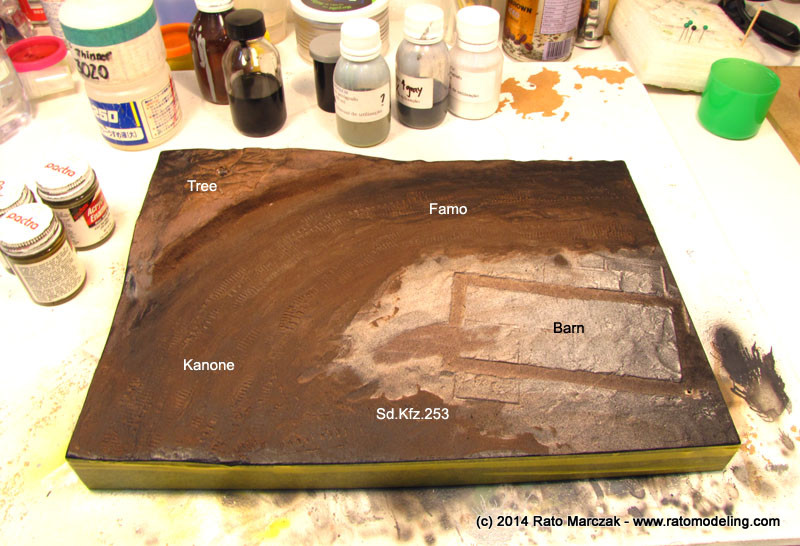
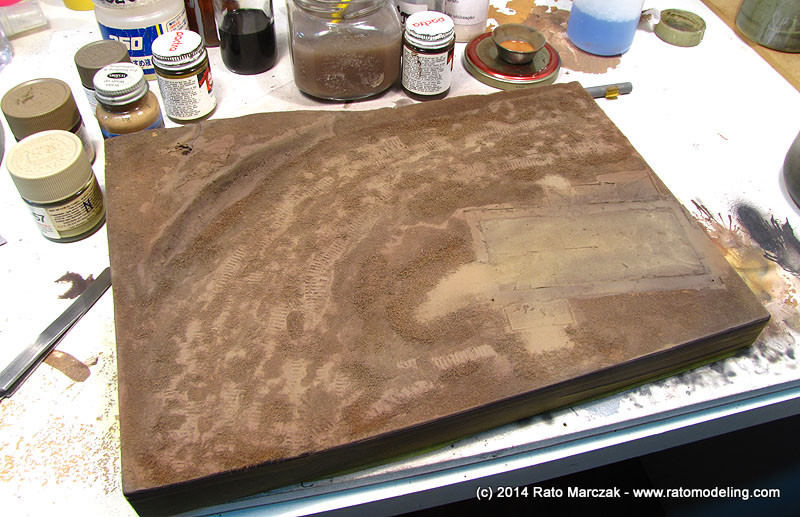
Once satisfied with the base relief, I added more texture to it by gluing what I call dirty grass. It is a first layer of static grass over which more grass will be added later. This first grass is painted in earth tones like the remaining areas of the terrain. Later, when the top (green) grass is glued, the final effect is like real grass, going from green on the top to brown on the bottom layer. The base was airbrushed with acrylic colors, and hardened earth/dusty areas highlighted with lighter colors:
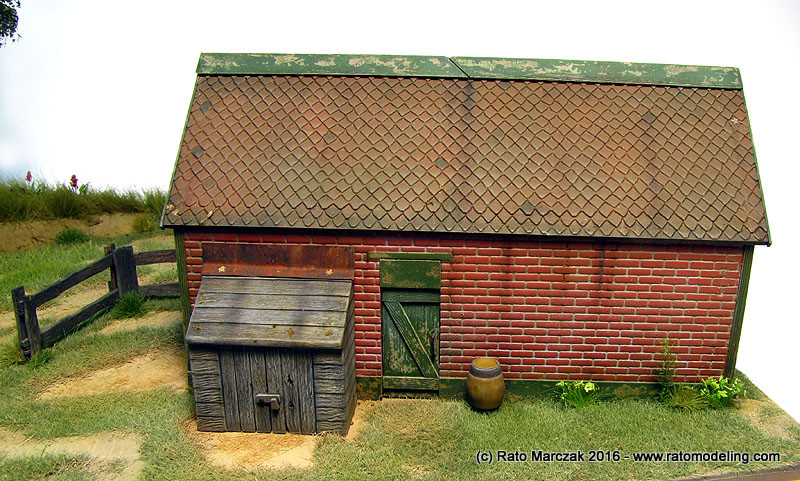
With the base settled, I started painting the barn. I didn't want a rotten barn, just something well weathered by the elements. I used exclusively acrylics for the job (Vallejo and Tamiya), mixed as I went, without thinking too much...
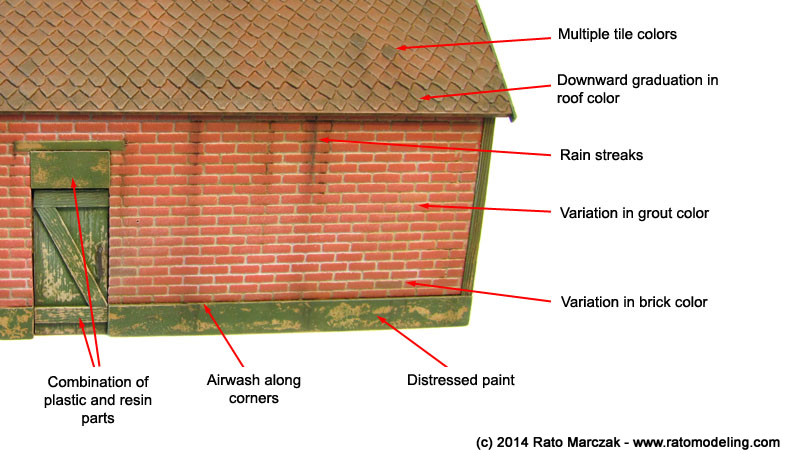
The brick walls obviously received a brick color, the roof was painted in dark brown and the wood frames in green. I started with the brick walls, airbrushed with a madder color, picking up several individual bricks with darker and lighter tones for a better visual effect. Once dry, the walls were protected with a good coat of gloss automotive lacquer. Then I prepared a grey oil sludge: it was thinned to the point of a enamel paint, but applied almost like an oil wash over the recesses between the bricks without much care. To clean up the excess, a piece of old T-shirt stretched over my finger was rubber over the walls while the sludge was still wet. This cleaned up the bricks leaving the gray oils in the recesses - really quick and easy, even quicker if you use lighter fluid to thin the oils. The roof was painted with a darker color, and I applied an oil wash of burnt umber color afterwards. A heavier effect of oils was used along the lower lip of the roof to simulate accumulated grime and dirt, by dabbing a flat brush with pure oils:.
Next, the masks were removed and the hole barn received another clear coat, this time flat, and light grey was gently drybrushed, concentrating the effect on the wood (green) items. Then the rain marks were added. I used AK's Rain Streaks enamels. Once dry, I diffused the effect using Humbrol's Smoke pigments - a nice product, by the way. The final effect was the application of an airwash over corners, recesses, and the transition seams between wood and brick.
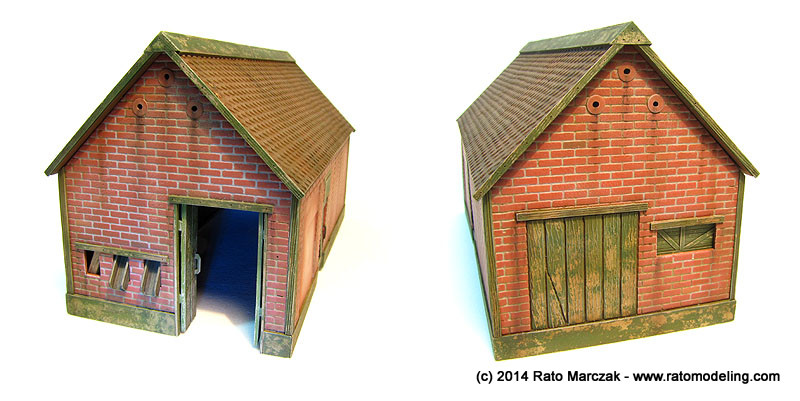
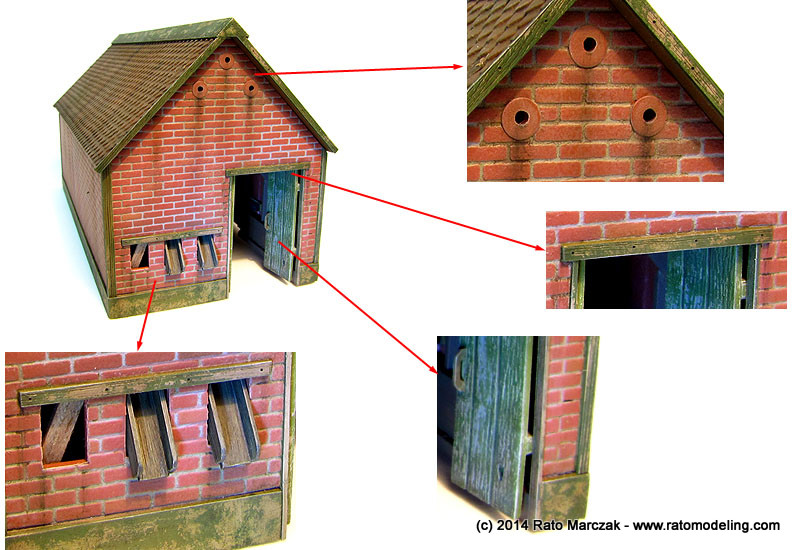
The channels I made earlier were painted as dry wood and glued in the small apertures on the front wall. They run inclined all the way up to the ceiling of the barn. These replicate the channels used to flow grains from the attic to containers outside the barn (seed dispensers). The main doors were reworked to look old and well used. They received new handles and were also painted with the hairspray method.
The chickenhouse was painted with a different technique. They should have that old, dry wood aspect. So I primed them with Mr. Surfacer and didn't use any other color after that. I just spread pure black oils with a fan brush until they looked right, trying to leave more oil paint near the ends. The secret is to run the brush along the grain direction, and clean the brush from times to times. The remaining steps were the same used on the barn: gloss coat, oils wash, flat coat, drybrushing and rain streak marks:
The same painting sequence was used on the small house, except that it had a piece of folded metal plate to avoid rain from dripping into the house. A piece of brass sheet was bent to shape, rusted, and glued in place. Small dry leaves gave the final touch:
In case you are wondering, the front yard faces South, while the back door faces North... A dry fit shows how it will look like:

In retrospect, I should have damaged a few bricks here and there. Maybe this is a not so old building, uh?
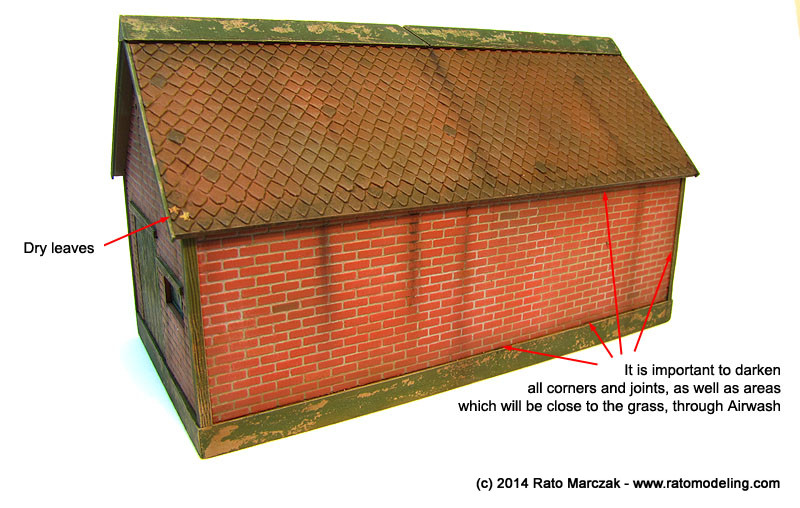
It is important to note that the weathering was not quite done at this point. After the buildings are glued to the base a new pass of airwash will be applied over the lower areas using earth colors. This is important to harmonize everything and equalize chromatic range of the dirty areas.
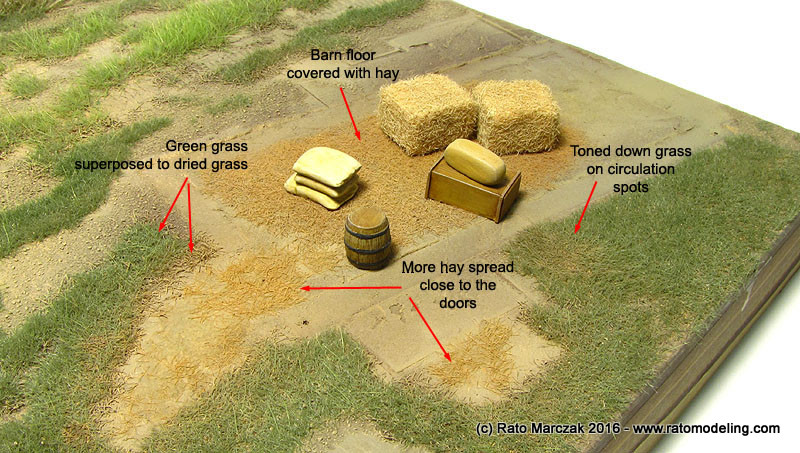
With the basic buildings done, I painted and weathered the smaller items. The corn sacks were hand made with Milliput, and the leftover putty was shaped in what is a cheese, I guess! A small container with grains inside will be placed under one of the channels in the front wall. There was also a broken wagon wheel, barrels and boxes. The ladder takes one to the attic. An effective trick to simulate hay blocks is to cut cubes from balsa wood, coat them with white glue, and cover with cream colored static grass. The grass of the same color will cover the floor of the barn later.
Two or three of these details will be placed outside the barn, but the rest will be laid visibly (I hope) inside, more to hide the crude interior of the barn than anything else. Since the barn will have troops checking around, I would decide about their definitive places later on.
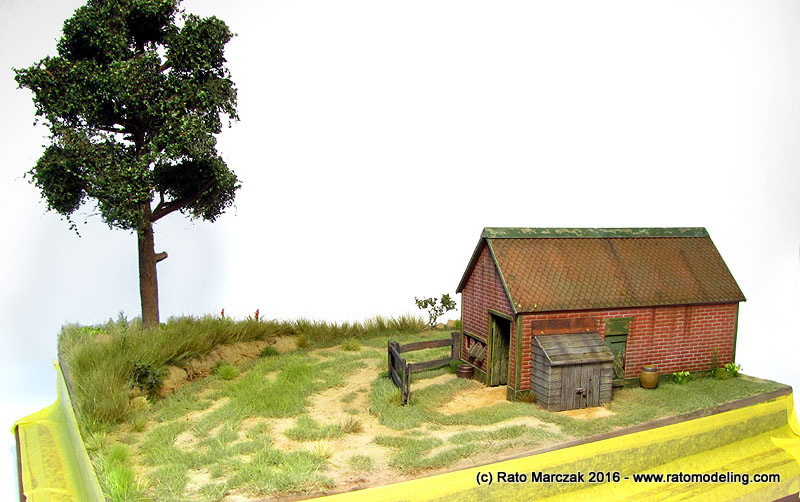
After putting this project aside for a few of months in order to finish off others, I finally resumed it with the slow task of criteriously planting tall and short grass, and yet leave the first (brown) grass partially visible. The idea was to divide the groundwork in three major areas, explained below.
But first, I had to finish the tree. It was basically a Woodland Scenics plastic amature whose trunk was reworked with wood filler to better represent the bark. Balls of polyfiber were shaped at the ends of the brances and everything was painded, oil washed and drybrushed. Pretty much standard diorama tree construction. I then proceeded to the leaves, and I wanted to use those wonderful Noch individually cut leaves. I used Dark Green (#07146) and a bit of mid-green (#07144) on top of it, plus a few dried leaves here and there. This is the result:

And if you look closely, you can see through it, proof that I succeeded in avoiding a model tree with that 'solid' look that we get when using sponge-type foliage. Not my best tree, but I liked it. I probably will trim a few small branches here and there later:
Back to the grass, as I said, I worked on three basic areas:
a) The elevated area where the tree should go would have tall grass, planted tuft by tuft, using the 'cigar' technique I learned from railroad modelers. Actually, I used a mix of Custom Dioramics light green short grass and Woodland Scenics light green (#173) and natural straw (#171) Field Grass, cut to a shorter size. This area would not be neatly arranged - think about cattle out to pasture there and you got the idea. It is part of the meadow surrounding the farm, I guess. Also, it was important not letting the grass to cover the small ravine, which is frequently eroding whenever rains...
b) The second area would be the short grass around the barn. The grass there should be short because of people coming and going while doing their daily duties, and not letting any grass get too tall... or maybe there was that goat leveling the grass inside the fence. I just don't know. Inside the bar I spread Woodland Scenics Harvest Gold static grass (#632) and pressed it with a book while the glue was setting. I wanted it looking like a layer of dry hay heavily stepped on, with some also spreading outside the barn entrance. In order to remove much of that artificial shine from the static grass, I airbrushed flat light brown acrylic paint. At this stage, I also glued most of the details that would go inside the barn to their definitive positions:
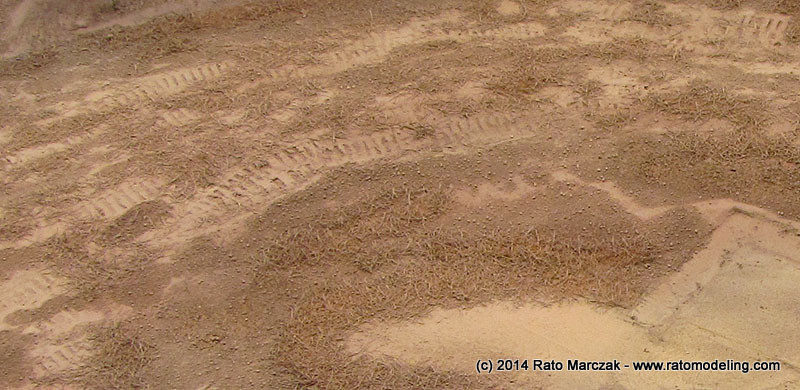
c) And outsite the fence there is the road. There I would like to have a mix of dark and mid green short grass, and light green tall grass (I used Woodland Scenics, Noch and Joefix items, but I don't remember which one is which one). That road was not a very busy one - mostly carts and wagons transit there - but rains are always washing the tracks, and the Wehrmacht was retreating that day. I can't tell how many times I would came back with the airbrush and change lightly the color, using browns and greens. I think the recipe worked out ok, because the tall fibers really stand up from the short grass, looking pretty much like what I saw in landscape photos:
The final effect is quite realistic, but there is still many vegetation details to be added. But before that, I misted a very thin mix of Model Master Dark Tan and Tamiya Buff from above with my airbrush set to low pressure. I like to use this trick to produce what my friend Fabricio Fay calls chromatic uniformity. It is exactly that, I mean, avoiding harsh color changes on the diorama groundwork.
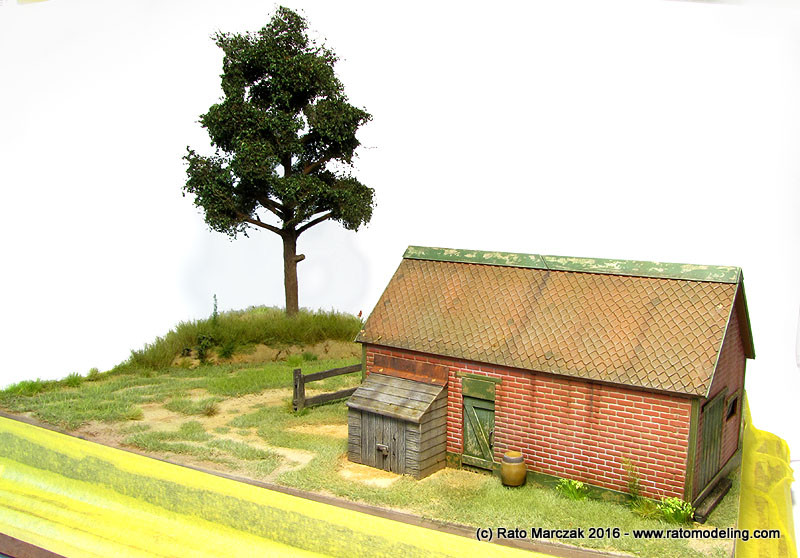
A couple of weeks has passed and I found some workbench time to add details to the diorama. The barn was finally glued to its place as well as the annexes:
Once the barn was firmly set in place, I started to add the missing vegetation. A small advice here: many modelers don't add any further grass after installing the buildings on their dioramas. I always like to add some fine turf or static grass to shut small apertures and gaps that remain from the irregular groundwork. Adding minute amounts of static grass to these places helps to integrate the building to the groundwork.
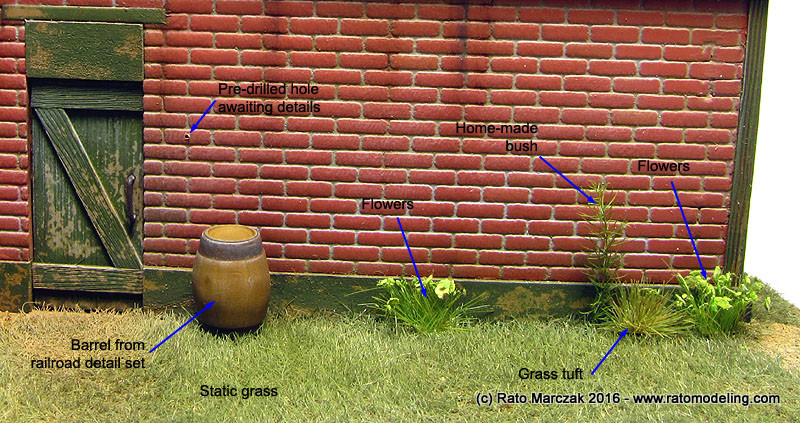
But besides that, I added flowers and bushes from either commercial items or home-grown, denaturated plants that I cultivate just for that. Ready made grass tufts also enhance those spots which look like if something is missing. During this project, I collected some railroad HO scale detail parts with potential use in the diorama. They were used as I deemed necessary. Barrels is one case - never believe in a barn without one or two of them...
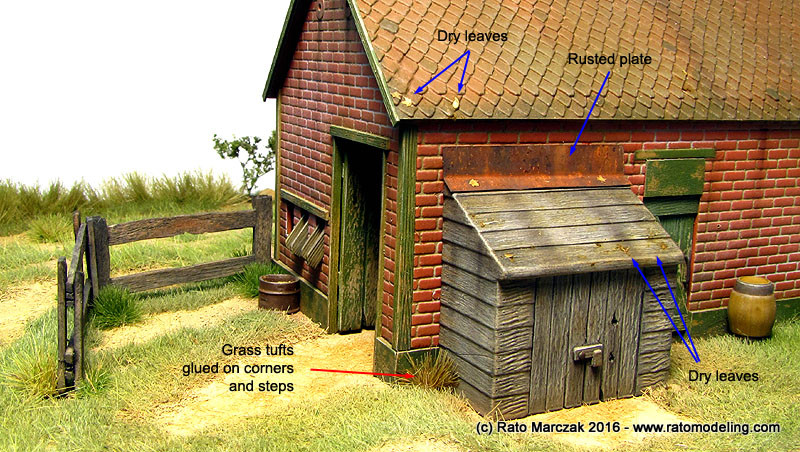
And another advice, if I may. As much as dust over horizontal surfaces, dry leaves on roofs are essential to add realism to a scene. You don't need too much - I just sprinkled some here and there, but they make a lot of difference:
A small dry wood fence was installed in the South entrance. I used the same technique used to weather basswood in my 1/72 Mark I tank vignette, and I loved the result. The main gate will be installed at the end, after gluing the vehicles and personnel. The half drum filled with corn was cemented under one of the seed dispenser channels painted and weathered earlier. A few railroad HO details enhanced even more the interior of the barn:
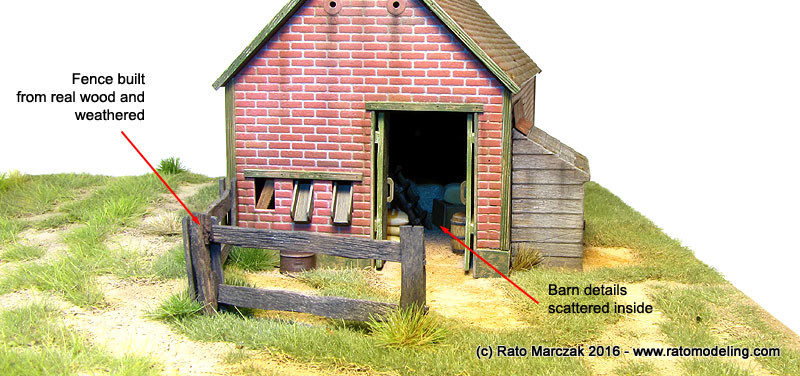
I am particularly pleased by the final aspect of the wood fences, to the point of using a few pieces of rotten wood as they were in order to better simulate what you find in photos of old farms...
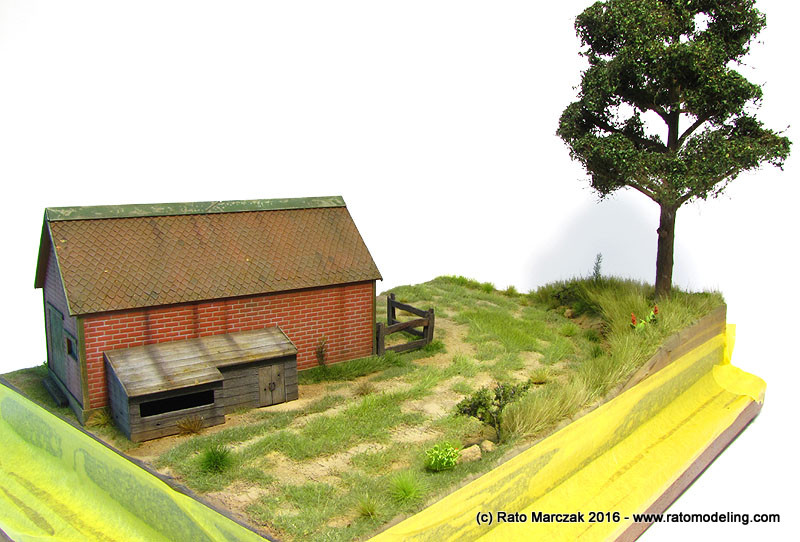
I will not describe where and why I planted this or that vegetation. Much of it was done on the fly. If you don't like it, remove it. Simple as that, just keep in mind that everything must make sense. Of course large vegetation or bushes wouldn't survive in the middle of the road, so I naturally added more of it along the borders of the road, particularly the West border, to give some impression of continuity of the high grass used on the tree plateau:
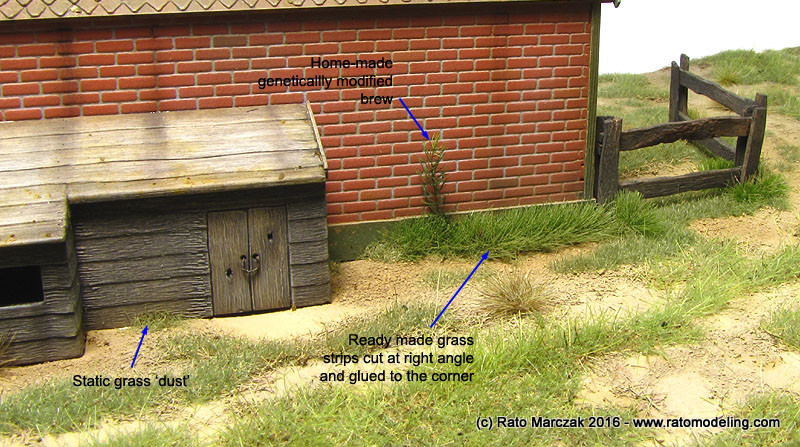
And since I was working on the West side, grass tufts were added around the chickenhouse, but this time I used less vivid colors for the tufts. An interesting method to add grass to the corners of the house is to slice commercial grass strips in halves and glue the sliced side to the wall. This way you get a perfectly squared grass strip. Better and easier than planting it using static grass:

A different touch was added in the form of a couple of flowers nearby the tree. I reasoned it would add some color to an otherwise too green view... Only at this point I startet to think that the choice of green as the color for the wood details of the barn was a mistake... too late now:
And here is a walkaround of the scene:
When you do dioramas, you start to understand better the delight of railroad folks building those huge scenic settings...

And here are a few more, from a higher view point:
After a long pause, I decided to tackle a very boring (for me) job: painting figures. I'm cry far from being a good figure painter, but fortunately in 1/72 scale I think this is more a job of optical illusion. Don't take me wrong, I'm aware of all the theory behind painting figures. Problem is: without good figures, there is no such a thing as realistic painting. I had to hunt up things I had in hand, plus a few items I got during a recent trip to Scale Model World. I concluded that small scale dioramas are poorly served in terms of good plastic figures. Sometimes, when I find a good one, it is molded in soft plastic, making impossible any attempt to clean mold seams or sanding. In the past, I used to copy them in resin and work with the copy, but this time I had to prepare at least 20 figures, and copying many of them was out of question.
I ended up with a mixed bag of figures and accessories from Preiser, Orion, Ceasar, Dragon and Pegasus. I tried to select the best ones as long as they would fit the scene I had in mind. My first task was to clean and paint a number of accessories to decorate the troops:
Clean up soft plastic figures is not for the faint heart... very frustrating. I had to accept some seams impossible to clean properly.
Then I assembled and painted all 20 figures. Part of them would be Wehrmacht infantary marching beside the convoy, the others would be panzer crews. I spent a few nights painting, washing and drybrushing them (yes, I am a dinossaur who still find drybrushing very useful)... you know the drill. For small scale figures, I usually start with the skin areas, then move on to uniforms: apply the base color, followed by shadows and lights. I seldom go as far as second light or second shadow, if I do, it is generally to correct something I don't like. I always leave the details like belts, boots, gear etc for the last. Here is the gang:
And let's not forget other living stock. At this point, I didn't know where or if they would go in the diorama, but at least they are painted:
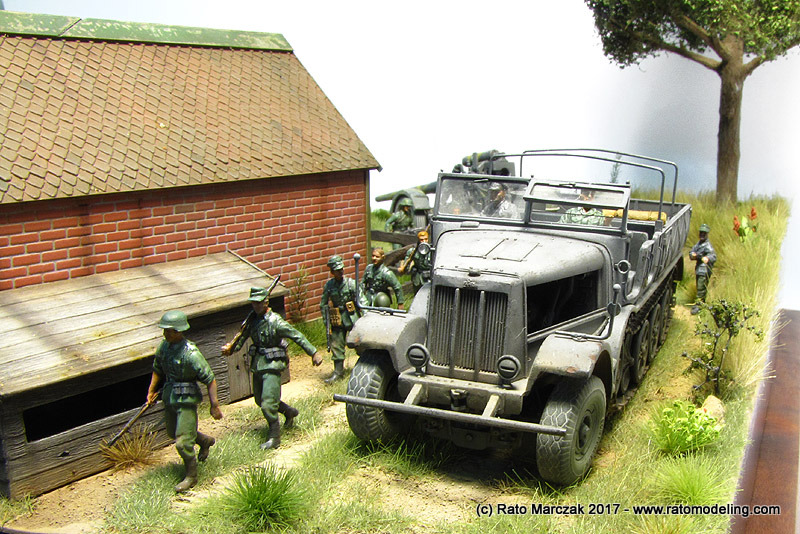
Next, I started to place the vehicles in their final position. Sometimes I had to remove part of the grass to fit wheels and tracks better to the ground. Once the heavy stuff was secured in place, I could finally glue the figures. Although I had a scene in mind, I still had doubts regarding the final position of the toops. I took photos and sent to several friends looking for opinions, and it helped a lot. A number of them even replied very technical aspects of dioramas, balance and all, and I used their reasoning to reach a decision. I cannot claim I'm completely happy with the disposition of the figures, but I concluded that the problem was more related to the poses I had available. I don't remember wether I mentioned before of not, but definitely figures avaliability are a crucial aspect to the small scale dioramist. I can only hope that the new 3D printing trend will help us out on this...
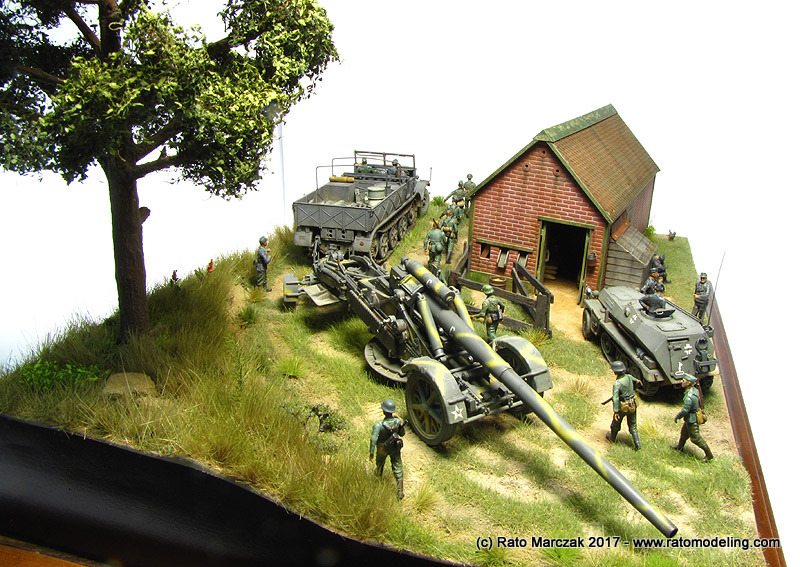
I'll leave you with my preliminary photos for now. I don't have the necessary gear to take professional photos of larger models, but will do in a near future. The base don't even have its plaque installed yet. Anyway, here is the result of my adventure in the Eastern front during that summer of 1943:
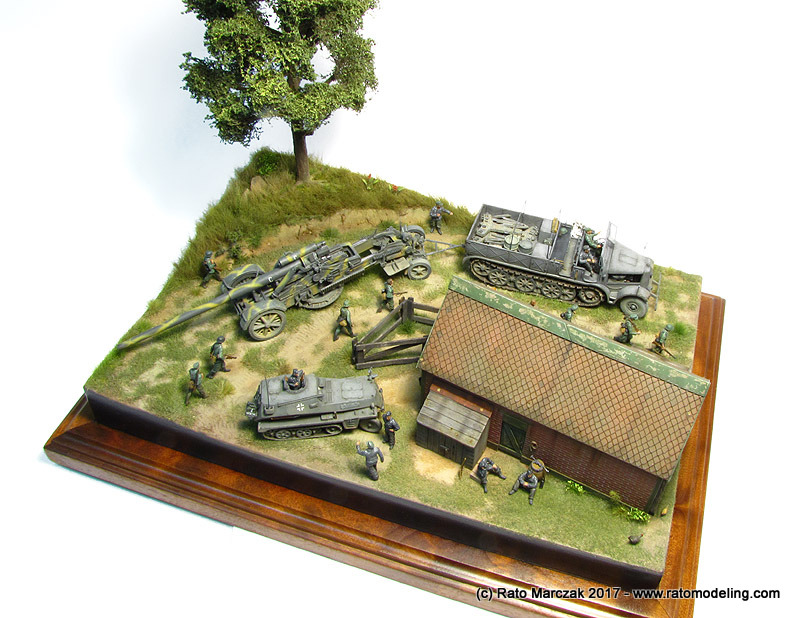

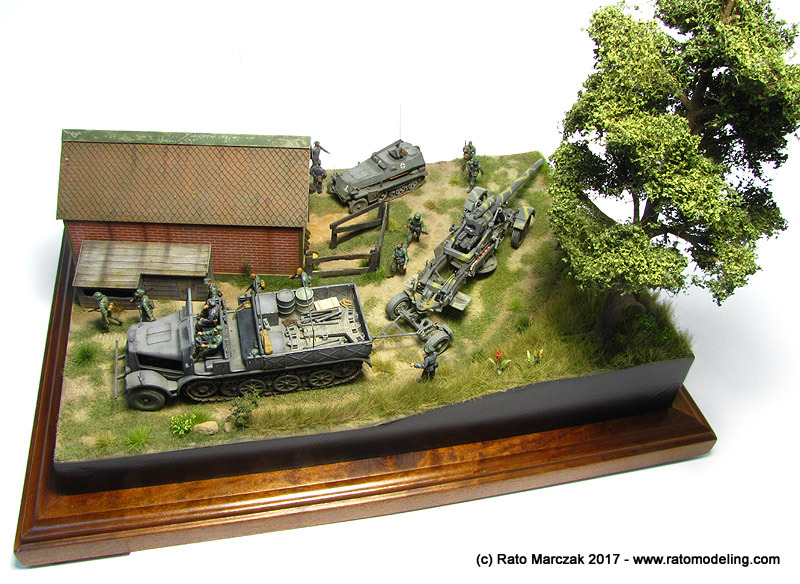
Some panoramic views:
Details hidden in these photos: the Famo mechanic helping the driver through the rear mirror, the rooster and chicken, and a few more...
Playing with B&W...
I hope you liked this project...
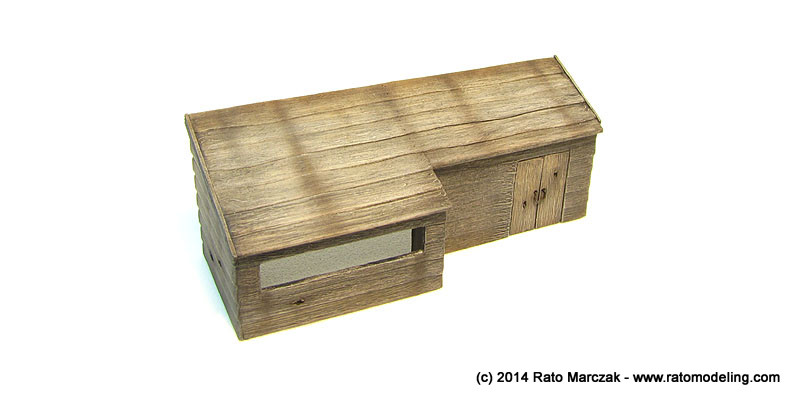
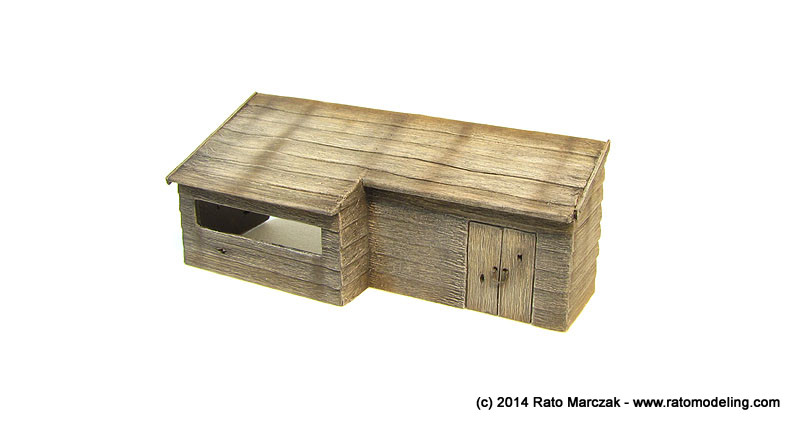
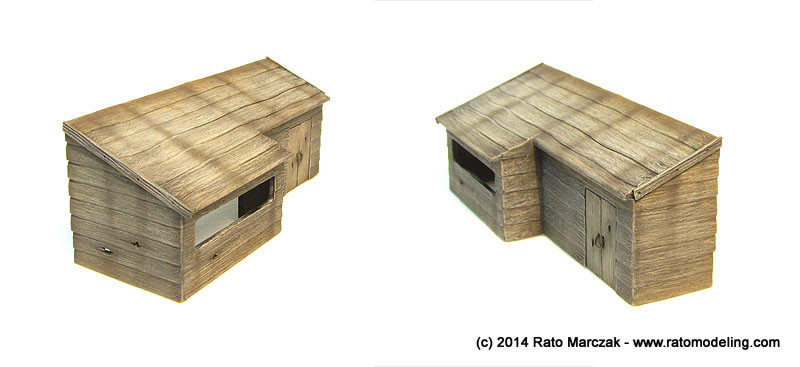
The diorama base was sketched several times, until I settled on something that looked nice and balanced. I wanted to include a building of some sort, so I resourced to Airfix Battle of Waterloo Farmhouse kit. This is a vintage kit, but thankfully manufacturers are starting to release similar kits more recently. They are very, very useful for anyone interested in dioramas.
Of course the first moves envolved some measurements. The essential part of the scene would be the Famo towing the Kanone and negotiating a tight curve, with the Sd.Kfz.253 parked in the entrance of a farmhouse or barn... So these are the actors:
The picture below gives you an idea of the basic setting. At that point I didn't have all details in mind, but I believe one of the nice things about building dioramas is exactly small changes that you do as you go, afterall the diorama in your mind seldom is exactly replicated in the real one. The opposite corner of the house will have a higher ground displaying a tree to balance things.
As you see in the photo above, I used only part of the Airfix farmhouse kit. Because of this, I had to make changes and corrections to use it as a kind of barn or farm storehouse. It was originally boxed as 1/76 scale, and later advertised as 1/72. A comparison with 1/72 figures showed that I had to make it a little taller to look right. So the the storehouse was lifted 6 mm by gluing wood shoes along the walls' base. I used architectural L shaped wood beam for that. Other internal structural elements were also used, crudely cut from plastic card, as not much of the inner wall would be visible:
Another modification was the addition of an attic, typical in this kind of construction - more on that latter:
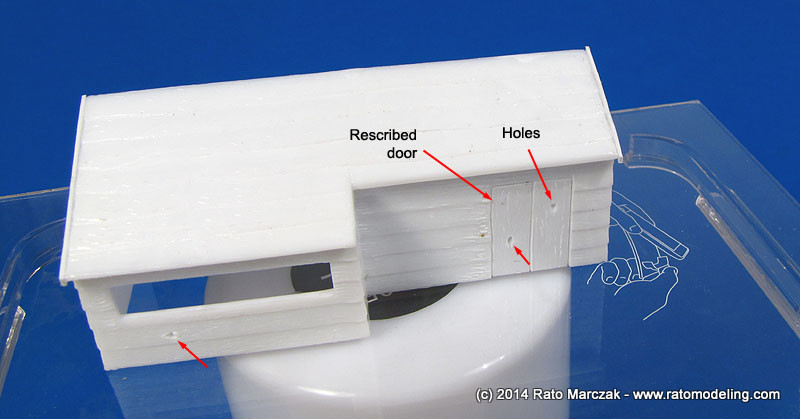
An annoying thing with the Airfix kit is the need to conceal all joints after the glue was set, and this means filling and rescribing the area to look like a continuation of the brick pattern:
I also added plastic strips on the corners to simulate columns and drip stoppers atop walls and windows. I think this was a good idea, as the old Airfix kit is very simple and would not look realistic without a twist:
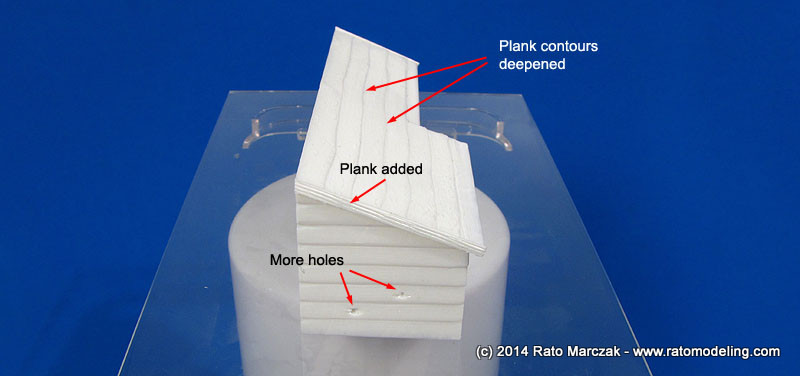
After gluing these planks, I used a needle to make a small punctures along them. Later, painting and oil washing these parts would make the small holes look like nails.
The roof parts were assembled as per instructions, and I went over the same steps there:
The wood planks simulated in the previous steps were made with plastic strips. Antecipating the need of a good amount of them, I simulated wood grain on a big piece of plastic strip by running a metal saw randomly along its length. After scrubbing with a Scotch Brite pad, I had enough to go on:
It is not the best way to simulate wood grain, mind you. You have to take care to avoid too parallel grains along the strips. At times I also used a pass with a metal brush to increase the randomness of the grains:
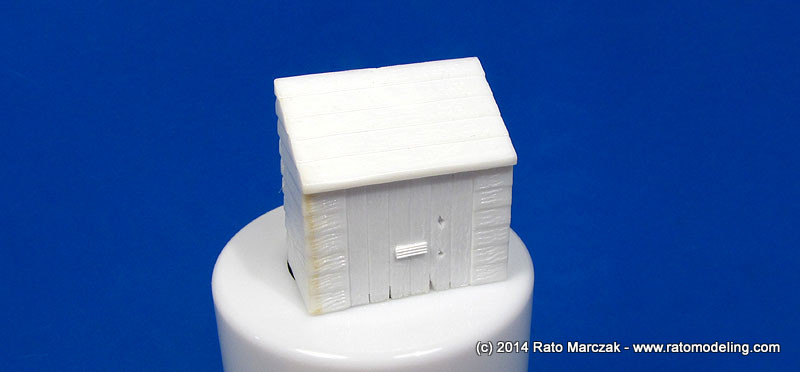
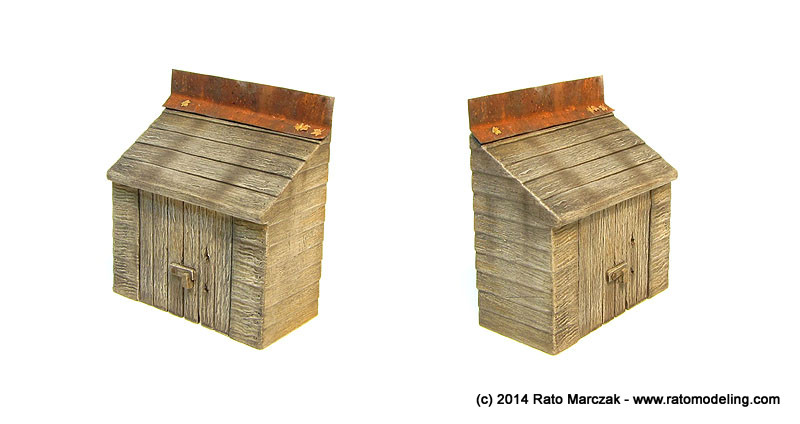
Besides the barn, I added two annexes to it, both also from the Airfix farmhouse kit.
The larger one was a..., uh..., well, I don't know what it was, but think about a chickenhouse of some sort. Maybe a storage space. It would go attached to West wall of the barn (heck, I know the geo-orientation of my dioramas!). A fun step during the preparation of these things is to rescribe wood planks, and simulate knots and holes in the wood. It is not like rescribing and aircraft model. Here you can go wrong without much of a problem, no need of rulers or tapes to guide the scriber. Of course this will be a battered house, made with old dry wood planks from another, even older, demolished building. Well you got the idea:
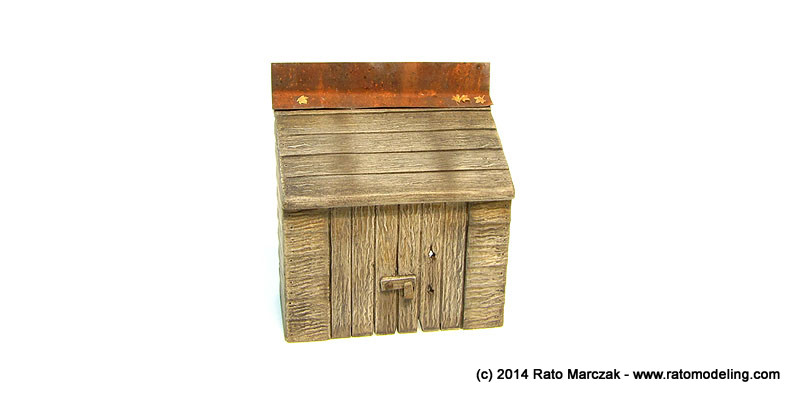
The second addition is where the farm owner used to stock cryogenically his best genetically modified eggs... Ok, in case you haven't noted, this was a joke. Again, I don't know what this little house was, except that it goes glued to the East wall of the barn. It also came from the Airfix farmhouse, and had some detail added mostly using a sharp hobby knife. I wasn't totally satisfied with the wood grain molded raised on these parts, so I sanded them slightly to mitigate the effect a tad and, if I were in the mood, I could add a few passes with a metal brush:
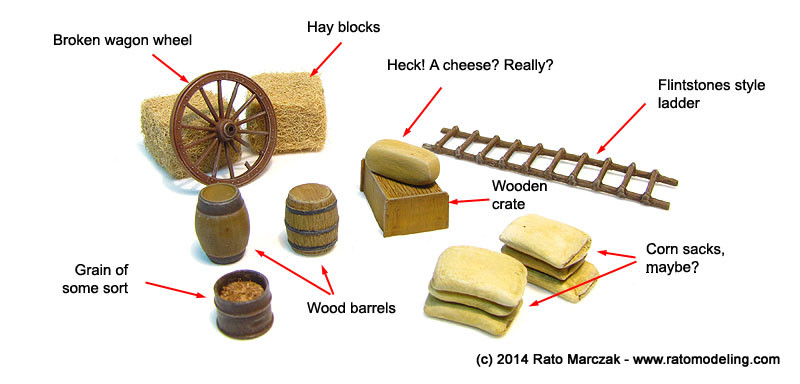
At that point, the main items were ready for priming. Besides the barn and the two houses, I scrounged or scratchbuilt the following items to decorate the scene:
- Wagon wheel
- Grain drum
- Grain sacks
- Wood barrels
- Stairs
- Channels
- Windows & doors
plus a few other things, not really sure what would be actually used in the diorama. Here is the family portrait:
So it was time to start working on the base itself. I used a small poster frame (20cm x 30 cm) over which a piece of expanded styrene was glued and carved to make the higher ground on the corner of the road. Then, a layer of acrylic putty was spread over the whole base and worked out before setting. The barn and the little houses were pressed against the putty to mark their final positions, a tree trunk was pressed on its place, and road marks of several types of tires/tracks were impressed along the road using parts from other kits.
Once satisfied with the base relief, I added more texture to it by gluing what I call dirty grass. It is a first layer of static grass over which more grass will be added later. This first grass is painted in earth tones like the remaining areas of the terrain. Later, when the top (green) grass is glued, the final effect is like real grass, going from green on the top to brown on the bottom layer. The base was airbrushed with acrylic colors, and hardened earth/dusty areas highlighted with lighter colors:
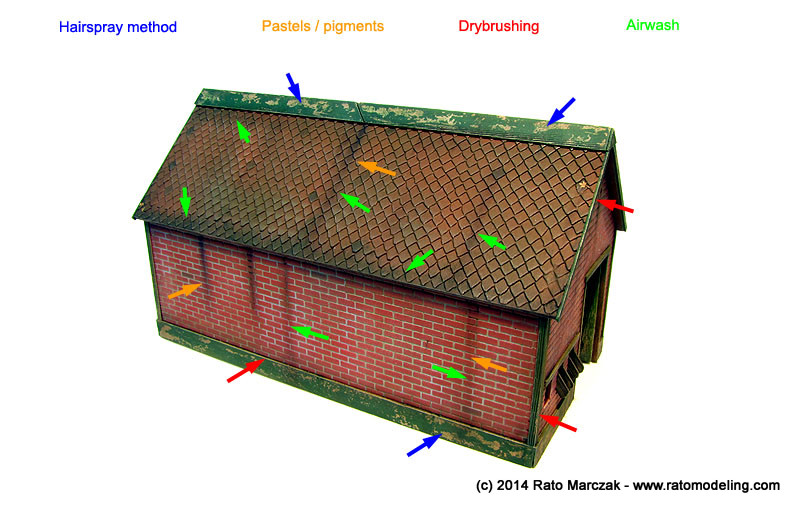
With the base settled, I started painting the barn. I didn't want a rotten barn, just something well weathered by the elements. I used exclusively acrylics for the job (Vallejo and Tamiya), mixed as I went, without thinking too much...
The brick walls obviously received a brick color, the roof was painted in dark brown and the wood frames in green. I started with the brick walls, airbrushed with a madder color, picking up several individual bricks with darker and lighter tones for a better visual effect. Once dry, the walls were protected with a good coat of gloss automotive lacquer. Then I prepared a grey oil sludge: it was thinned to the point of a enamel paint, but applied almost like an oil wash over the recesses between the bricks without much care. To clean up the excess, a piece of old T-shirt stretched over my finger was rubber over the walls while the sludge was still wet. This cleaned up the bricks leaving the gray oils in the recesses - really quick and easy, even quicker if you use lighter fluid to thin the oils. The roof was painted with a darker color, and I applied an oil wash of burnt umber color afterwards. A heavier effect of oils was used along the lower lip of the roof to simulate accumulated grime and dirt, by dabbing a flat brush with pure oils:.
The
green details were next. After waiting the oils to dry completely,
I masked everthing leaving out only what should be green. These areas
were painted in wood color, and protected with gloss automotive
lacquer. Since I wanted a very distressed paint effect, hairspray
method was the trick used. I used AK's Heavy Chipping Effect
fluid instead of an ordinary hairspray fluid for my first time,
airbrushing it thinned with water (30% water / /70% chipping fluid).
Then I proceeded with Tamiya's XF-5 Green, and right after that I started distressing the green paint with a flat brush and lots of water. AK's fluid should
be similar to any hairspray, but I found out that even cut with water
it is more agressive, removing larger chunks of paint than my previous
experiences with ordinary hairspray. Because of this I later re-applied
some green with a sponge in places where I thought the wood was too
exposed. I didn't quite liked the final effect, but wouldn't do it all
over again:
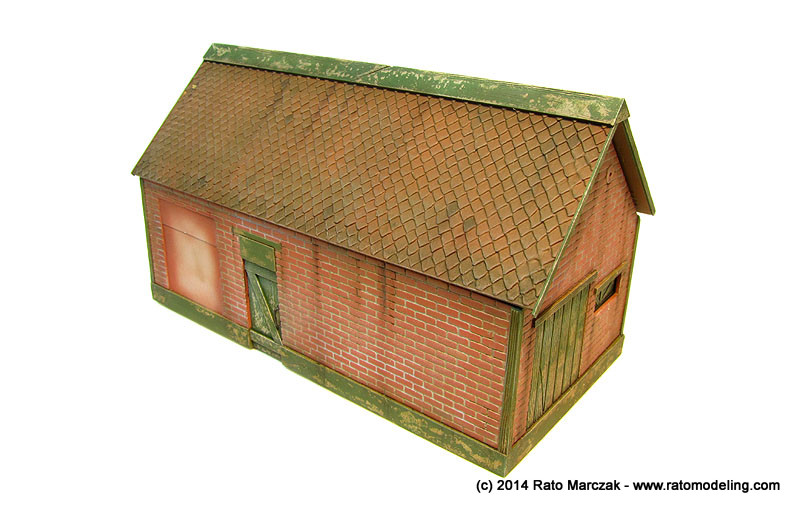
Next, the masks were removed and the hole barn received another clear coat, this time flat, and light grey was gently drybrushed, concentrating the effect on the wood (green) items. Then the rain marks were added. I used AK's Rain Streaks enamels. Once dry, I diffused the effect using Humbrol's Smoke pigments - a nice product, by the way. The final effect was the application of an airwash over corners, recesses, and the transition seams between wood and brick.
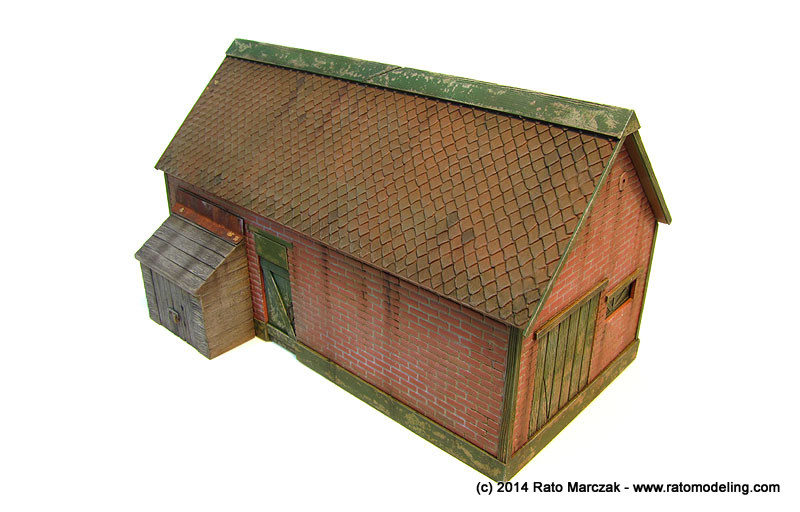
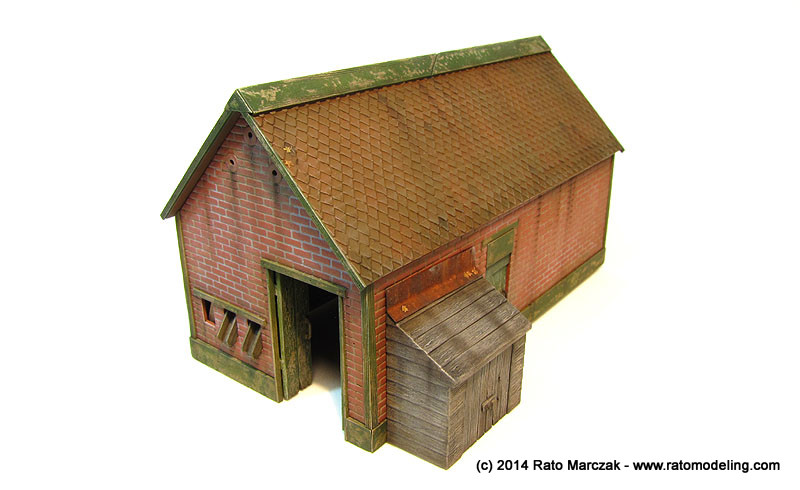
The channels I made earlier were painted as dry wood and glued in the small apertures on the front wall. They run inclined all the way up to the ceiling of the barn. These replicate the channels used to flow grains from the attic to containers outside the barn (seed dispensers). The main doors were reworked to look old and well used. They received new handles and were also painted with the hairspray method.
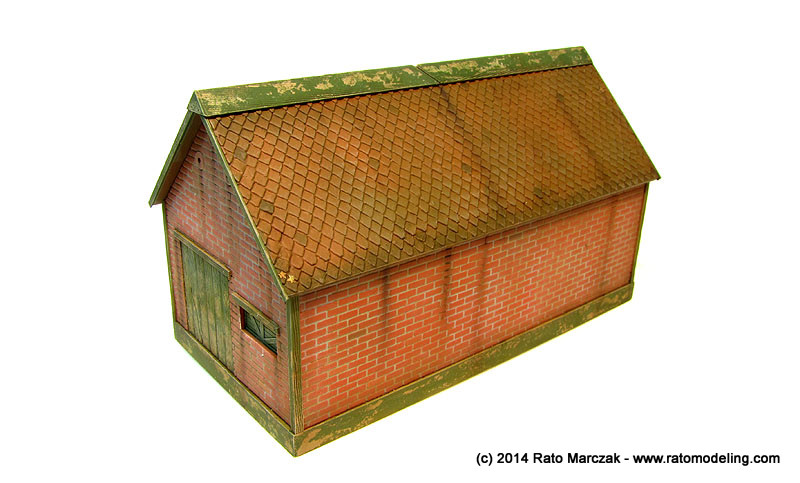
The chickenhouse was painted with a different technique. They should have that old, dry wood aspect. So I primed them with Mr. Surfacer and didn't use any other color after that. I just spread pure black oils with a fan brush until they looked right, trying to leave more oil paint near the ends. The secret is to run the brush along the grain direction, and clean the brush from times to times. The remaining steps were the same used on the barn: gloss coat, oils wash, flat coat, drybrushing and rain streak marks:
The same painting sequence was used on the small house, except that it had a piece of folded metal plate to avoid rain from dripping into the house. A piece of brass sheet was bent to shape, rusted, and glued in place. Small dry leaves gave the final touch:
In case you are wondering, the front yard faces South, while the back door faces North... A dry fit shows how it will look like:
In retrospect, I should have damaged a few bricks here and there. Maybe this is a not so old building, uh?
It is important to note that the weathering was not quite done at this point. After the buildings are glued to the base a new pass of airwash will be applied over the lower areas using earth colors. This is important to harmonize everything and equalize chromatic range of the dirty areas.
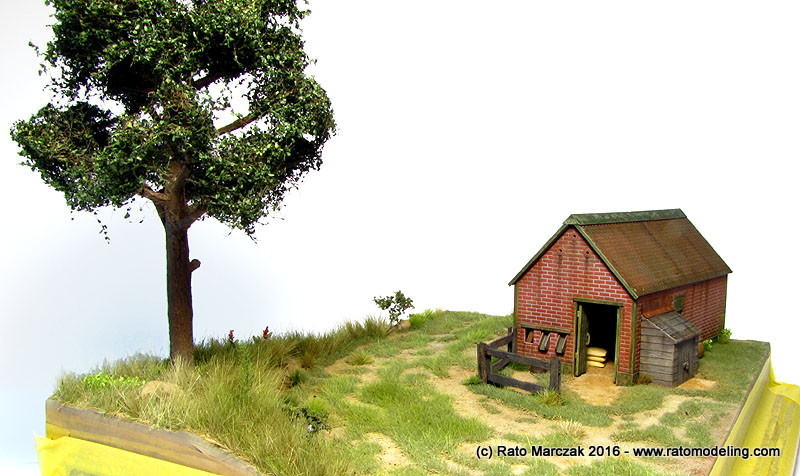
With the basic buildings done, I painted and weathered the smaller items. The corn sacks were hand made with Milliput, and the leftover putty was shaped in what is a cheese, I guess! A small container with grains inside will be placed under one of the channels in the front wall. There was also a broken wagon wheel, barrels and boxes. The ladder takes one to the attic. An effective trick to simulate hay blocks is to cut cubes from balsa wood, coat them with white glue, and cover with cream colored static grass. The grass of the same color will cover the floor of the barn later.
Two or three of these details will be placed outside the barn, but the rest will be laid visibly (I hope) inside, more to hide the crude interior of the barn than anything else. Since the barn will have troops checking around, I would decide about their definitive places later on.
After putting this project aside for a few of months in order to finish off others, I finally resumed it with the slow task of criteriously planting tall and short grass, and yet leave the first (brown) grass partially visible. The idea was to divide the groundwork in three major areas, explained below.
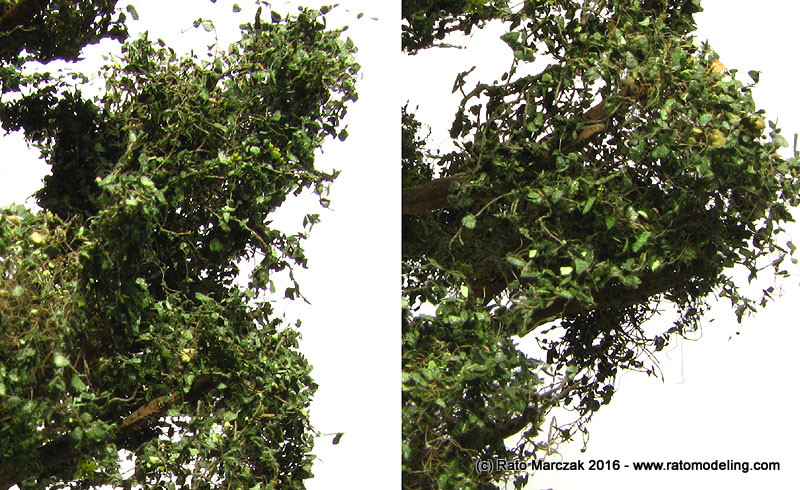
But first, I had to finish the tree. It was basically a Woodland Scenics plastic amature whose trunk was reworked with wood filler to better represent the bark. Balls of polyfiber were shaped at the ends of the brances and everything was painded, oil washed and drybrushed. Pretty much standard diorama tree construction. I then proceeded to the leaves, and I wanted to use those wonderful Noch individually cut leaves. I used Dark Green (#07146) and a bit of mid-green (#07144) on top of it, plus a few dried leaves here and there. This is the result:
And if you look closely, you can see through it, proof that I succeeded in avoiding a model tree with that 'solid' look that we get when using sponge-type foliage. Not my best tree, but I liked it. I probably will trim a few small branches here and there later:
Back to the grass, as I said, I worked on three basic areas:
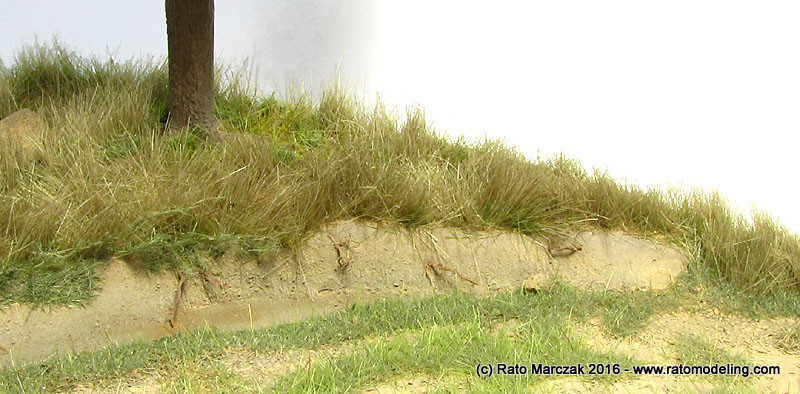
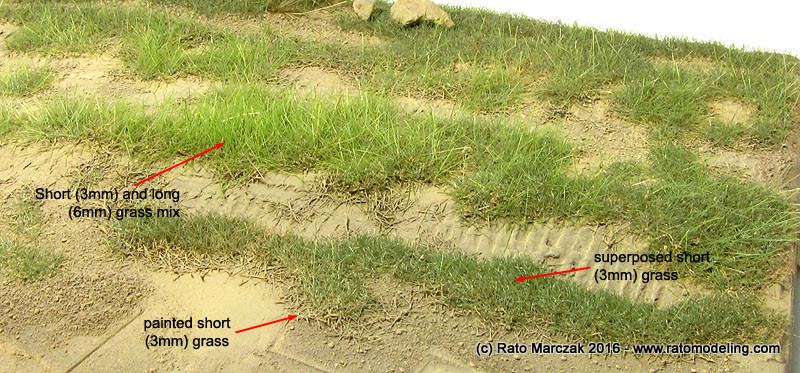
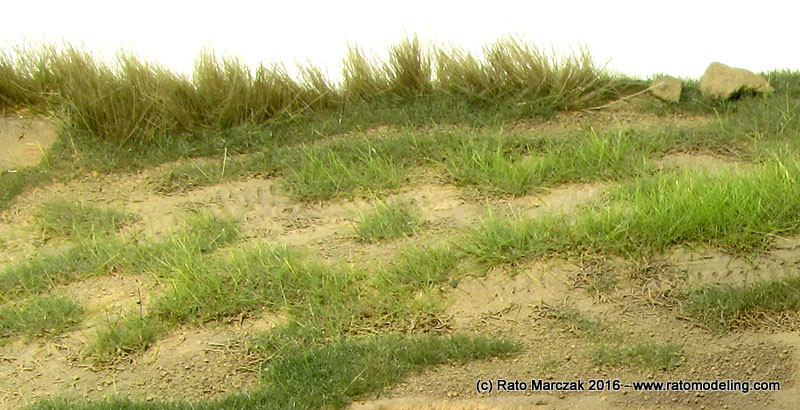
a) The elevated area where the tree should go would have tall grass, planted tuft by tuft, using the 'cigar' technique I learned from railroad modelers. Actually, I used a mix of Custom Dioramics light green short grass and Woodland Scenics light green (#173) and natural straw (#171) Field Grass, cut to a shorter size. This area would not be neatly arranged - think about cattle out to pasture there and you got the idea. It is part of the meadow surrounding the farm, I guess. Also, it was important not letting the grass to cover the small ravine, which is frequently eroding whenever rains...
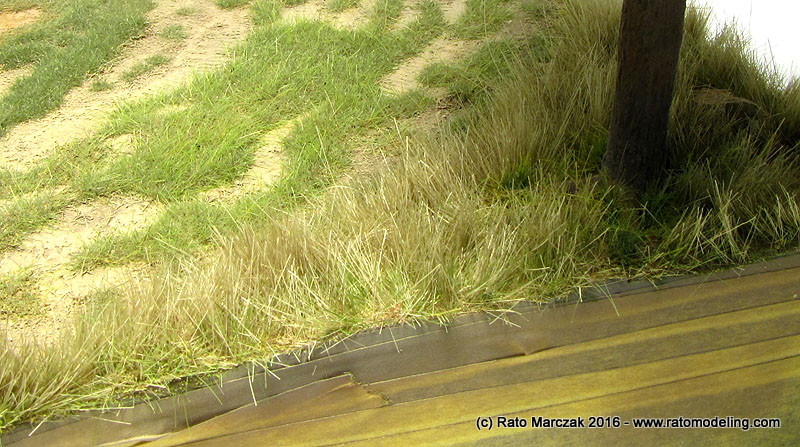
b) The second area would be the short grass around the barn. The grass there should be short because of people coming and going while doing their daily duties, and not letting any grass get too tall... or maybe there was that goat leveling the grass inside the fence. I just don't know. Inside the bar I spread Woodland Scenics Harvest Gold static grass (#632) and pressed it with a book while the glue was setting. I wanted it looking like a layer of dry hay heavily stepped on, with some also spreading outside the barn entrance. In order to remove much of that artificial shine from the static grass, I airbrushed flat light brown acrylic paint. At this stage, I also glued most of the details that would go inside the barn to their definitive positions:
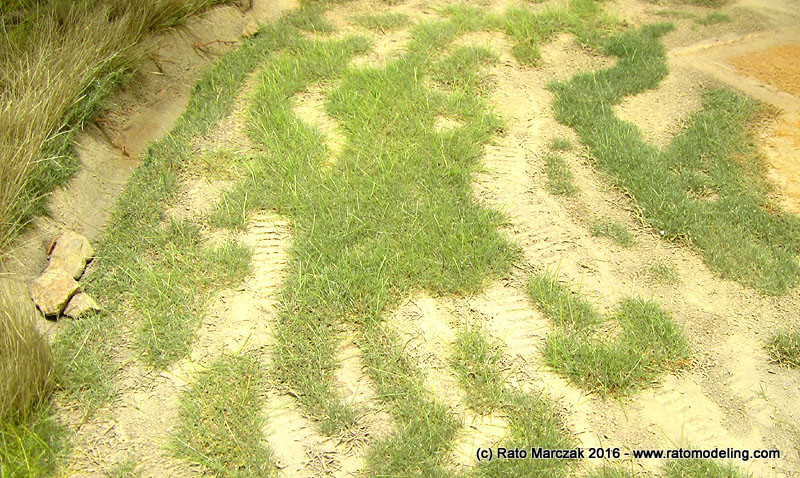
c) And outsite the fence there is the road. There I would like to have a mix of dark and mid green short grass, and light green tall grass (I used Woodland Scenics, Noch and Joefix items, but I don't remember which one is which one). That road was not a very busy one - mostly carts and wagons transit there - but rains are always washing the tracks, and the Wehrmacht was retreating that day. I can't tell how many times I would came back with the airbrush and change lightly the color, using browns and greens. I think the recipe worked out ok, because the tall fibers really stand up from the short grass, looking pretty much like what I saw in landscape photos:
The final effect is quite realistic, but there is still many vegetation details to be added. But before that, I misted a very thin mix of Model Master Dark Tan and Tamiya Buff from above with my airbrush set to low pressure. I like to use this trick to produce what my friend Fabricio Fay calls chromatic uniformity. It is exactly that, I mean, avoiding harsh color changes on the diorama groundwork.
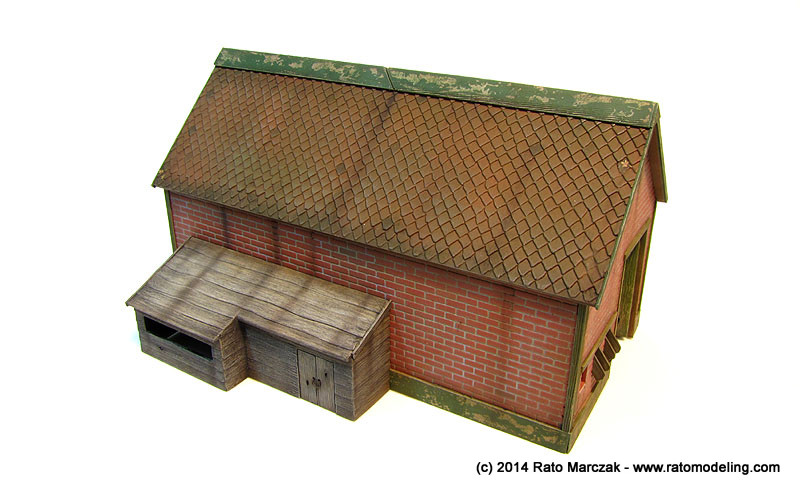
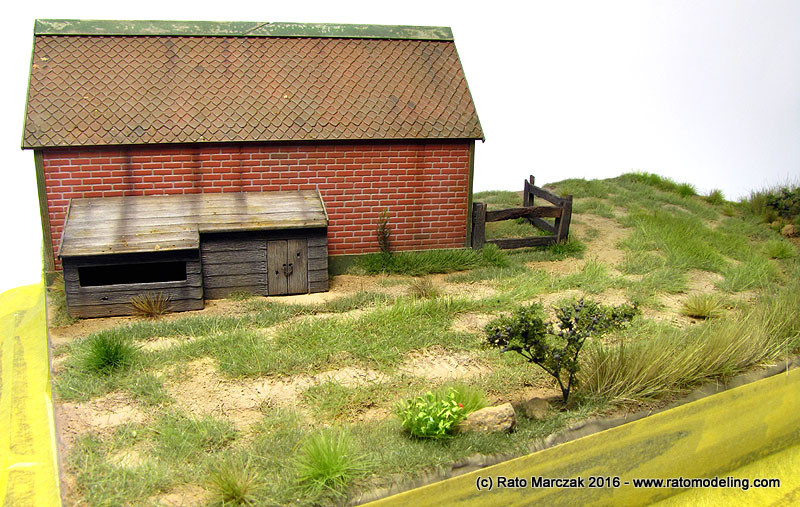
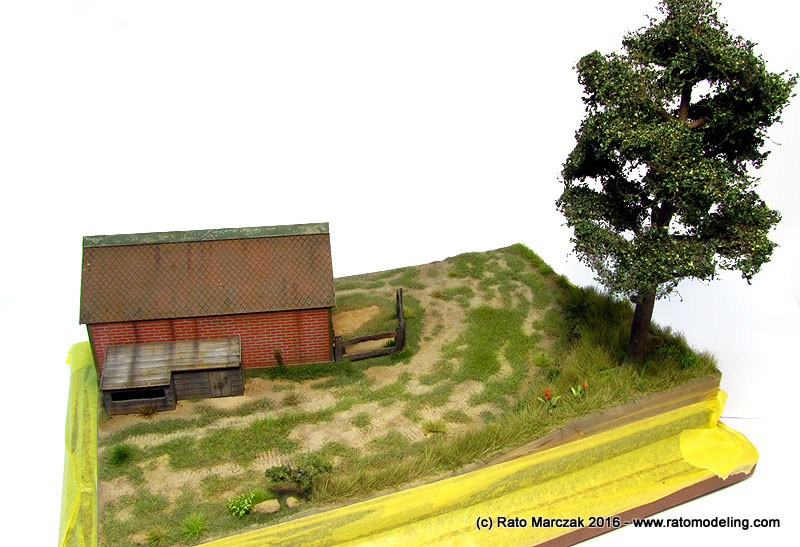
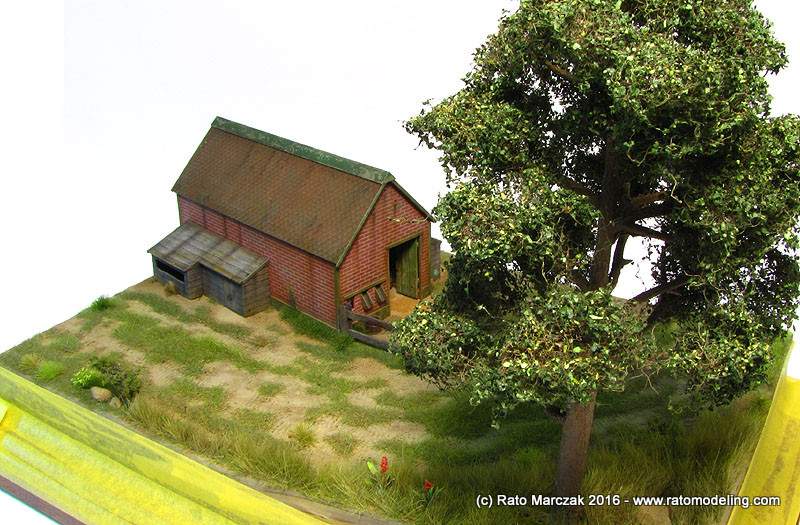
A couple of weeks has passed and I found some workbench time to add details to the diorama. The barn was finally glued to its place as well as the annexes:
Once the barn was firmly set in place, I started to add the missing vegetation. A small advice here: many modelers don't add any further grass after installing the buildings on their dioramas. I always like to add some fine turf or static grass to shut small apertures and gaps that remain from the irregular groundwork. Adding minute amounts of static grass to these places helps to integrate the building to the groundwork.
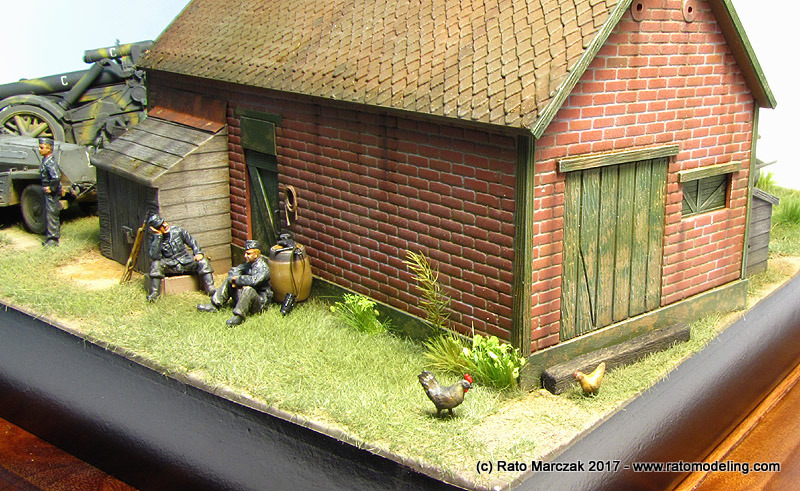
But besides that, I added flowers and bushes from either commercial items or home-grown, denaturated plants that I cultivate just for that. Ready made grass tufts also enhance those spots which look like if something is missing. During this project, I collected some railroad HO scale detail parts with potential use in the diorama. They were used as I deemed necessary. Barrels is one case - never believe in a barn without one or two of them...
And another advice, if I may. As much as dust over horizontal surfaces, dry leaves on roofs are essential to add realism to a scene. You don't need too much - I just sprinkled some here and there, but they make a lot of difference:
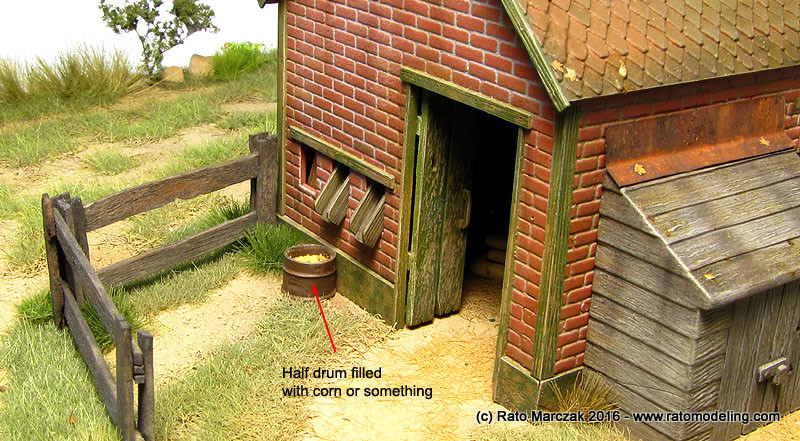
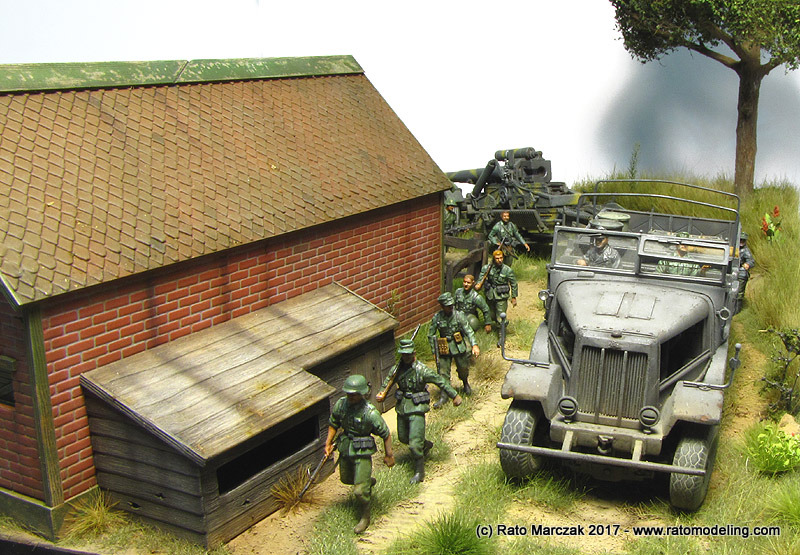
A small dry wood fence was installed in the South entrance. I used the same technique used to weather basswood in my 1/72 Mark I tank vignette, and I loved the result. The main gate will be installed at the end, after gluing the vehicles and personnel. The half drum filled with corn was cemented under one of the seed dispenser channels painted and weathered earlier. A few railroad HO details enhanced even more the interior of the barn:
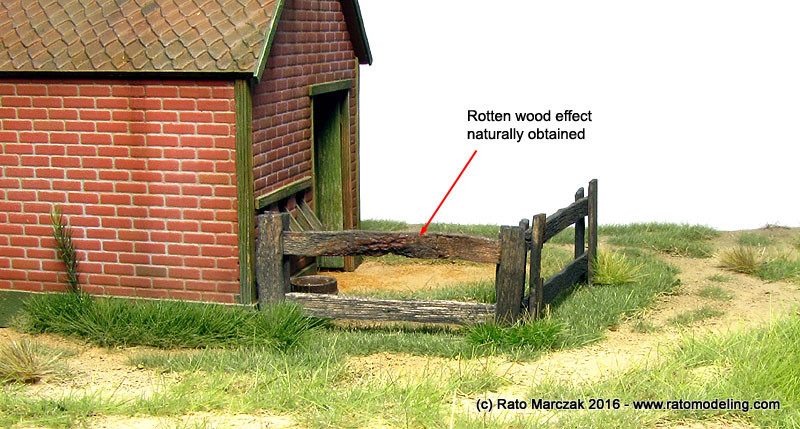
I am particularly pleased by the final aspect of the wood fences, to the point of using a few pieces of rotten wood as they were in order to better simulate what you find in photos of old farms...
I will not describe where and why I planted this or that vegetation. Much of it was done on the fly. If you don't like it, remove it. Simple as that, just keep in mind that everything must make sense. Of course large vegetation or bushes wouldn't survive in the middle of the road, so I naturally added more of it along the borders of the road, particularly the West border, to give some impression of continuity of the high grass used on the tree plateau:
And since I was working on the West side, grass tufts were added around the chickenhouse, but this time I used less vivid colors for the tufts. An interesting method to add grass to the corners of the house is to slice commercial grass strips in halves and glue the sliced side to the wall. This way you get a perfectly squared grass strip. Better and easier than planting it using static grass:
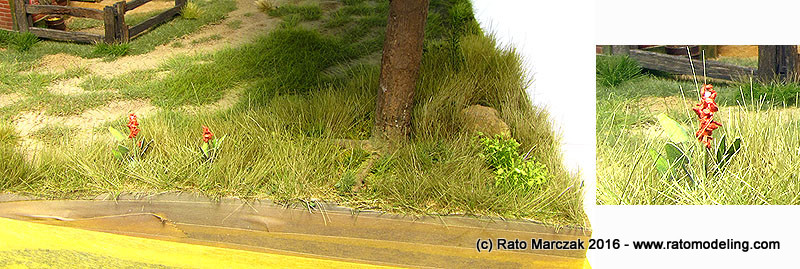
A different touch was added in the form of a couple of flowers nearby the tree. I reasoned it would add some color to an otherwise too green view... Only at this point I startet to think that the choice of green as the color for the wood details of the barn was a mistake... too late now:
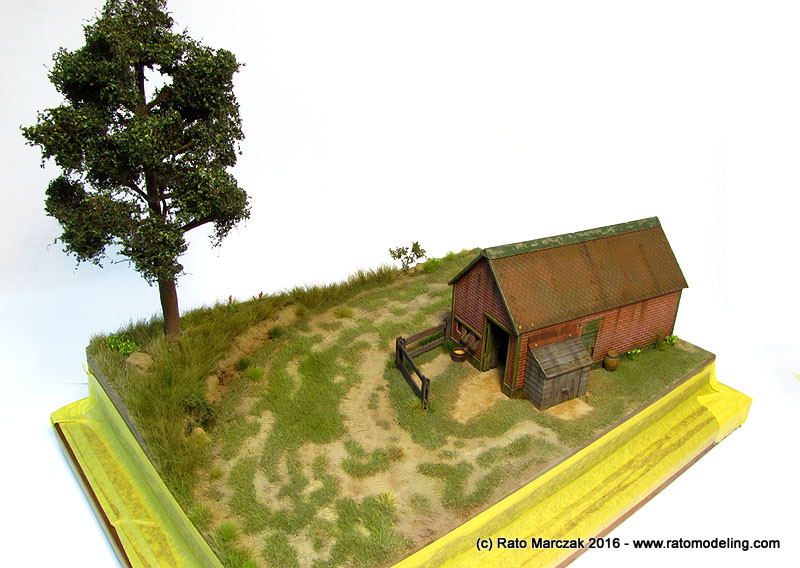
And here is a walkaround of the scene:
When you do dioramas, you start to understand better the delight of railroad folks building those huge scenic settings...
And here are a few more, from a higher view point:
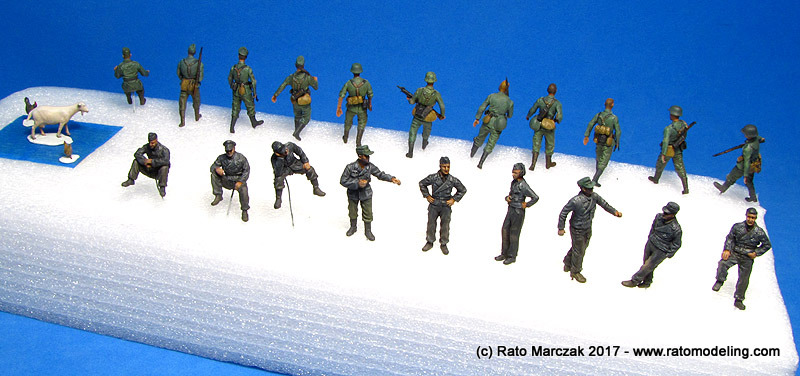
After a long pause, I decided to tackle a very boring (for me) job: painting figures. I'm cry far from being a good figure painter, but fortunately in 1/72 scale I think this is more a job of optical illusion. Don't take me wrong, I'm aware of all the theory behind painting figures. Problem is: without good figures, there is no such a thing as realistic painting. I had to hunt up things I had in hand, plus a few items I got during a recent trip to Scale Model World. I concluded that small scale dioramas are poorly served in terms of good plastic figures. Sometimes, when I find a good one, it is molded in soft plastic, making impossible any attempt to clean mold seams or sanding. In the past, I used to copy them in resin and work with the copy, but this time I had to prepare at least 20 figures, and copying many of them was out of question.
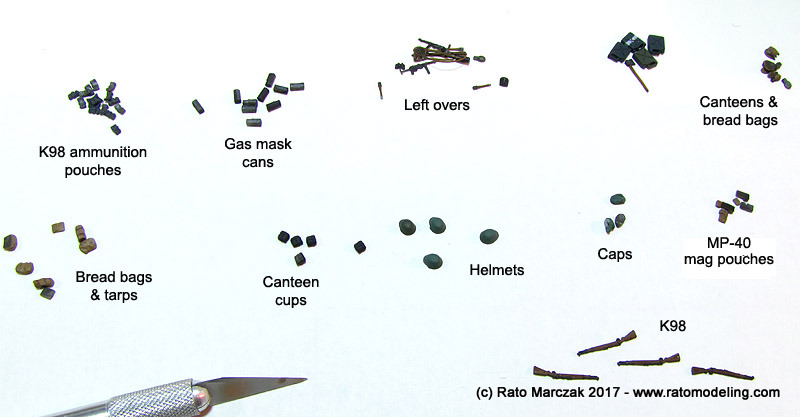
I ended up with a mixed bag of figures and accessories from Preiser, Orion, Ceasar, Dragon and Pegasus. I tried to select the best ones as long as they would fit the scene I had in mind. My first task was to clean and paint a number of accessories to decorate the troops:
Clean up soft plastic figures is not for the faint heart... very frustrating. I had to accept some seams impossible to clean properly.
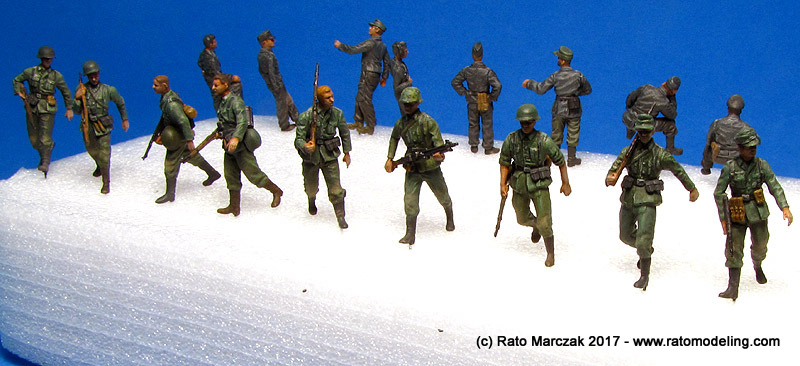
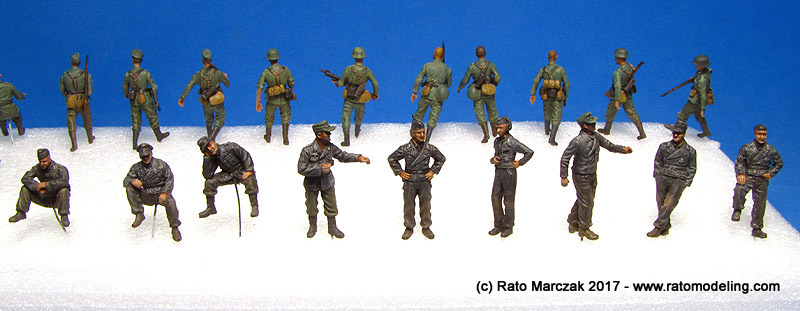
Then I assembled and painted all 20 figures. Part of them would be Wehrmacht infantary marching beside the convoy, the others would be panzer crews. I spent a few nights painting, washing and drybrushing them (yes, I am a dinossaur who still find drybrushing very useful)... you know the drill. For small scale figures, I usually start with the skin areas, then move on to uniforms: apply the base color, followed by shadows and lights. I seldom go as far as second light or second shadow, if I do, it is generally to correct something I don't like. I always leave the details like belts, boots, gear etc for the last. Here is the gang:
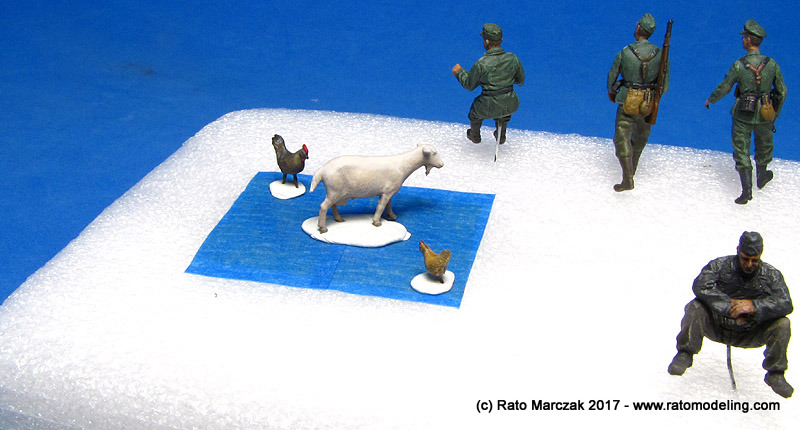
And let's not forget other living stock. At this point, I didn't know where or if they would go in the diorama, but at least they are painted:
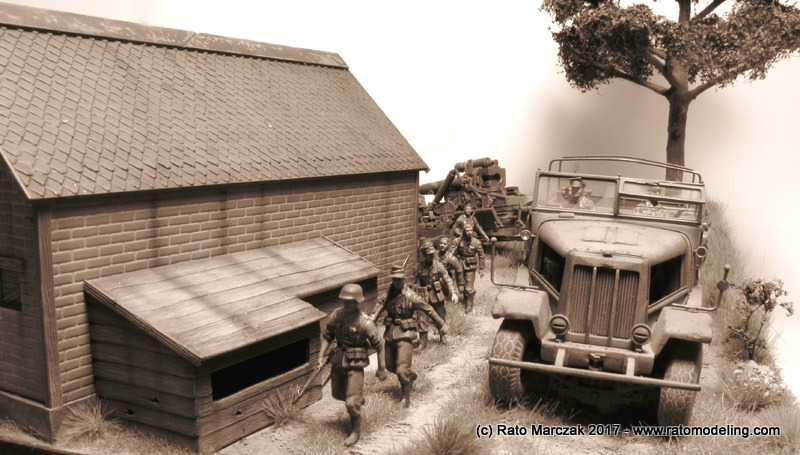
Next, I started to place the vehicles in their final position. Sometimes I had to remove part of the grass to fit wheels and tracks better to the ground. Once the heavy stuff was secured in place, I could finally glue the figures. Although I had a scene in mind, I still had doubts regarding the final position of the toops. I took photos and sent to several friends looking for opinions, and it helped a lot. A number of them even replied very technical aspects of dioramas, balance and all, and I used their reasoning to reach a decision. I cannot claim I'm completely happy with the disposition of the figures, but I concluded that the problem was more related to the poses I had available. I don't remember wether I mentioned before of not, but definitely figures avaliability are a crucial aspect to the small scale dioramist. I can only hope that the new 3D printing trend will help us out on this...
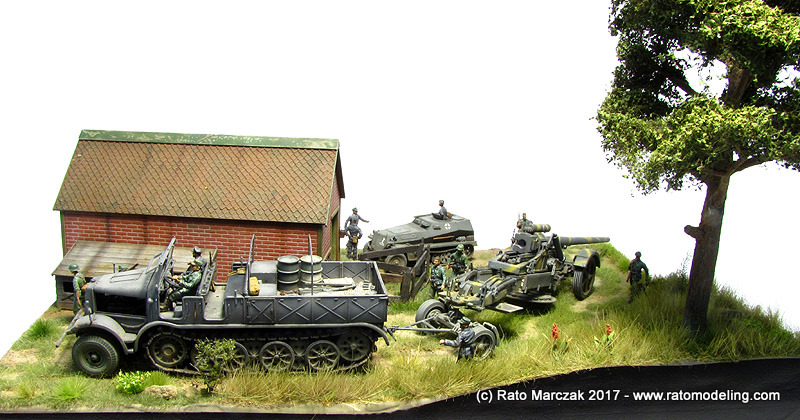
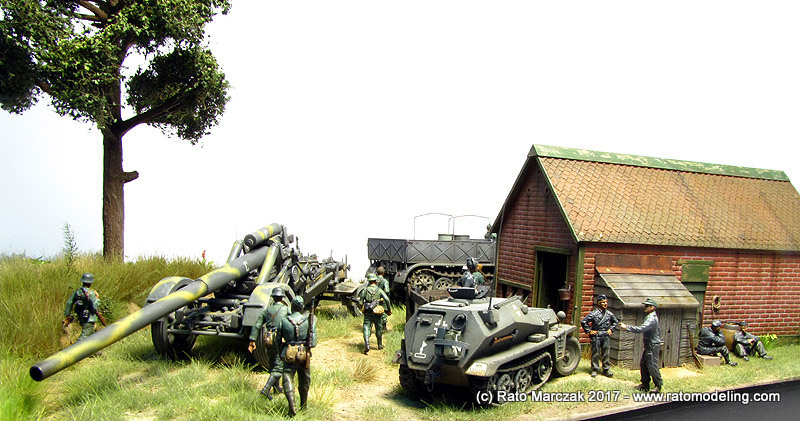
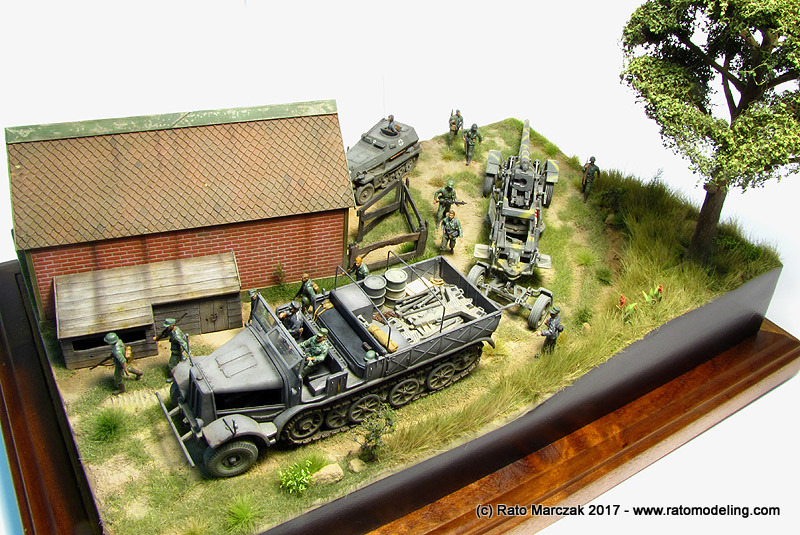
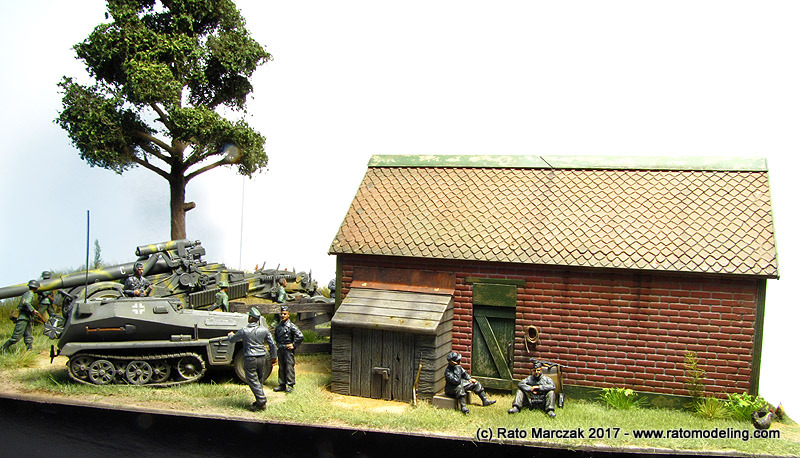
I'll leave you with my preliminary photos for now. I don't have the necessary gear to take professional photos of larger models, but will do in a near future. The base don't even have its plaque installed yet. Anyway, here is the result of my adventure in the Eastern front during that summer of 1943:
Some panoramic views:
Details hidden in these photos: the Famo mechanic helping the driver through the rear mirror, the rooster and chicken, and a few more...
Playing with B&W...
I hope you liked this project...
| Technical file | |
| Kits:
|
-
Italeri #7034 - Trumpeter #7252 - Revell #03176 |
| Additions:
|
- Parts of Airfix Battle of Waterloo Farmhouse (kit #04738) - Preiser Advancing Infantary - The German Reich 1938-45 (item #72504) - Ceasar Miniatures WWII German Panzer Crews (item HB03) - Orion German Panzer Soldiers (item #72001) - Pegasus Farm Animals (item #7252) |
| Basic
colors: |
For the terrain and buildings: - Primer: automotive gray primer. - Various Vallejo, Andrea, Pactra, Tamiya and Mural acrylic paints. - Flat coat: Testors Dullcote and Humbrol Flat Coat For the vehicles, see their construction logs. |
| Notes: |
-
Several scratchbuilt details (see text). |
Rato Marczak © 2017
