| The Sheep's Nest Revell F4U-1A Corsair diorama in 1/144 |
| Started: october/2000 Finished: november/2000 |
Under command of Maj. Gregory "Pappy" Boyington, the unit became one of the
most famous fighter units of WWII.
Pappy Boyingston's VMF-214
Undoubtly
one of the most famous fighter squadrons of all time is the VMF-214,
The
Black Sheep. Contrary to popular belive, the Black Sheep was the second
encarnation of the squadron, originally called "The Swashbucklers". The
nickname Black Sheep originated at a unit party during the first days
at
Munda. Since they had been thrown together so hastily from
replacements,
the pilots decided to call themselves "Boyington's Bastards." Frank
Walton,
the squadron's intelligence officer, was told the next day by a Marine
public relations officer that the nickname would be unacceptable for
newspaper
accounts, so the fliers called themselves the "Black Sheep".
The enduring fame of VMF-214 is due a number of reasons, but the unorthodox leadeship of Maj. Gregory Boyington and the famous (and greatly exaggerated) TV series from the 70's "Baa Baa Black Sheep" (based on the autobiography of Boyington himself) are the most significant. Because the 31 year old Boyington was at least 10 years older than most of his pilots, they started calling him "Pappy" or "Gramps". The untold side of the fame is that the Black Sheep earned its excellent reputation because they performed greatly as a fighter squadron in those difficult war days. Needless to say, with Boyington's extensive combat experience (he had fought early with the Flying Tigers in China), his colorful personality and his friendly relationship with the press, though, the unit was always in the national spotlight.
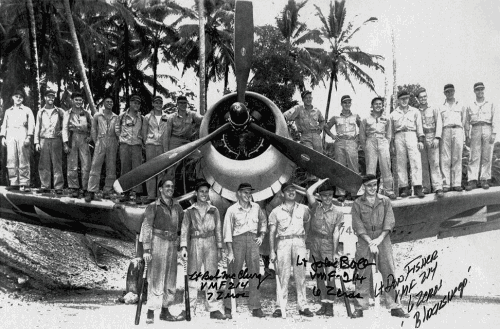
"The Black Sheep" rooster on the
sturdy wings
of F4U-1 Bu.No. 17740. Pappy Boyington
is the third from right, front
row. Aces John Bolt
and Don Fisher are at his left while
Robert McClurg is at his right
side.
In the early part of World War II, from island to island campaign in the South Pacific, there occasionally cropped up flyers who were unattached and who were separated from their squadrons by reason of illness or breakup of their organizations. They had been left out of it somehow in the shuffle and had no way to get back into the fight. Some were veteran combat pilots with several kills to their credit; others were pilots newly arrived from the United States as replacements. This was the situation at Espiritu Santo, New Hebrides, when finally the persistent campaigning of Maj. Boyington and Maj. Stan Bailey (who was later named executive officer) was rewarded when wing headquarters gave them permission to form the stragglers into a squadron. VMF-214 was commissioned early in 1943 at Ewa on the island of Oahu in the Hawaiian Islands, with the understanding that they would have less than four weeks to mold themselves into a fully trained, completely coordinated Marine squadron. This was accomplished by flying every day and night with their eight Corsairs. In August of 1943, 27 young men under "Pappy" Boyington's leadership formed the core of the second VMF-214. So they were sent to South Pacific...
The "Black Sheep" fought their way to fame in just 84 days, piling up a record 197 planes destroyed or damaged, troop transports and supply ships sunk, and ground installations destroyed in addition to numerous other victories. They flew their first combat mission on September 16, 1943, escorting Dauntless dive bombers to Ballale, a small island west of Bougainville where the Japanese had a heavily fortified airstrip. They encountered heavy opposition from the enemy Zeros, and ‘Pappy’ claimed five kills, his best single day total. In October VMF-214 moved up from their orginal base in the Russells to a more advanced location at Munda. From there they were closer to the next big objective -- the Japanese bases on Bougainville. On one mission over Bougainville, according to Boyington’s autobiography, the Japanese radioed him in English, asking him to report his position and so forth. Pappy played along, but stayed 5000 feet higher than he had told them, and when the Zeros came along, the Black Sheep blew twelve of them away. During the intense period from November 1943 to early January 1944, Boyington destroyed 22 Japanese aircraft. By late December, it was clear that he was closing in on Eddie Rickenbacker’s WW I record of 26 victories, and the strain was starting to tell. On Jan. 3, 1944, Boyington was shot down in a large dogfight in which he claimed two enemy aircraft. He landed in the water, badly injured. After being strafed by the Japanese fighters, he struggled onto his raft until captured by an enemy submarine several hours later. They took him first to Rabaul, then to Truk, and eventually to a prison camp outside of Yokohama. His autobiography relates the frequent beatings, interrogations, and near starvation that he endured for the next 18 months. When he was repatriated, he found he had been awarded the Medal of Honor and the Navy Cross.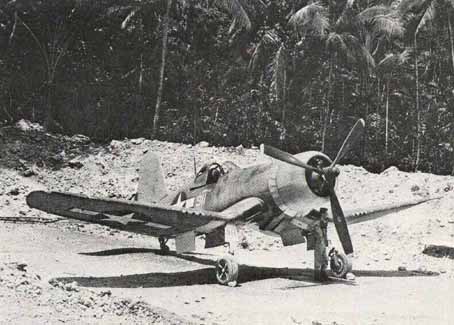
This is the photo that inspired the author
for this
project. "Mary-Jo" is a F4U-1A
of VMF-212 parked in a Vella
Lavella revetment. VMF-211,
212, 214, 215, 216 and 221
shared Vella Lavella, Munda
and Torokina facilities,
ground personal and sometimes even
aircraft during the last months
of 1943 - early 1944.
Note the "Flintstone's wheel shocks".
The Model
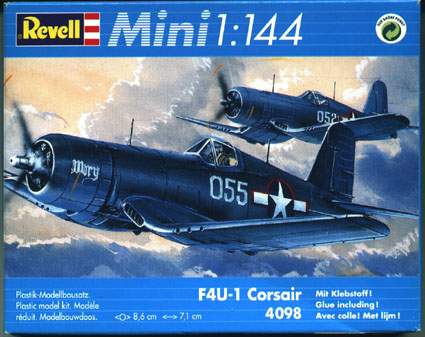
The kit come with a single light grey sprue of parts, plus a single clear canopy, decals and a half-A4 instruction sheet of exploded view type. Except for the fin, the kit is reasonably accurate in shape and dimensions, but as one could expect from a kit of this age, there are several points that would keep a purist away from this model. Here are some of them:
- The fit is poor. Landing gear and horizontal stabilizers fit loosely.
- All panel lines and hinges are raised.
- The vertical stabilizer has a wrong shape.
- There's no cockpit detail.
- There's no wheel wells details. The doors are excessively thick for the scale.
- The tail wheel is horrible, including the well, and is molded with a fuselage half.
- Main landing gear struts, wheels and front doors are molded in one single piece.
- The clear part is useless.
- The propeller hub is symbolic, but the blades are usable.
The kit's decal sheet includes a single option: VMF-121's Corsair #55 called "Mary". They're very well printed, as one could expect from Revell-Germany. The ID number 55 on both fuselage sides are printed in white but, according to references, it should be yellow #56. Furthermore, almost the entire fin of VMF-121 Corsairs used to be painted white, as an identification aid. This is not mentioned on the painting instructions neither in the box-art.
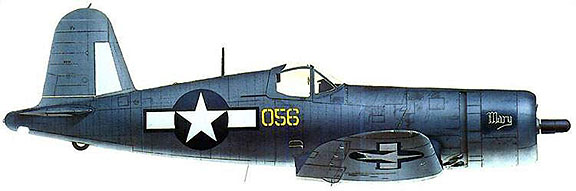
FG-1A of Captain Francis E. Pierce Jr.,
VMF-121, Peleliu,
November 1944. This is the aircraft depicted in the Revell kit.
As for after-market products, to the best of my
knowledge there's only one after-market
items for this kit: Scale Link has a very complete range of 1:144
cockpits
for several kits, including the F4U Corsair (reference #14408). The
current
price of this accessory is about £0.70, but I can't make
any
further comments about it since I've never got one in my hands.
Now, onto the model...
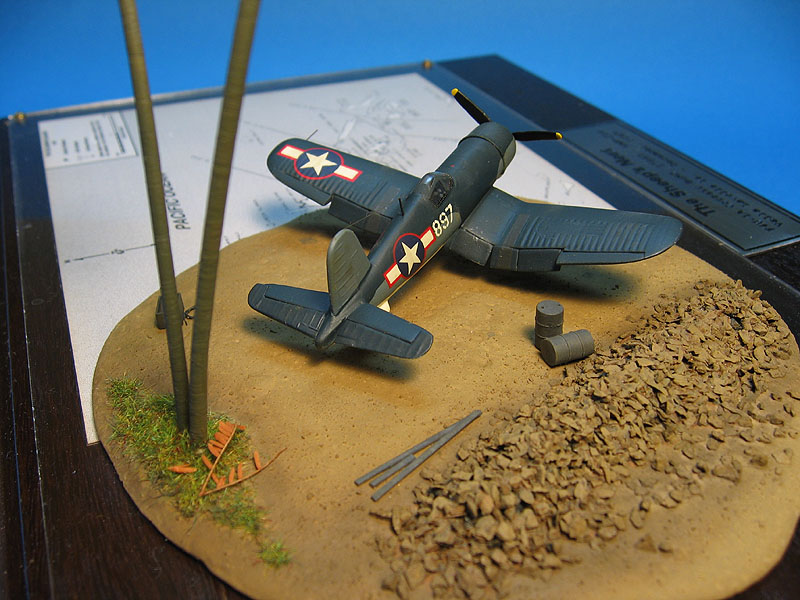
The first step was to scratchbuild a basic cockpit interior. Seems too much, I know, but at this point I wasn't sure whether the cockpit would be open or closed. The items scratched here are: panel, bulkhead, floor, seat, side consoles and a control stick. Plastic card and sprue were used, and painted Model Master interior green (FS 34151) and black enamels. Smaller details were picked using a 0.1 mm ink pen with white paint. The control panel instruments were simulated making small white circles over the black panel. To my surprise, most of these are visible from the outside, and it is far better than an empty cockpit. The rule of thumb here is "illusion".
Next, I decided to scratch build a new tailwheel,
because the kit renderization
is molded integrally with the fuselage and devoid of any resemblance
with
the prototype. I've used the kit wheel and assembled a new strut
using plastic stripes. The wheel was glued in a reverse position, since
aircrafts are generally pulled back to revetments by ground crew. I
didn't
bother with the tailhook, because most ground based Corsairs didn't use
it to save weight. I carved the well to accept the new tailwheel strut,
a little thinning here and there and left it. At this point I decided
not
to replace the tailwheel doors. I would regret hardly later. To
replace
them would be a simple task of cutting plastic card, and it would
improve
the aspect of the model. Fortunately, this is not a much visible area
on
the finished model.
The
cockpit and the new tailwheel were installed and the fuselage halves
glued.
Then I carved the wheel bay areas on the inside of the top wing halves
to clear some further room (without this the wheel well would be too
shallow)
and painted them Testors Interior Green (FS 34151) enamel. I gave up
the
idea of inserting the well walls. Next, I cut the flaps off to assemble
them deployed. The top and bottom wings were assembled and glued to the
fuselage. The small flaps were reshaped and reattached to the wing
(yes,
I know that the dash 1 and 1-A never parked with flaps down, but I
couldn't
resist). The good thing about small scales is that the gaps in general
are also small, what allowed me to solve most gap and seam problems
using
Gunze Mr. Surfacer. The bad thing is that any sanding you do will
usually
remove more than you indeed want to.
Now comes a difficult step: to scratch a new canopy. Most WWII pictures of aircrafts parked on airfields in the Pacific area show closed canopies, certainly to keep sand and coral dust out. This gave me an excuse to build an integral closed canopy. As I said before, the kit part is really bad, but I used it as a starting shell to make a male mold and form the new part. After reinforcing the inside of the kit part, I applied a thin coat of putty on the outside and sanded/checked it carefully until a good shape was achieved. Then the master was inserted in a handle and I formed several new parts. I selected the best two, cut and dipped them in Future Floor Wax. So far, to scratch a new canopy was a relatively easy task. The next problem is a different story: how to install it on the fuselage? I couldn't make use of any kind of slots because they would be quite visible. So I decided to butt-joint the new canopy on the cockpit edges using 5-minute epoxy. It worked, but filling/sanding the seams was a real nightmare.
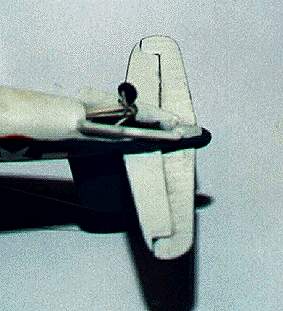
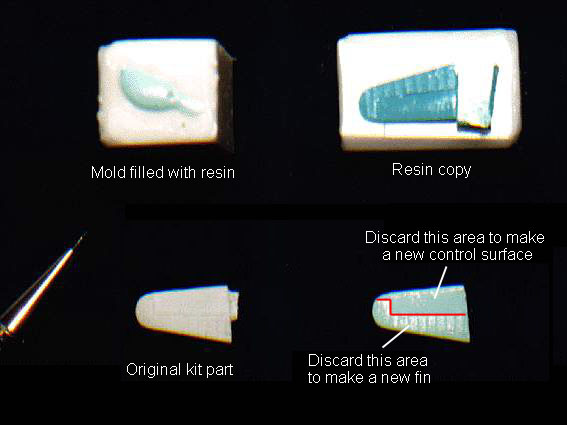
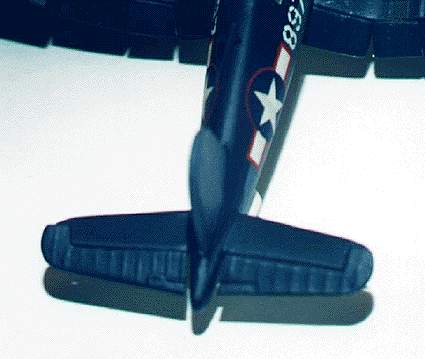
During
the cleaning process, one of the kit stabilizers fall down in my messy
floor, and I'm still looking for it. So, I decided to make a resin copy
of the one left and glue it inverted. Then I realized that to cut the
elevators
would be an easy job. I prepared several copies of the kit stabilizer
and
carved two of them leaving only the control surface and with two others
I carved in a way that only the rigid fin of the elevator was left.
These
were securely glued to the fuselage and the control surfaces were
finally
installed in a slightly down position. The effect is very convincing,
and
helps to hide the (overthick) tail wheel doors.
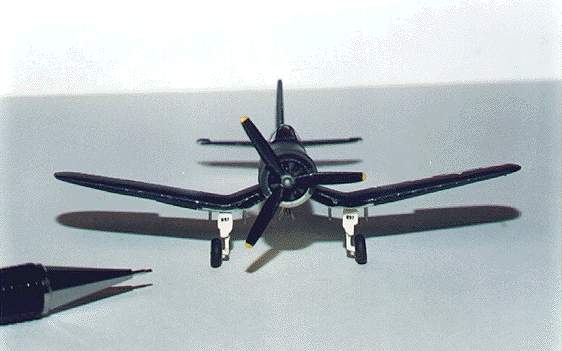
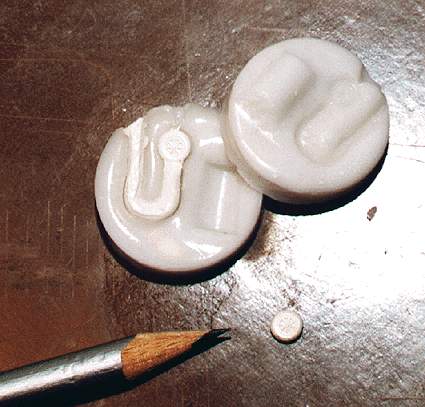
Proceed to the main wheel. I wasn't happy with the
general aspect of a
single part main undercarriage since the beginning of this project. So
I used a motor tool to carve the wheel out from the kit part until a
L-shape
leg if left. Much easier than it seems. Then I made resin copy wheels
from
a Minicraft Avenger in 1:144 scale. The number of wheel spokes are
different
for these aircrafts, but the "artistic license" in 1:144 is much
broader
than in the popular scales. I foresaw that it would be difficult to
paint
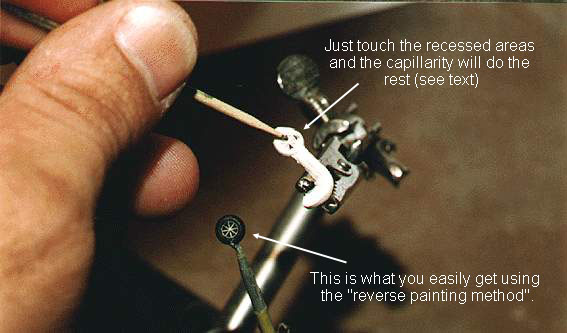
wheel spokes of that size. I tried drybrushing but it didn't work. An
interesting
technique was devised to solve this: make the resin copies of the
wheels
in the color of the spokes (white, in my case). Remeber to exaggerate a
bit on the amount of pigment used to ensure a solid colored copy. Then
apply thinned Aeromaster tire-black paint on the recessed spokes and
tire
using a toothpick or needle. The capillarity will fill the recessed
areas
preserving the color of the resin on the raised ones. I called this the
"reverse painting method" and it can be used in a number of situations.
To finish with the landing gear, I thinned the well doors to scale and
left them together with the gear legs and wheels to install later.
The
propeller hub is very badly molded and I replaced it for a new one
scratched
by turning a small piece of sprue attached to a motor tool against a
file.
The kit blades were cut off, sanded and attached to the new hub. Then
the
engine cowling was cleaned and glued to the fuselage and the propeller
was left aside for easy painting. The final step in the assembly line
was
to scratch a Brewster bomb rack using plastic card and stretched sprue.
This was attached later to pre-drilled holes just behind the cowling.
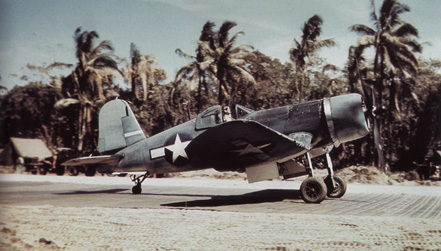
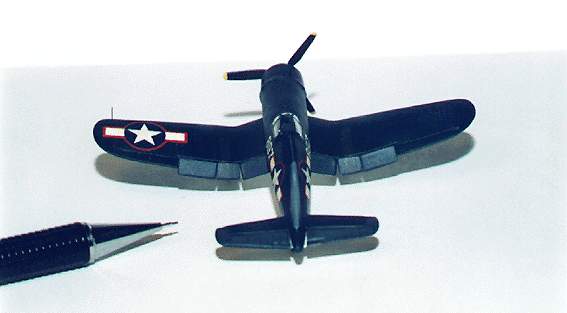
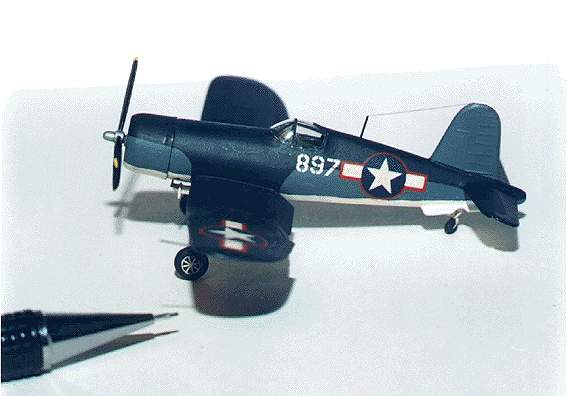
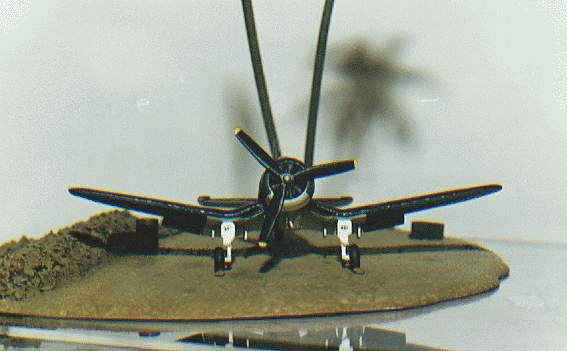
It's painting time. References state that Vella Lavella based squadrons receive a batch of new F4U-1A's in the end of 1943. According to Joe Baugher's American Military Aircraft Encyclopedia, the Bu.No. 17456 to 18121 are all dash 1A's (except for 17516, converted to XF4U-3). After VMF-214 wartime photos, many of their aicrafts appeared to have field-applied (highly blended and faded) three-tone colors. Photographic evidences also show that many Corsairs of this batch left Strattford factory already in three-tone scheme, but I can't assert wheater the 17897 is one of them.
I
used only Model Master enamels for this little Corsair cammo, slightly
toned down with white for the "scale effect". I started by hand
brushing
the white undersides in three or four very thinned coats. Next I masked
the white areas and airbrushed intermediate blue (FS 35164), including
the undersides of the outer wings. Then masked all lateral/bottom
surfaces
and followed with non-specular sea blue (FS 35042) on the remaining
upper
surfaces. I didn't paint the canopy frames. I'd use decal stripes
later.
The masking produced a wavy hard demarcation line between colors, but I
think this is acceptable in this scale. The propeller was painted as
typical.
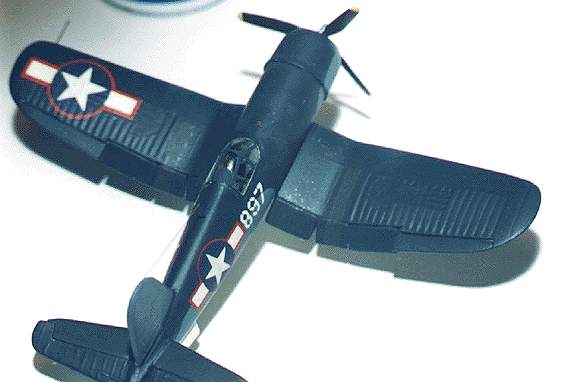
For the decals, the stars from the kit sheet were used, and their are of the red outline style. This type of star was still very common in the end of 1943. The white fuselage numbers came from Aeromaster US 45 degree ID Numbers & Letters (product #72-012). The tiny black numbers in the front wheel door were cut from a 1/48 serial number. The canopy frames were made cutting thin stripes from Aeromaster canopy trim (sea blue over zinc chromate - product #FB-07).
Wheatering was accomplished mostly using pastels. Panel lines and the exhaust stains were enhanced using dark brown and black. Some panels and fabric covered areas were masked using post-it paper and faded using light grey pastels. The landing gear received a heavy wash of burnt sienna artist oil, as well as the tailwheel. Brown oil wash was also applied on recessed areas on the underside of the fuselage and behind the cowling. Paint chipping was simulated with small dabs of Model Master Aluminum plate buffing metalizer carefully applied with a 000 brush.
An overall coat of Testors Dullcote sealed everything
and resulted a very flat finish. On the other hand, the fading achieved
with the pastels was reduced considerably. I decided not to reapply it.
A very thin aerial antenae finished the Corsair. Now move to the base.
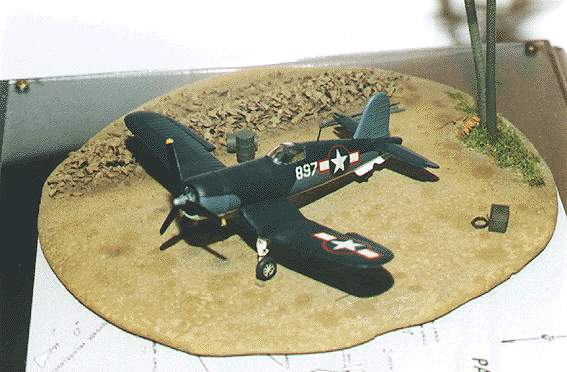
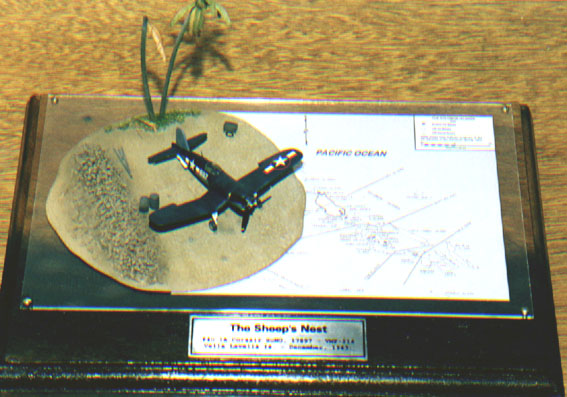
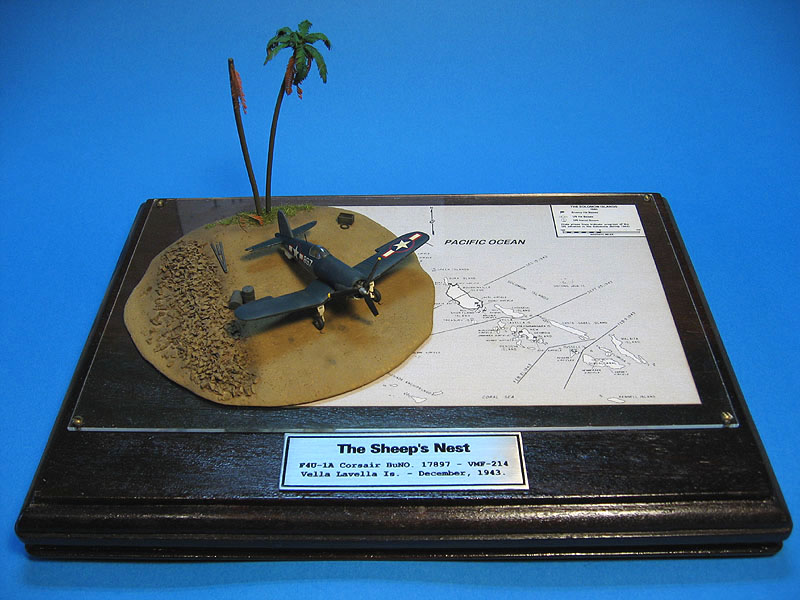
The Base
The diorama
base is a home-made mix of plaster and tan/brown color pigments.
The mix was poured on an Aluminum foil laid over a piece of glass.
After
dried, the foil was removed. This formed my randomly bounded shell over
which everything would be placed. Incidentally, I didn't mixed very
well
the color pigments with the plaster and this produced a irregular top
surface,
resulting in a very convincing crushed-coral emulation. Next, I added
several
layers of railroad ballast glued with Future Floor Wax to simulate a
pile
of coral, sand, stones etc pushed aside by a bulldozer. At this point,
everything received a very thinned coat of dark sand. While this was
still
wet, some sand grains were sprinkled around low traffic areas. Caution
is necessary here, as even a sand grain seems a big stone in this
scale.
An even darker sand color was washed over the pile. Later, a gentle
drybrushing
of light tan highlighted the raised edges. This gave a shadowed effect
to the stone pile. Finally, a heavy application of white and sand
pastel
chalk toned down the maintenance area.
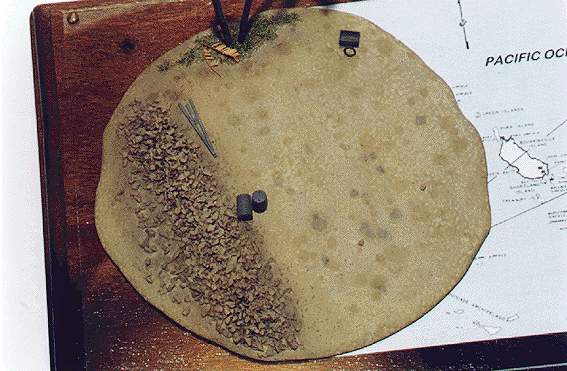
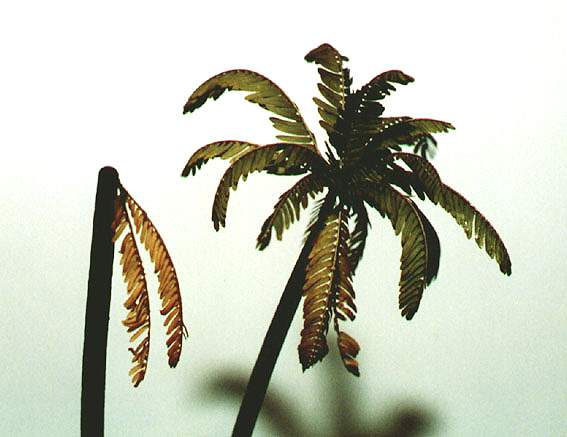
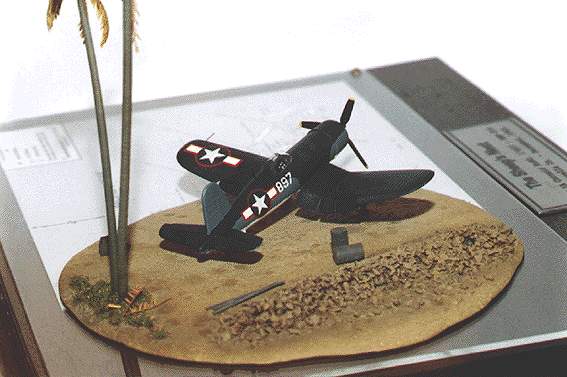
In
order to have a genuine South Pacific island diorama, some palm trees
are necessary. To cut some work down, I decided to include two, one of
them being very battered as consequence of earlier battles or bomber
raids.
The trunks are plastic rods slightly bent in hot water. To simulate the
rings around the trunks, I twisted the rods against a heavy duty steel
wool. They were painted with a mix of dark gray/green. The fronds came
from a natural plant I cultivate at home. This kind of plant use to
bend
heavily after you remove them from their arms. The trick is to brush
some
Future Floor Wax on it before removing them. Because Future dries very
fast, this will "freeze" the leaves with the shape you want.
Interestingly,
the Future application keeps the natural color of the leaves during
several
years, but a flat clear coat is necessary to remove the shiny finish.
Of
course it is quite boring to glue each frond in a convincing position,
but the result is worth. The battered palm tree recieved two dry fronds
and a flat black drybrush on its upper end to simulate soot. Around the
base of the palm trees I applied a small amount of Vernlinden's static
grass to depict some ground vegetation. I also laid some dead fronds on
the grass, as well as some dead leaves here and there.
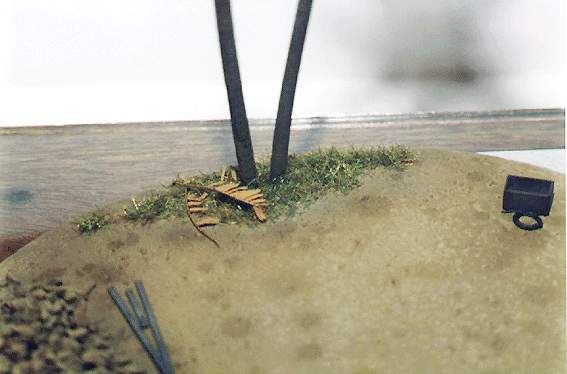
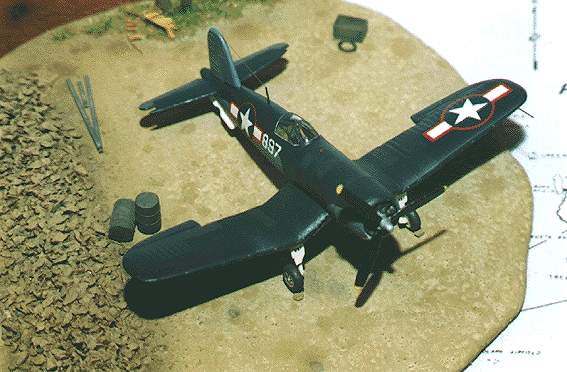
As a
maintenance area, some gizmos were also added: an open crate made
of plastic card, a rope and some steel spars scattered randomly. I also
included a couple of fuel drums made from a short lenght of plastic rod
with two stretched srpues glued around them. Two small hole were
drilled
on the top of the drums to simulate open caps. Then the diorama base
was
glued on the top of a clear acrylic plate and the plate was fastened to
a wood base. Between the plate and the wood base I sandwiched a small
map
of the Solomon Islands. A steel plate with the name of the diorama,
Bu.No.
etc. completed the base. It looks beautiful. The diorama base took me
about
the same time of the Corsair, but it was a good personal chance to try
some new diorama techniques.
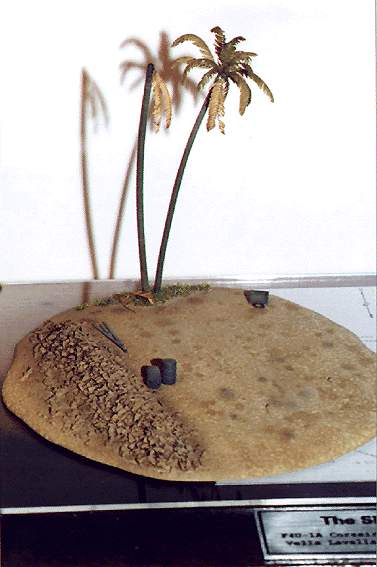
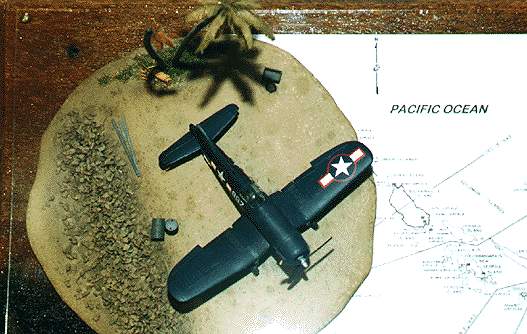
And that's
it. Now the little Corsair was positioned using small
dabs of white glue. No ground crew, no pilots. Fortunately, it is very
hard to find good figures in this scale (it would be a real core to
paint
them...). As a final touch, I added a couple of single ballast stones
in
front of each main wheel to simulate the "Flintstone's wheel shocks",
so
common in wartime pictures.
This should be a two weekends project. I didn't clock
it, but I estimate it took me about 60 hours to complete, spanning 2
summer
months. Most of this time was spent correcting the kit flaws and on
trial
& error preparing the base. My 1:48'ers fellows are always
complaining
about the 1:72 scale being too small. Let me tell you that my favorite
scale is the 1:32. And I can't explain why, but now I fell much more
confident
to build a 1:32 F4U Corsair.
References
| Technical file | |
| Kit:
|
-
Revell #4098 |
| Accessories:
|
|
| Stolen
parts: |
-
Main wheels: resin copy of the
Academy TBF Avenger in 1/144 |
| Basic
colors: |
-
Interior green: Model Master enamel
FS 34151 - Intermediate blue: Model Master enamel FS 35164 - Non-specular sea blue: Model Master enamel FS 35042 - Non-specular white: can't remember - Flat varnish: Testors Dullcote |
| Notes: |
-
Scratchbuilt cockpit and flaps. |
Rato Marczak © 2007
