| Revell Convair R3Y-2 Tradewind in 1/165 |
| Start:
1981 (see text) Finished: July/2009 |
Ahhh!
Good memories. I'm sure all of you
who passed the 40's know this kit. Originally released by Revell-USA in
1956, the H-178 kit was released again by Revell-Brazil in late
70's/early
80's. My sample if from the latter brew (I'm not that old).
Revell-Germany also re-released it once again during Revell 50 years
anniversary celebration, some years ago. Typical of the time, the scale
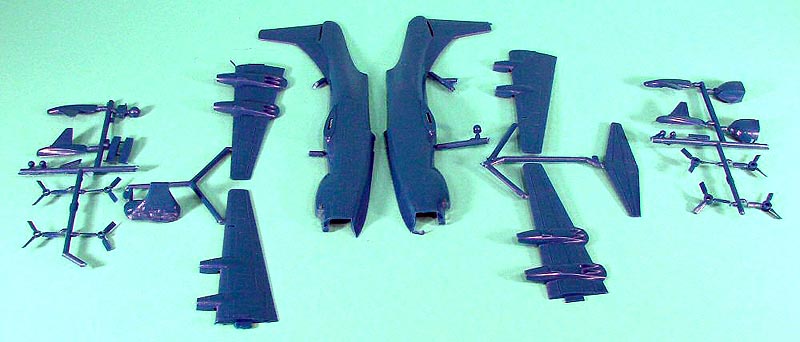
is 1/box, or 1/166 in this case. The kit comes with very few parts
molded in dark blue. Surface details are curiously recessed, although
not very consistent, but includes those cheese grater rivet lines
everywhere. Another characteristic are the molded-on decal placement
positions.
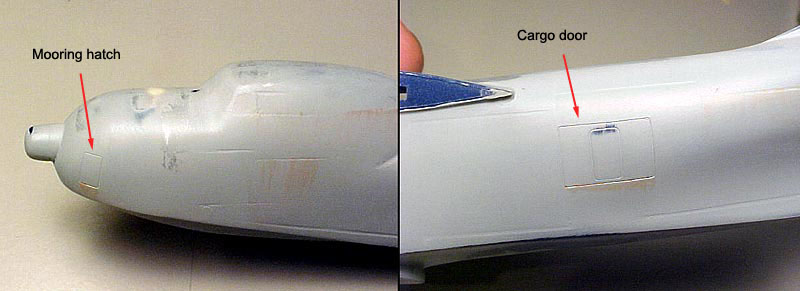
Let me make it straight that mine is not a unassembled kit. I built this model in 1980 or 81 - can't recall. It's been living in my spare box all these years, sometimes hired as a paint testing hull. I sanded the rivets ages ago and put it back to the box. A few more years and the trench-like panel lines were puttied and sanded flush... then back to the box. One more year and the fuselage had the cargo doors and mooring hatch rescribed. This year, after reading an article about overhauling old, never reissued models, I thought it could be interesting to refurnish this old friend of mine. But besides bringing good memories from my childhood, I wondered it could also be a test bed for learning how to make scale water (something I must learn fast, as I'm almost finishing a couple of 1/700 WWII ships).
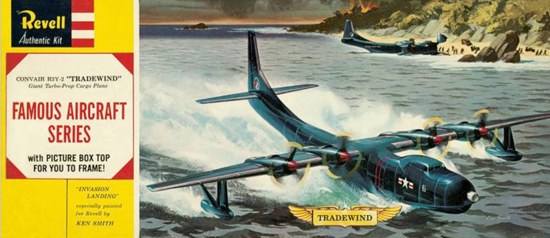
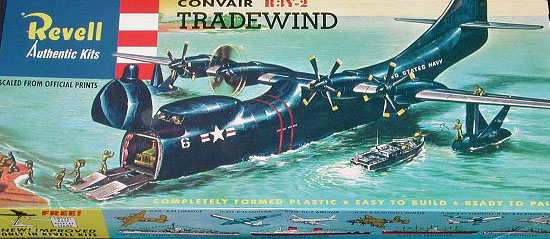
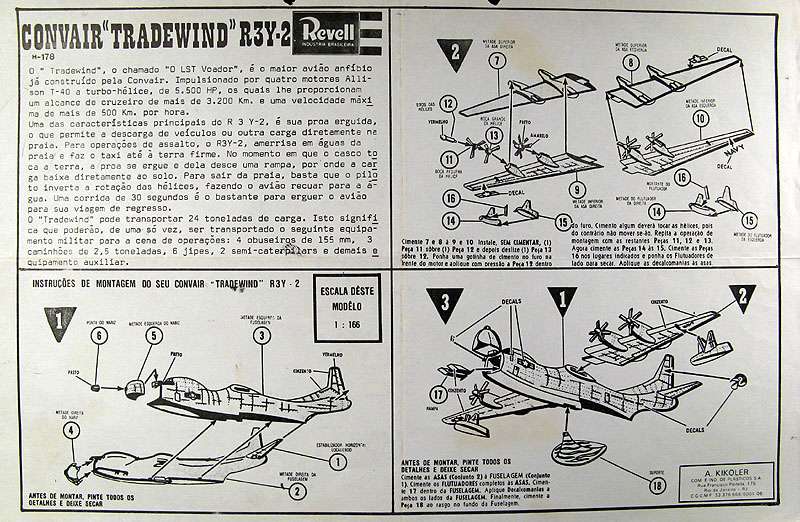
Digging my archives, I found the instructions of this model - then traded in Brazil by the late A. Kikoler - in a remarkable good state. "The Flying LST" says the text... As an off-note, the R3Y-2 was never called Tradewind, but Bowloader, due to its hinged nose. You probably will remember the movable nose with the small ramp... And by the way, I've never found a single photo of a R3Y-2 wearing the pelican found in the original decals. I'm pretty sure it never did.
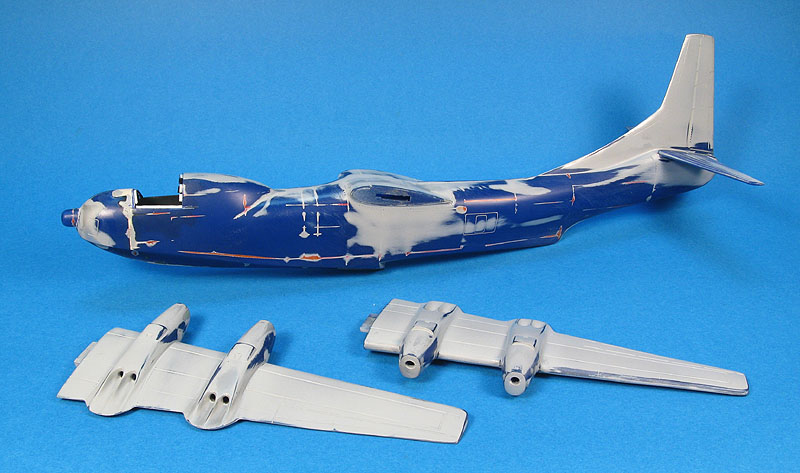
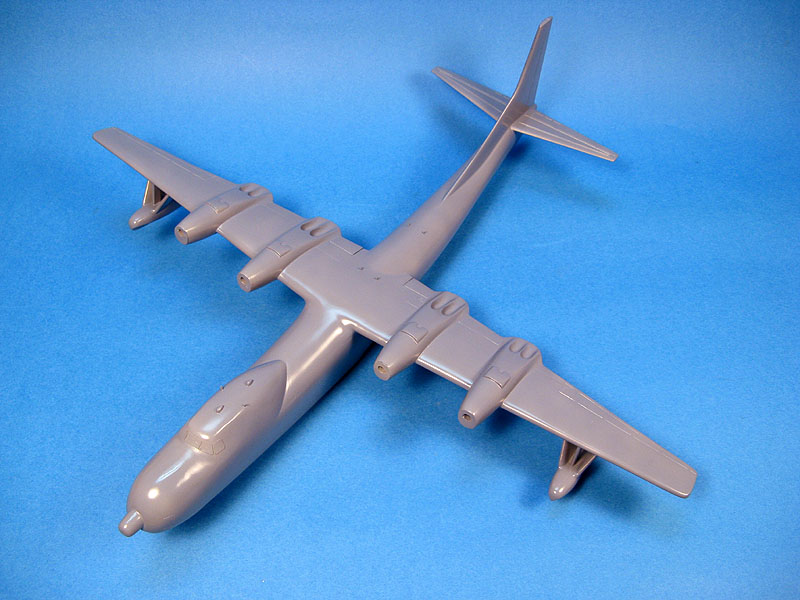
I don't have any decent pics of the model from its first steps. Suffices to mention that the model survived moves and stuffs with almost all its parts, except for some propeller blades. The wings and vertical stabilizer were badly warped, which I tried to correct with the aid of steam from a cappuccino machine.
Before re-attaching the wings, the fuselage and wings received two putty-sanding-primer-sanding treatments until a decent finish was achieved.
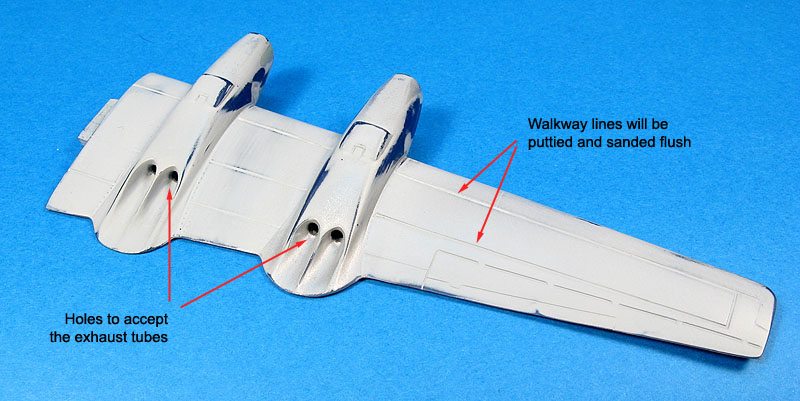
The aft of the engine nacelles were drilled to accept the exhaust pipes of the T-40 turbo-prop engines.
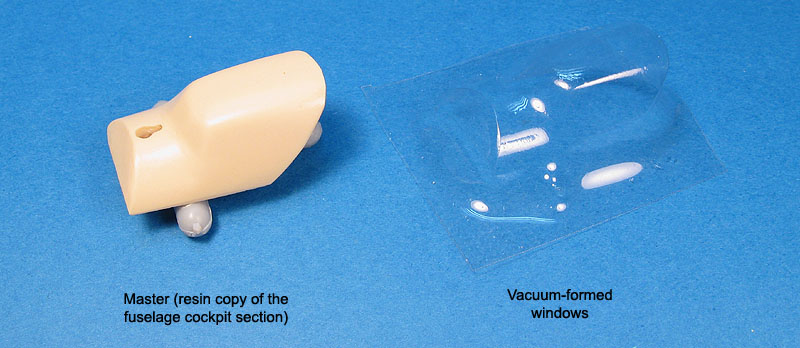
The original model didn't come with any clear parts, and the windows openings were filled with putty sometime in the last century. I reasoned this absence would detract from the final appearence of the model. Not satisfied with all the work so far, the front fuselage was dipped in a cup with silicone rubber, and a mold was prepared. The mold allowed me to make a couple of resin castings of the decking. I used polyester resin instead of epoxy to purposedly leave some shrinking (2-3%) to occur. This margin allowed me to vacuum form a new cockpit roof in clear plastic, taking into account the thickness of the clear part. Later this would save me a lot of sanding. Well, not that much...
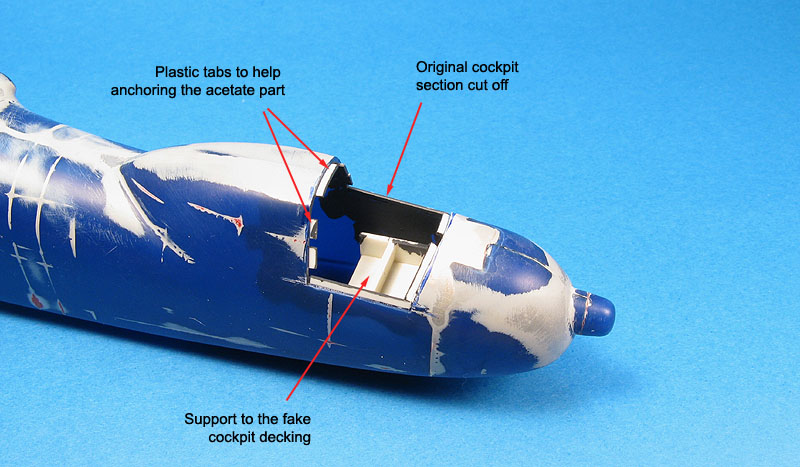
Once done with the new clear cockpit roof, I cut the cockpit decking off the fuselage, and installed small tabs to support the clear part. I also glued a plastic bed on the bottom of the hull to receive a fake cockpit atop of it.
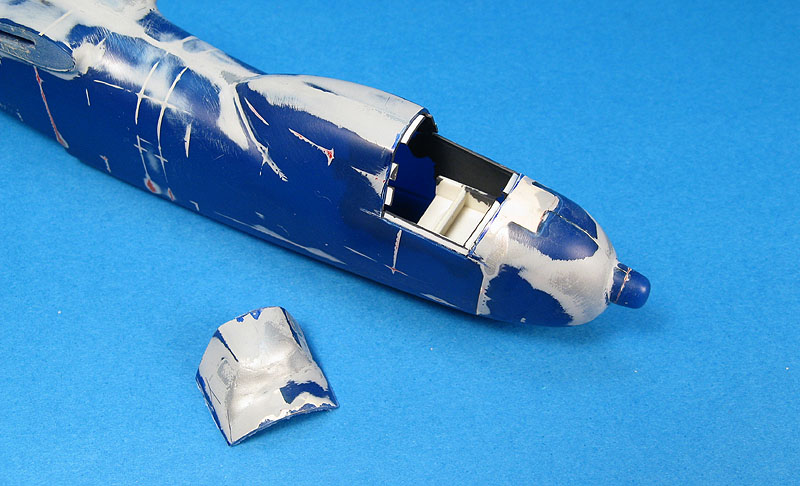
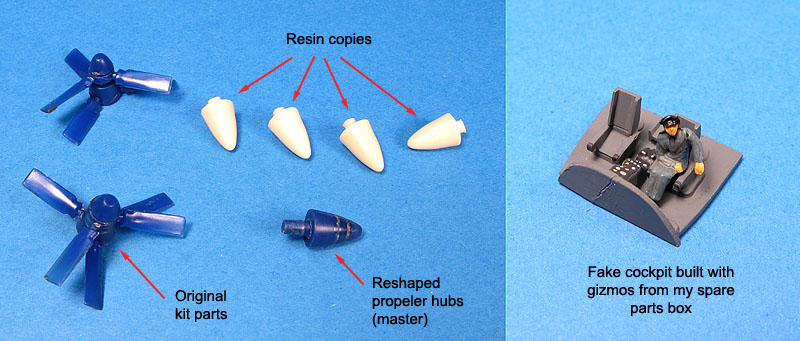
The new cockpit is very simple, made with some spare parts and a pilot from another Revell oldie: the Lockheed Constellation. I don't know the scale, but it appear to be reasonably close for the job. It was glued inside the fuselage resting on its bed. And since the silicon and resin bottles were around my bench, I reshaped a new spinner master from the kit parts. It was just a matter of filling the voids with superglue and sanding it the help of a rotatory tool. The drawings from Steve Ginter's book on the Tradewind (Naval Fighters series #34) were instrumental to achieve the correct, more pointed shape.
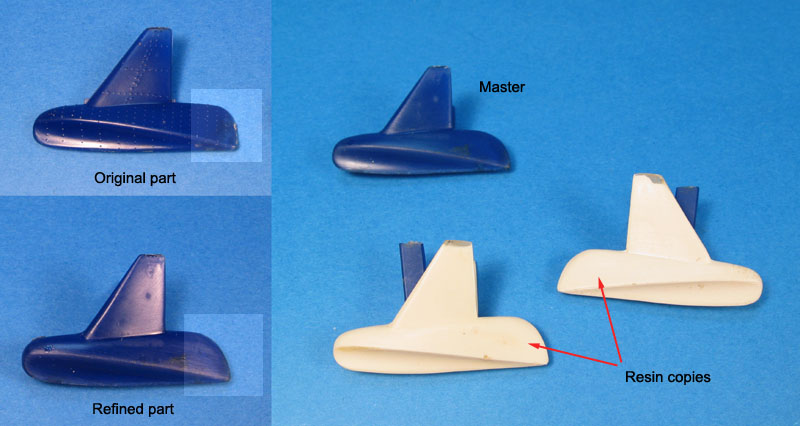
The wing floats were the other items reworked. In addition to the rivet removal, the shape of the floats were re-defined to match the drawings on Ginter's book. I prepared one master and cast two copies of it in resin.
The new clear roof was cut to match the fuselage opening. After securely fixing it to the fuselage, the seams gave me a lot of work to disappear. Two passes of putty plus an additional Mr. Surfacer trueing. Lots of wet sanding, and I'm still not much satisfied.
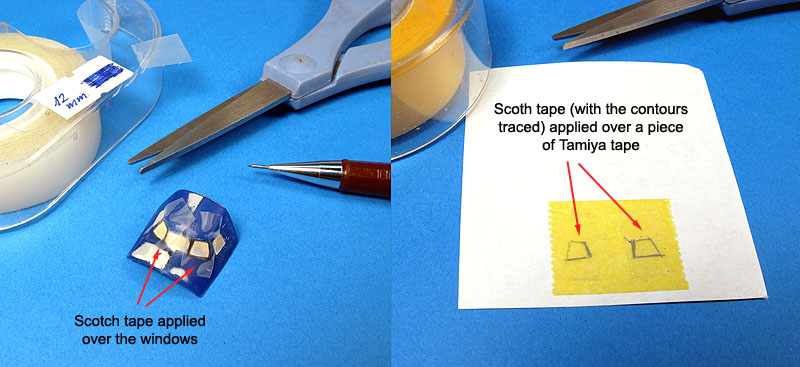
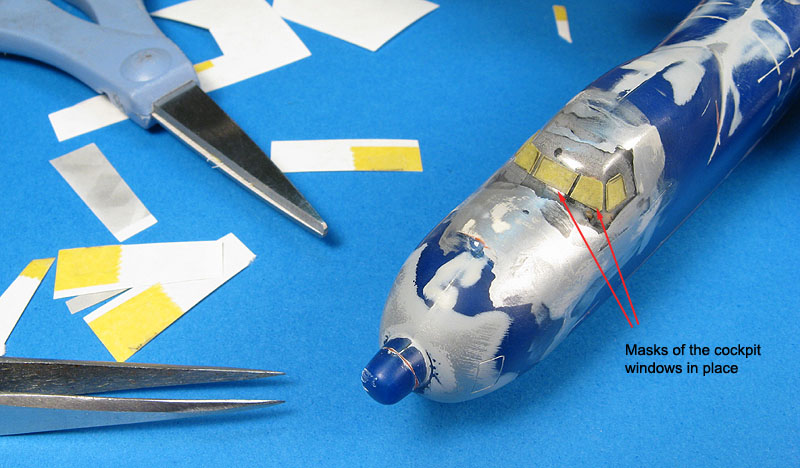
In order to protect the transparent areas of the windows, a set of masks were prepared. I sanded the cockpit roof sawed before until the original windows were clearly visible (thanks God I used white putty when I filled them). Scotch tape was then laid over the windows, and their outlines were roughly traced by hand with a pencil. The tapes were removed and applied over a piece of Tamiya tape, and finally the final masks were cut, this time using a steel ruler and a hobby knife. I also tried to preserve the symmetry of the windows.
The masks were transfered to the model. I didn't bothered to remove the Scotch tape. The frost look of the clear roof you see in the photo below are water droplets condensed after washing the model with water - I missed a seam somewhere... Hopefully, they will dry clear.
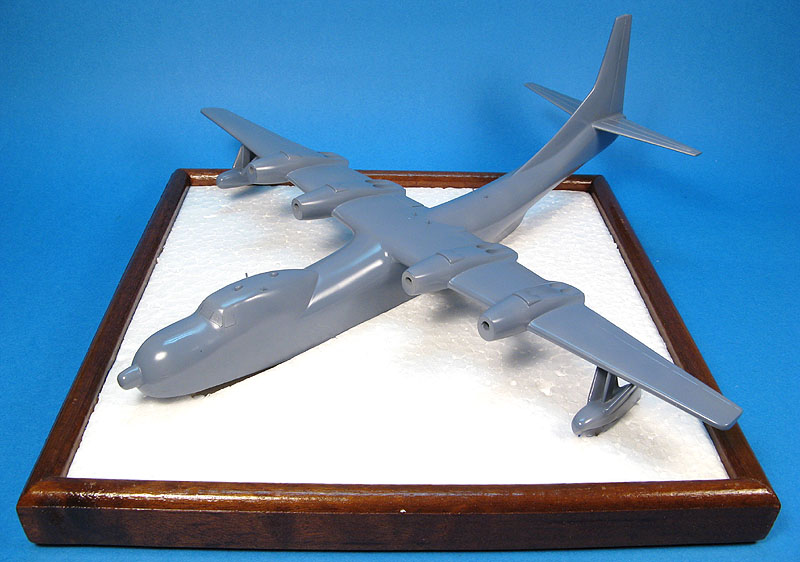
After attaching the wings to the fuselage, another infamous putty-sanding-primer-sanding section took place. My arms hurt. The clear areas received a coat of Tamiya XF-1.
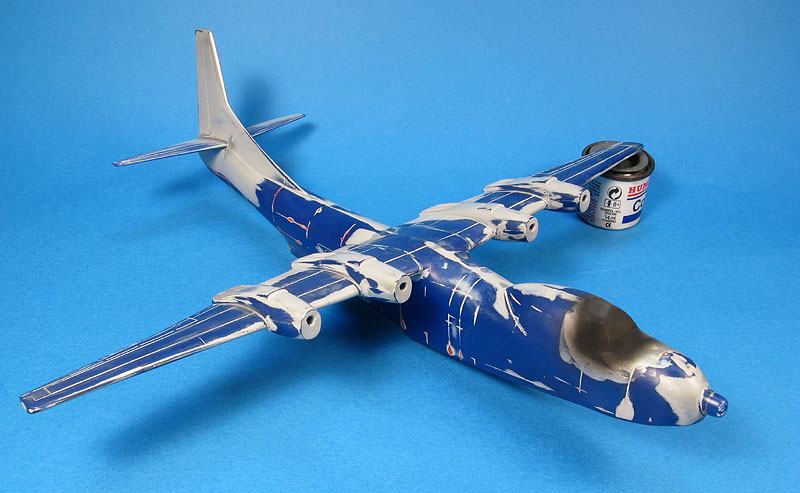
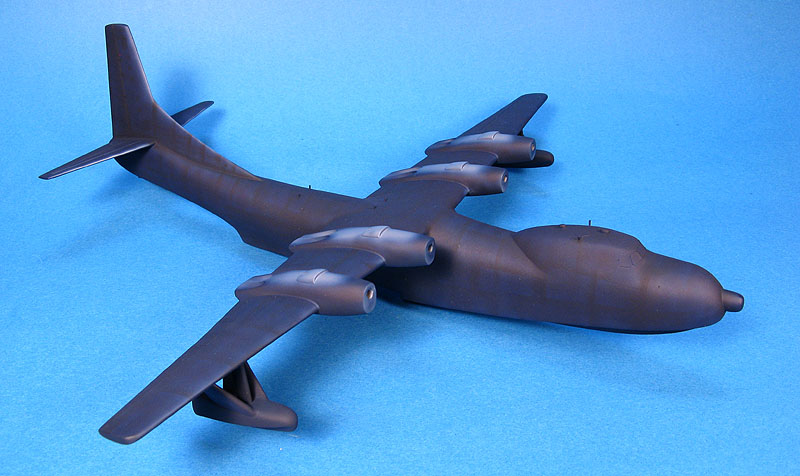
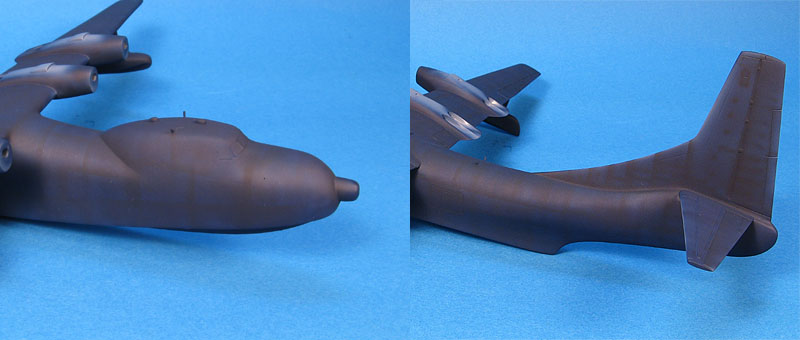
A final coat of primer was applied, and as you can see in the photo below, some rough spots persisted.
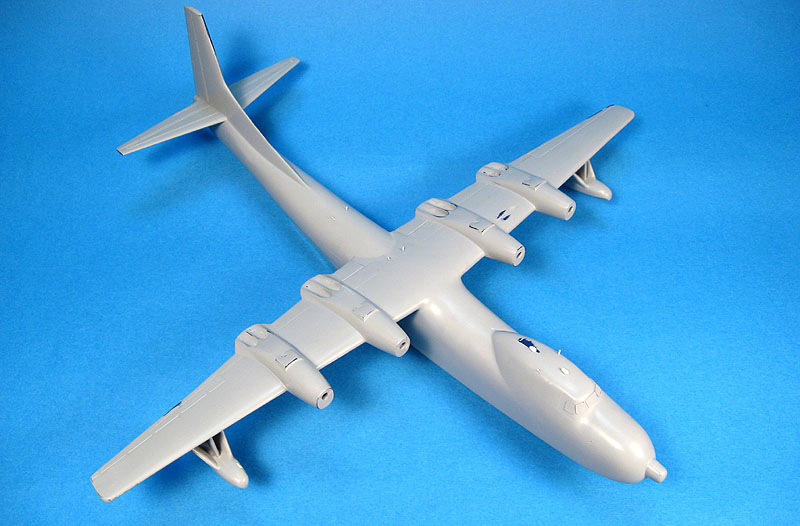
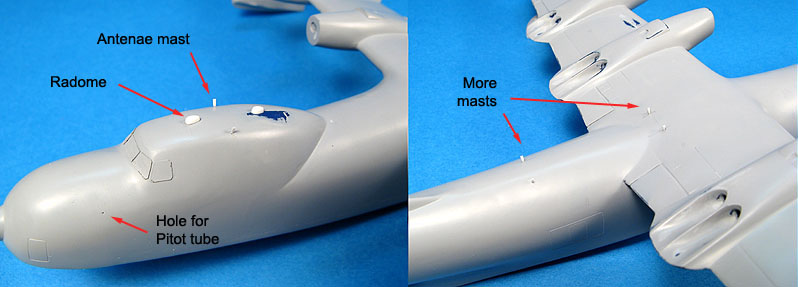
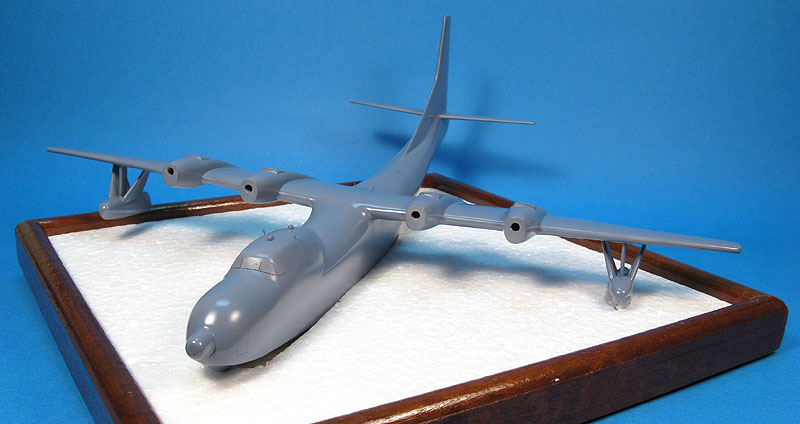
Once satisfied (not really) with the finish, I started to add the smaller details. And the R3Y had a number of them, mostly small hatches and windows that I'll add with decals after painting. For now, I made both radomes you see glued on top of the crew compartment and the array of antenae masts along the fuselage spine.
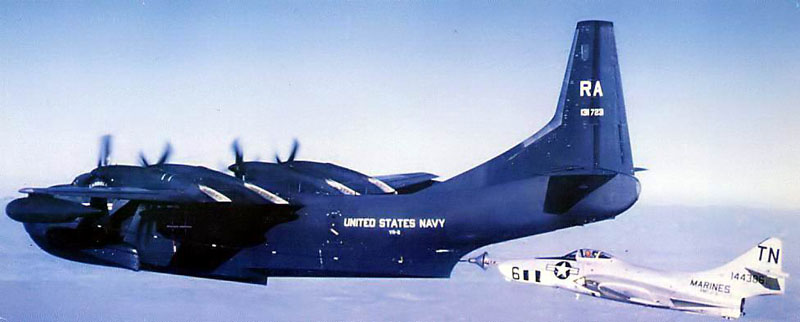
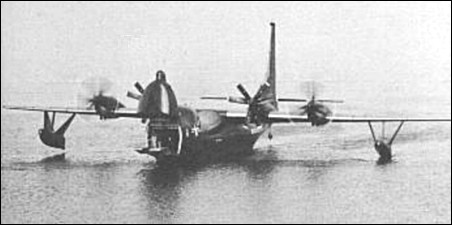
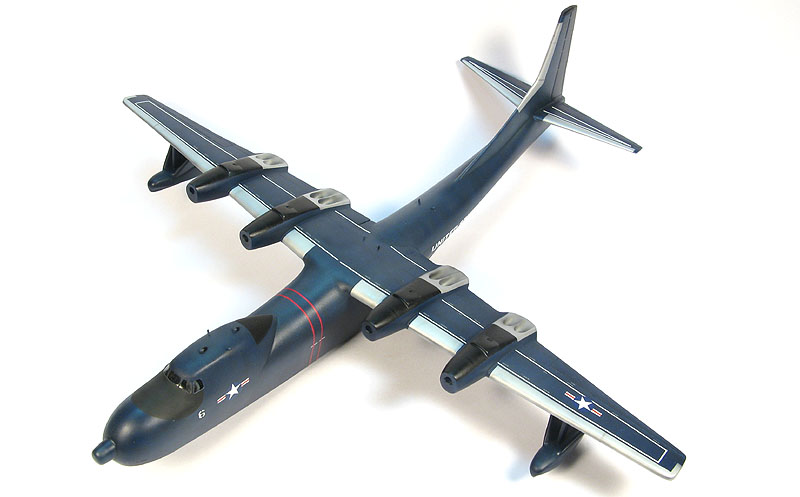
Both operational R3Y-1s and 2s suffered from severe paint fading. This occurred due to a number of reasons, but the main two were: (a) the Dark Sea Blue (FS 15042) was very prone to fading under exposition to sun and sea elements, let alone in an aircraft of that size, and this is visible in many photos of the aircraft; (b) the hulls of the first dashs 1 and 2 remained resting under the sun for almost a year before the arrival of the Lycoming turbo-prop engines. Since I'm going to model one of the first (if not the first) bowloader (BuNo 128450) during the San Diego trials in 1957, I'm going to trust on pre-shading techniques as well as varying flatness clear coats to depict the effect. Ginter's book brings some very elucidating photos about the subject. The photo below show the bird I'm going to depict:

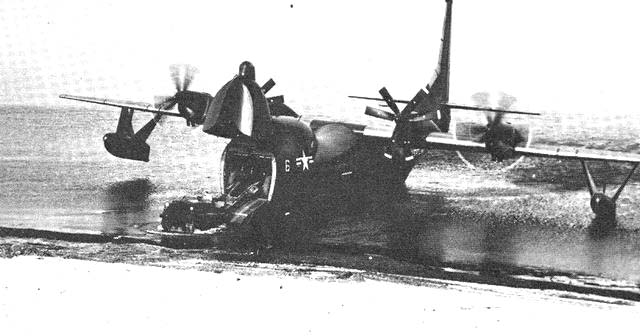
And here's another one, the Caribbean Sea Tradewind during aerial refuelling trials, showing how the blue varied:
My first step was an overall coat of Intermediate Blue (FS 35164), using automotive lacquer. It was irritating to still find some remaining bad spots after so many putty-sand passes... That's me. The Intermediate Blue was chosen as a lighter background over which I'll built up layers of DSB later.
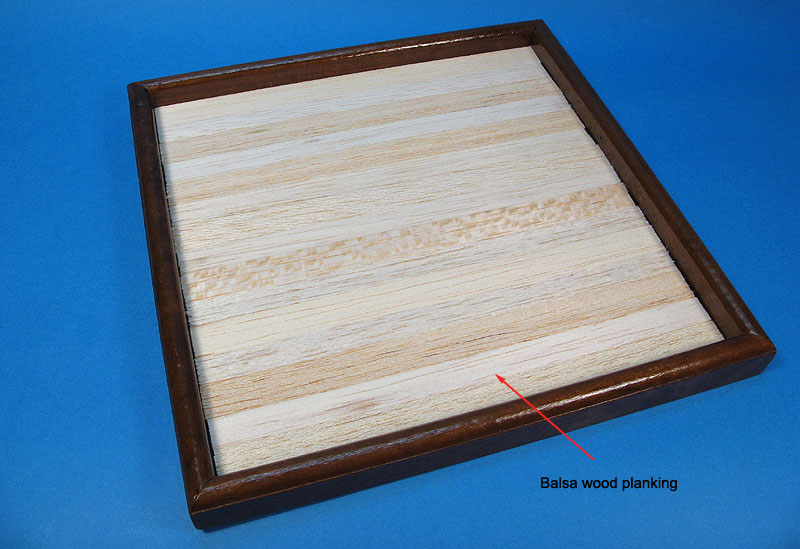
The work on the model was halted to start the preparation of the base. It would be too risky to handle the finished model while modeling the sea around it. So I started assembling a wood framed slightly smaller than the model dimensions. A sheet of expanded polystyrene (Isopor ©) was cut to fit inside the frame.

Since Isopor is not know for its strength, I planked the bottom of the frame with pieces of balsa wood, glued with copious amounts of carpenter glue, but not fixed to the frame yet. The idea is to work on the sea and insert it in the frame once finished:
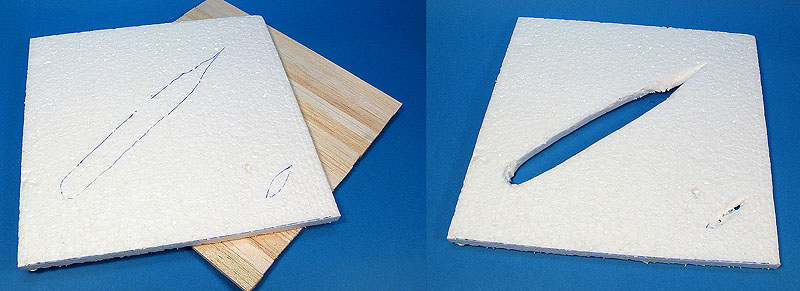
The Isopor sheet was roughly cut to accept the Tradewind fuselage, as well as one of its port wing float (the R3Ys would touch the sea with both floats only under maximum load conditions - not my case: trials, remember?):
Here's a test fit to check the balance of the display:
The available photos show that the bow remains almost entirely out of the water, so I tried to reproduce the same attitude:
Note the listing of the airframe to the port side.
More or less like this:
Continuing with the "ocean", I elected to avoid the use of resin materials and all associated issues (shrinking, heat, drying time, smell). Instead, I reasoned acrylic pastes properly painted and gloss coated would do a convincing job. It is important to remember that this is small scale, and anything faulty will look overly exaggerated. That includes the water effects.
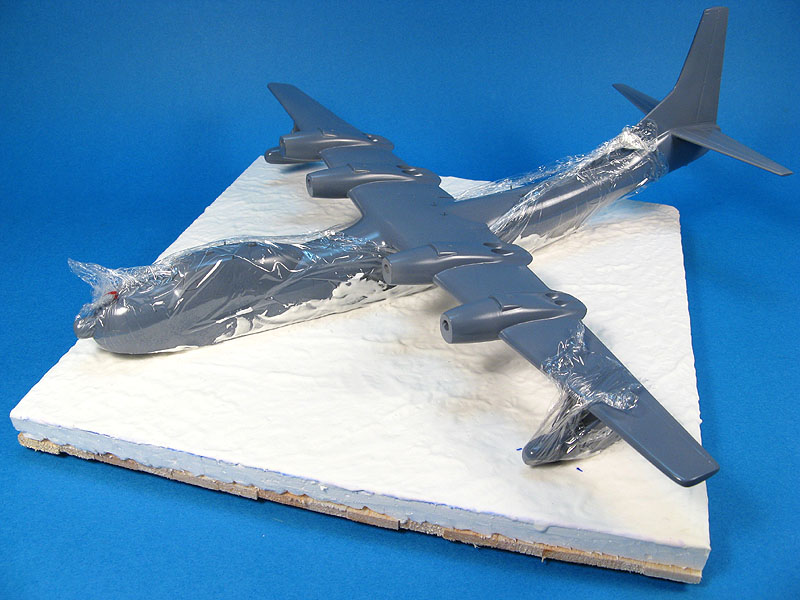
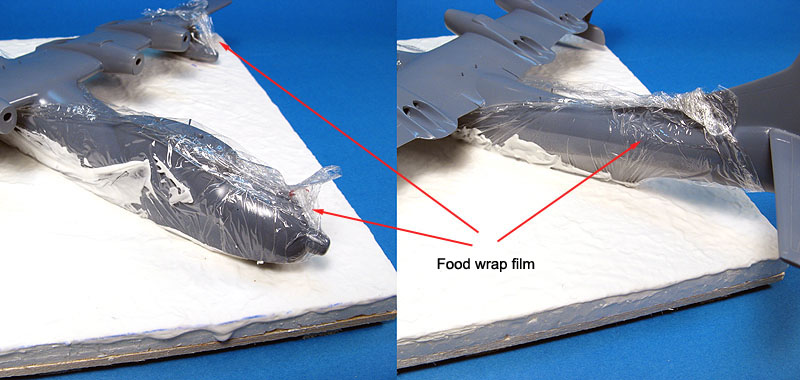
I started applying a thin coat of white acrylic paste (the type you find in artist shops) to seal the base and smooth the surface. By smoothing the surface I don't mean making it flat, but filling voids and eliminating the characteristic surface pattern of Isopor. In short, I wanted to let some randomness on the sea topography to accur. Once this layer was dry, I applied a second, thicker coat of paste with a large spatula. While it was still wet, I sprayed water to make the paste more workable, and added waves and curls by tapping my finger all over the surface. So far, the model was not fitted to the base. While the base was drying, I wrapped the lower areas of the model with ordinary food wrap film to protect it. The model was then pressed on its place on the base, with the paste still quite wet.
Next, using a small spatula, I applied small amounts of paste around the hull and wing float to fill all cavities. The model was then perfectly laid on the water.
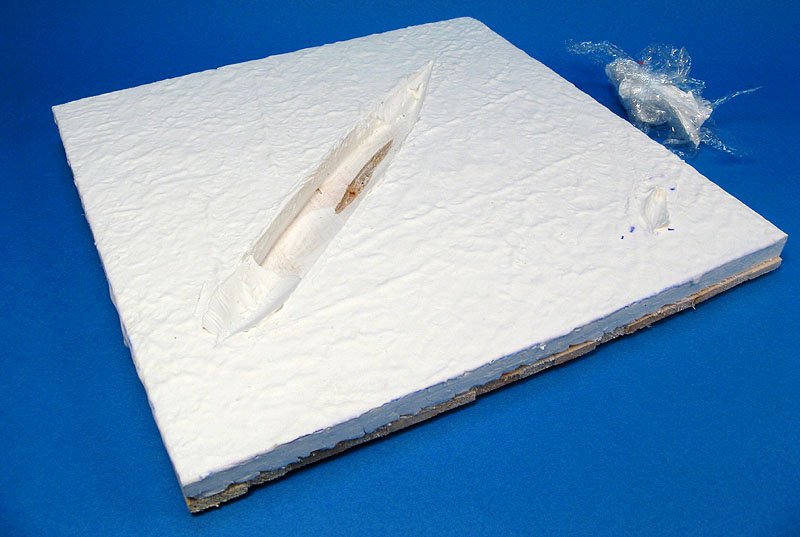
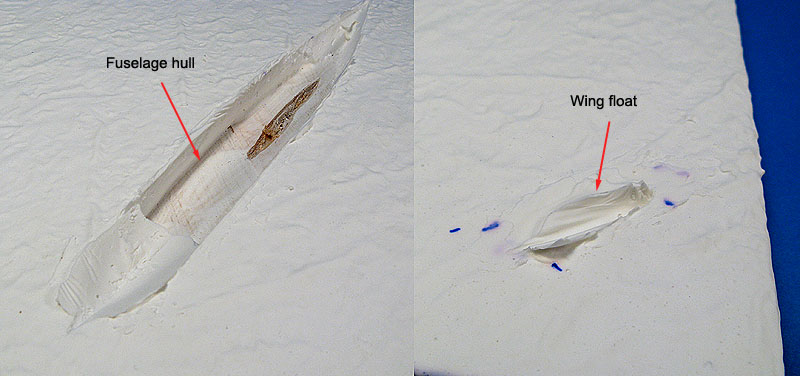
Since there was a significant amount of paste, enough drying time is an important issue before proceeding. However, the model was acting as a seal, and therefore avoiding the putty inside the cavities to dry. So I waited 24 hours to let the outer paste shell to dry, and gently popped out the model from the base. The food wrap film allowed me to do so, since no area of the model was in contact with the paste. The result is a base on which the model will click perfectly. Now the paste previously trapped inside the cavities will dry properly, and I can add the sea effects without worrying about damaging the model:
The sea surface was then finished by adding wakes and hull/float trails. Remember: this is calm sea, a few hundred yards from San Diego shore. So, once the paste was fully cured, I applied a generous coat of Liquitex Colored Gesso, a kind of water based thinned plaster. This coat was necessary because I gently sanded the acrylic paste in order to remove the rough spots. The plaster acted as a smoothing agent, filling small bubbles and other imperfections.
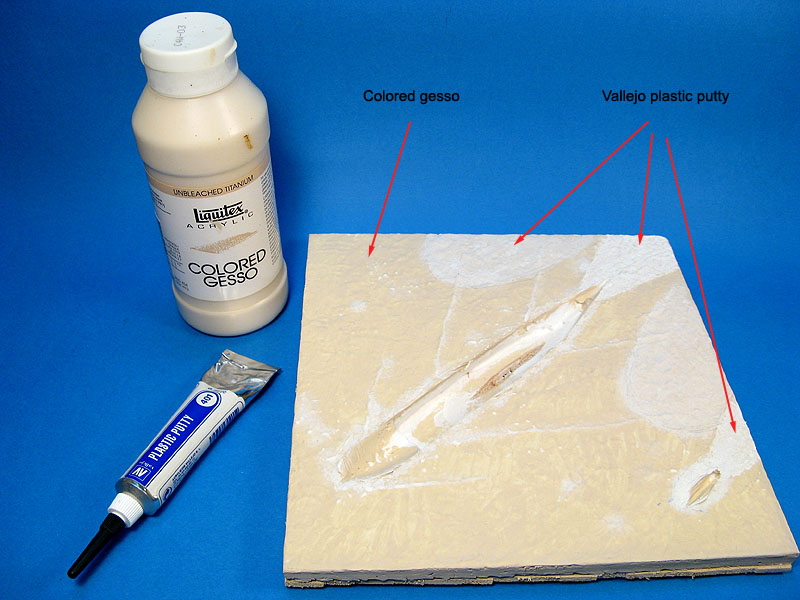
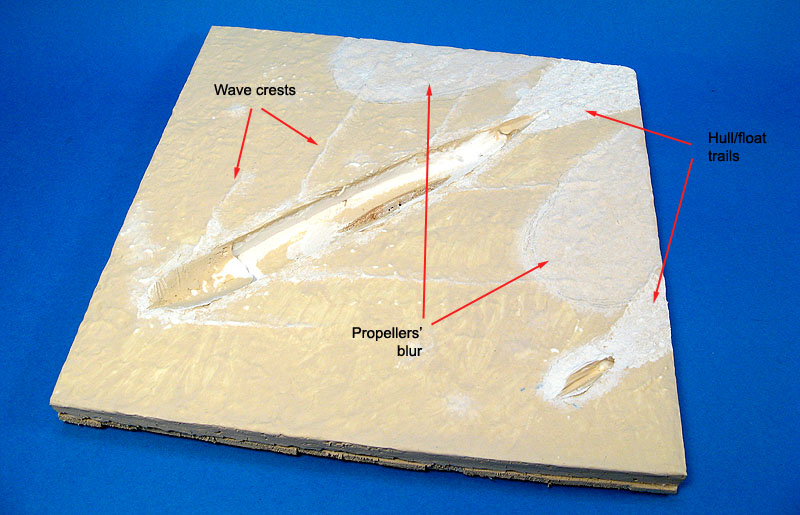
After the plaster coat was dry (it took just a few minutes under a bulb light), Vallejo plastic putty (another water soluble product, in spite of the name) was used to add the hull/float trails and some foam at wave crests. I also added some texture to simulate the propeller blur (only the outer engines). The effect was obtained by dabbing a stiff brush over a thin layer of putty. I applied a thicker layer for the trails and a very light one for the blurring. The brush did the rest. I used the same method to roughen the wave crests.
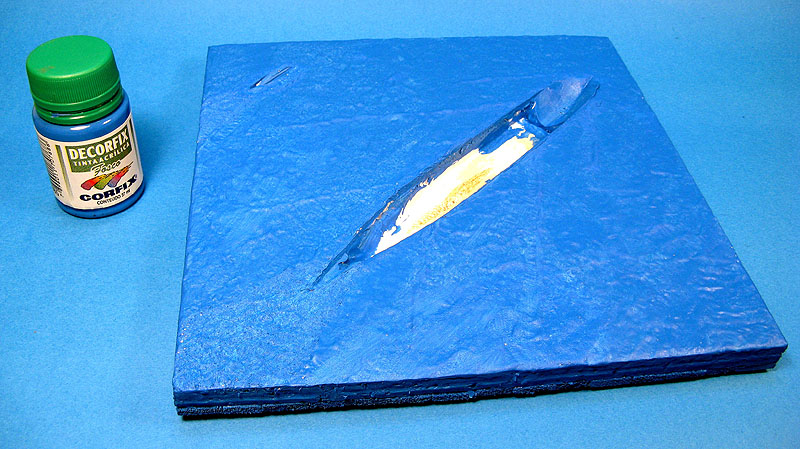
At this point it was difficult to see any further imperfections on my sea surface, therefore I applied a coat of blue acrylic paint to check how was everything. The final color will be applied with an airbrush using various blue/grey/green tones. On top of it, a gloss varnish will be applied.
Let me make it straight that mine is not a unassembled kit. I built this model in 1980 or 81 - can't recall. It's been living in my spare box all these years, sometimes hired as a paint testing hull. I sanded the rivets ages ago and put it back to the box. A few more years and the trench-like panel lines were puttied and sanded flush... then back to the box. One more year and the fuselage had the cargo doors and mooring hatch rescribed. This year, after reading an article about overhauling old, never reissued models, I thought it could be interesting to refurnish this old friend of mine. But besides bringing good memories from my childhood, I wondered it could also be a test bed for learning how to make scale water (something I must learn fast, as I'm almost finishing a couple of 1/700 WWII ships).
Digging my archives, I found the instructions of this model - then traded in Brazil by the late A. Kikoler - in a remarkable good state. "The Flying LST" says the text... As an off-note, the R3Y-2 was never called Tradewind, but Bowloader, due to its hinged nose. You probably will remember the movable nose with the small ramp... And by the way, I've never found a single photo of a R3Y-2 wearing the pelican found in the original decals. I'm pretty sure it never did.
I don't have any decent pics of the model from its first steps. Suffices to mention that the model survived moves and stuffs with almost all its parts, except for some propeller blades. The wings and vertical stabilizer were badly warped, which I tried to correct with the aid of steam from a cappuccino machine.
Before re-attaching the wings, the fuselage and wings received two putty-sanding-primer-sanding treatments until a decent finish was achieved.
The aft of the engine nacelles were drilled to accept the exhaust pipes of the T-40 turbo-prop engines.
The original model didn't come with any clear parts, and the windows openings were filled with putty sometime in the last century. I reasoned this absence would detract from the final appearence of the model. Not satisfied with all the work so far, the front fuselage was dipped in a cup with silicone rubber, and a mold was prepared. The mold allowed me to make a couple of resin castings of the decking. I used polyester resin instead of epoxy to purposedly leave some shrinking (2-3%) to occur. This margin allowed me to vacuum form a new cockpit roof in clear plastic, taking into account the thickness of the clear part. Later this would save me a lot of sanding. Well, not that much...
Once done with the new clear cockpit roof, I cut the cockpit decking off the fuselage, and installed small tabs to support the clear part. I also glued a plastic bed on the bottom of the hull to receive a fake cockpit atop of it.
The new cockpit is very simple, made with some spare parts and a pilot from another Revell oldie: the Lockheed Constellation. I don't know the scale, but it appear to be reasonably close for the job. It was glued inside the fuselage resting on its bed. And since the silicon and resin bottles were around my bench, I reshaped a new spinner master from the kit parts. It was just a matter of filling the voids with superglue and sanding it the help of a rotatory tool. The drawings from Steve Ginter's book on the Tradewind (Naval Fighters series #34) were instrumental to achieve the correct, more pointed shape.
The wing floats were the other items reworked. In addition to the rivet removal, the shape of the floats were re-defined to match the drawings on Ginter's book. I prepared one master and cast two copies of it in resin.
The new clear roof was cut to match the fuselage opening. After securely fixing it to the fuselage, the seams gave me a lot of work to disappear. Two passes of putty plus an additional Mr. Surfacer trueing. Lots of wet sanding, and I'm still not much satisfied.
In order to protect the transparent areas of the windows, a set of masks were prepared. I sanded the cockpit roof sawed before until the original windows were clearly visible (thanks God I used white putty when I filled them). Scotch tape was then laid over the windows, and their outlines were roughly traced by hand with a pencil. The tapes were removed and applied over a piece of Tamiya tape, and finally the final masks were cut, this time using a steel ruler and a hobby knife. I also tried to preserve the symmetry of the windows.
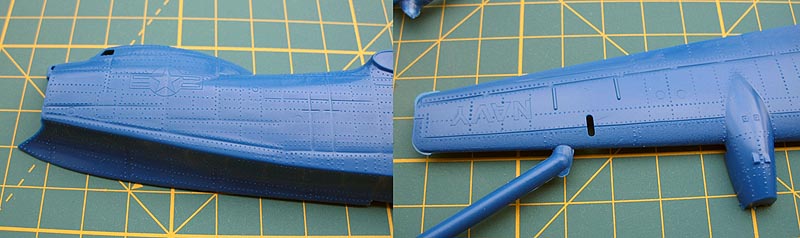
The masks were transfered to the model. I didn't bothered to remove the Scotch tape. The frost look of the clear roof you see in the photo below are water droplets condensed after washing the model with water - I missed a seam somewhere... Hopefully, they will dry clear.
After attaching the wings to the fuselage, another infamous putty-sanding-primer-sanding section took place. My arms hurt. The clear areas received a coat of Tamiya XF-1.
A final coat of primer was applied, and as you can see in the photo below, some rough spots persisted.
Once satisfied (not really) with the finish, I started to add the smaller details. And the R3Y had a number of them, mostly small hatches and windows that I'll add with decals after painting. For now, I made both radomes you see glued on top of the crew compartment and the array of antenae masts along the fuselage spine.
Both operational R3Y-1s and 2s suffered from severe paint fading. This occurred due to a number of reasons, but the main two were: (a) the Dark Sea Blue (FS 15042) was very prone to fading under exposition to sun and sea elements, let alone in an aircraft of that size, and this is visible in many photos of the aircraft; (b) the hulls of the first dashs 1 and 2 remained resting under the sun for almost a year before the arrival of the Lycoming turbo-prop engines. Since I'm going to model one of the first (if not the first) bowloader (BuNo 128450) during the San Diego trials in 1957, I'm going to trust on pre-shading techniques as well as varying flatness clear coats to depict the effect. Ginter's book brings some very elucidating photos about the subject. The photo below show the bird I'm going to depict:
And here's another one, the Caribbean Sea Tradewind during aerial refuelling trials, showing how the blue varied:
My first step was an overall coat of Intermediate Blue (FS 35164), using automotive lacquer. It was irritating to still find some remaining bad spots after so many putty-sand passes... That's me. The Intermediate Blue was chosen as a lighter background over which I'll built up layers of DSB later.
The work on the model was halted to start the preparation of the base. It would be too risky to handle the finished model while modeling the sea around it. So I started assembling a wood framed slightly smaller than the model dimensions. A sheet of expanded polystyrene (Isopor ©) was cut to fit inside the frame.
Since Isopor is not know for its strength, I planked the bottom of the frame with pieces of balsa wood, glued with copious amounts of carpenter glue, but not fixed to the frame yet. The idea is to work on the sea and insert it in the frame once finished:
The Isopor sheet was roughly cut to accept the Tradewind fuselage, as well as one of its port wing float (the R3Ys would touch the sea with both floats only under maximum load conditions - not my case: trials, remember?):
Here's a test fit to check the balance of the display:
The available photos show that the bow remains almost entirely out of the water, so I tried to reproduce the same attitude:
Note the listing of the airframe to the port side.
More or less like this:
Continuing with the "ocean", I elected to avoid the use of resin materials and all associated issues (shrinking, heat, drying time, smell). Instead, I reasoned acrylic pastes properly painted and gloss coated would do a convincing job. It is important to remember that this is small scale, and anything faulty will look overly exaggerated. That includes the water effects.
I started applying a thin coat of white acrylic paste (the type you find in artist shops) to seal the base and smooth the surface. By smoothing the surface I don't mean making it flat, but filling voids and eliminating the characteristic surface pattern of Isopor. In short, I wanted to let some randomness on the sea topography to accur. Once this layer was dry, I applied a second, thicker coat of paste with a large spatula. While it was still wet, I sprayed water to make the paste more workable, and added waves and curls by tapping my finger all over the surface. So far, the model was not fitted to the base. While the base was drying, I wrapped the lower areas of the model with ordinary food wrap film to protect it. The model was then pressed on its place on the base, with the paste still quite wet.
Next, using a small spatula, I applied small amounts of paste around the hull and wing float to fill all cavities. The model was then perfectly laid on the water.
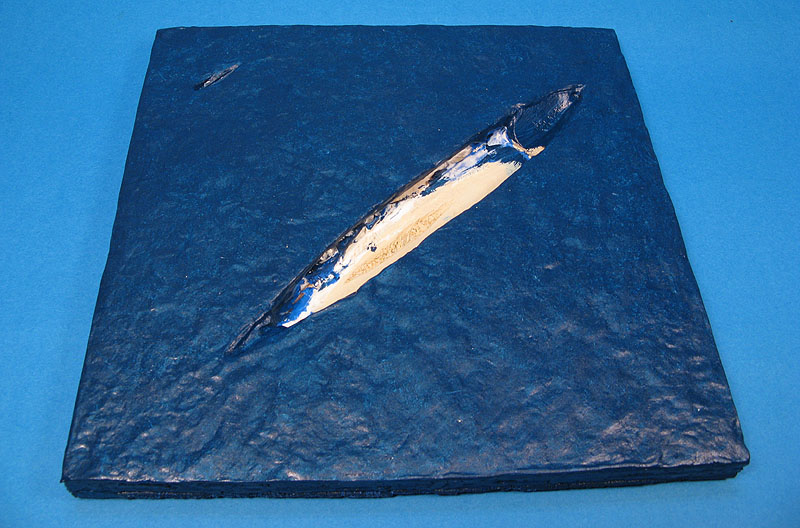
Since there was a significant amount of paste, enough drying time is an important issue before proceeding. However, the model was acting as a seal, and therefore avoiding the putty inside the cavities to dry. So I waited 24 hours to let the outer paste shell to dry, and gently popped out the model from the base. The food wrap film allowed me to do so, since no area of the model was in contact with the paste. The result is a base on which the model will click perfectly. Now the paste previously trapped inside the cavities will dry properly, and I can add the sea effects without worrying about damaging the model:
The sea surface was then finished by adding wakes and hull/float trails. Remember: this is calm sea, a few hundred yards from San Diego shore. So, once the paste was fully cured, I applied a generous coat of Liquitex Colored Gesso, a kind of water based thinned plaster. This coat was necessary because I gently sanded the acrylic paste in order to remove the rough spots. The plaster acted as a smoothing agent, filling small bubbles and other imperfections.
After the plaster coat was dry (it took just a few minutes under a bulb light), Vallejo plastic putty (another water soluble product, in spite of the name) was used to add the hull/float trails and some foam at wave crests. I also added some texture to simulate the propeller blur (only the outer engines). The effect was obtained by dabbing a stiff brush over a thin layer of putty. I applied a thicker layer for the trails and a very light one for the blurring. The brush did the rest. I used the same method to roughen the wave crests.
At this point it was difficult to see any further imperfections on my sea surface, therefore I applied a coat of blue acrylic paint to check how was everything. The final color will be applied with an airbrush using various blue/grey/green tones. On top of it, a gloss varnish will be applied.
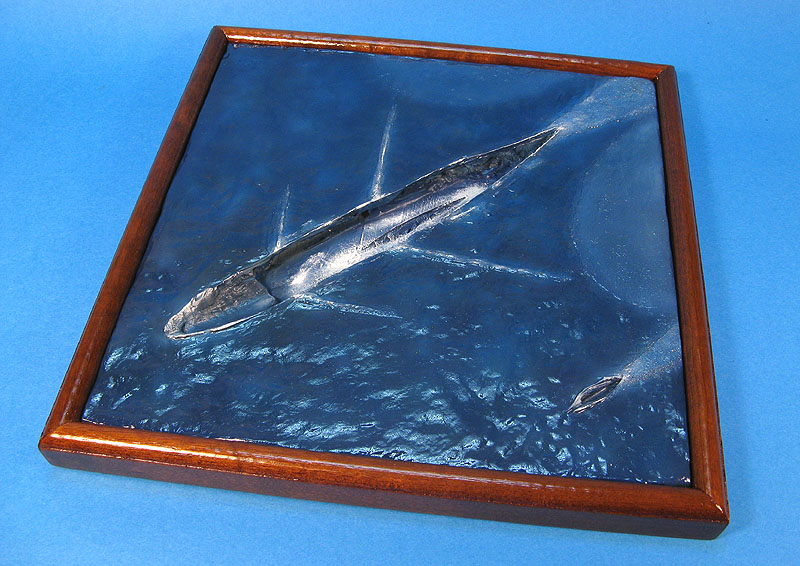
Well, that was the plan. I applied a generous coat of enamel gloss varnish and waited it to dry. In the next day, to my horror, I discovered that the varnish had eaten through the acrylic paint and dissolved the isopor in several places. What was a calm, flat sea has became a furious ocean, much to my dismay... I considered removing the whole thing all the way to the balsa planking, but on a second thought I filled the depressions with acrylic paste and re-flattened the sea surface. It was then sanded and a new surface texture was added. Here is how it stands, still missing the wakes. I had to redo everything again...
After a week re-doing
the sea, I ended up with this, test fitted against its frame (a final
coat of acrylic gloss
varnish will be added after the model is glued to the base):
Then the painting finally commenced. The first step was the pre-shading. I used black lacquer and my Sagyma airbrush. Panel lines are always a problem in small scales. Rescribing them was out of question, but I can use a sharp pencil to highlight some lines in the end. For now, just the pre-shading. I tried to produce sharp edges, hoping that it will visually simulate the panel lines after the overall color was applied. All you need is a few telephone cards cut in strips and hold in place while you airbrush the lines. Here's the result:
I must confess that I had my share of headache to decide which color to use. Although I'm probably the modeler owing the largest Dark Sea Blue hobby paint stock in the world, none of them seemed correct to me, no matter the brand or what I mixed with them. After studying color photos of several Bowloaders, I found that DSB simply is not the correct color for a model. Weather it was heavily faded in real life or Convair used their own DSB tone in them is beyond me, but definitely it was not FS 35042 or FS 15042. I mixed some colors trying to match what I found in the photos, but decided for the plain simple FS 35044. Yep, you guessed: Insignia Blue. Maybe my judgement was just a consequence of scale effect... I had to refrein my old habit of exaggerating the base coat and annihilating any pre-shading effort. So far so good:
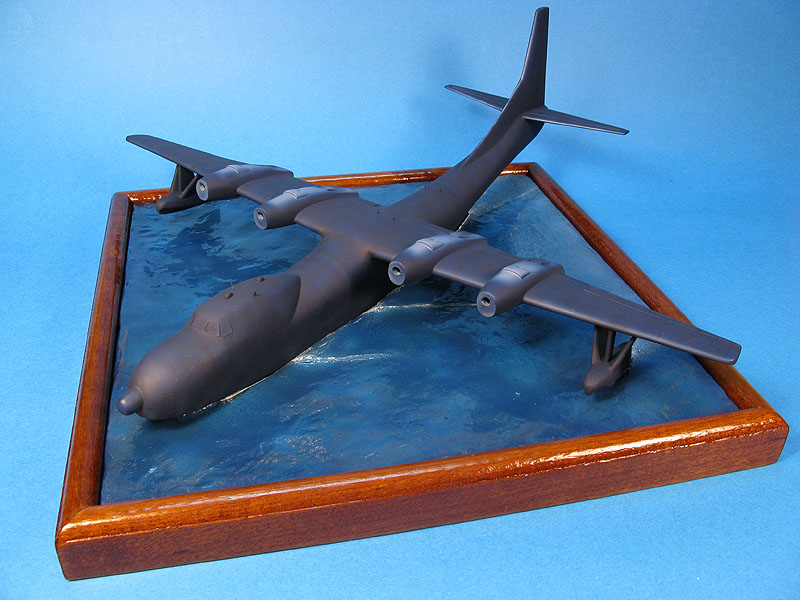
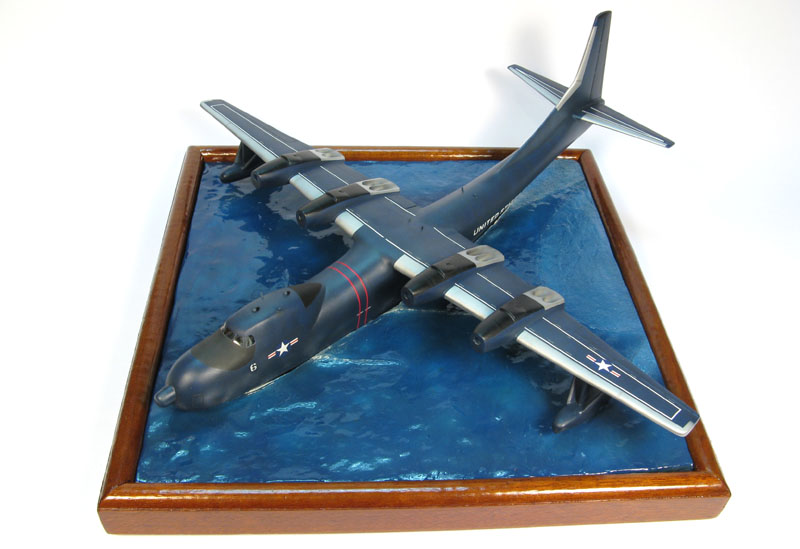
And of course, I couldn't resist to test fit my Bowloader on its base:
As you can see from the photos, the Model Master used for the blue is flat. I'm not sure if it somehow reacted with the lacquer thinner I use or something else, but it looks like a sandpaper on the model' surface. Ignoring that, I applied a good coat of Model Master Metalizer Sealer, an old favorite of mine, hoping that it would level the surface. It didn't... and I ended up with a heavy orange-peel effect all over the model. After waiting everything to dry for several days, I sanded the model with a 2000 grid sandpaper in those more affected areas. It is now barely passable.
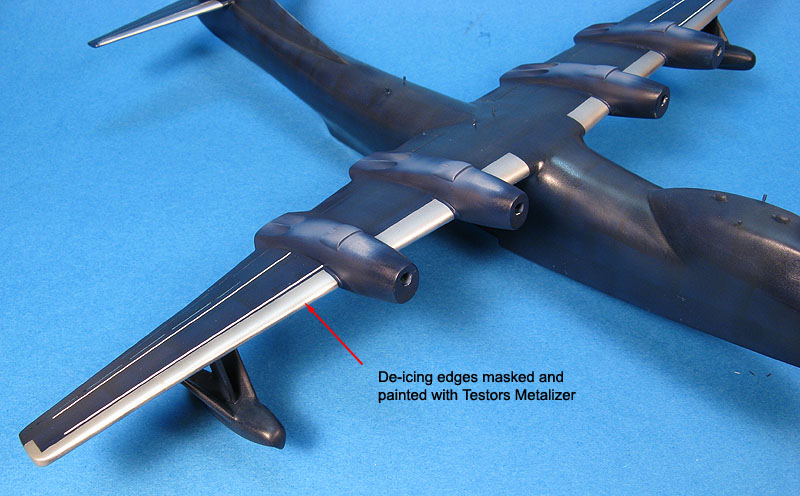
The model was cleaned once more to remove sanding residuals, and I touched up the painting here and there. I also applied a very thin (translucent) coat of Gunze Sangyo H-56 Intermediate Blue over the horizontal areas of the fuselage. Next, I masked the deicing edges of the control surfaces, airbrushed another coat of Metalizer Sealer and proceeded with a 50/50% mix of Model Master Aluminum Metalizer and Metalizer Sealer (see the 1/72 Spirit of St.Louis article for the recipe). I didn't want something too bright in this scale, and I think I succeeded. Here's the result:
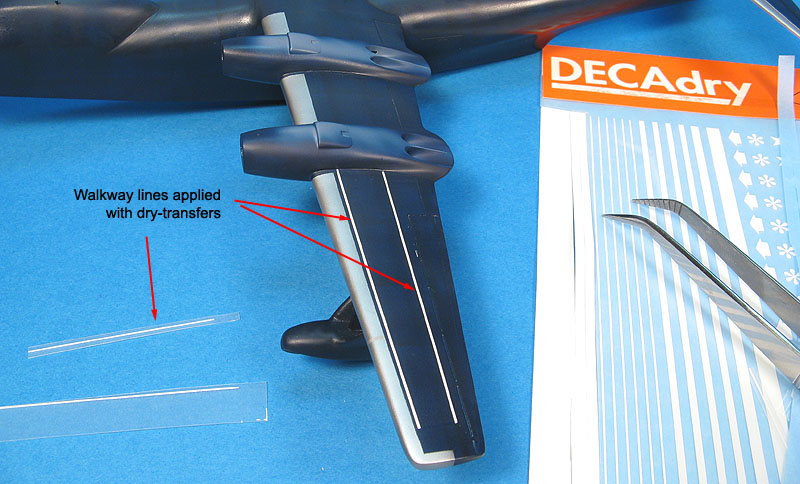
Then came the decals. But before, I had to apply the walkway lines over the wings. I discarded masking and painting it (too much trouble), and didn't think decals would be a good idea because it would be almost impossible to apply so many so thin lines perfectly straight. The solution was something I dug from my decals file: dry-transfers. I found a sheet containing several white stripes with the correct width. With the help of a drafting compass, I cut the stripes in sections and applied them over the wings, using masking tape to position each one before start rubbing. Since the backing sheet of the dry-transfer is pretty stiff, it guarantees a perfectly straight stripe. I'm satisfied with the results so far, but there's still a lot of them to be applied:
The insignias were applied next. I used the FCM's Insignias USAF multiscale sheet. This is one of the Elite decal series, designed to have the clear film removed after application (see review). I've never had much success using the technique, so I decided to apply them using another method. Instead of applying the decals and waiting it to dry for a couple of days before removing the clear film, I removed the clear film before dipping the decals in water. The clear film in these decals are rather thick, so they are easily peeled off with a fine pointed tweezers:
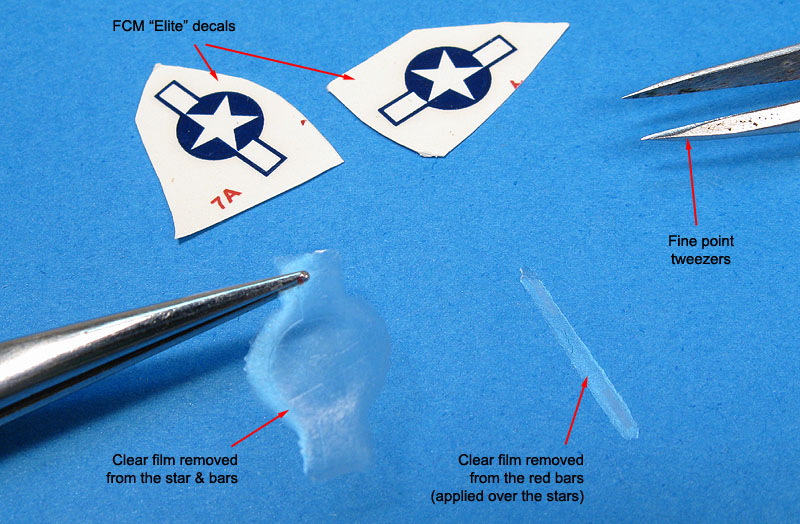
The result is a truly "only paint film" decal. The application of the decals without the clear film is more difficult than conventional decals, since they are pretty flexible and fragile now (think about those tiny decal numbers without clear film). They have a tendency to slide to the underside of the backing paper, so it is a good idea to put a small pool of water on their placement spots and adjust with a soft brush. The stars and bars I used are relatively small, so I did not have major problems. The red bars were added later using the same method. The white 6 on the fuselage is a conventional decal from my spare box, but I had to slice it in the middle as per photographs:
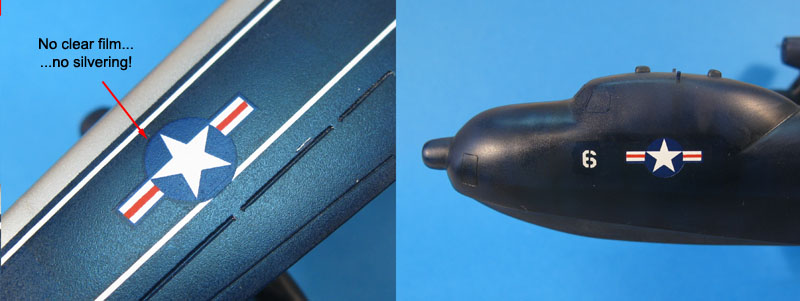
No silvering at all. In fact, the result is a painted on marking, literally. The project was halted until I find a solution for the United States Navy decal. And it came as a generous contribution from modeler Paulo Vorrath, who kindly sent me a sheet of the Tradewind edition re-released by Revell a few years ago. A big thank you Paulo! The sheet also would save me the work of making the propeller warning stripes, but I did not liked both stripes in the same decal, with the space in between both filled with clear decal film, so I removed as much as I could with a hobby knife.
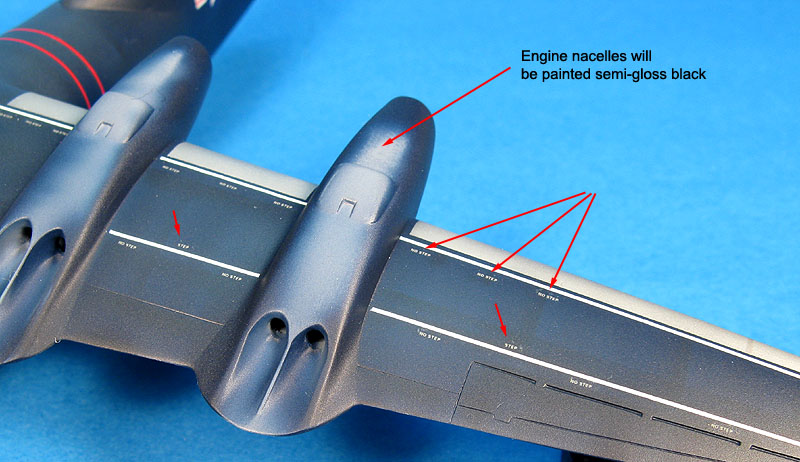
The wing-walk markings came from my spare box. They are small enough, yet readable. In fact, these stencils are gray, not white, but I liked the final effect on main wings and stabilizers:
I applied a heavy coat of Vallejo satin varnish to homogenize the surface finish. More than the semi-gloss aspect, I was interested in a quality varnish that would smooth the numerous touch-ups and color shifts. Except for the black and silver areas, the basic painting is done:

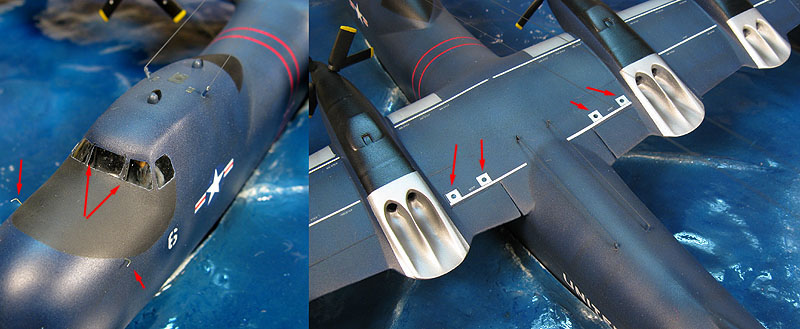
At this point I had to start to think about the smaller details, some of them already added. The diagram below summarizes the missing details so far.
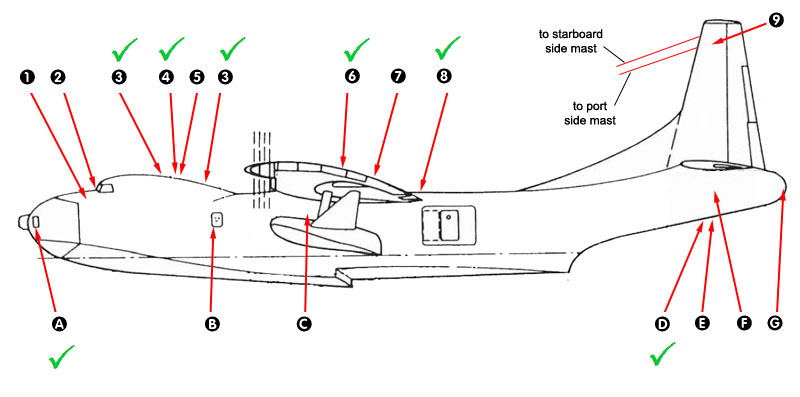
| 1. Pitot tubes (both
sides) 2. Windscreen wipers 3. Radomes 4. Main deck antenae masts 5. Astro hatch 6. Fuselage antenae masts (front) 7. Scape hatch 8. Fuselage antenae masts (aft) 9. VHF antenae plate |
A. Mooring hatch B. Baggage door (starboard side) C. Refuelling access door D. Towing fin E. Tow fitting hatch F. Window (both sides) G. Transparent cone |
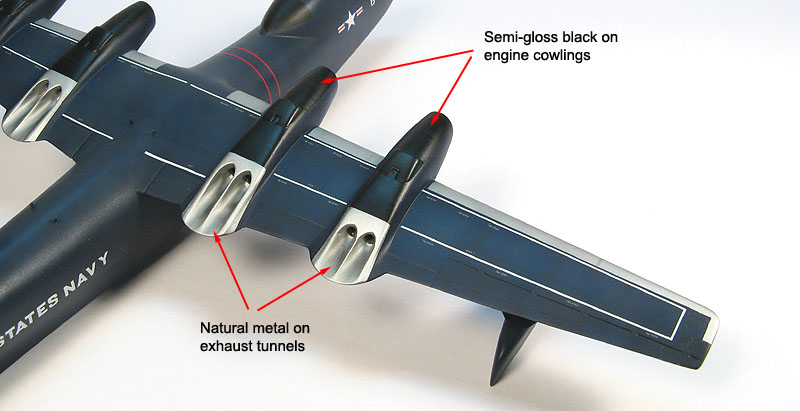
While researching the missing details, I finished off the painting. The first move was to mask and paint the semi-gloss black used on the engine panels. It is worth to nothe that not all Tradewinds had this area painted in black. Mine had (see the picture of #6 in flight above). So I masked these areas and applied the semi-gloss black using automotive lacquer paints:
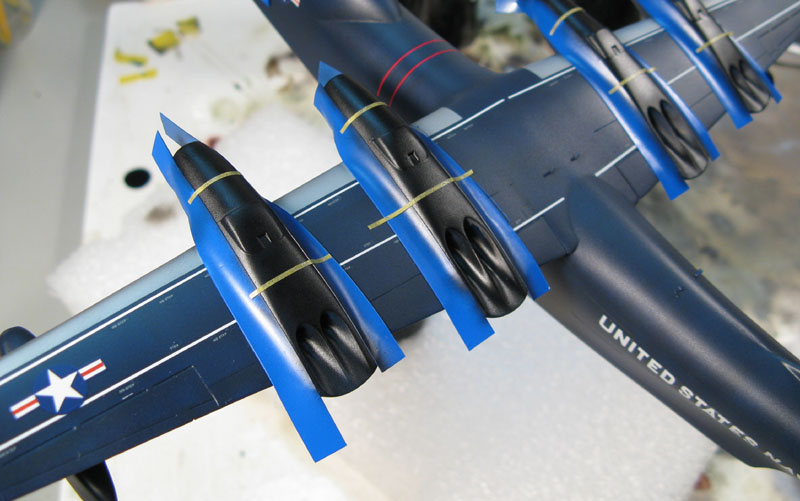
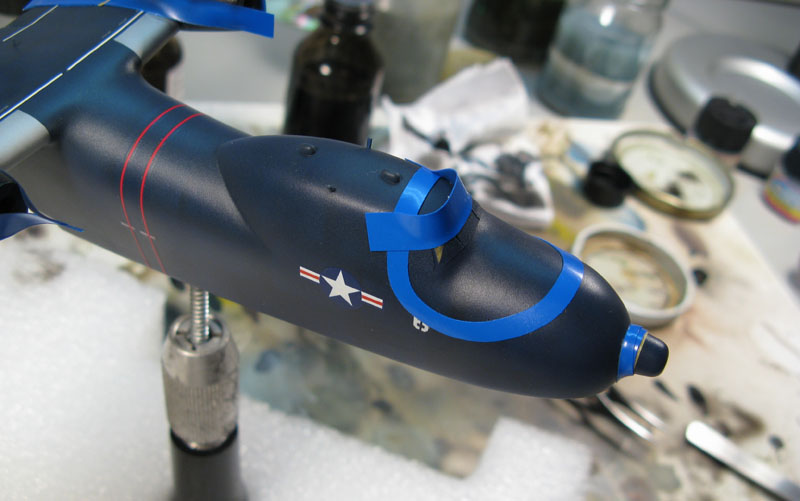
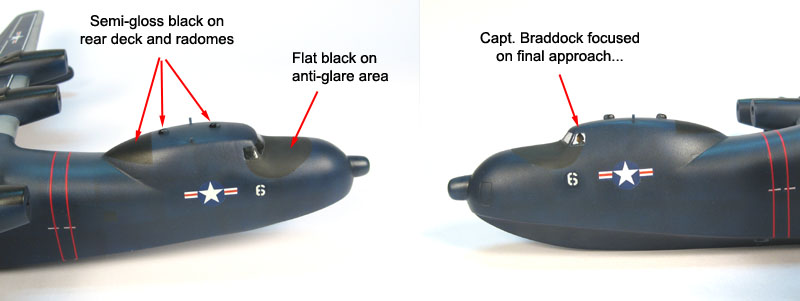
Later I would apply the natural metal over the aft of the nacelles. I also applied the anti-glaring flat black on the nose, and the 3M 471 vinyl tape was a great help to make that curved shape:
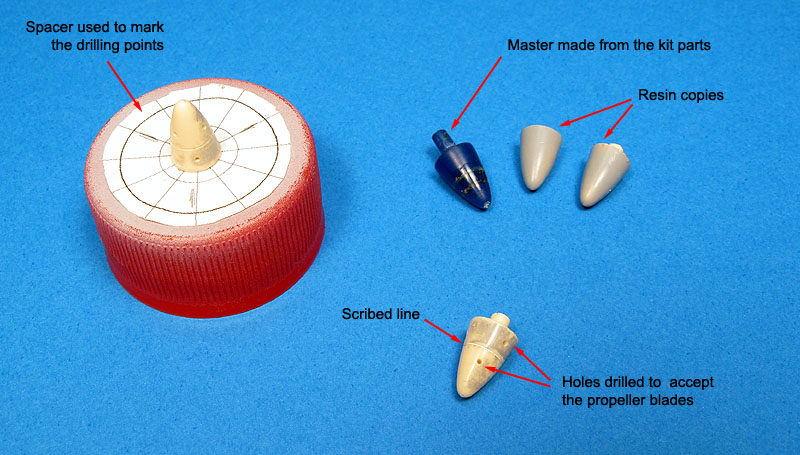
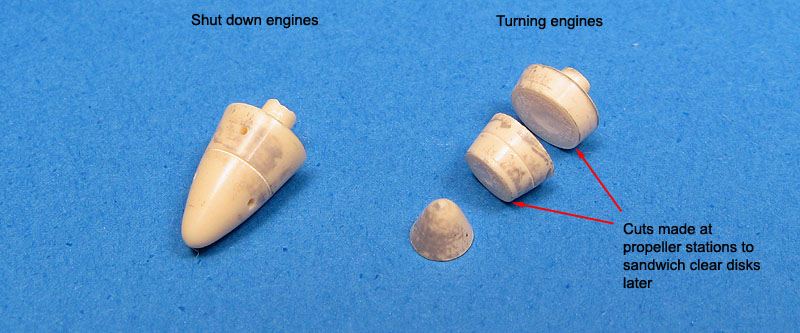
I used, again, automotive lacquer paints, with some drops of flat white to give some scale effect. While the paint was drying, I turned my attention to the propellers. As I mentioned before, I made a new prop hub master by reshaping the kit parts in a Dremel. The resin copies were then reworked by adding a recessed line to emphasize the division of the counter-rotating hubs, and by drilling the holes to accept the blades later. This was done for the shut down (inner) engines:
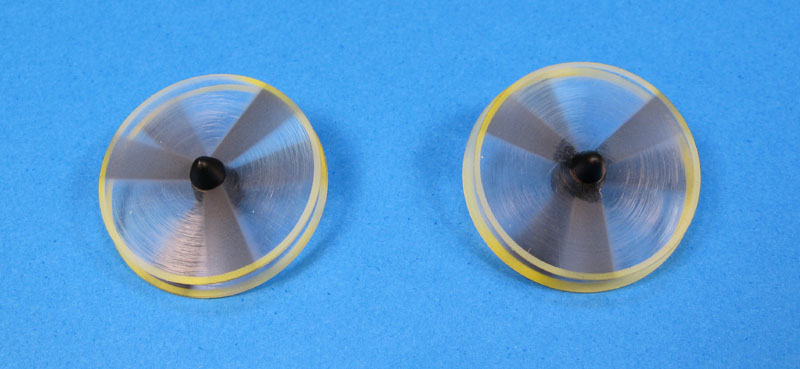
For the outer engines, I did not make the holes. Instead, the hubs were sliced on the position of the blades. Later I would sandwich clear disks between the slices to simulate a rotating propeller:
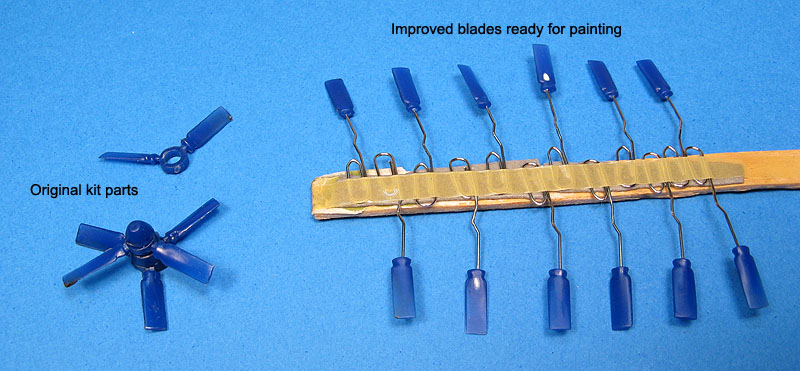
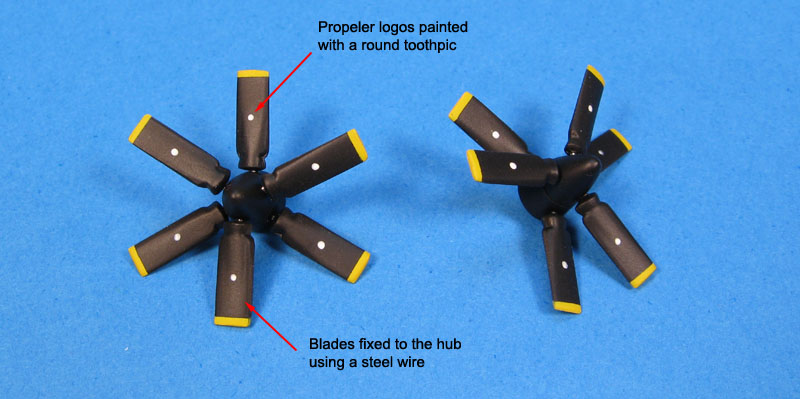
The blades came from the kit. Fortunately, I had enough for both engines shut down. The cuffs are wrong, but I decided to use them anyway. I just sanded the blades a bit for a better scale thickness, and installed metal pins to fix them to the hubs later:
The trailing area of the engine nacelles were masked and painted with my magic formula of MM Metalizer Aluminum Plate (#1401) mixed with MM Metalizer sealer. That creates a rock hard aluminum paint (non buffable, though). This finished the painting on the wings.
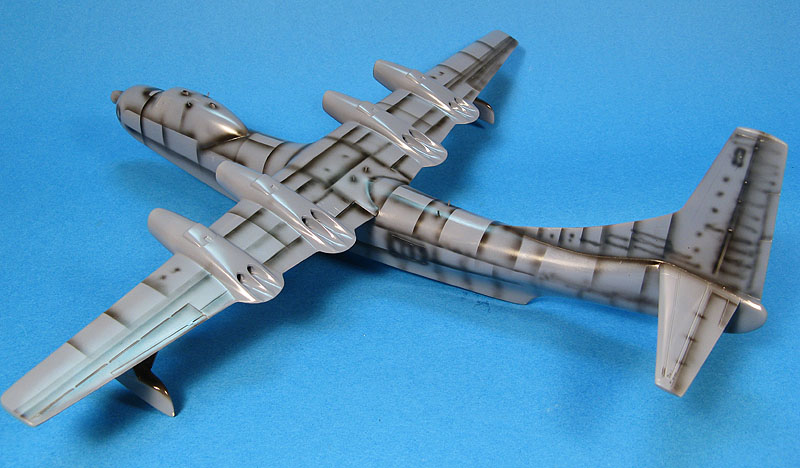
Next, I applied the old but still good Humbrol semi-gloss black on the rear area of the cockpit deck and two small radomes on the deck roof. I finished off highlighting the various windows and hatches using a slightly lighter shade of blue airbrushed using rectangular rescribing templates of different sizes. The scape hatch and baggage door will be added later on with decals. The windscreen masks were finally removed, revealing Capt. Braddock still in place.
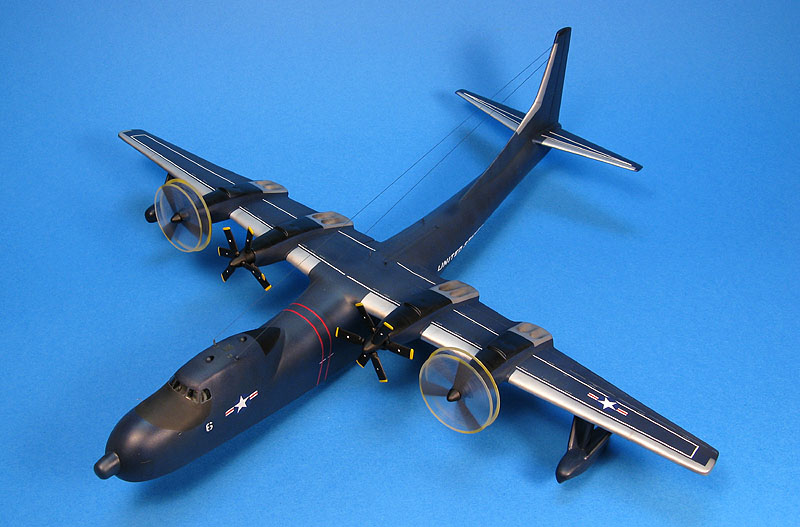
Here is the R3Y almost ready for action:
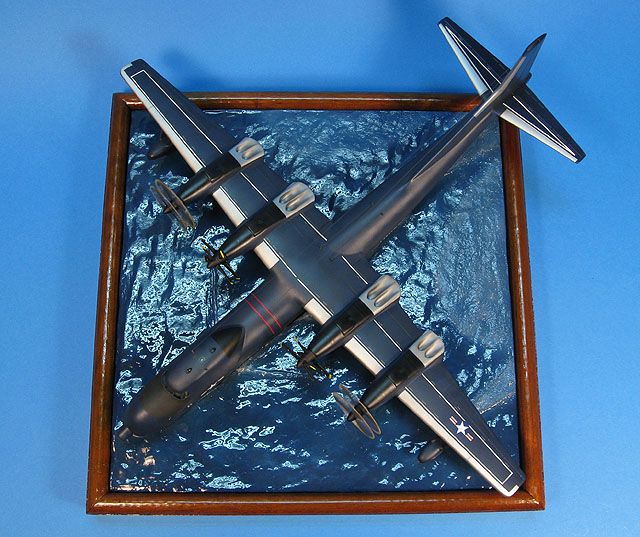
But of course I couldn't resist to check it sitting on the Pacific Blue...
I finished the spinning propellers using a modified version of the clear disc method. The halted ones were painted, assembled, and the logos were simulated with small dots of white paint applied with a toothpick:
After glueing the propellers to the nacelles using wood glue, I added the four stainless steel APU exhausts on top of the central wing section. These were cut from silver decal, with small black decal dots applied over them. I also added the Pitot tubes on both sides of the nose and two windscreen wipers, all made from stretched sprue.
The aerial antenaes are also stretched sprue, painted dark gray and glued to their posts. All glass windows present in the various hatches and doors were simulated with a small dot of Future directly applied on. That finished my Bowloader:
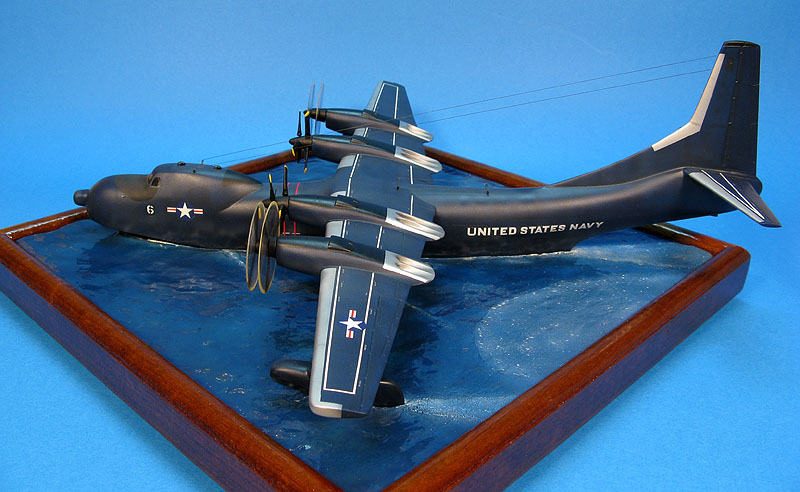
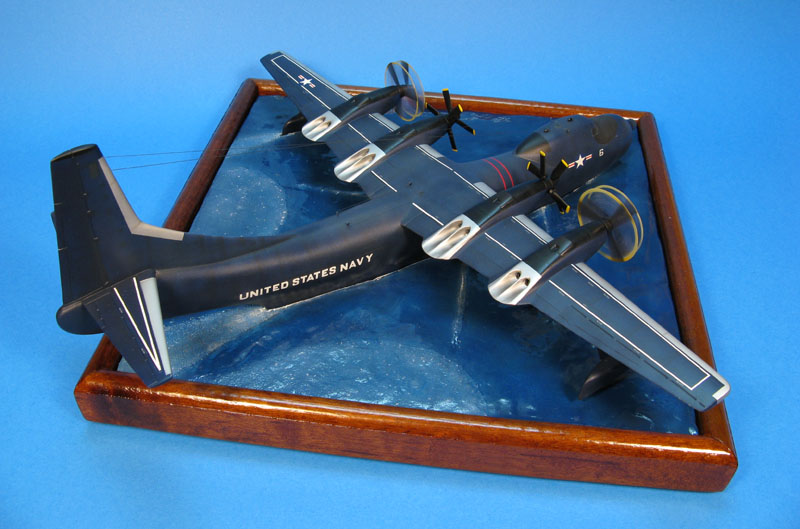
The base was retouched with several small dots of white oil paint to simulate foam spots over the sea roughed by the propellers' stream. The R3Y was finally laid over the base to finish off this project. Here are some pics (these photos were actually taken before the APU exhausts were added, so they do not appear):

Faults? Every modeling project has them, and here are the ones I recall: The propellers (both, the spinning and the halted ones) did not result perfectly aligned but thankfully you cannot see it from any angle. My paint finish is far from perfect, and that is the reason why I used Vallejo varnish as the top coat (next time I will not used old paint stocks!). I could have used some pieces of tubing to better represent the engines exhausts. And finally, the panel lines of the hinged nose was completely forgotten (the initial plan was to draw them with a hard pencil after painting). Adding it now would be too risky...
This was a very fun project. More than that, it was a revival of my childhood days, when AMS was not aflicting most of us. I am happy with the outcome, and 28 years after first opening its box, this one now stands as the oldest model in my collection. Better late than never, right?...
| Technical file | |
| Kit:
|
- Revell H-178 |
| Additions:
|
-
|
| Basic
colors: |
-
Primer: Fast drying automotive acrylic primer - Blues: Model Master #1749 Insignia Blue FS 35044. - Flat Black: Aerotech automotive lacquer and Tamiya XF-1 acrylic - Semi-gloss Black: Aerotech automotive lacquer - Aluminum: Aeromaster Metalizer Aluminum Plate (#1401) - Gloss clear: Model Master #1409 Sealer for Metalizer - Semi-gloss clear: Vallejo Model Air Satin Varnish (#060) |
| Notes: |
-
Scratchbuilt cockpit; crew deck roof thermoformed in clear plastic. |
Rato Marczak © 2009
