| Willy Pete Farmer Academy Rockwell Int. OV-10A Bronco in 1/72 |
|
Started: April/2016 Current state: Main assembly |
The
Rockwell International OV-10 Bronco is one of those aircraft designed
for very specific purposes from the outset. Although now retired from
all American services, modern studies show that its performance
still cannot be surpassed by potential replacements like the Tucano or
the Texan II. Its service in Vietnam, Middle East, NASA, US Department
of State, Bureau of Land Management and - late in its career - as a
fire fighter leaves little doubt about its versatility. Personally, I
never liked much the modernized D version, and in my mind the Bronco
will always be flying low over the jungles of Vietnam, dodging enemy
fire and launching white phosphorous (Willy Pete) rockets to mark enemy
targets for the fast movers... That's the idea of this project. I could
have called the diorama Hit the Smoke, but I liked the pun in Willy Pete Farmer.
Even being an aircraft with so many qualities, modelers do not have many choices when it comes to build a decent early Bronco in 1/72 scale. The Academy offering (product #1655), now more than 20 years old, still stands as the best option. In spite of some glaring issues that must be addressed, out of the box it is unquestionably way better than the old Hasegawa (which Academy seems to have copied), the misterious hybrid that Revell called OV-10A, or the equally very old Frog and Airfix offerings.
I planned this diorama showing the Bronco being readied in a revetment in Vietnam. I wanted the cockpit doors open and one engine being manteined. Like other contemporary Academy offerings, a quick look at the parts testfies that some help would be needed to make a minimally detailed cockpit. I would worry about the exposed engine later. Eduard PE fret 72-310 is as old as the kit, but brings almost everything I needed, like control panels, side consoles and other details, as well as a good deal of useless parts. It is an unpainted set, though. If you are interested, CMK produces three comprehensive detail sets for this kit, as does Extratech.
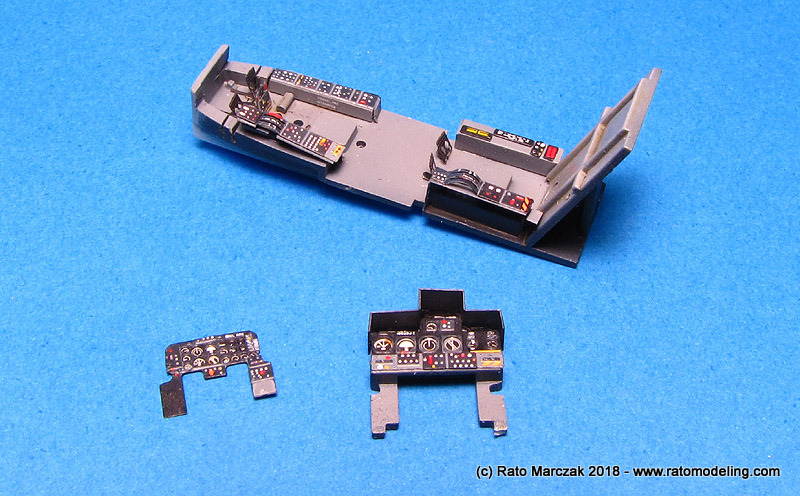
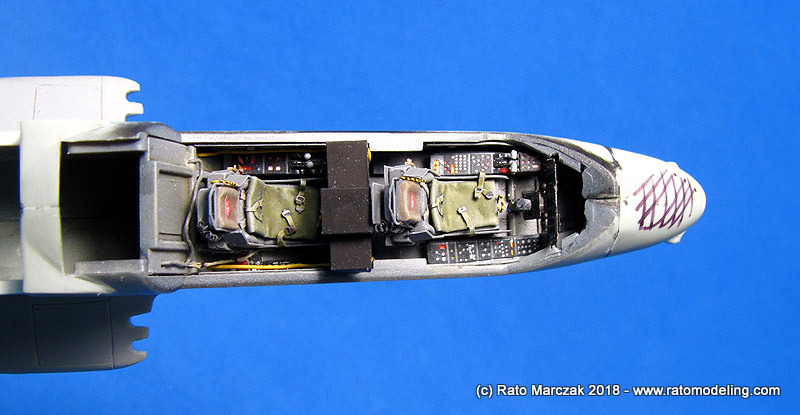
I started by adding basic structural elements to the upper sides of the cockpit, glueing some placards and painting everything in a close match to Dark Gull Grey FS16231. Drybrushed oils brought the details to life, and the placards came from spare decals:

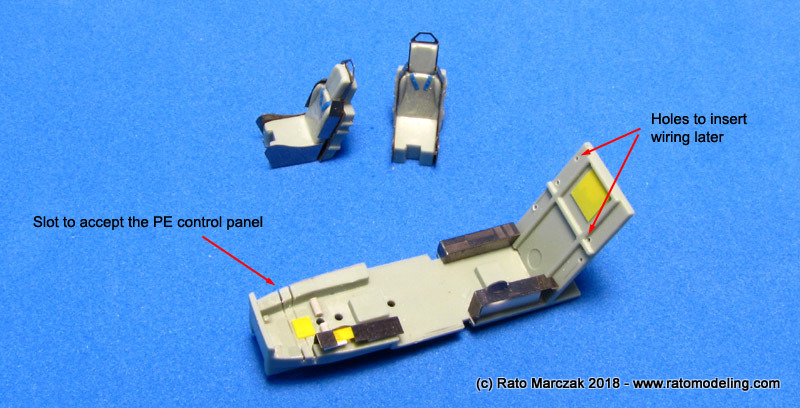
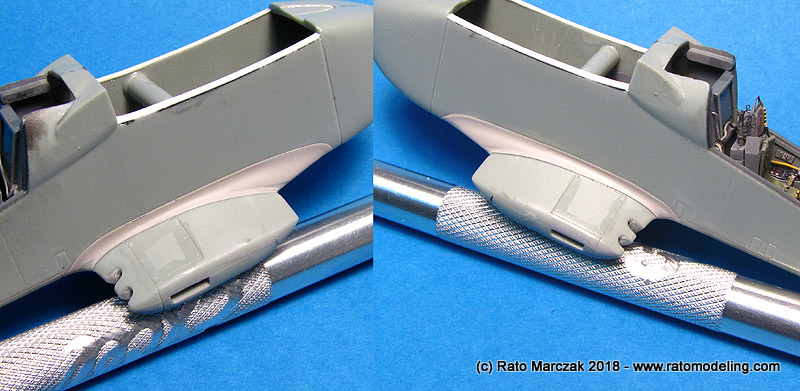
The cockpit floor was modified to accept the Eduard PE parts. In particular, I had to saw a slot across the pilot consoles to make the control panel sit properly at the correct station. Some holes were drilled to the aft bulkhead to insert wiring later. As several reference photos show, the OV-10 cockpit had a real mess of wire running along both sides, and some of them are quite characteristic - pretty much like the cockpit fuel line in a Messerschmitt Bf-109...
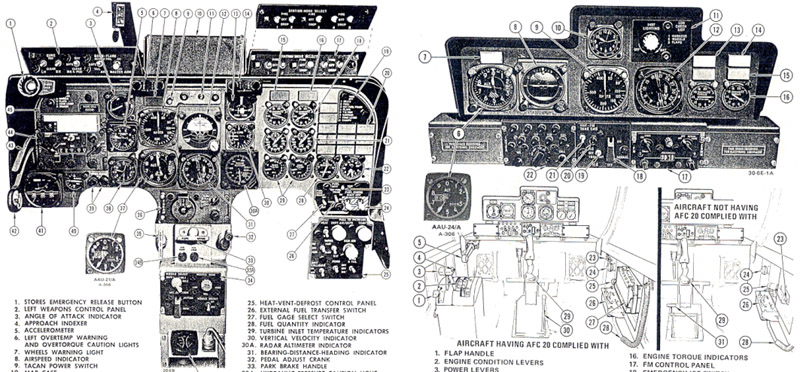
Except for the instruments film, all instruments, knobs, buttons and handles had to be painted by hand. Over the years I have developed a number of techniques to paint these things with minimal fuzz. When done correctly, the consoles look like a pre-painted item. I also like to put a stencil decal here and there. Don't go overboard. It is important to check the manual of the aircraft, although not always the detail set manufacturer does it during the design of the set...
As for the colors of each knob, museum photos of unrestored cockpits help to find out what is and what is not, just don't forget this is 1/72 scale!
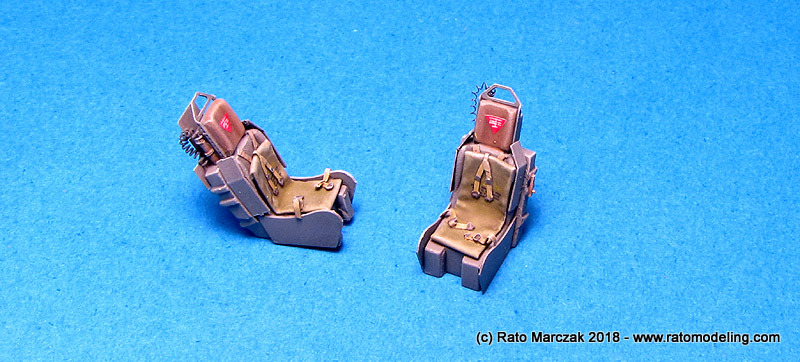
The Eduard set is particularly important to bring the kit' seats closer to the real thing. In a 'Nam bird, the seat armor is a requisite. Those tiny ejection handles are a real time saver, too. However, I had to sand the sides of the kit parts - assemblies A and B of step 1 in the instructions - to make it fit inside the cockpit tube with the side armors in place. It was a tight fit.
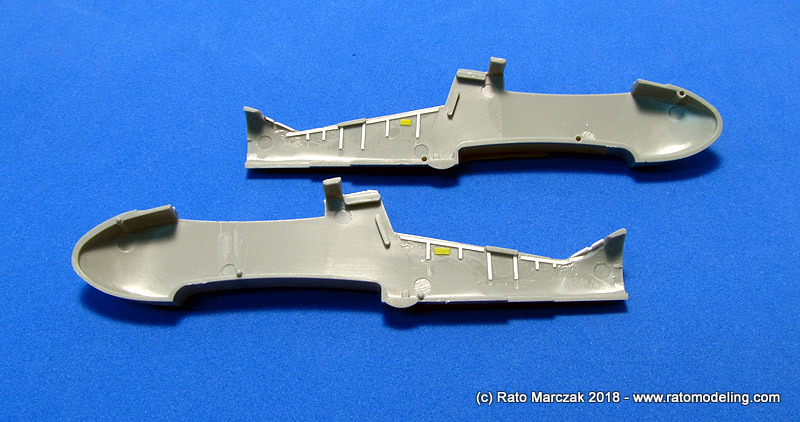
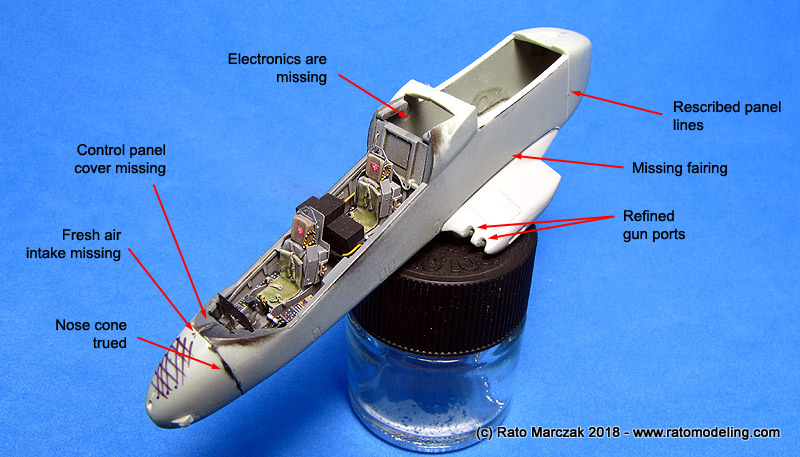
In the kit, the nose wheel bay details are all under the cockpit floor (part A6), which ends where the nose (parts A7-A8) starts. Since the interior of the nose cone is devoid of any structural detail, I added some based on walkaround photos I found on the internet:
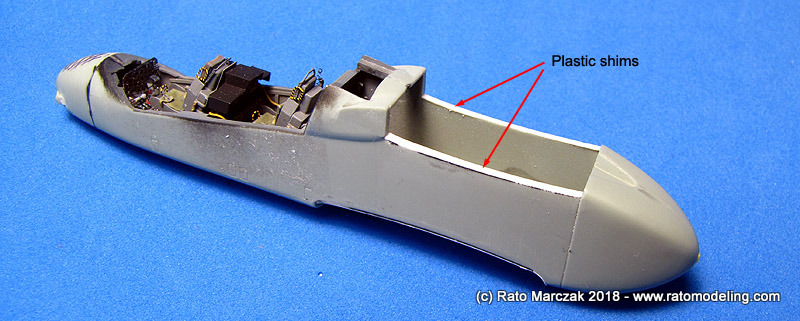
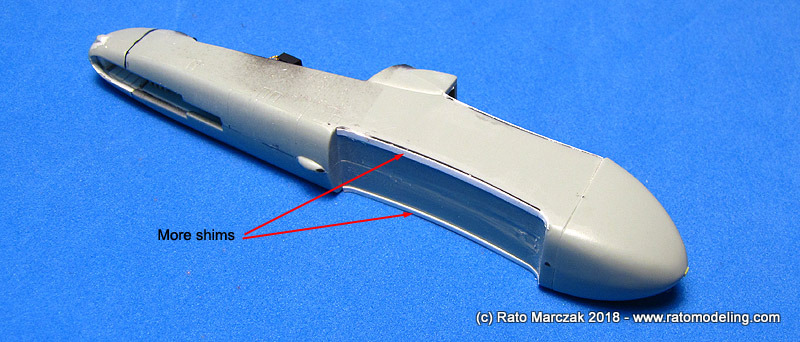
In many early Academy kits, fit is not their strong point, and the Bronco is no exception. The nose parts were installed and the resulting seam was terrible. I spent some time filling and sanding there in order to produce a joint flush. Black super glue helps a lot in such cases, and I've been using the stuff more and more. Besides that, when I dry fitted the wings and the sponsons, visible gaps showed up. I attenuated the problem by cementing plastic shims along the joint, but sure the area would need attention later:
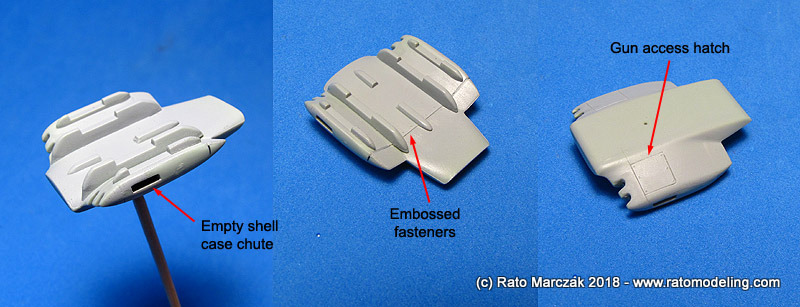
Talking about the sponsons, They are not very well molded and have almost no surface detail. I refined the machine gun openings, scribed the gun bay access hatch and embossed some rivets and fasterners. The pylons would be spruced up later, once I decided the ordnance. Another important detail missed by Academy are the M60 empty shell case chutes on both sides. I filed the chutes on the inner side of parts C8 and C9 before gluing them together, and refined the job after the glue has set:
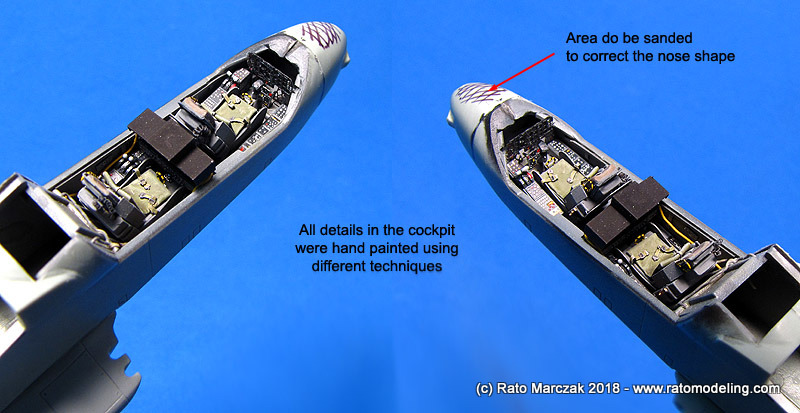
The sponsons subassembly was glued to the fuselage, and sure enough there was a visible gap along its joint. More on that later. On the other hand, I really liked the way the cockpit resulted, and I felt vindicated for all the effort put in there. At this stage, my only complain was the shape of the nose, which seemed too round on top. I would address the area later with a sandpaper. Except for the control panel cover and the electronics bay aft the copilot's seat, the cockpit was done...
,,, but not the fuselage - if I can call it fuselage. There were a few smaller surface details that I would add after priming the model, but at this point the model was almost ready to receive its wings:
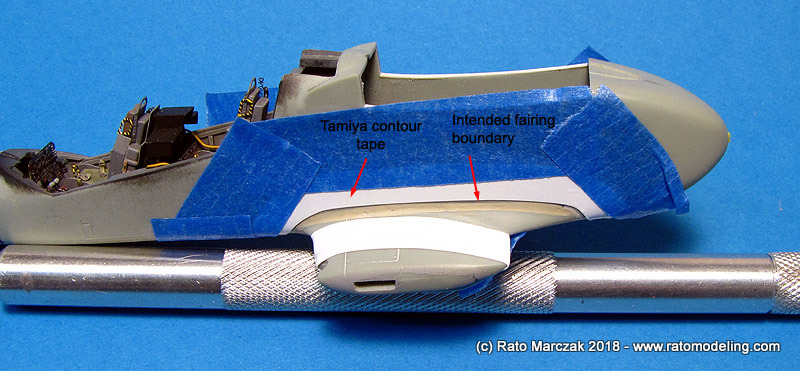
Woops... not quite yet. The sponson gap had to be addressed. Also, I started to figure out that at least some areas over the sponsons or under the wings should be painted before the wing was installed, or it would be difficult to make the paint get in there with an airbrush once the model was assembled:
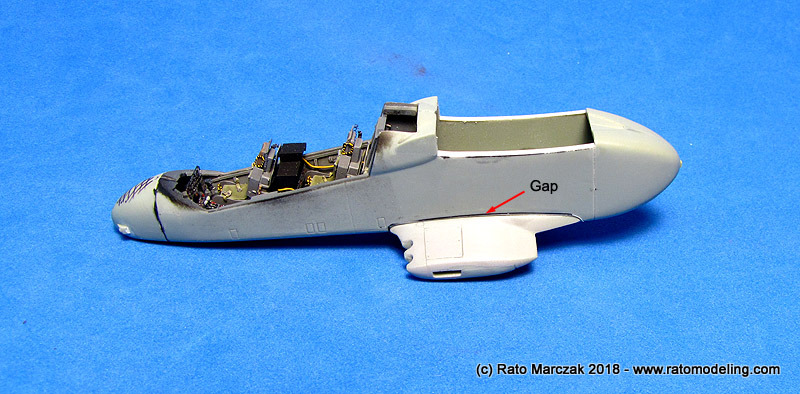
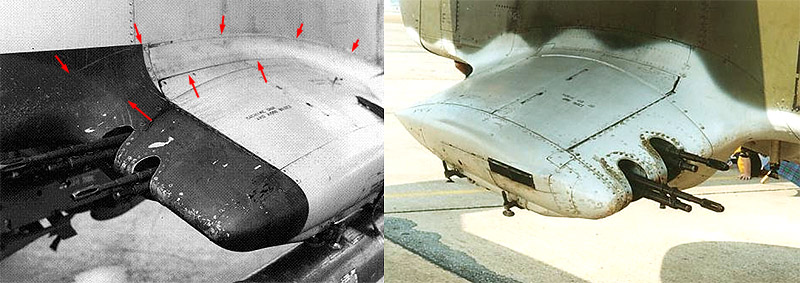
Back to the gap, not only I had to make it disappear, but also simulate the overlapping fairings which merged the sponsons to the fuselage, like in the photos below:
I recollected a technique I used to simulate overlapping panels on my Heinkel He-170 years ago. The process started by puttying the gap and sanding the area smooth. Next, the boundary of the fairing to be represented is masked. Then a heavy coat of primer is airbrushed over the area. These coats must be really heavy, because the final paint coat thickness (once dry) will be the step heigh of the overlapping panels. I usually apply three or four generous coats apart 5 min from each other. I never tried the method with other paints, but I don't see why it would not work:
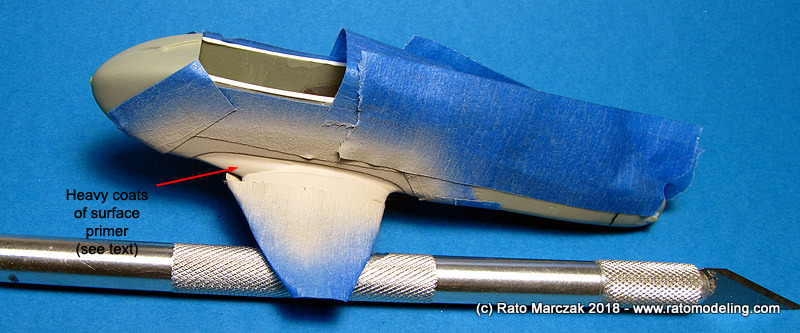
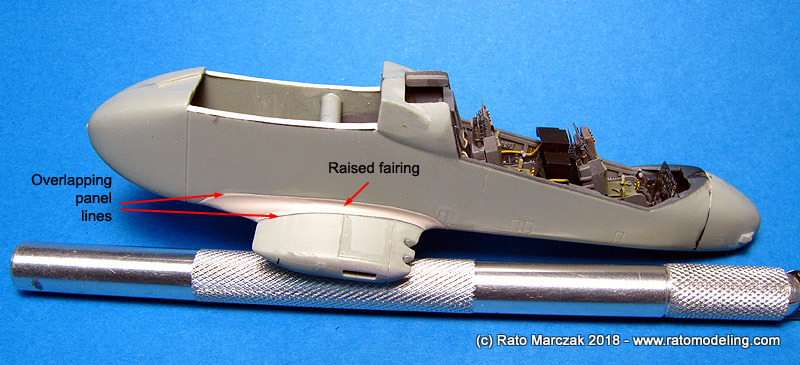
Wait 24 hours for a complete drying and sand the area carefully with fine sandpaper to remove any excessive roughness. Finally, carefully remove the masks. What you get is an overlapping panel in scale:
Still a long road to go. Stay tuned...
References
Useful links
Even being an aircraft with so many qualities, modelers do not have many choices when it comes to build a decent early Bronco in 1/72 scale. The Academy offering (product #1655), now more than 20 years old, still stands as the best option. In spite of some glaring issues that must be addressed, out of the box it is unquestionably way better than the old Hasegawa (which Academy seems to have copied), the misterious hybrid that Revell called OV-10A, or the equally very old Frog and Airfix offerings.
I planned this diorama showing the Bronco being readied in a revetment in Vietnam. I wanted the cockpit doors open and one engine being manteined. Like other contemporary Academy offerings, a quick look at the parts testfies that some help would be needed to make a minimally detailed cockpit. I would worry about the exposed engine later. Eduard PE fret 72-310 is as old as the kit, but brings almost everything I needed, like control panels, side consoles and other details, as well as a good deal of useless parts. It is an unpainted set, though. If you are interested, CMK produces three comprehensive detail sets for this kit, as does Extratech.
I started by adding basic structural elements to the upper sides of the cockpit, glueing some placards and painting everything in a close match to Dark Gull Grey FS16231. Drybrushed oils brought the details to life, and the placards came from spare decals:
The cockpit floor was modified to accept the Eduard PE parts. In particular, I had to saw a slot across the pilot consoles to make the control panel sit properly at the correct station. Some holes were drilled to the aft bulkhead to insert wiring later. As several reference photos show, the OV-10 cockpit had a real mess of wire running along both sides, and some of them are quite characteristic - pretty much like the cockpit fuel line in a Messerschmitt Bf-109...
Except for the instruments film, all instruments, knobs, buttons and handles had to be painted by hand. Over the years I have developed a number of techniques to paint these things with minimal fuzz. When done correctly, the consoles look like a pre-painted item. I also like to put a stencil decal here and there. Don't go overboard. It is important to check the manual of the aircraft, although not always the detail set manufacturer does it during the design of the set...
As for the colors of each knob, museum photos of unrestored cockpits help to find out what is and what is not, just don't forget this is 1/72 scale!
The Eduard set is particularly important to bring the kit' seats closer to the real thing. In a 'Nam bird, the seat armor is a requisite. Those tiny ejection handles are a real time saver, too. However, I had to sand the sides of the kit parts - assemblies A and B of step 1 in the instructions - to make it fit inside the cockpit tube with the side armors in place. It was a tight fit.
In the kit, the nose wheel bay details are all under the cockpit floor (part A6), which ends where the nose (parts A7-A8) starts. Since the interior of the nose cone is devoid of any structural detail, I added some based on walkaround photos I found on the internet:
In many early Academy kits, fit is not their strong point, and the Bronco is no exception. The nose parts were installed and the resulting seam was terrible. I spent some time filling and sanding there in order to produce a joint flush. Black super glue helps a lot in such cases, and I've been using the stuff more and more. Besides that, when I dry fitted the wings and the sponsons, visible gaps showed up. I attenuated the problem by cementing plastic shims along the joint, but sure the area would need attention later:
Talking about the sponsons, They are not very well molded and have almost no surface detail. I refined the machine gun openings, scribed the gun bay access hatch and embossed some rivets and fasterners. The pylons would be spruced up later, once I decided the ordnance. Another important detail missed by Academy are the M60 empty shell case chutes on both sides. I filed the chutes on the inner side of parts C8 and C9 before gluing them together, and refined the job after the glue has set:
The sponsons subassembly was glued to the fuselage, and sure enough there was a visible gap along its joint. More on that later. On the other hand, I really liked the way the cockpit resulted, and I felt vindicated for all the effort put in there. At this stage, my only complain was the shape of the nose, which seemed too round on top. I would address the area later with a sandpaper. Except for the control panel cover and the electronics bay aft the copilot's seat, the cockpit was done...
,,, but not the fuselage - if I can call it fuselage. There were a few smaller surface details that I would add after priming the model, but at this point the model was almost ready to receive its wings:
Woops... not quite yet. The sponson gap had to be addressed. Also, I started to figure out that at least some areas over the sponsons or under the wings should be painted before the wing was installed, or it would be difficult to make the paint get in there with an airbrush once the model was assembled:
Back to the gap, not only I had to make it disappear, but also simulate the overlapping fairings which merged the sponsons to the fuselage, like in the photos below:
I recollected a technique I used to simulate overlapping panels on my Heinkel He-170 years ago. The process started by puttying the gap and sanding the area smooth. Next, the boundary of the fairing to be represented is masked. Then a heavy coat of primer is airbrushed over the area. These coats must be really heavy, because the final paint coat thickness (once dry) will be the step heigh of the overlapping panels. I usually apply three or four generous coats apart 5 min from each other. I never tried the method with other paints, but I don't see why it would not work:
Wait 24 hours for a complete drying and sand the area carefully with fine sandpaper to remove any excessive roughness. Finally, carefully remove the masks. What you get is an overlapping panel in scale:
Still a long road to go. Stay tuned...
References
Useful links
- North American Rockwell OV10 Bronco Association – GermanWing
- Bronco Association
- VAL-4 Black Ponies (on facebook)
- Paul Gaertner’s Scratchbuilt Convair Model 48 Charger II in 1/72 scale
| Technical file | |
| Kit:
|
- Academy #1655 |
| Additions:
|
- Eduard 72 310 - OV-10A 1/72 detail set for Academy kit - Eduard CX 127 Mask for OV-10 1/72 |
| Basic
colors: |
-
Primer: Automotive grey primer - Camouflage: - Flat finish: |
| Notes: |
-
Many scratchbuilt details (see text). |
Rato Marczak © 2018
