| Tamiya F-84G Thunderjet in 1/72 |
|
Start: November / 2005 Current state: closed fuselage and halted for now |
My
first military jet in many, many years (I started this one before my
F4D). I got the Thunderbirds box
for a bargain... Big mistake, the kit is chrome plated... a useless,
very fragile stuff. I had (and still have) to make countless touch-ups
because the paint simply don´t stick well. If you´re going
to make this
one, do yourself a favor and remove the chrome layer before starting.
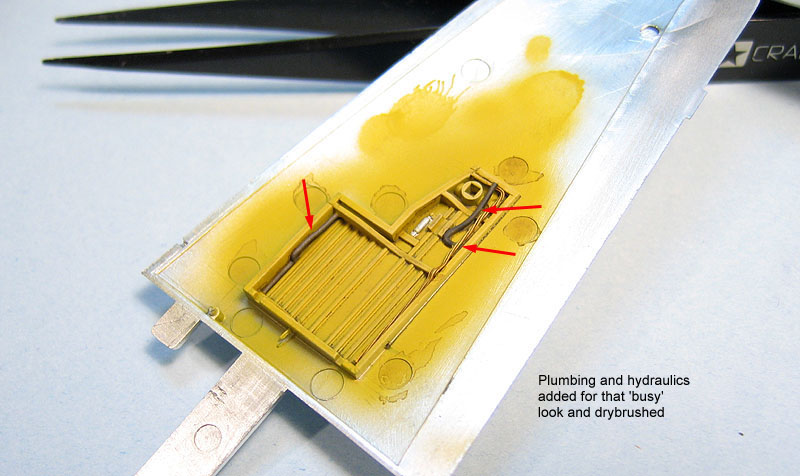
I started with the wheel wells. I added some basic plumbing and airbrushed a coat of Model Master Yellow Zinc Chromate (#1184, the small square bottle). A coat of Model Master metalizer sealer was used to seal everything. I then drybrushed lightly and picked out the details using a fine brush:
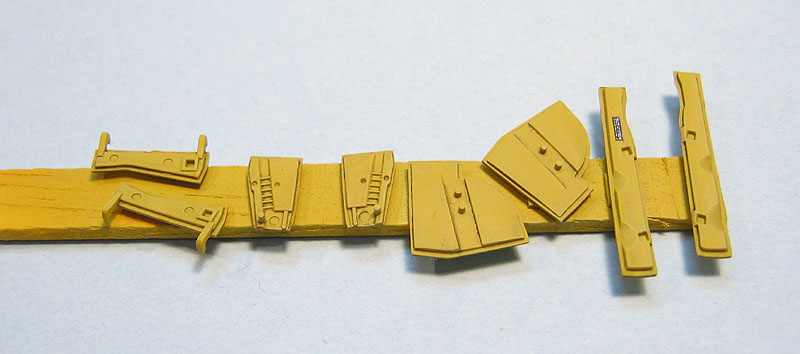
I used the same procedure on the landing gear doors, but used a small stencil plate on one of the nose doors. I didn't bothered with the ejection pin marks on the smaller parts - let's pretend they are recesed details...
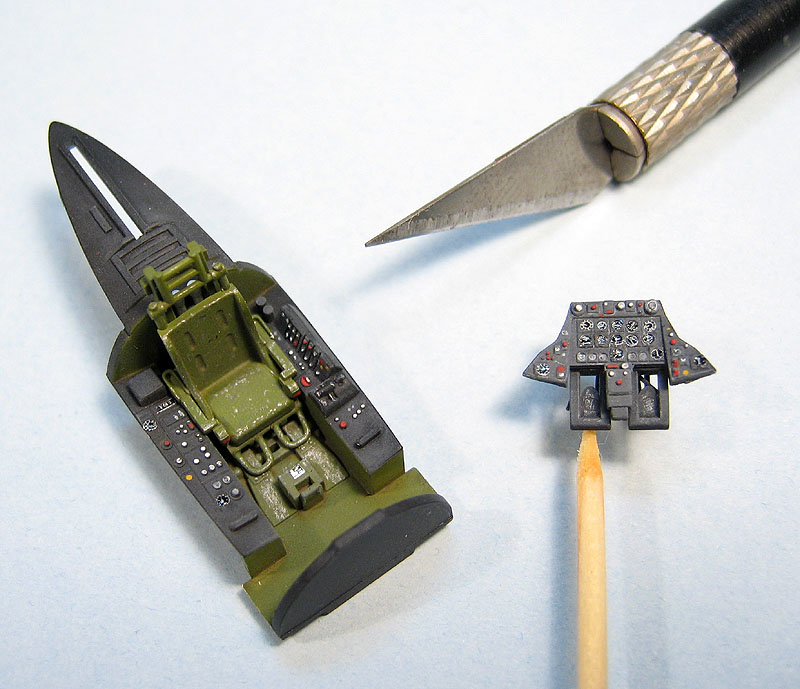
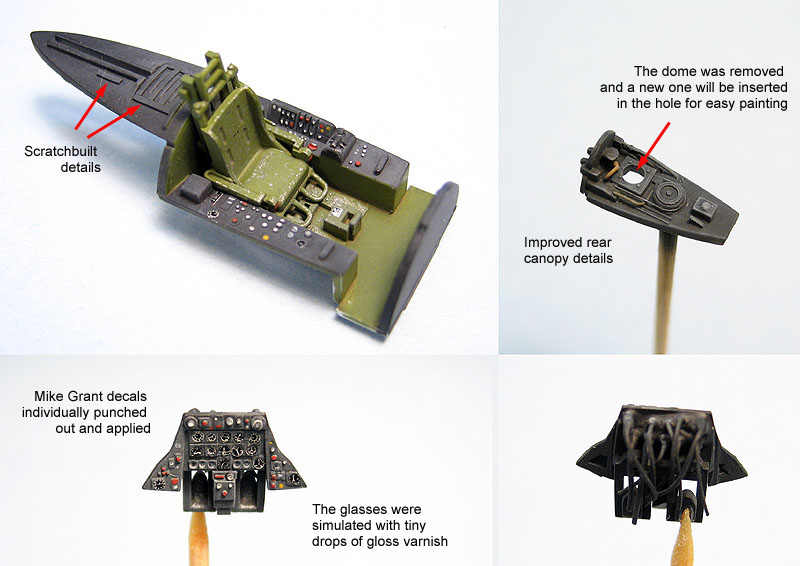
I then turned my attention to the cockpit tube. I added a few missing details, but overall Tamiya did a nice job (as usual). I used Testors Model Master Interior Green #1715 (FS 34151) as a base color, and Tamiya Flat Black (XF-1). The parts were drybrushed with grey oils and the chipped paint effect was achieved with a silver Prismacolor pencil. Later I discovered that Tamiya has molded the seat pad integrally with the pilot's seat. I not only painted it with interior green but also chipped the pad!!! I'll live with that. On the control panel, all instrument faces are Mike Grant's decals. Excellent product, by the way. They are printed with Okidata printers, so they come with continuous clear film. I punched one by one and applied then to the corresponding recesses with copious amounts of Micro-Sol. The instrument glasses were simulated using clear nail enamel. Instrument details, buttons, levers etc. were picked out using white, yellow and red colors applied with a toothpick.
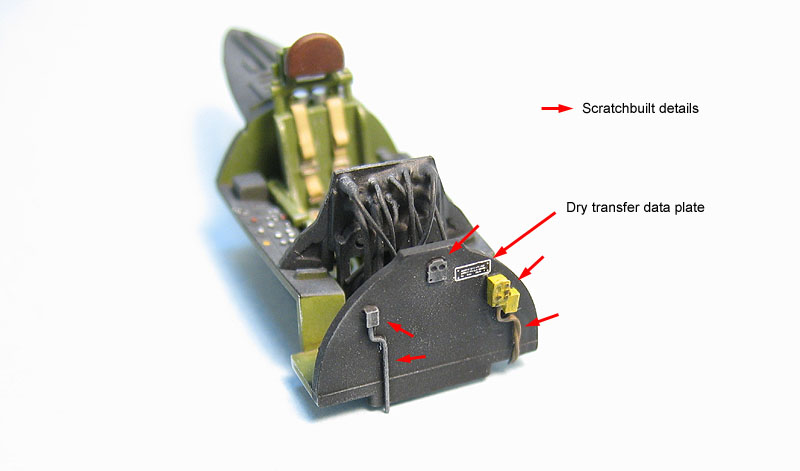
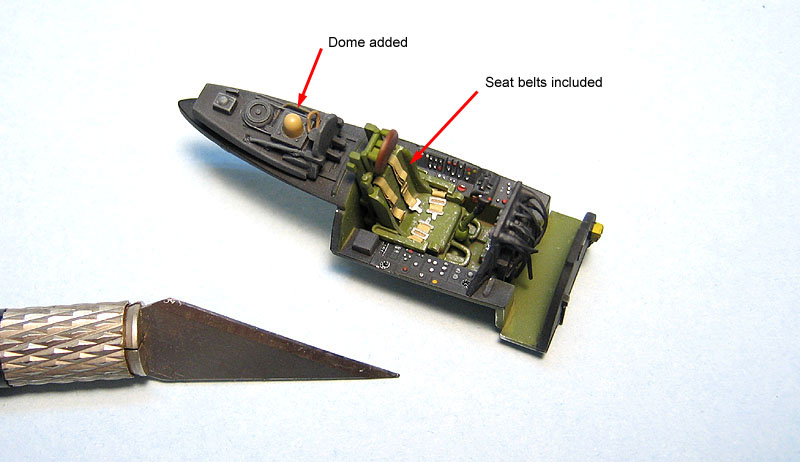
The rear area of the sliding portion of the canopy was heavily modified. Using reference photos, I added various details and the sliding cables. There is a tan colored dome (IFF transmitter??) which I wouldn't be able to paint later. So I removed it and bored a hole through which I would insert a new one turned on my Dremel. I also added the back of the control instruments, since they will be visible through the windscreen. The seatbelts came from an old Eduard fret.
Antecipating that I would display the gun bay open, I added some detailing to the firewall, since it cames completely plain in the kit and will be quite visible through the gun bay:
The cockpit was was then finished. Here's a dry fit to see how it looks before closing the fuselage:
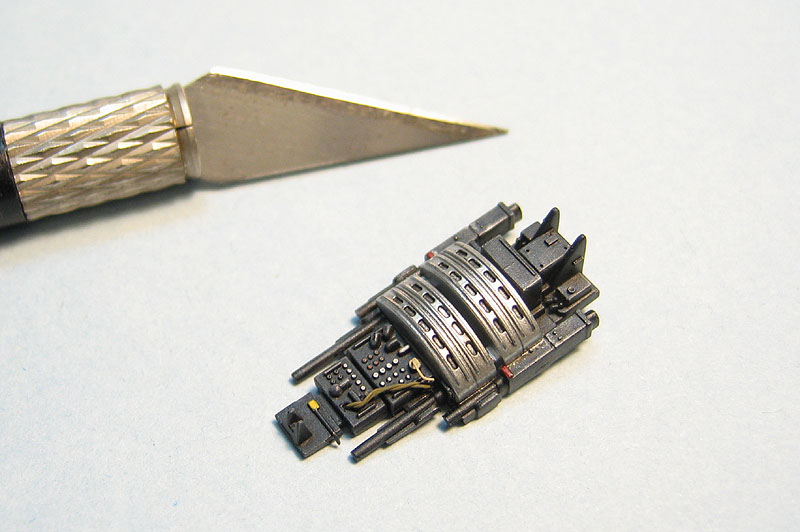
But before that, I needed to paint the single piece gun bay. As usual, some electrical connections/wires were added. Everything was painted with Model Master Gun Metal (#1795) and drybrushed with silver. Next, the area surrounding the ammo magazines were masked, and I tried Vallejo Model Air Aluminum (#062) for the first time. Right after airbrushing, the coat presented a heavy orange peel effect, but after a couple of hours, it leveled beautifully. I washed the magazines with gouache black (another first to me) to avoid any damage to the Aluminum coat, and painted smaller details. It's done:
I started with the wheel wells. I added some basic plumbing and airbrushed a coat of Model Master Yellow Zinc Chromate (#1184, the small square bottle). A coat of Model Master metalizer sealer was used to seal everything. I then drybrushed lightly and picked out the details using a fine brush:
I used the same procedure on the landing gear doors, but used a small stencil plate on one of the nose doors. I didn't bothered with the ejection pin marks on the smaller parts - let's pretend they are recesed details...
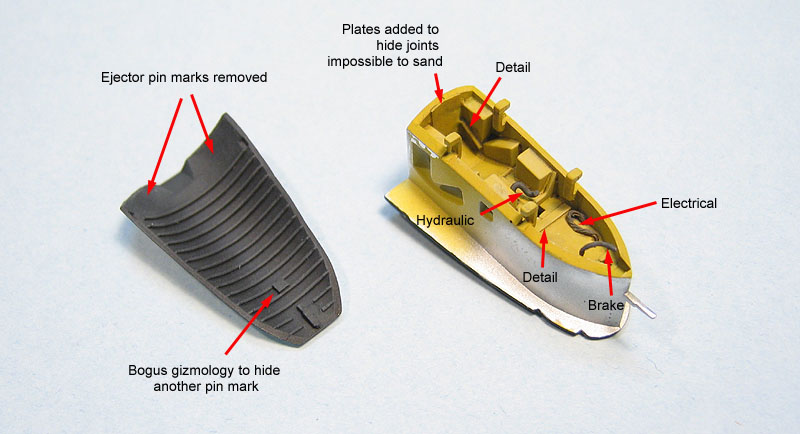
Next, I reworked the nose
wheel bay. Electrical, hydraulic and brake lines were added using fine
wire and stretched sprue. I retouched the natural metal area that will
be visible through the air intake, since the wheel bay is made up by
glueing two halves (had to take care of the seam line). I also worked
on the gun bay cover. One of the ejection pin marks simply couldn't be
removed, so I added some spurious gizmology to hide it:
I then turned my attention to the cockpit tube. I added a few missing details, but overall Tamiya did a nice job (as usual). I used Testors Model Master Interior Green #1715 (FS 34151) as a base color, and Tamiya Flat Black (XF-1). The parts were drybrushed with grey oils and the chipped paint effect was achieved with a silver Prismacolor pencil. Later I discovered that Tamiya has molded the seat pad integrally with the pilot's seat. I not only painted it with interior green but also chipped the pad!!! I'll live with that. On the control panel, all instrument faces are Mike Grant's decals. Excellent product, by the way. They are printed with Okidata printers, so they come with continuous clear film. I punched one by one and applied then to the corresponding recesses with copious amounts of Micro-Sol. The instrument glasses were simulated using clear nail enamel. Instrument details, buttons, levers etc. were picked out using white, yellow and red colors applied with a toothpick.
The rear area of the sliding portion of the canopy was heavily modified. Using reference photos, I added various details and the sliding cables. There is a tan colored dome (IFF transmitter??) which I wouldn't be able to paint later. So I removed it and bored a hole through which I would insert a new one turned on my Dremel. I also added the back of the control instruments, since they will be visible through the windscreen. The seatbelts came from an old Eduard fret.
Antecipating that I would display the gun bay open, I added some detailing to the firewall, since it cames completely plain in the kit and will be quite visible through the gun bay:
The cockpit was was then finished. Here's a dry fit to see how it looks before closing the fuselage:
But before that, I needed to paint the single piece gun bay. As usual, some electrical connections/wires were added. Everything was painted with Model Master Gun Metal (#1795) and drybrushed with silver. Next, the area surrounding the ammo magazines were masked, and I tried Vallejo Model Air Aluminum (#062) for the first time. Right after airbrushing, the coat presented a heavy orange peel effect, but after a couple of hours, it leveled beautifully. I washed the magazines with gouache black (another first to me) to avoid any damage to the Aluminum coat, and painted smaller details. It's done:
Now the fuselage is closed,
and I'm regreting for not removing the chome plate at first.
Stay tuned...
Stay tuned...
| Technical file | |
| Kit:
|
-
Tamiya #60762 |
| Additions:
|
-
Eduard American Seat Belts and Pedals
(#25002) - Mike Grand Cockpit Details decals (CKP072) - Archer Fine Transfers Generic Placards (#AR35202S) |
| Basic
colors: |
-
Primer: Gunze Mr. Surfacer 500 - Green Zinc Chromate: Testors Model Master Interior Green (#1715) - Yellow Zinc Chromate: Model Master Yellow Zinc Chromate (#1184) - Flat black: Tamiya XF-1 - Aluminum (gun bay): Vallejo Model Air Aluminum (#062) - Black (gun bay): Model Master Gun Metal (#1795) |
| Notes: |
-
The rear area of the cockpit (under the canopy) was mostly scratchbuilt. |
Rato Marczak © 2007
