| Hasegawa Kawasaki Ki-61 Otsu in 1/72 |
| Finished: May/2013 |
I've
been working on this project, on and off, for years, literally. I
remember starting it during a vacation week with family, when decided
to built it OOB. My mind changed several times since then, and this
particular model ended up being another important element in my hobby
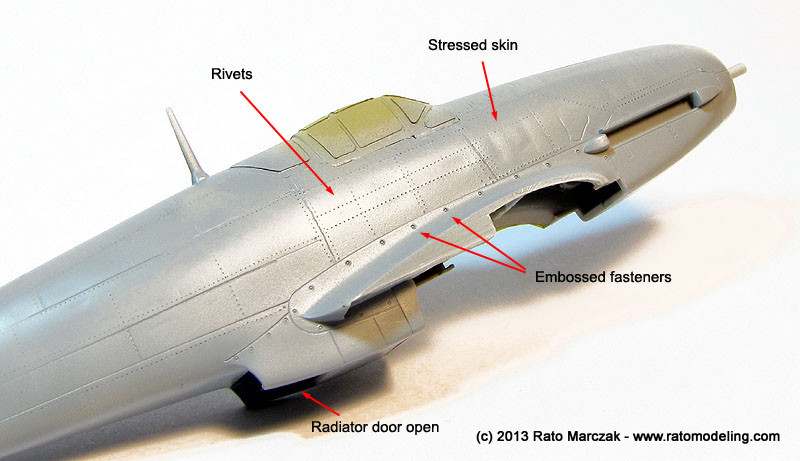
learning curve. In particular, this was the first time I attempted to do both, rivets and
stressed skin effect on the same model. The model
is the venerable Hasegawa Ki-61 offering from their famous 1/72 scale
series. It is an old one, but it has recessed (and sometimes
inconsistent) panel lines and a relatively accurate outline. My sample
was a second hand model, still in the original box:
I know there are more detailed options on the market, but since this was going to be pretty much an experimental project, it would do. Being another example of the fine Hasegawa's lineage of the 70's, the cockpit is only symbolic, and the wheel wells are fictitious. Upon inspecting the model, I noted that the fine panel lines disappear at places. And of course the decal had yellowed quite a bit after all these years.
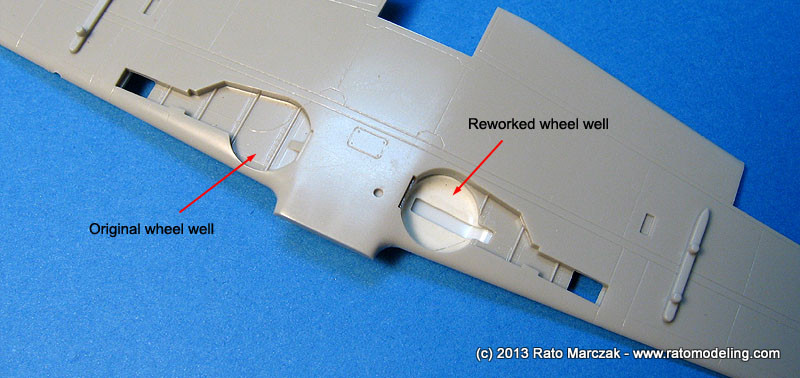
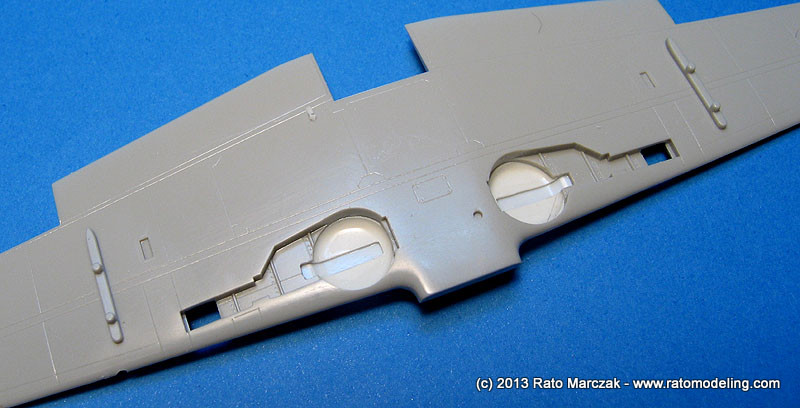
For a change, I haven't started this model by the cockpit. Instead, I decided to scratchbuilt a good part of the wheel wells to better represent the real thing. The circular area of the wells were removed and replaced by two new vacuum formed ceilings, containing the characteristic slot running parallel to the leading edge of the wing:
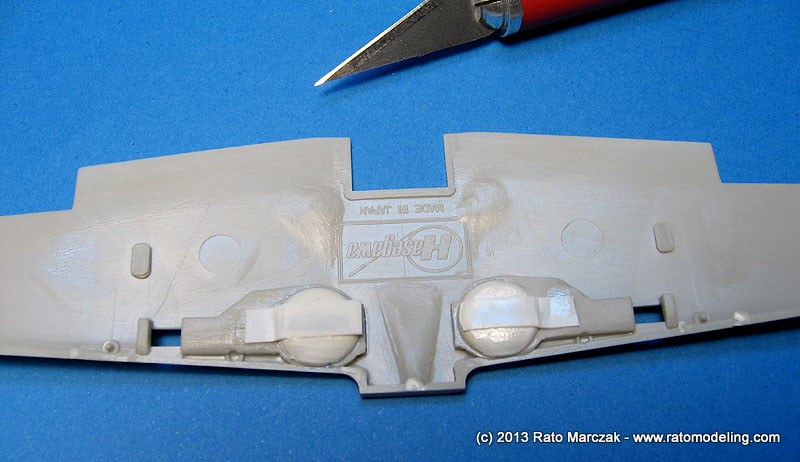
I tried my best to make the well as deep as possible, but the upper wing halves represented an obstacle. I reduced as much as I could from the upper wings' thickness so that I still could glue the wing parts confortably:
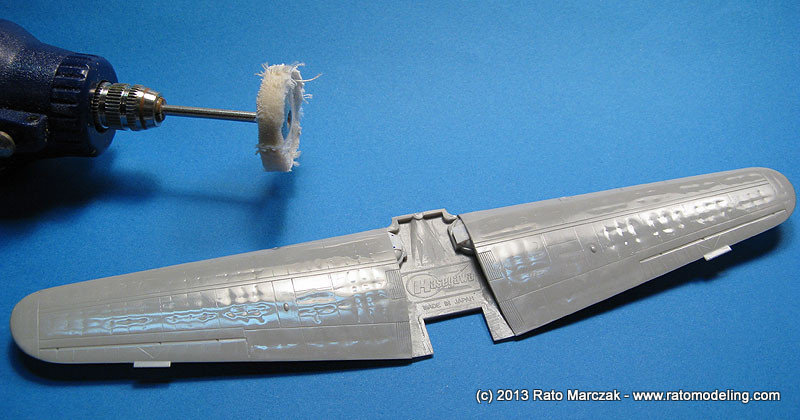
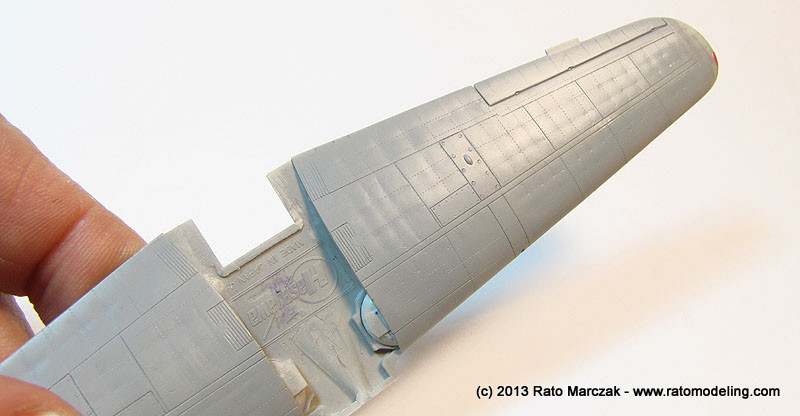
At this point I decided to start the stressed skin treatment to the model, so I assembled the main wing and triggered the process, as described in my earlier article. I won't go over all the steps, but I confess it is frightenig to scrape plastic from the kit, and that explains why I haven't started by the cockpit. If something went wrong, I'd just scrap the model:
Since I haven't mentioned in the article, let me show you the tools used to simulate the stressed skin effent on the wings and fuselage (not in order of usage):
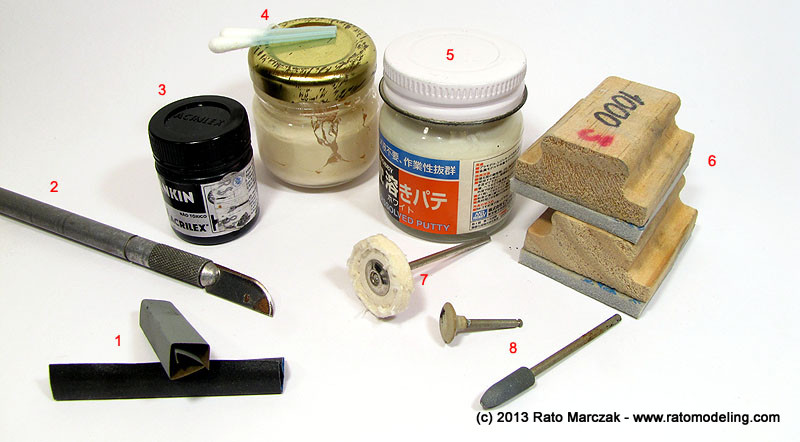
1. Regular sandpaper, grades 400 and 800, for localized sanding.
2. Curved blade, to scrape plastic.
3. India ink, to help to check panel lines and rivets later.
4. Metal polising compound (the paste type, not the liquid one), used to polish the surface.
5. Mr.Dissolved Putty, to correct small blemishes.
6. Sponge backed sandpaper, for sanding larger areas.
7. Cotton disk, for the final polishing.
8. Abrasive bits, for removing small scratches.
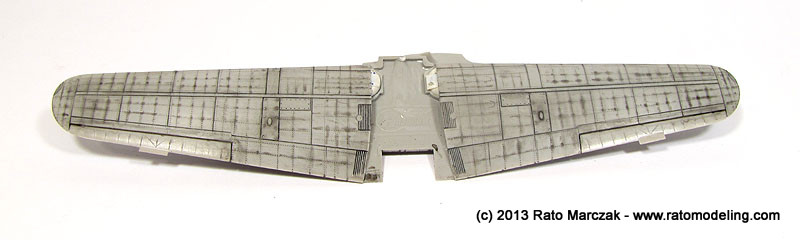
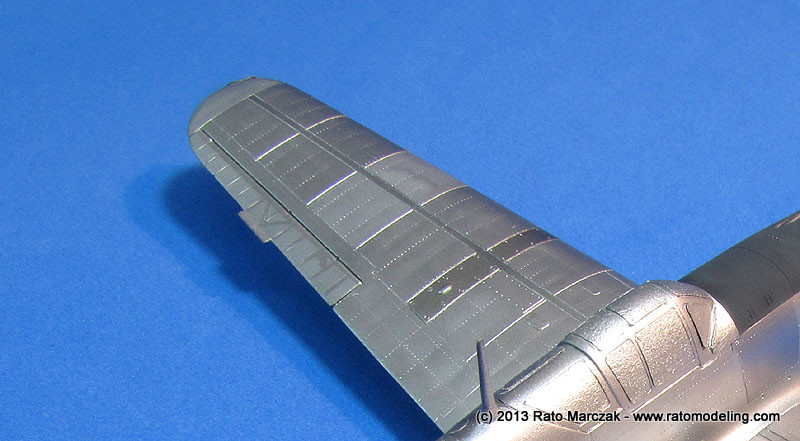
Once I was done with the stressed skin, the wing was ready for the riveting phase:
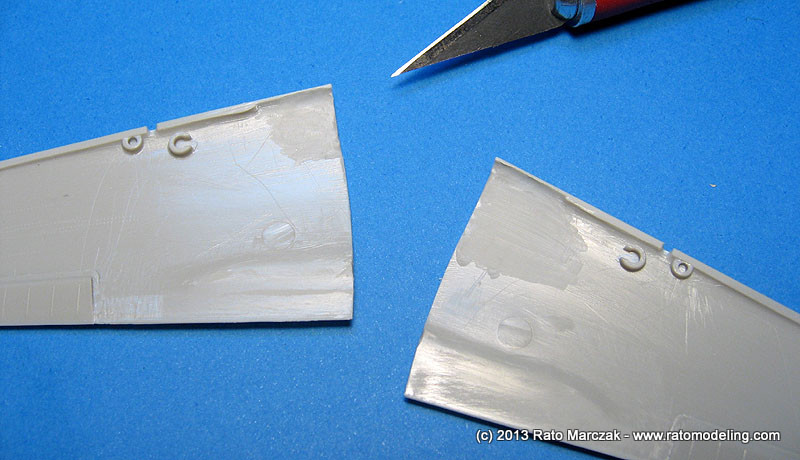
The riveting was very boring because many of the panel lines disappeared partially during the process. This meant that they should be rescribed before using the riveter, and to complete partially visible panel lines is not the most interesting job in modeling, I'm telling you. Anyway, my weapons of choice for the rescribing/riveting were shown below:
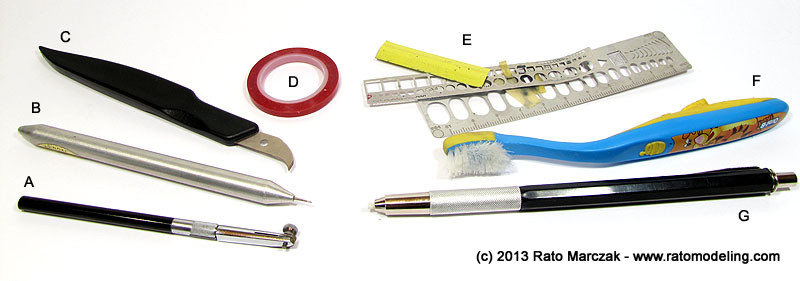
A. My home made riveter.
B. Needle for scribing curves.
C. Scriber for lines.
D. Dymo tape for guiding the scriber/riveter.
E. Metal templates for guiding and scribing access panels.
F. Old toothbrush for cleaning.
G. Abrasive pen for small corrections.
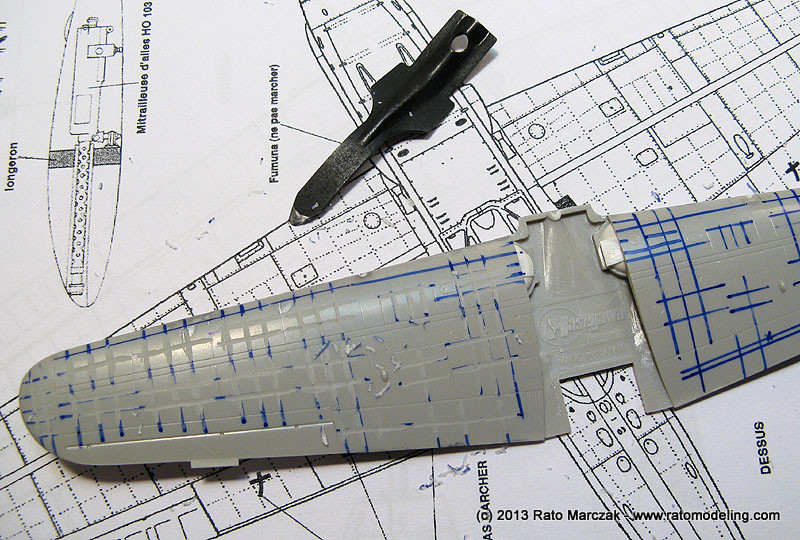
I also used other tools to reproduce fasteners and screws. Once I finished the scribing/riveting, I washed the parts with India ink to check out the results:
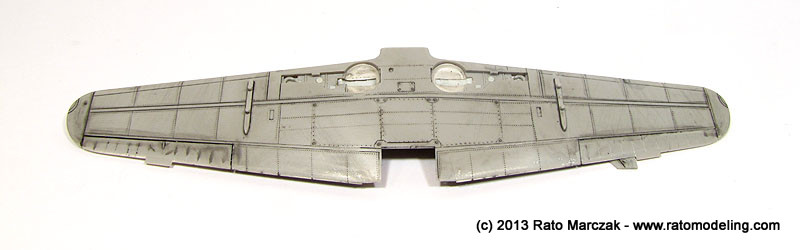
To finish off the wings, wingtip lights were installed using the popular clear plastic method and re-primed:
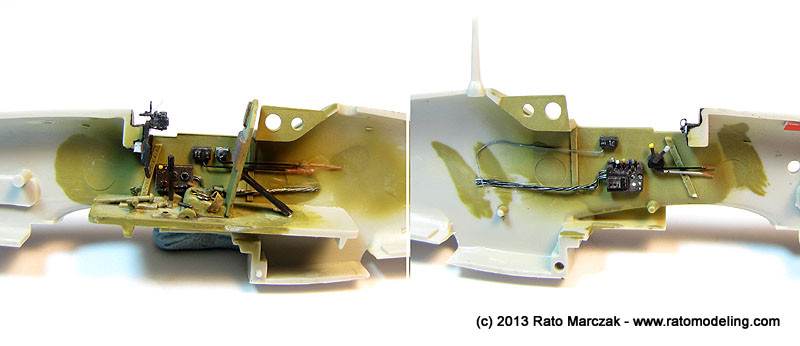
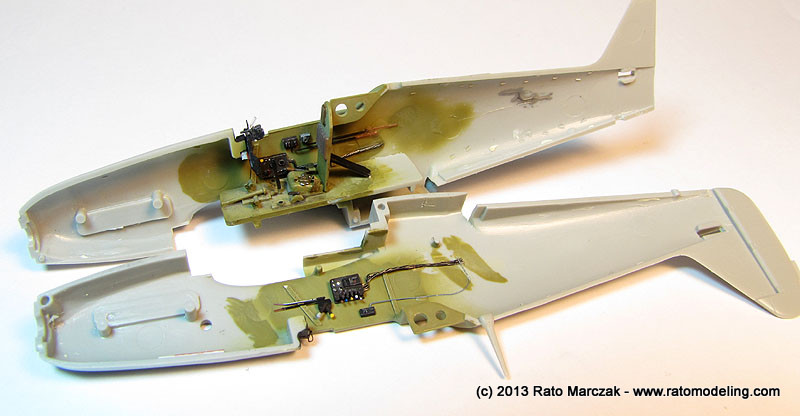
After going that far, my chances of doing an acceptable job on the fuselage as well increased considerably. But before tackling it, I had to replace the kit's oversimplified cockpit. I used the kit's floor and pilot's seat, but all the rest was scratchbuilt, except for the Quickboost gunsight and leftover PE seatbelts. I didn't went nuts on this, since the canopy would be closed, but it is far better than the kit:
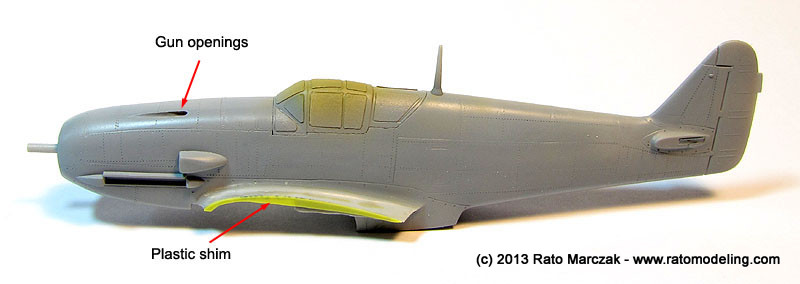
The fuselage halves were finally glued and I could correct a few points. First, the nose gun openings were drilled and trued. Next, I checked the wing dihedral and had to add a plastic shim along the port wing root to make it even. Then, after observing wartime photos, it was common to find parked Hiens with the radiator flap down. I decided to do the same, even though that would make a scratchbuilt radiator grille another mandatory item later. As for the stressed skin and riveting, I just repeated the same steps used on the wings, except that it was way more annoying to work on curved surfaces like a fuselage. Much of the riveting work on the fuselage was done free hand, mind you:
 .
.
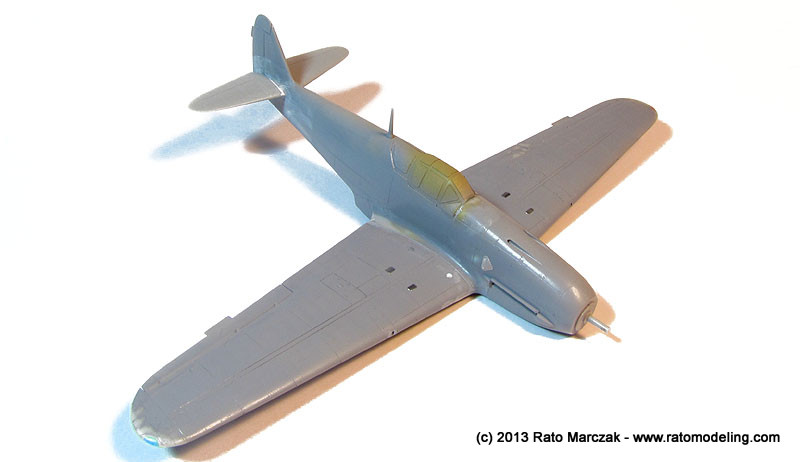
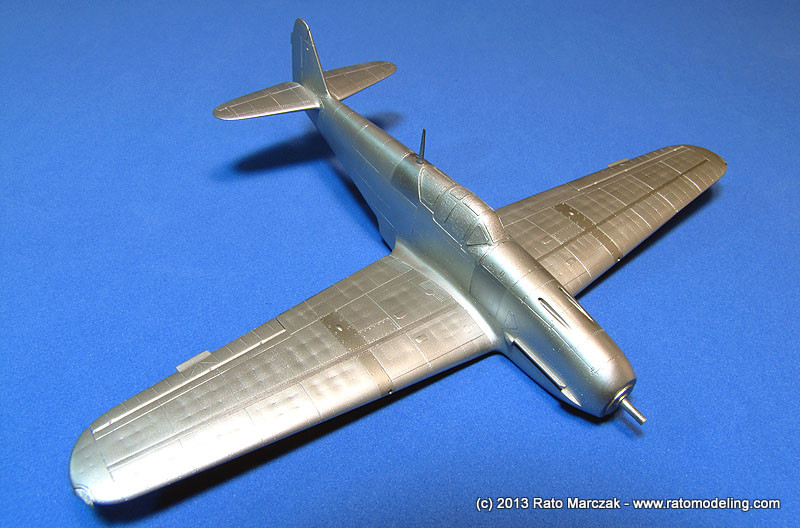
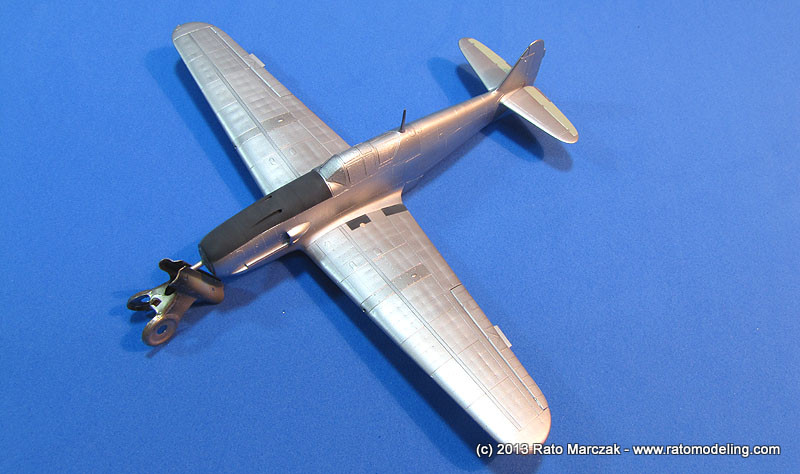
After priming the fuselage and polishing it, I had the main parts of the airframe ready for assembly:
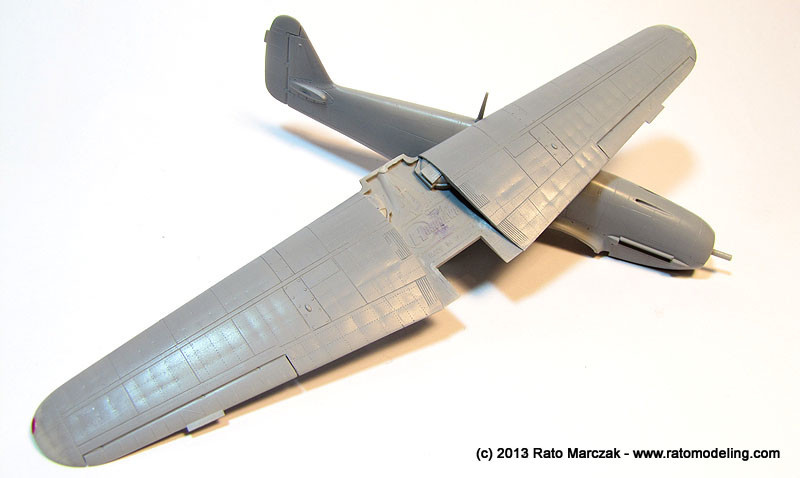
The fuselage was then mated to the wing. The fit was excellent, even for a kit of this vintage.
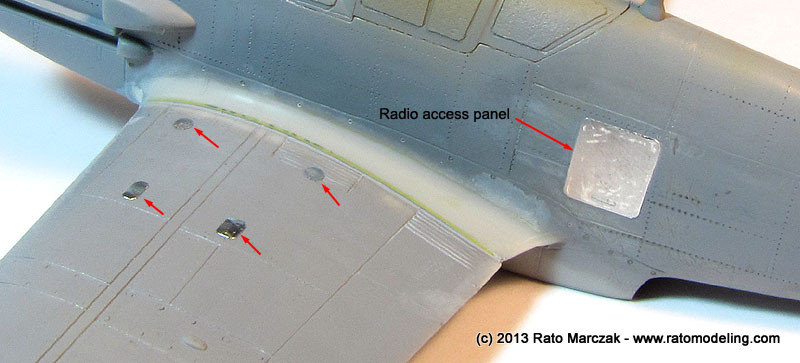
One technique which I've been using more and more during the last years is the superposition of thick foil to the model surface to represent raised panels and access doors. I really like the resulting effect after the model is painted, as it contrasts to the recessed details, adds interest to plain areas, and can be drybrushed if it is the case:

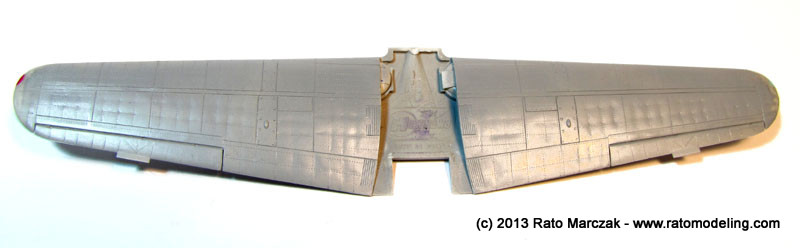
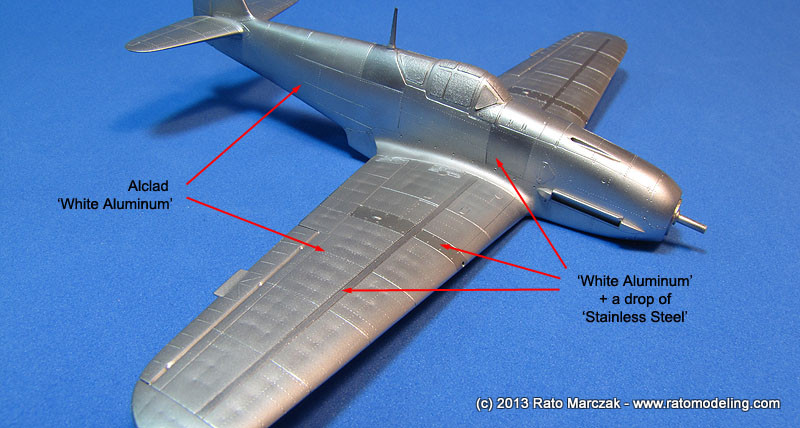
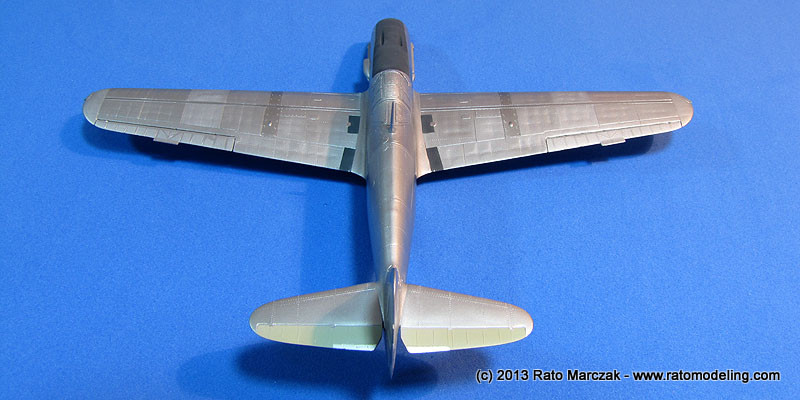
Another check out round and finally I could apply some paint. Since I knew the model would be handled a lot, and also be submitted to a great deal of weathering, a durable paint should be used, without the protective help of a clear coat (it always shift the natural look of a good NMF, in my opinion). I naturally opted for Alclad II, the most tough and forgiving natural metal paint that I know. I used White Aluminum (ALC-106) throughout the model, then added a few of drops of Stainless Steel (ALC-115) to the mix and went back to change the tone of the spar, gun bay hatches, plus a few other panels.
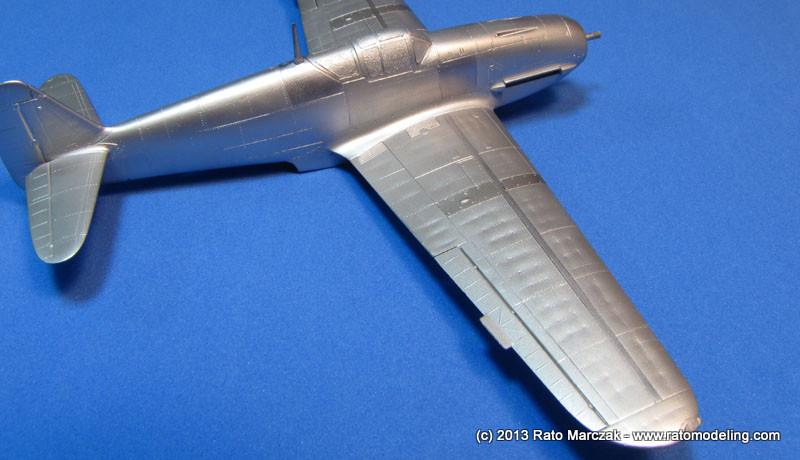
At this point I had a bad surprise. At the crossing spots of two stressed skin tracks, I found small dimples which were not quite visible when the model was only primed. This was a clear indication that I worked with a heavy hand during that phase of the project. It is not bad, but any flaw looks bigger under NMF, you know. Lesson learned for the next model... At least the stressed skin effect was visible:
I played with some contrast effects on the ailerons by masking the raised ribs and airbrushing Vallejo flat varnish. The elevators were painted in IJA gray green. I didn't do the same on the ailerons following one of Ian Baker's books, which states that for some reason it was more common to paint the ailerons in Aluminum dope, but not the elevatores (different subcontractors, maybe?).

The method produces interesting results, but can be seen only from certain angles:
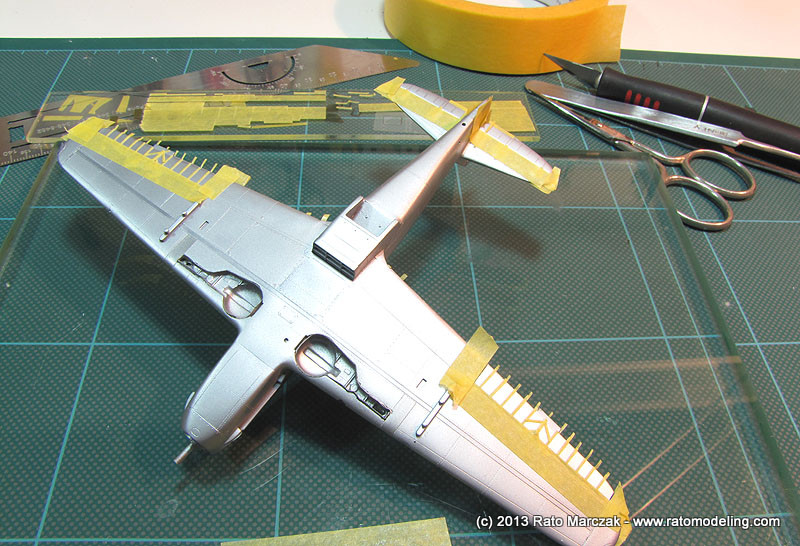
I also thought that the paneling effect (darker Aluminum areas) was too exaggerated. So I went back and reworked these areas with a highly diluted White Aluminum. The walkway bands on the wing roots and the anti-glare area of the nose were masked and painted with a mixture of Tamiya black, white and blue flat colors:
Next, the leading edges of the wings were masked and painted yellow (with a drop of red). Both the black and the yellow areas were purposedly painted with Tamiya paints diluted in water. This would reduce significantly its adherence, in preparation for the paint chipping that would follow.
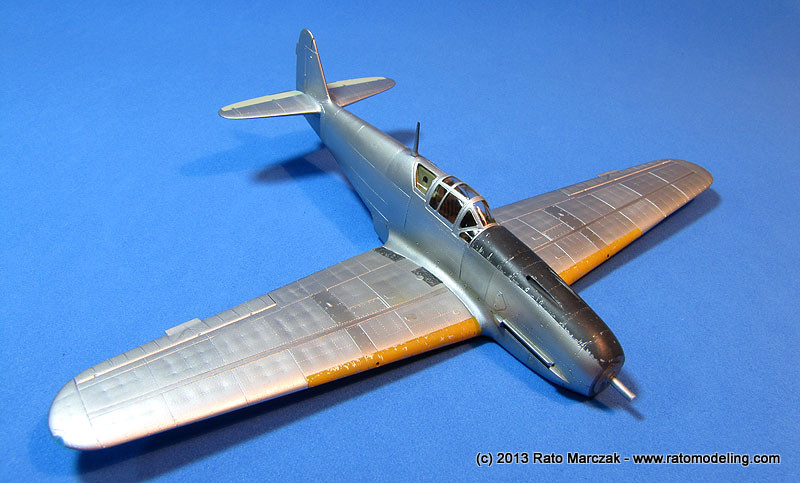
Paint chipping was simulated using a toothpick to scrape tiny chips of paint. I tried to follow panel borders, then added more chips to the interior of the panels, always trying to be random (like if I could). It was really easy.
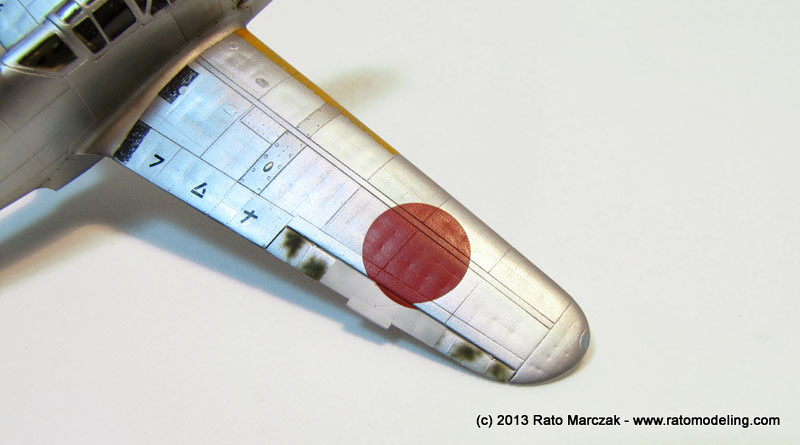
On the anti-glare area of the nose, the job was finished by scrubbing an abrasive pad vigorously. This method not only complements the finish by adding very small chipping (impossible to do with a tookpick), but it also remove the black paint from the rivets, producing neat lines of chipped rivet heads. And best of all, the Alclad remained unharmed all the way:
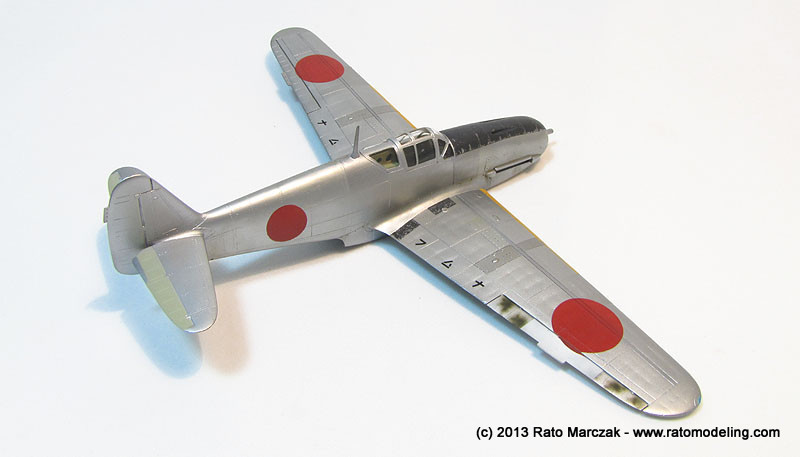
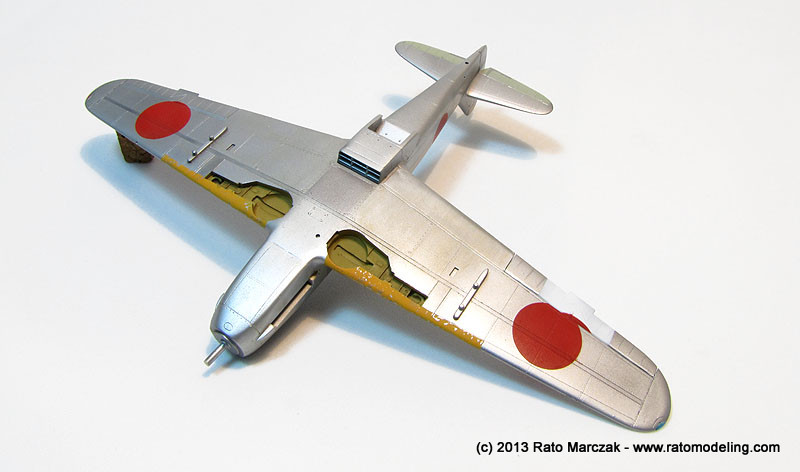
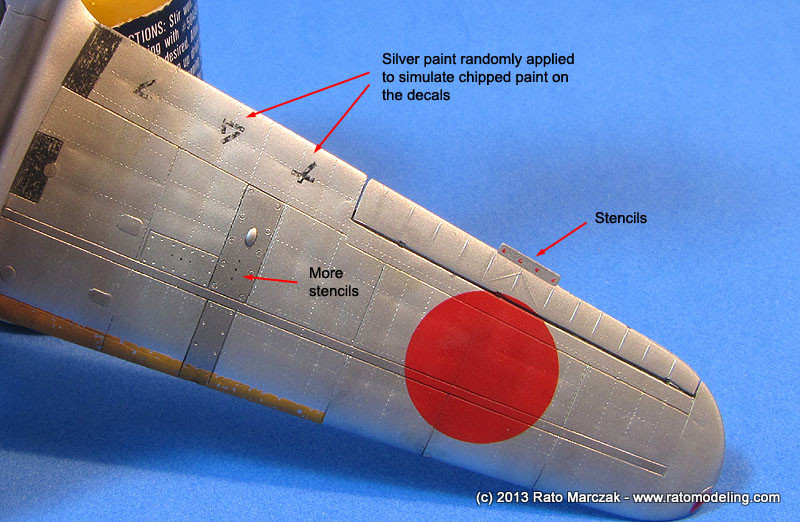
When the time to paint the markings came, I had my mind made to avoid gaudy camouflage and markings. Not only this would obscure the stressed skin, but also my idea was to depict a warbird recently arrived to its Sentai. If you don't know, the Hiens were delivered devoid of any camouflage or markings, to be hastly camouflaged in the field. My Ki-61 represents one of such cases, where the aircraft already had its share of combat hours before receiving his cammo. The hinomarus were painted with a mix of Tamiya flat paints and Future floor to deliver a semi-gloss finish, masked with home made vinyl masks. The stencils came from an old Aeromaster sheet. To impart more interest, I camouflaged the starboard aileron and painted a mismatched hinomaru to simulate a replaced aileron:
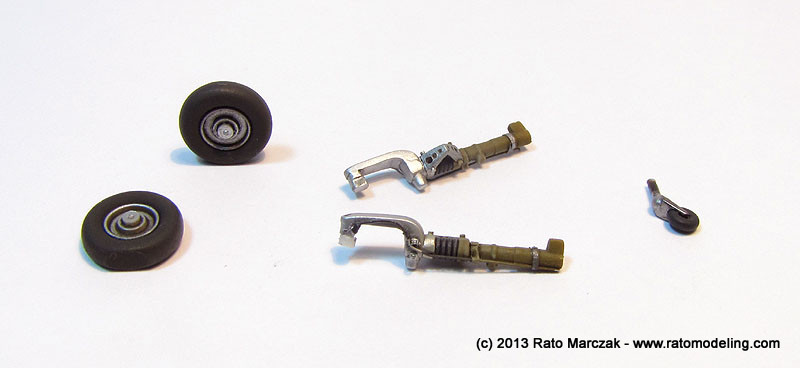
At this point I turned my attention to the smaller bits. The landing gear was refined with bolts, holes, and other missing bits. After installing the brake lines, the struts were painted half silver and half Khaki. After a dark brown oil wash, I drybrushed the assemply and picked small details with silver. Also, note that the tail wheel was removed from the fuselage early in the project and received a metal pin for later installment:
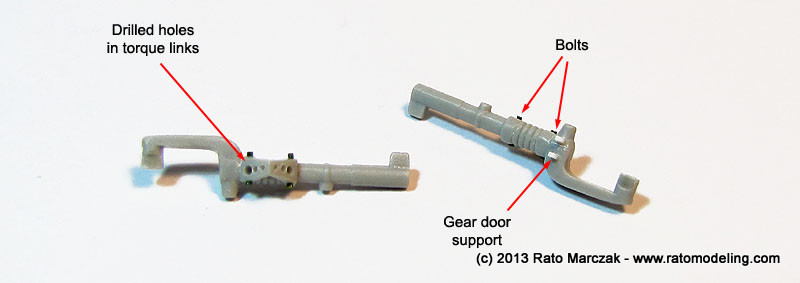
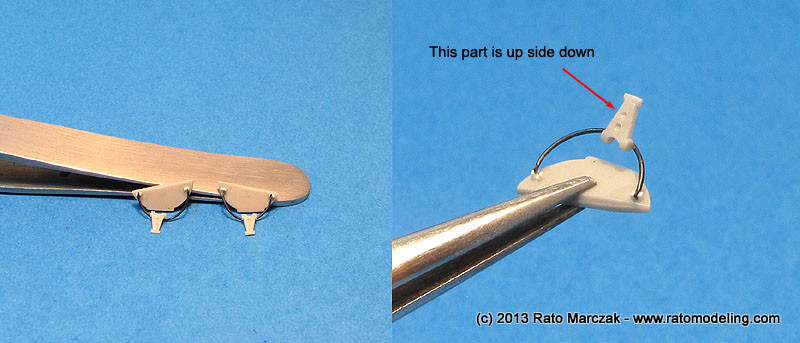
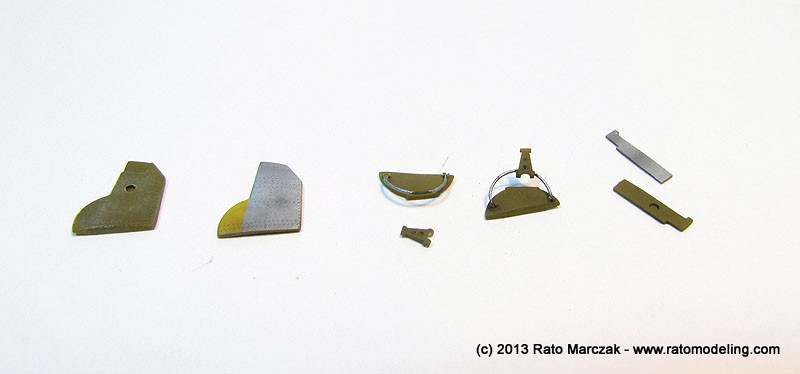
The landing gear doors were thinned to scale thickness and riveted. As in many IJA/IJN aircraft, the inner wheel bay doors were shut mechanically by the action of the main wheels. That mechanism was completely forgotten by Hasegawa, so I had to make one (or two) from scratch using plastic bits. These parts received basically the same treatment of the landing gear legs:
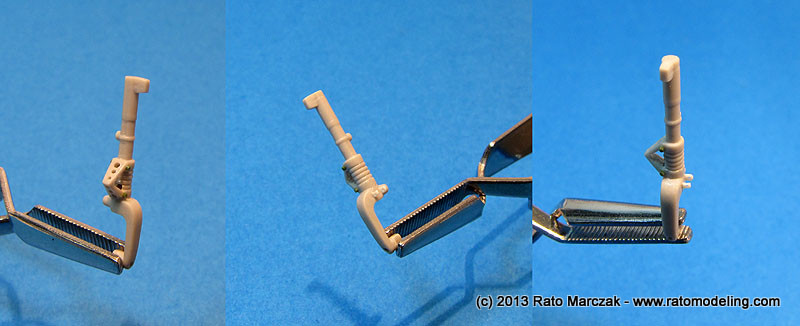
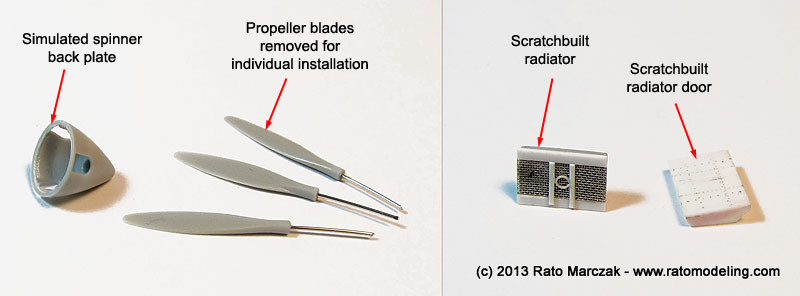
Next, the spinner was reworked by adding a circular backplate. It is amazing how frequently this detail is ignored even by modern kits. In the case of my Ki-61, to install a back plate meant that the propeller blades must be removed and installed separetely later. So I made the corresponding holes in the hub and installed metal pins on the blades for a stronger assembly later. I also scribed lines and rivets around the spinner. The radiator was built from scratch, as well as its movable door. I designed the radiator in such a way that it could be installed after the fuselage was assembled:
I know there are more detailed options on the market, but since this was going to be pretty much an experimental project, it would do. Being another example of the fine Hasegawa's lineage of the 70's, the cockpit is only symbolic, and the wheel wells are fictitious. Upon inspecting the model, I noted that the fine panel lines disappear at places. And of course the decal had yellowed quite a bit after all these years.
For a change, I haven't started this model by the cockpit. Instead, I decided to scratchbuilt a good part of the wheel wells to better represent the real thing. The circular area of the wells were removed and replaced by two new vacuum formed ceilings, containing the characteristic slot running parallel to the leading edge of the wing:
I tried my best to make the well as deep as possible, but the upper wing halves represented an obstacle. I reduced as much as I could from the upper wings' thickness so that I still could glue the wing parts confortably:
At this point I decided to start the stressed skin treatment to the model, so I assembled the main wing and triggered the process, as described in my earlier article. I won't go over all the steps, but I confess it is frightenig to scrape plastic from the kit, and that explains why I haven't started by the cockpit. If something went wrong, I'd just scrap the model:
Since I haven't mentioned in the article, let me show you the tools used to simulate the stressed skin effent on the wings and fuselage (not in order of usage):
1. Regular sandpaper, grades 400 and 800, for localized sanding.
2. Curved blade, to scrape plastic.
3. India ink, to help to check panel lines and rivets later.
4. Metal polising compound (the paste type, not the liquid one), used to polish the surface.
5. Mr.Dissolved Putty, to correct small blemishes.
6. Sponge backed sandpaper, for sanding larger areas.
7. Cotton disk, for the final polishing.
8. Abrasive bits, for removing small scratches.
Once I was done with the stressed skin, the wing was ready for the riveting phase:
The riveting was very boring because many of the panel lines disappeared partially during the process. This meant that they should be rescribed before using the riveter, and to complete partially visible panel lines is not the most interesting job in modeling, I'm telling you. Anyway, my weapons of choice for the rescribing/riveting were shown below:
A. My home made riveter.
B. Needle for scribing curves.
C. Scriber for lines.
D. Dymo tape for guiding the scriber/riveter.
E. Metal templates for guiding and scribing access panels.
F. Old toothbrush for cleaning.
G. Abrasive pen for small corrections.
I also used other tools to reproduce fasteners and screws. Once I finished the scribing/riveting, I washed the parts with India ink to check out the results:
To finish off the wings, wingtip lights were installed using the popular clear plastic method and re-primed:
After going that far, my chances of doing an acceptable job on the fuselage as well increased considerably. But before tackling it, I had to replace the kit's oversimplified cockpit. I used the kit's floor and pilot's seat, but all the rest was scratchbuilt, except for the Quickboost gunsight and leftover PE seatbelts. I didn't went nuts on this, since the canopy would be closed, but it is far better than the kit:
The fuselage halves were finally glued and I could correct a few points. First, the nose gun openings were drilled and trued. Next, I checked the wing dihedral and had to add a plastic shim along the port wing root to make it even. Then, after observing wartime photos, it was common to find parked Hiens with the radiator flap down. I decided to do the same, even though that would make a scratchbuilt radiator grille another mandatory item later. As for the stressed skin and riveting, I just repeated the same steps used on the wings, except that it was way more annoying to work on curved surfaces like a fuselage. Much of the riveting work on the fuselage was done free hand, mind you:
.After priming the fuselage and polishing it, I had the main parts of the airframe ready for assembly:
The fuselage was then mated to the wing. The fit was excellent, even for a kit of this vintage.
One technique which I've been using more and more during the last years is the superposition of thick foil to the model surface to represent raised panels and access doors. I really like the resulting effect after the model is painted, as it contrasts to the recessed details, adds interest to plain areas, and can be drybrushed if it is the case:
Another check out round and finally I could apply some paint. Since I knew the model would be handled a lot, and also be submitted to a great deal of weathering, a durable paint should be used, without the protective help of a clear coat (it always shift the natural look of a good NMF, in my opinion). I naturally opted for Alclad II, the most tough and forgiving natural metal paint that I know. I used White Aluminum (ALC-106) throughout the model, then added a few of drops of Stainless Steel (ALC-115) to the mix and went back to change the tone of the spar, gun bay hatches, plus a few other panels.
At this point I had a bad surprise. At the crossing spots of two stressed skin tracks, I found small dimples which were not quite visible when the model was only primed. This was a clear indication that I worked with a heavy hand during that phase of the project. It is not bad, but any flaw looks bigger under NMF, you know. Lesson learned for the next model... At least the stressed skin effect was visible:
I played with some contrast effects on the ailerons by masking the raised ribs and airbrushing Vallejo flat varnish. The elevators were painted in IJA gray green. I didn't do the same on the ailerons following one of Ian Baker's books, which states that for some reason it was more common to paint the ailerons in Aluminum dope, but not the elevatores (different subcontractors, maybe?).
The method produces interesting results, but can be seen only from certain angles:
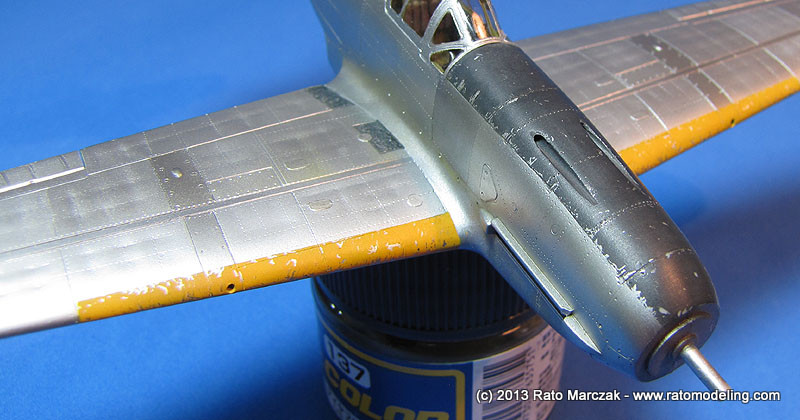
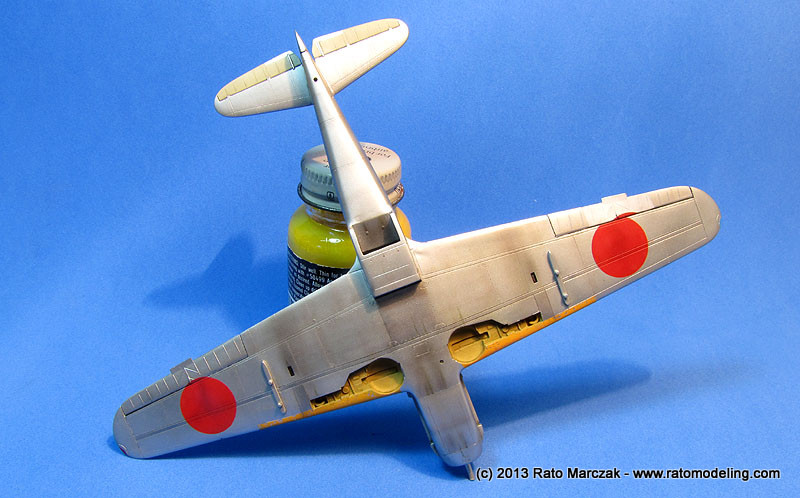
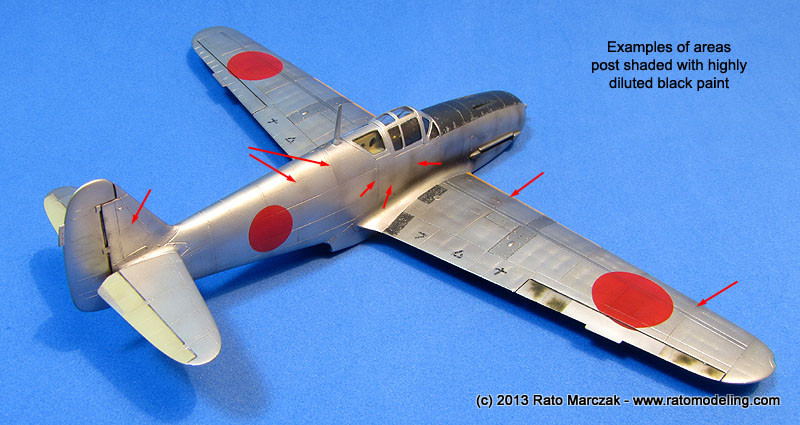
I also thought that the paneling effect (darker Aluminum areas) was too exaggerated. So I went back and reworked these areas with a highly diluted White Aluminum. The walkway bands on the wing roots and the anti-glare area of the nose were masked and painted with a mixture of Tamiya black, white and blue flat colors:
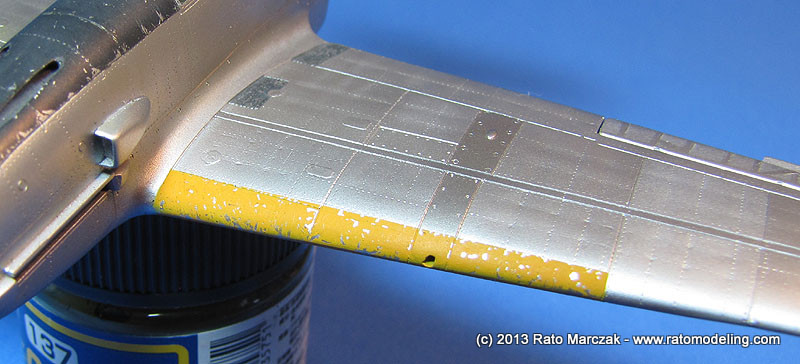
Next, the leading edges of the wings were masked and painted yellow (with a drop of red). Both the black and the yellow areas were purposedly painted with Tamiya paints diluted in water. This would reduce significantly its adherence, in preparation for the paint chipping that would follow.
Paint chipping was simulated using a toothpick to scrape tiny chips of paint. I tried to follow panel borders, then added more chips to the interior of the panels, always trying to be random (like if I could). It was really easy.
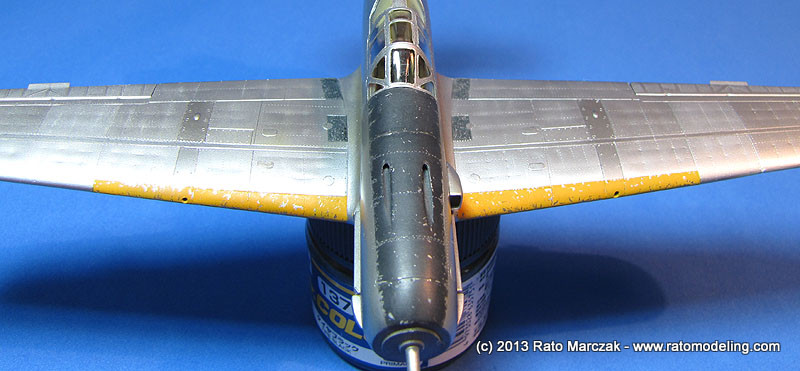
On the anti-glare area of the nose, the job was finished by scrubbing an abrasive pad vigorously. This method not only complements the finish by adding very small chipping (impossible to do with a tookpick), but it also remove the black paint from the rivets, producing neat lines of chipped rivet heads. And best of all, the Alclad remained unharmed all the way:
When the time to paint the markings came, I had my mind made to avoid gaudy camouflage and markings. Not only this would obscure the stressed skin, but also my idea was to depict a warbird recently arrived to its Sentai. If you don't know, the Hiens were delivered devoid of any camouflage or markings, to be hastly camouflaged in the field. My Ki-61 represents one of such cases, where the aircraft already had its share of combat hours before receiving his cammo. The hinomarus were painted with a mix of Tamiya flat paints and Future floor to deliver a semi-gloss finish, masked with home made vinyl masks. The stencils came from an old Aeromaster sheet. To impart more interest, I camouflaged the starboard aileron and painted a mismatched hinomaru to simulate a replaced aileron:
At this point I turned my attention to the smaller bits. The landing gear was refined with bolts, holes, and other missing bits. After installing the brake lines, the struts were painted half silver and half Khaki. After a dark brown oil wash, I drybrushed the assemply and picked small details with silver. Also, note that the tail wheel was removed from the fuselage early in the project and received a metal pin for later installment:
The landing gear doors were thinned to scale thickness and riveted. As in many IJA/IJN aircraft, the inner wheel bay doors were shut mechanically by the action of the main wheels. That mechanism was completely forgotten by Hasegawa, so I had to make one (or two) from scratch using plastic bits. These parts received basically the same treatment of the landing gear legs:
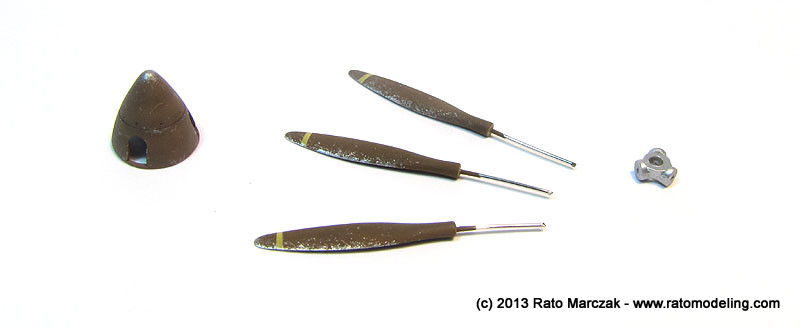
Next, the spinner was reworked by adding a circular backplate. It is amazing how frequently this detail is ignored even by modern kits. In the case of my Ki-61, to install a back plate meant that the propeller blades must be removed and installed separetely later. So I made the corresponding holes in the hub and installed metal pins on the blades for a stronger assembly later. I also scribed lines and rivets around the spinner. The radiator was built from scratch, as well as its movable door. I designed the radiator in such a way that it could be installed after the fuselage was assembled:
The
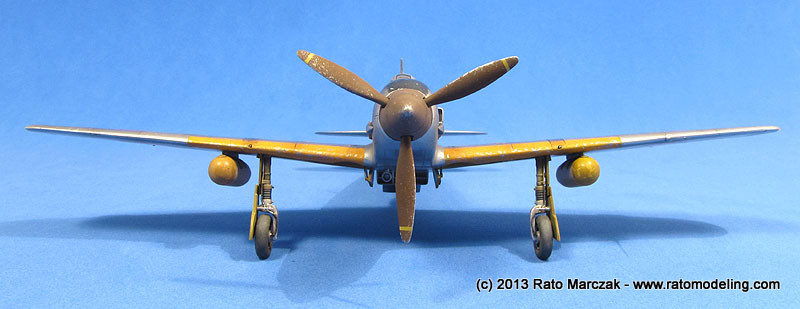
propeller blades and the spinner ware painted in dark brown, oil washed
and received a paint chipping treatment using the popular sponge
method. Instead of using usual color brands, I used an ordinary silver
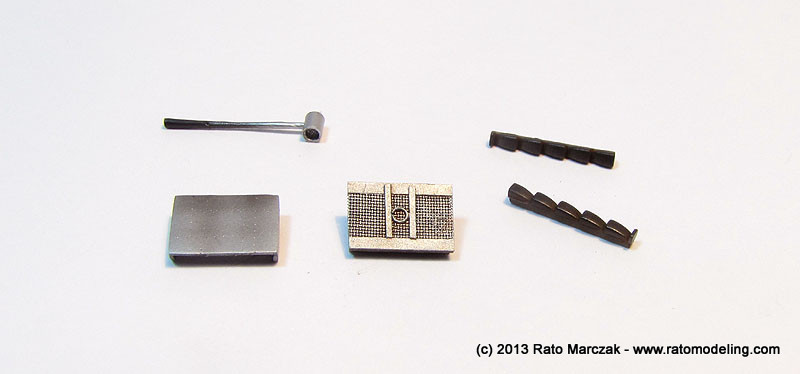
ink for that, an old trick of mine. After painting the radiator parts
and the exhaust stacks, nothing was left on the sprues...
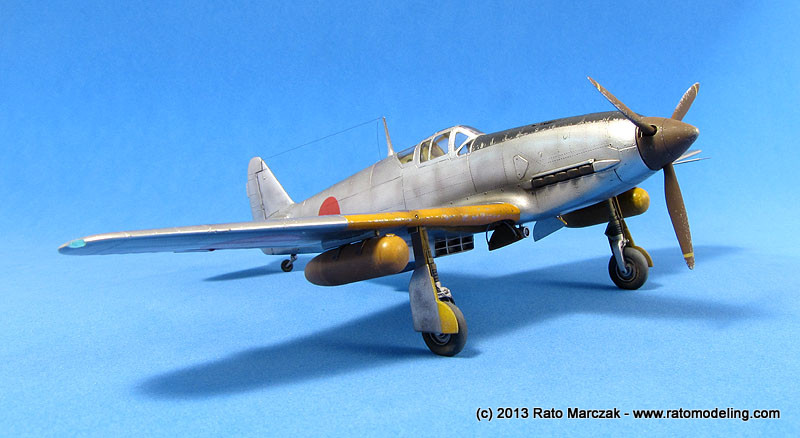
Oh, oh... there was still something on the sprues. The auxiliary fuel tanks. These were manufactured with wood, and I don't read Japanese, so I don't have any idea of what the instructions said but I've seen several models of IJA aircraft with the wing tanks painted in yellow. So yellow it was. I painted each tank with a slightly different shade of yellow and then dabbed the tanks with liquid mask using a sponge. Once dry, I airbrushed a very thin coat of Tamiya Smoke (X-19). Then the liquid mask was rubbed off showing an interesting effect:
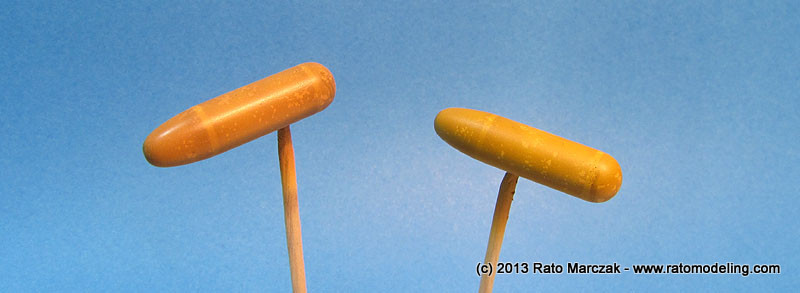
I was in the auto-pilot mode by then, and didn't make any research on these tanks. Had I, I would discover that they were usually painted in IJA Gray, not yellow. Rats...
At this point I could finally finish the weathering on the Tony. Additional weathering at this stage was basically done by a gentle dark brown/black oil wash over the whole airframe. In some places I let the wash act as a highlighter to the rivets, in others as a filter. The effect is subtle, but quite visible.
The undersides received oil streaks under the engine area to simulate fluid marks. I applied an airwash of a heavily thinned brown and black acrylics - sometimes more black, sometimes more brown, along selected panels, concentrating the effect where I wanted the finish looking more dirty or oxidized. I also produced some paint chipping on the stencils by dabbing silver ink with an sponge. I should have done the same on the Hinomarus, but... well, I don't know why I didn't.
The last weathering task was to simulate the exhaust stains, which was airbrushed using Gunze's Soot H-343 from their acrylic range.
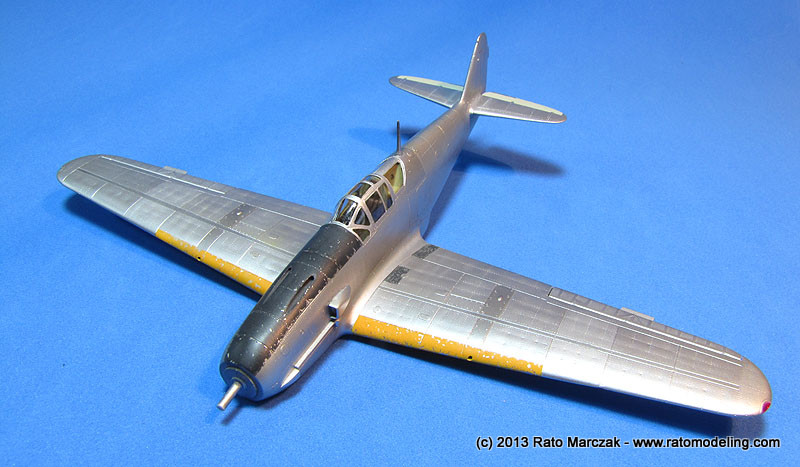
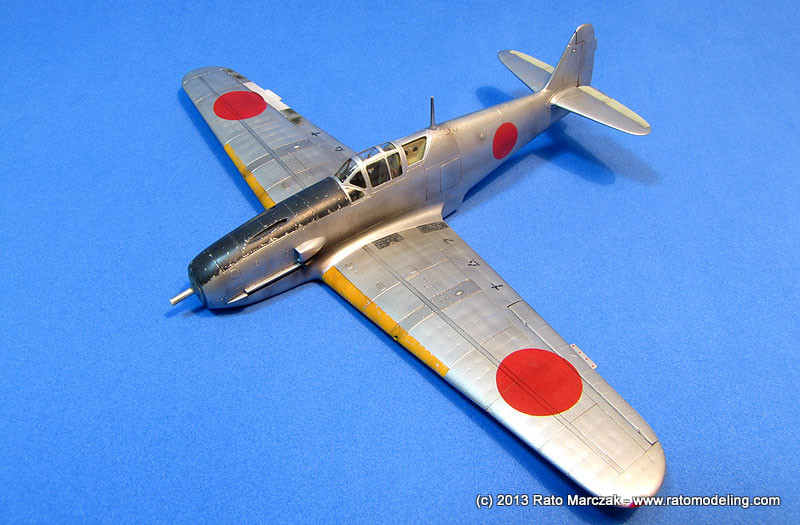
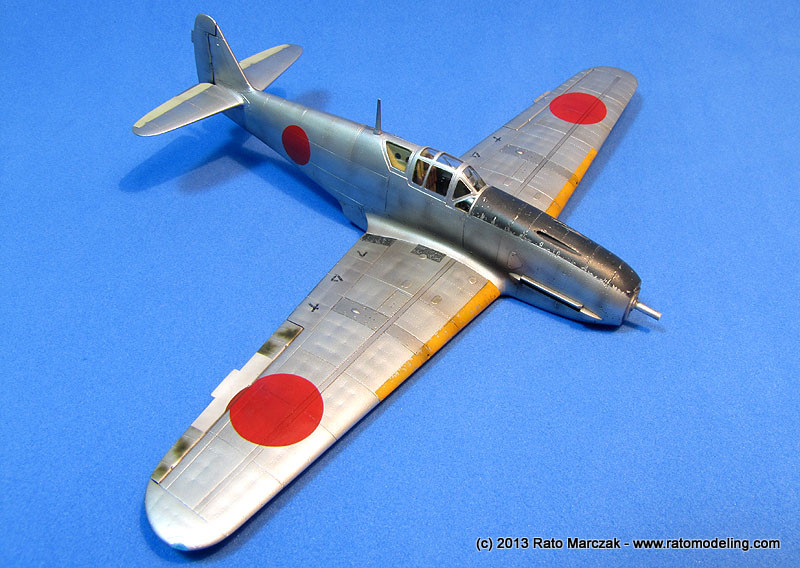
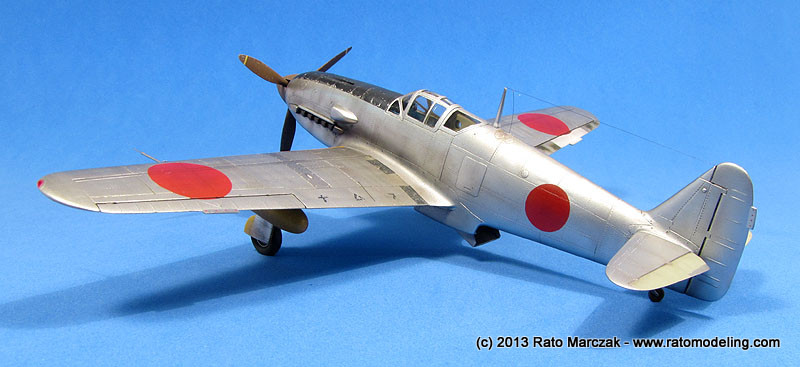
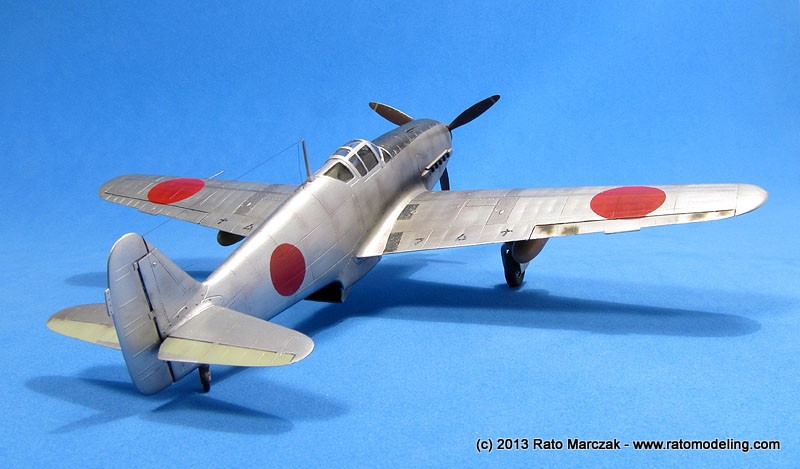
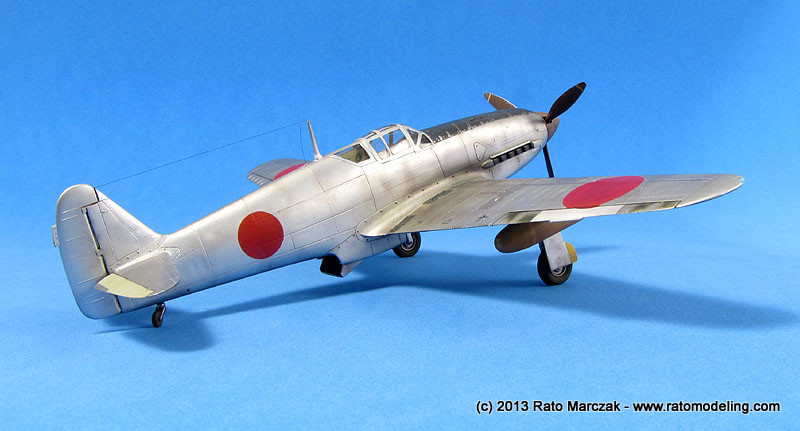
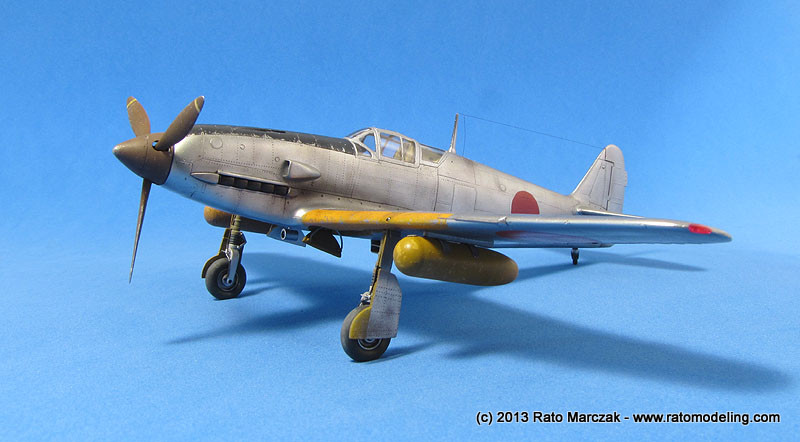
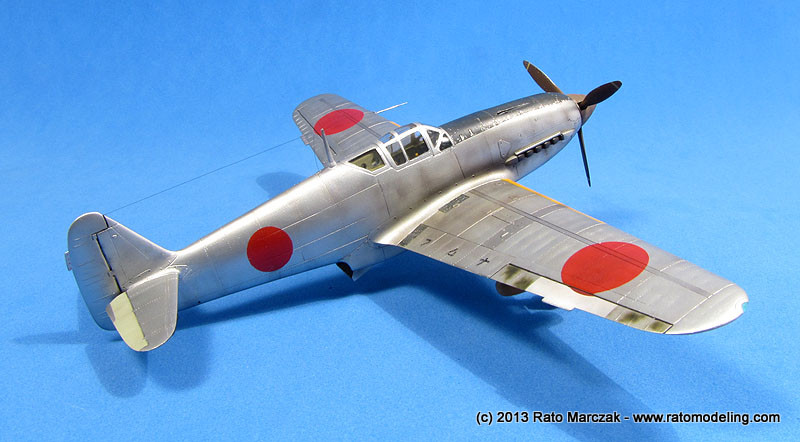
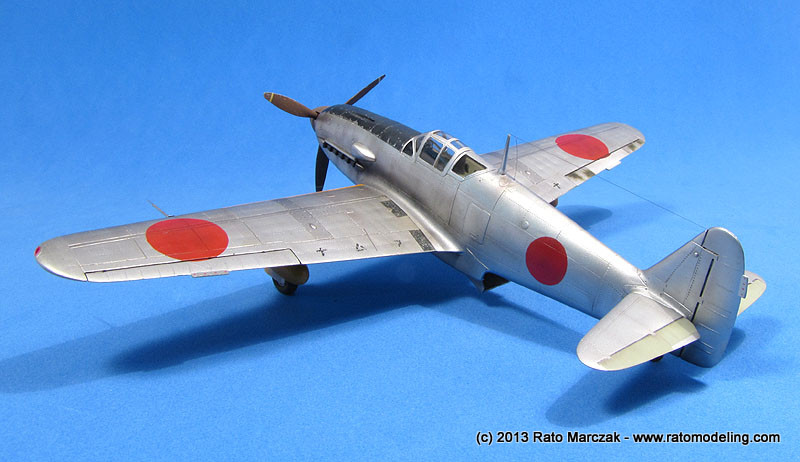
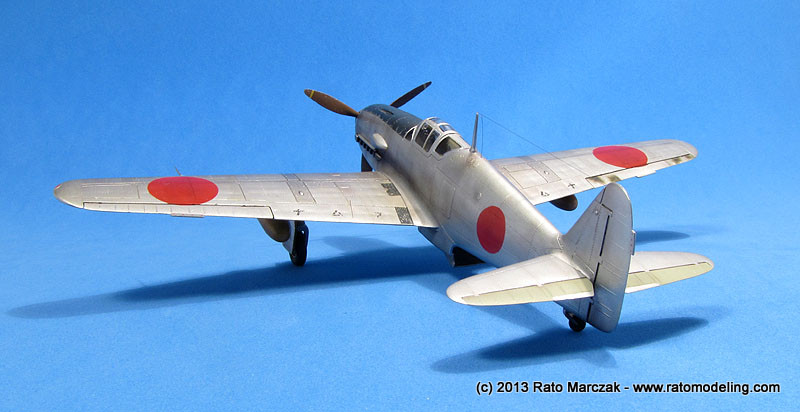
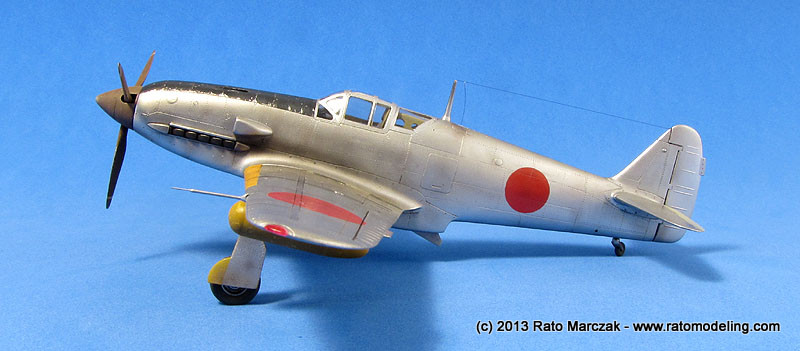
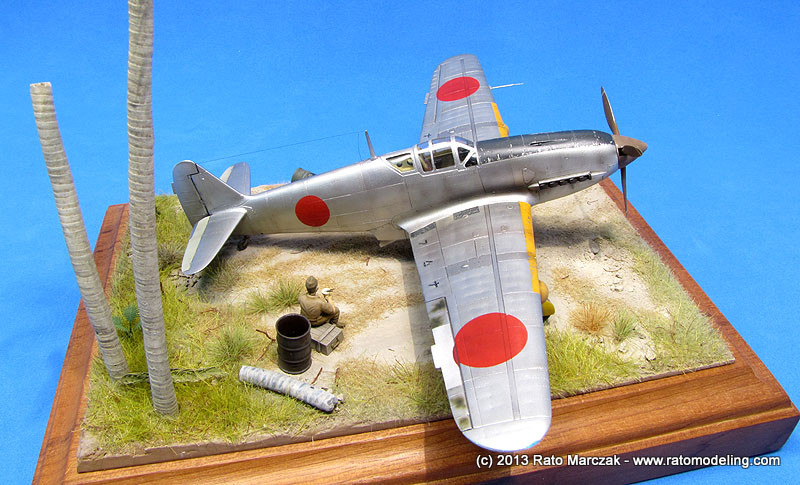
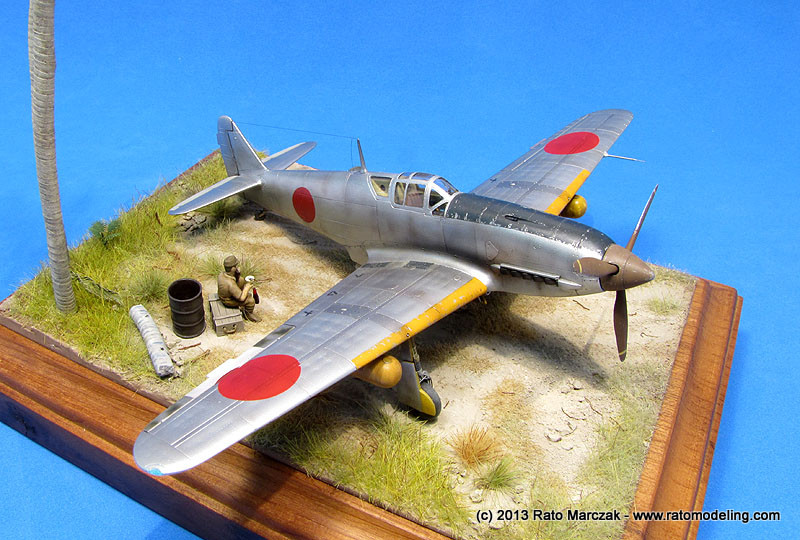
I was very satisfied with the overall finish. It wasn't a warbird with a long combat carreer, so I decided to stop with the weathering. Had I chosen a camouflaged scheme, I would loose most of the stressed skin and riveting effect:
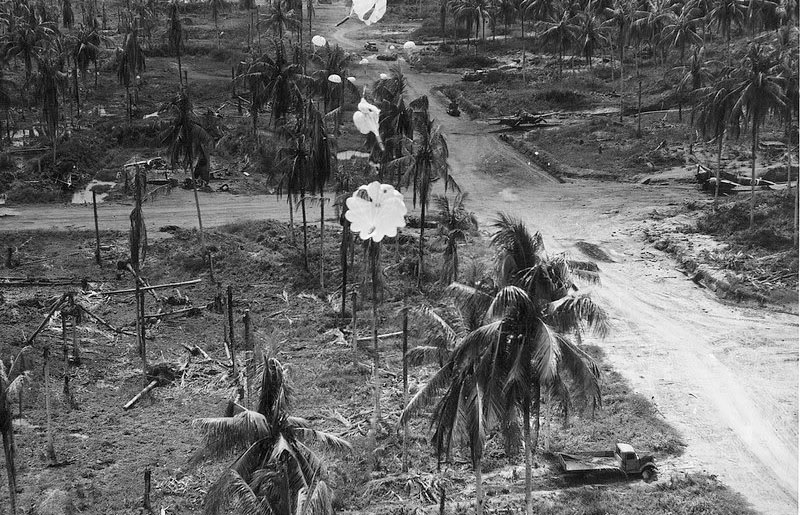
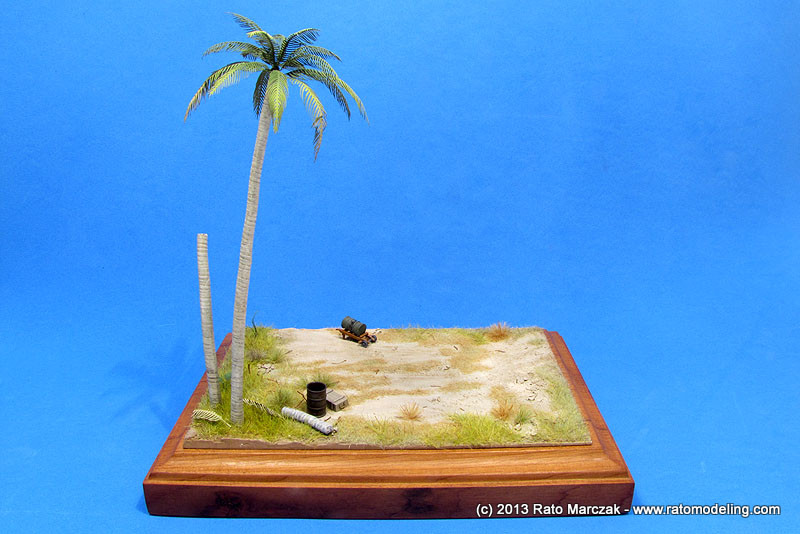
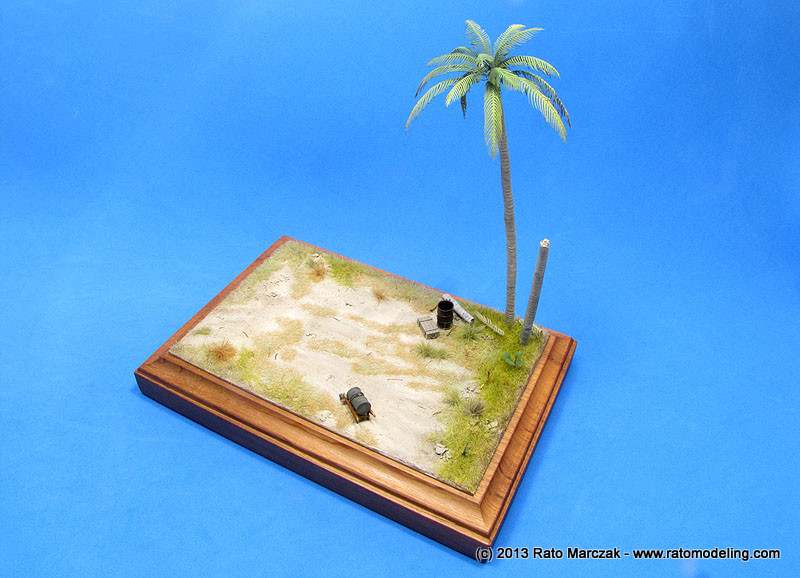
Before glueing the missing parts, I took some fresh air by working on a suitable base. The idea was to depict a parking area of Boram airfield, one of the many improvised airfields used by IJA around Wewak airfield area, which makes my model a possible replacement aircraft from 68 Sentai, or so I decided. These two photos give you an idea of how Boram should look like during 1943/44, the first shows the main runway, while the second one (taken during a B-25 bomb run) shows the parking area, and it gave me the information and inspiration necessary to decorate the base:

The base followed pretty much the basic steps and materials described in the construction of the display base for my Sd.Kfz.222. I started with a layer of craft putty, which was molded to add some relief to the base. When dry to touch, I impressed truck wheel marks on several places, and glued the bigger rocks. Fine sand was glued next. Several shades of sand color were used through an airbrush, trying to simulate the several colors found on these airfields.

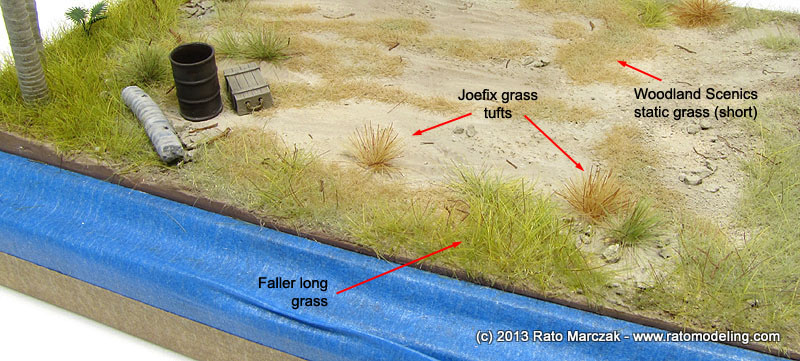
Static grass (Woodland Scenics) was glued randomly along the base, trying to concentrate it on high spots. Once dry, I glued Faller high grass (ground cover fibers - 'meadow' long, product #180484) with the aid of a home-made static grass applicator. Note that these long static grass cannot be easily cemented upright without an electric aid. The grass tufts area Joefix Studio items in various colors. Most areas covered with short grass were airbrushed with a highly thinned light brown color to simulate dead/sun burnt grass:
Small vegetation were left-overs from Voyager Palm Leaves PE set 1:
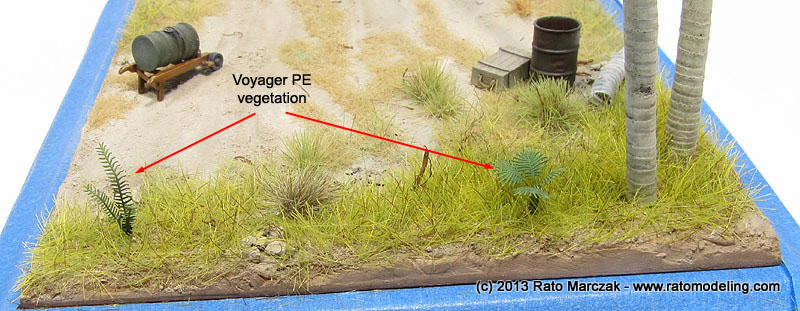
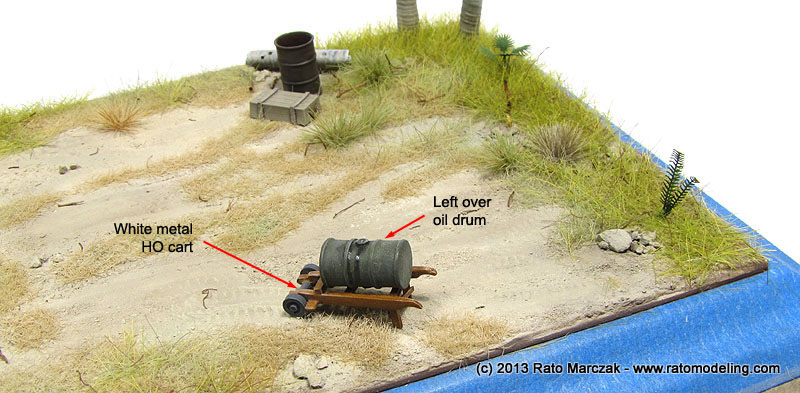
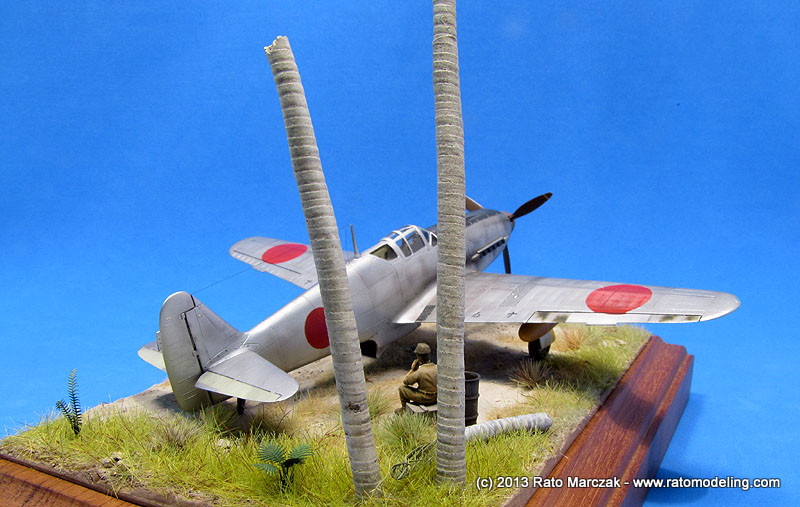
The palm trunks came from my own production. They are resin copies of a master I made years ago. More on palm trees later. Besides the vegetation, I also added a oil drum cart to the scene. The drum came from my spares' box, while the cart is a white metal left over item from a Scale Link set. I modified it to support the drum, and replaced the wheels by new ones turned in brass:
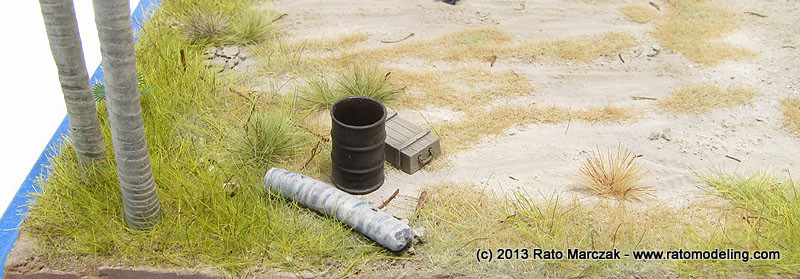
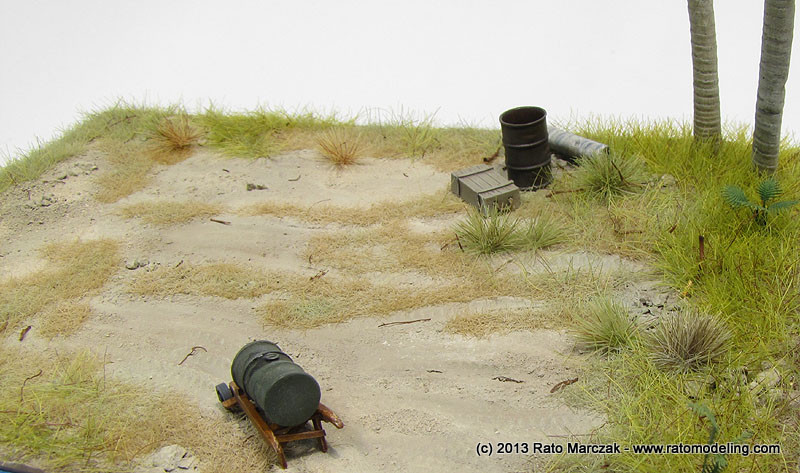
An empty fuel drum, an ammo box and a piece of palm trunk were also added to the scence. Small pieces of roots and dried leaves were scattered around, trying to depict what we see in such environments. Although not finished when these photos were taken, you got the idea:
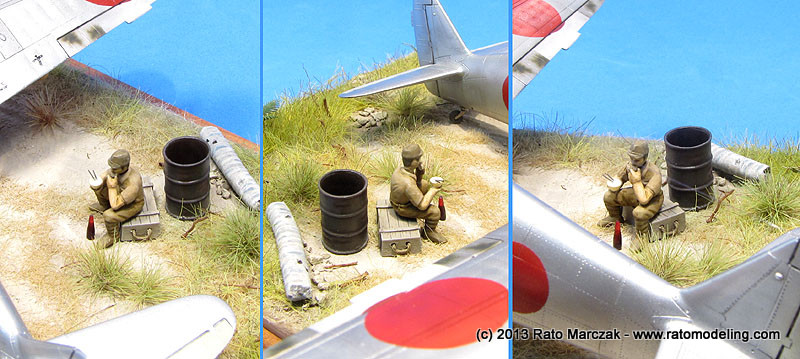
In order to give a notion of size and scale, I decided to add a human element to the dispaly. I heavily modified an old Hasegawa Izusu starter truck driver to represent a mechanic having lunch. He will be seated on the ammo box:

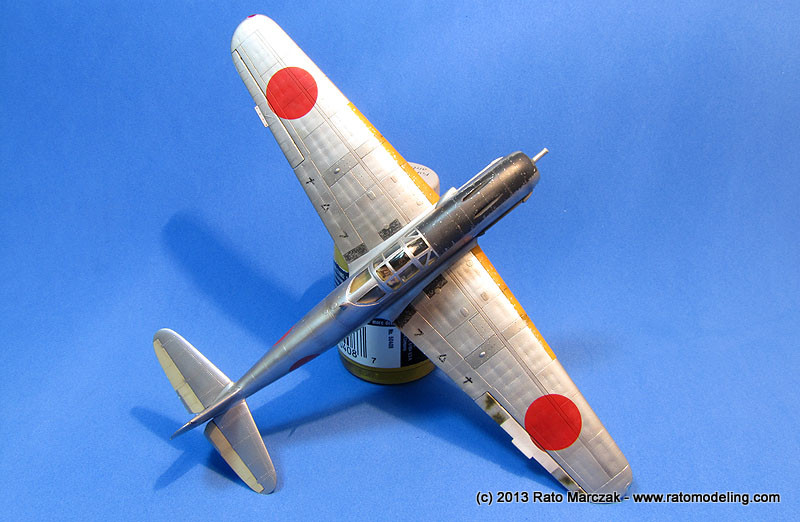
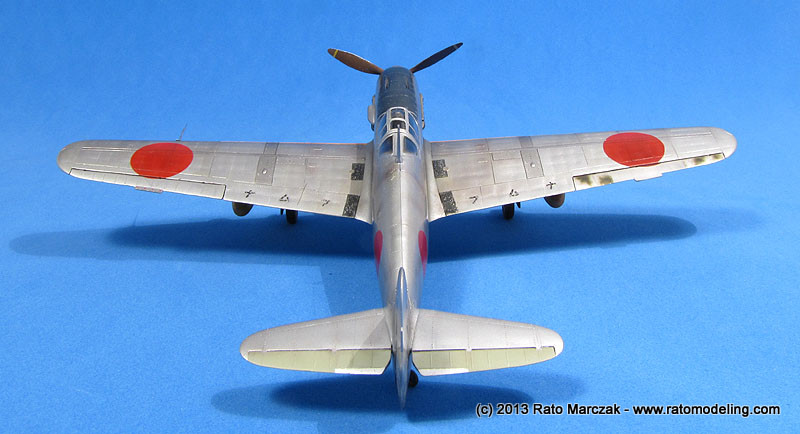
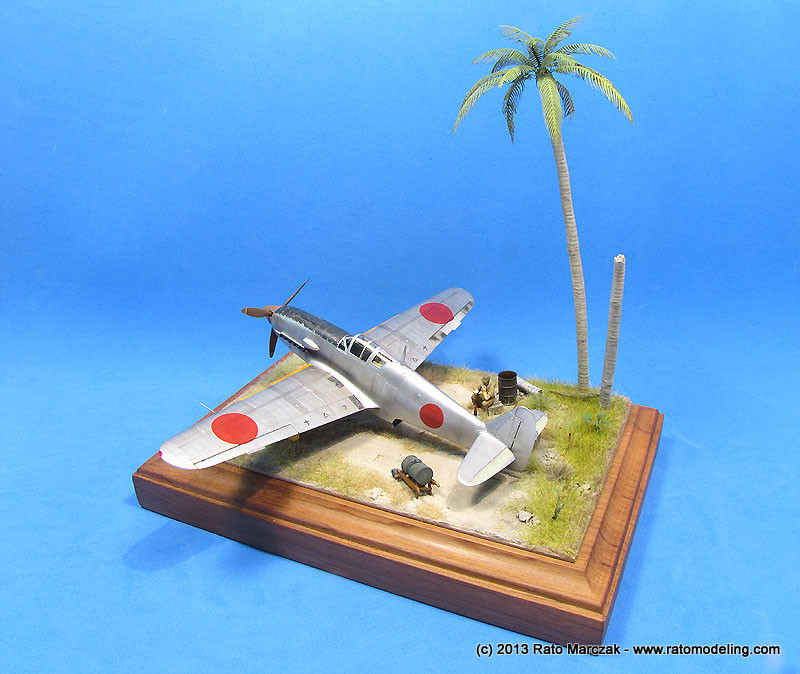
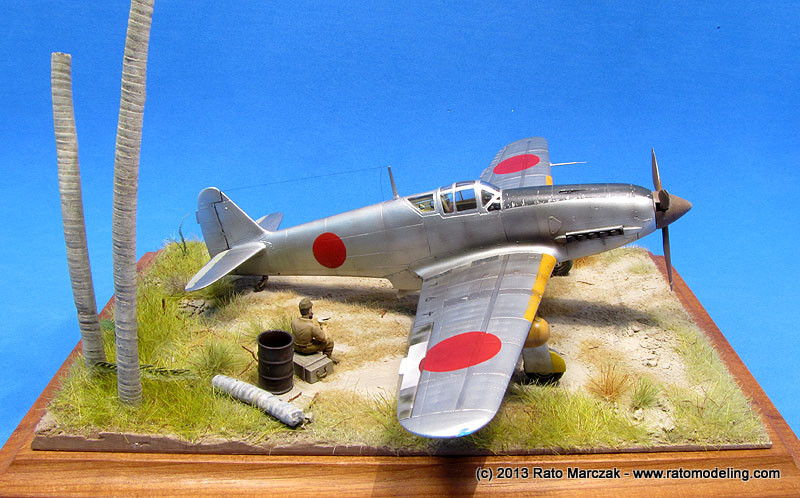
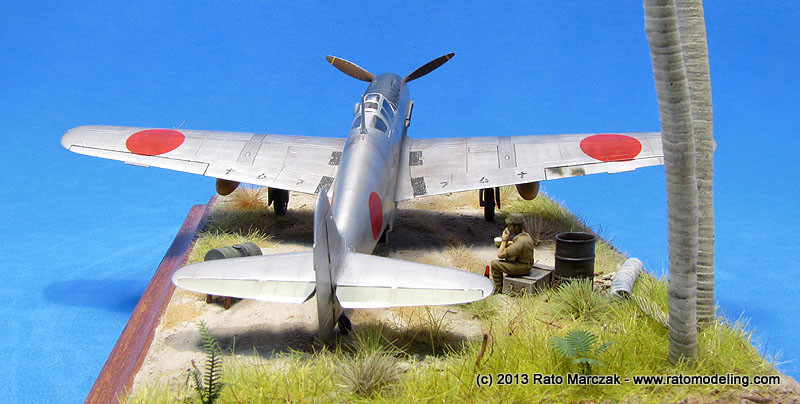
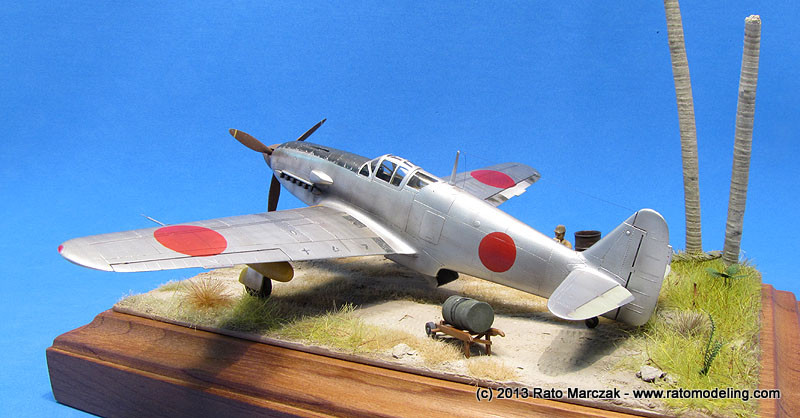
After going that far, I went back to my Tony and finished the model. The missing parts were glued in place and an aerial antenna of TenueFil was installed. Here are the final photos before I finish the base:
Back to the base, I finished the palm tree using a modified version of the laser printer method to photoetch the fronds. It worked like a charm, and the base was completed with dried roots and dirt scattered over the base:
Next, I painted the mechanic like if he was having lunch or something. I made him using hashi and chopsticks, which may look a bit too formal for a forward combat scene... maybe it's a holiday of sorts, who knows? Ah, and of course a bottle of sake!
With everything ready, my Hien finally was laid on its base:
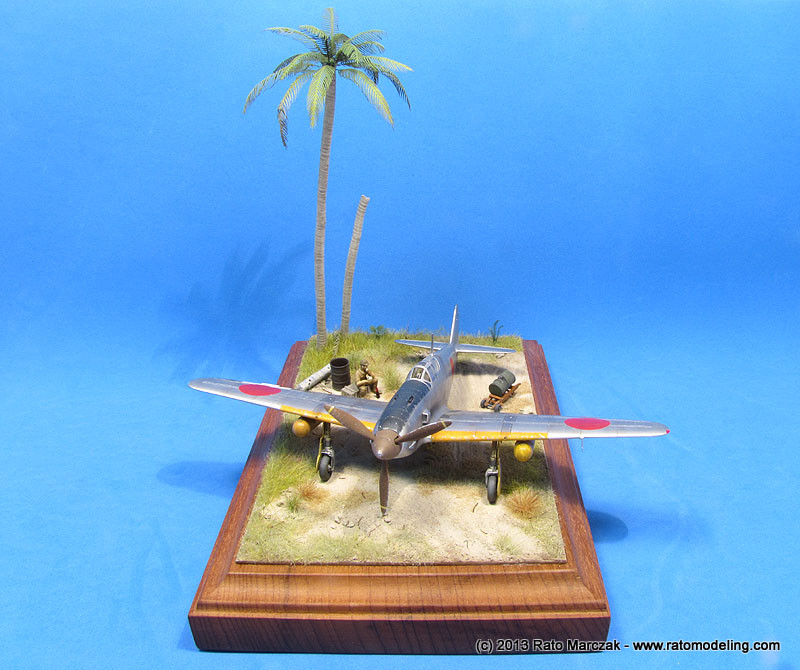
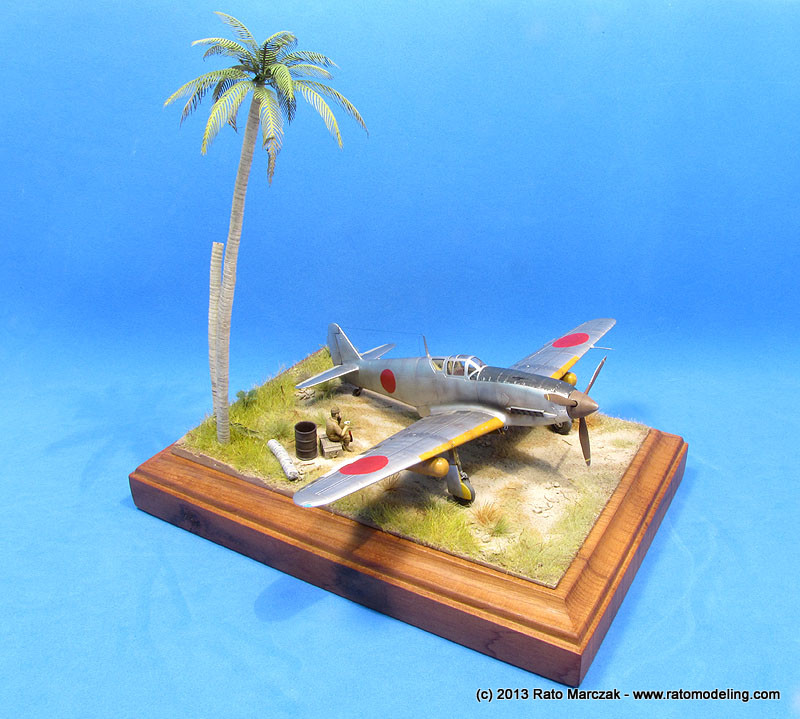
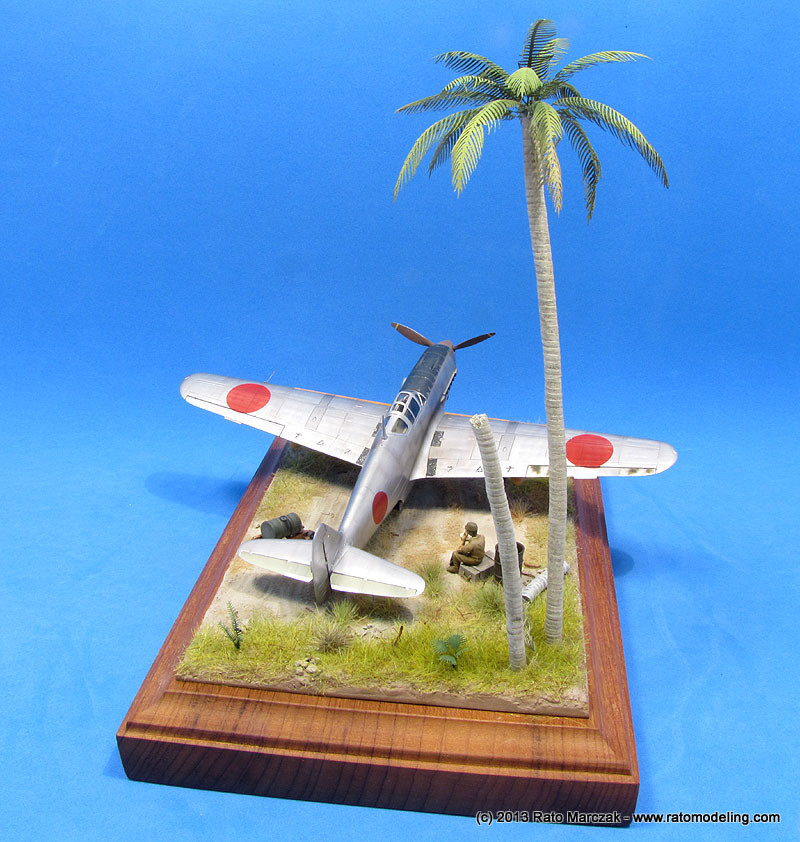
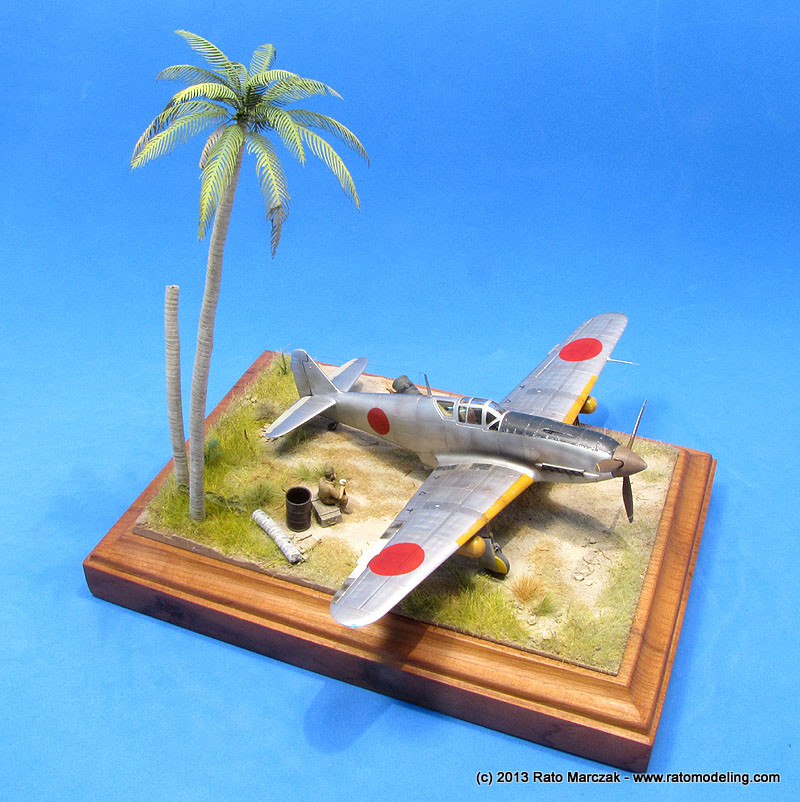
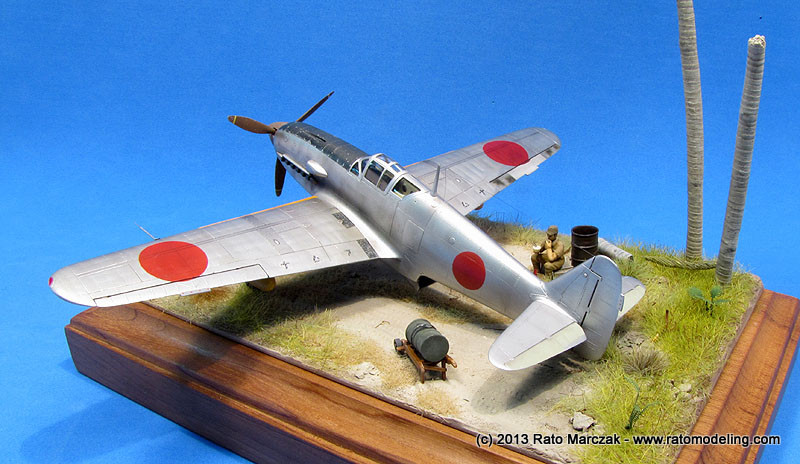
Closer shots:
| Technical file | |
| Kit:
|
- Hasegawa JS-091 |
| Additions:
|
- Quickboost gunsight - Eduard PE seat belts - Various decorative items for the base |
| Basic
colors: |
- Primer: automotive lacquer primer. - Aluminum: Alclad II White Aluminum (ALC-106) - Anti-glare black: Tamiya XF-1 mixed with XF-2 and XF-3. - Yellow: Tamiya XF-8 with a touch of XF-7. - Interior finish: Gunze Mr.Color Khaki (#55). |
| Notes: |
- Many scratchbuilt items (see text) |
Rato Marczak © 2013 (revised March/2023)
